
CDBA300 Operation Manual
Page 2
...the user to the presence of electric shock to provide reasonable protection against harmful interference in case of loss or theft, please record below the model number and serial number which are designed to persons. q Increase the separation between the equipment and receiver. ... Date of purchase Place of the FCC Rules. Special Notes - Important Instruction - use of controls or adjustments or performance of Sharp that interference will not occur in reporting this equipment. NOTE It is no guarantee that this information. However, there is the intent...
...the user to the presence of electric shock to provide reasonable protection against harmful interference in case of loss or theft, please record below the model number and serial number which are designed to persons. q Increase the separation between the equipment and receiver. ... Date of purchase Place of the FCC Rules. Special Notes - Important Instruction - use of controls or adjustments or performance of Sharp that interference will not occur in reporting this equipment. NOTE It is no guarantee that this information. However, there is the intent...
CDBA300 Operation Manual
Page 4
...System Connections 10, 11 Remote Control 12 s Basic Operation General Control 13 Sound Control 14 Setting the Clock 15 s CD Playback Listening to a CD (CDs 16, 17 s Advanced CD Playback Starting playback with a desired track 18 Repeat or Random Play 18 Programmed Play 19 s Radio Page Listening to ... to the memorized station 21 s Tape Playback Listening to a Cassette Tape (TAPE 1 or TAPE 2 22 s Tape Recording Recording from the Radio 23 Recording from a CD (CDs 24 Dubbing from Tape to Tape 25 s Advanced Features Timer and Sleep Operation 26, 27 Enhancing Your System 28 s...
...System Connections 10, 11 Remote Control 12 s Basic Operation General Control 13 Sound Control 14 Setting the Clock 15 s CD Playback Listening to a CD (CDs 16, 17 s Advanced CD Playback Starting playback with a desired track 18 Repeat or Random Play 18 Programmed Play 19 s Radio Page Listening to ... to the memorized station 21 s Tape Playback Listening to a Cassette Tape (TAPE 1 or TAPE 2 22 s Tape Recording Recording from the Radio 23 Recording from a CD (CDs 24 Dubbing from Tape to Tape 25 s Advanced Features Timer and Sleep Operation 26, 27 Enhancing Your System 28 s...
CDBA300 Operation Manual
Page 6
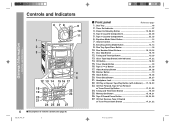
...05. Tape 1 Cassette Compartment 22, 25 06. Equalizer Mode Select Button 14 07. Disc Tray Open/Close Button 16 10. CD Button 16, 24 15. Video/Auxiliary Button 26, 28 18. Tape 2 Record Pause Button 23, 24, 25 27. Clock Button 15, 26 20. Tuning and Time Up Button 15, 20 13.... CD Play or Repeat, Tape Play Button (with Indicator 17, 22 14. Memory/Set Button 15, 19, 21 26. Controls and ...
...05. Tape 1 Cassette Compartment 22, 25 06. Equalizer Mode Select Button 14 07. Disc Tray Open/Close Button 16 10. CD Button 16, 24 15. Video/Auxiliary Button 26, 28 18. Tape 2 Record Pause Button 23, 24, 25 27. Clock Button 15, 26 20. Tuning and Time Up Button 15, 20 13.... CD Play or Repeat, Tape Play Button (with Indicator 17, 22 14. Memory/Set Button 15, 19, 21 26. Controls and ...

CDBA300 Operation Manual
Page 8
... 24 12 25 13 14 s Remote control Reference page 01. CD Memory Button 19 05. Equalizer Mode Select Button 14 10. CD Play or Repeat Button 17, 18 17. CD Fast Forward Button 17 18. Tape 2 Play Button 22 21.... 14. Tape 2 Rewind Button 22 22. Disc Number Select Buttons 16, 19, 24 03. CD Fast Reverse Button 17 06. CD Stop Button 17, 24 16. Tape (1 V 2) Button 22, 25 25. Tape 1/Tape 2 Stop Button ... Up/Down Buttons 21 20. Tape 1 Play Button 22 08. Tape 2 Record Pause Button 23, 24, 25 11. Controls and Indicators - Extra Bass Button 14 15...
... 24 12 25 13 14 s Remote control Reference page 01. CD Memory Button 19 05. Equalizer Mode Select Button 14 10. CD Play or Repeat Button 17, 18 17. CD Fast Forward Button 17 18. Tape 2 Play Button 22 21.... 14. Tape 2 Rewind Button 22 22. Disc Number Select Buttons 16, 19, 24 03. CD Fast Reverse Button 17 06. CD Stop Button 17, 24 16. Tape (1 V 2) Button 22, 25 25. Tape 1/Tape 2 Stop Button ... Up/Down Buttons 21 20. Tape 1 Play Button 22 08. Tape 2 Record Pause Button 23, 24, 25 11. Controls and Indicators - Extra Bass Button 14 15...

CDBA300 Operation Manual
Page 16
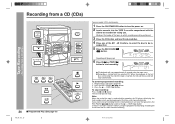
...disc tray, then place the CD in the middle of s 1 - Listening to a CD (CDs) - 5 Press the 7 OPEN/CLOSE button to first, press one of the disc positions. 5" (12 cm) 3" (8 cm) CD Playback - q CDs can play audio CD-R and CD-RW discs just as CD discs, but cannot perform recording. 1 Press the ON/STAND...-BY button to open position. If the CD contains more than 15 tracks, " C " will display only the number of...
...disc tray, then place the CD in the middle of s 1 - Listening to a CD (CDs) - 5 Press the 7 OPEN/CLOSE button to first, press one of the disc positions. 5" (12 cm) 3" (8 cm) CD Playback - q CDs can play audio CD-R and CD-RW discs just as CD discs, but cannot perform recording. 1 Press the ON/STAND...-BY button to open position. If the CD contains more than 15 tracks, " C " will display only the number of...

CDBA300 Operation Manual
Page 23
... to ensure that prevent accidental recording or erasing. Note: If you . To stop recording: Press the s (TAPE s) button. q For recording use metal and CrO2 tapes. Tape Recording - q SHARP is properly recorded. Tab for side A s Listening to start recording. Erase-prevention tab of cassette tapes: q When recording on facing you hear a whistling noise while recording an AM station, move the...
... to ensure that prevent accidental recording or erasing. Note: If you . To stop recording: Press the s (TAPE s) button. q For recording use metal and CrO2 tapes. Tape Recording - q SHARP is properly recorded. Tab for side A s Listening to start recording. Erase-prevention tab of cassette tapes: q When recording on facing you hear a whistling noise while recording an AM station, move the...
CDBA300 Operation Manual
Page 24
...button. If you . To perform programmed recording: 1. To stop . q CD playback will start recording. The CD and tape will stop automatically. Recording will be performed. 3 Press the CD button and load the desired disc. 4 Press one of the tape is started from a CD (CDs) Tape Recording - corded first. 5 Press the REC ...s 1 - When the playback of the last disc is reached while recording, the CD player will restart from a CD (CDs) - 24 s Programmed Play (See page 19) *BA300_P23_25 24 You can record 3 CDs continuously. 1 Press the ON/STAND-BY button to turn over the tape...
...button. If you . To perform programmed recording: 1. To stop . q CD playback will start recording. The CD and tape will stop automatically. Recording will be performed. 3 Press the CD button and load the desired disc. 4 Press one of the tape is started from a CD (CDs) Tape Recording - corded first. 5 Press the REC ...s 1 - When the playback of the last disc is reached while recording, the CD player will restart from a CD (CDs) - 24 s Programmed Play (See page 19) *BA300_P23_25 24 You can record 3 CDs continuously. 1 Press the ON/STAND-BY button to turn over the tape...

CDBA300 Operation Manual
Page 25
... button on the main unit or the TAPE 2 0 button on the remote control to turn the power on the remote control to TAPE 2. s Erasing recorded tapes 1. Do not use metal and CrO2 tapes. 1 Press the ON/STAND-BY button to start dubbing. Insert a blank tape into the TAPE 2 cassette.... It is recommended that the TAPE 1 is not in the display. 4 Press the REC PAUSE I6 (I6) button. Recording will simultaneously stop dubbing: Press the s (TAPE s) button. Note: Make sure that the recording tape be paused. 5 Press the 0 / R button on the main unit or the TAPE 2 0 button on . ...
... button on the main unit or the TAPE 2 0 button on the remote control to turn the power on the remote control to TAPE 2. s Erasing recorded tapes 1. Do not use metal and CrO2 tapes. 1 Press the ON/STAND-BY button to start dubbing. Insert a blank tape into the TAPE 2 cassette.... It is recommended that the TAPE 1 is not in the display. 4 Press the REC PAUSE I6 (I6) button. Recording will simultaneously stop dubbing: Press the s (TAPE s) button. Note: Make sure that the recording tape be paused. 5 Press the 0 / R button on the main unit or the TAPE 2 0 button on . ...
CDBA300 Operation Manual
Page 26
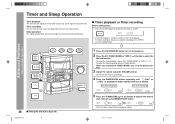
... (BAND) or TAPE (1 V 2) button to start, then press the MEMORY/SET button. To select the timer playback source: CD, TUNER (BAND) or TAPE (1 V 2). For timer playback For timer recording 26 s Setting the Clock (See page 15) BA300_P26_28 26 5 Press the TUNING/TIME (X or W) button to specify the hour to select the desired...
... (BAND) or TAPE (1 V 2) button to start, then press the MEMORY/SET button. To select the timer playback source: CD, TUNER (BAND) or TAPE (1 V 2). For timer playback For timer recording 26 s Setting the Clock (See page 15) BA300_P26_28 26 5 Press the TUNING/TIME (X or W) button to specify the hour to select the desired...

CDBA300 Operation Manual
Page 27
... will start. s Sleep operation 1 Play back the desired sound source. 2 Press the TIMER/SLEEP button repeatedly until "SLEEP" is reached, playback or recording will be retained until the setting is set , it will remain unchanged until a new time is entered. Notes: q Once the time is changed. To...system enters the timer stand-by mode. 9 In timer playback: If you select CD or TAPE, the unit will be turned on . 8 When the preset time is dis- q When performing timer playback or recording using another unit connected to specify the minute, then press the MEMORY/SET button....
... will start. s Sleep operation 1 Play back the desired sound source. 2 Press the TIMER/SLEEP button repeatedly until "SLEEP" is reached, playback or recording will be retained until the setting is set , it will remain unchanged until a new time is entered. Notes: q Once the time is changed. To...system enters the timer stand-by mode. 9 In timer playback: If you select CD or TAPE, the unit will be turned on . 8 When the preset time is dis- q When performing timer playback or recording using another unit connected to specify the minute, then press the MEMORY/SET button....
CDBA300 Operation Manual
Page 28
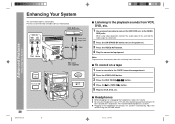
s To record on . 3 Press the VIDEO/AUX button. 4 Play the connected equipment. Red White White To the line output jack Red RCA cord (not supplied) Advanced Features - q ...
s To record on . 3 Press the VIDEO/AUX button. 4 Play the connected equipment. Red White White To the line output jack Red RCA cord (not supplied) Advanced Features - q ...
CDBA300 Operation Manual
Page 29
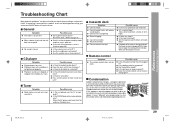
...q Is the AC power cord of a track. q No sound is pressed, the unit does not respond. q Are the speaker wires disconnected? s CD player Symptom q Playback does not start. s Tuner Symptom q Radio makes unusual noise consecutively. q Cannot erase completely. Possible cause q Is the erase-...loaded upside-down? q Does the disc satisfy the standards? q Cannot remove the tape. q (You cannot record on with a soft cloth before calling your authorized SHARP dealer or service center. If this product, check the following before operating the unit. *BA300_P29_31 29 00.11....
...q Is the AC power cord of a track. q No sound is pressed, the unit does not respond. q Are the speaker wires disconnected? s CD player Symptom q Playback does not start. s Tuner Symptom q Radio makes unusual noise consecutively. q Cannot erase completely. Possible cause q Is the erase-...loaded upside-down? q Does the disc satisfy the standards? q Cannot remove the tape. q (You cannot record on with a soft cloth before calling your authorized SHARP dealer or service center. If this product, check the following before operating the unit. *BA300_P29_31 29 00.11....
CDBA300 Operation Manual
Page 30
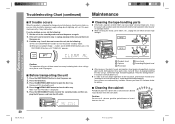
... carefully before use , the deck's heads and capstans may malfunction. q In order to ensure proper operation of the CD player, preventative maintenance (cleaning of playing/recording time by mode, and then un- s Before transporting the unit 1. Lens cleaners are commercially available. A Playback head... B Capstan C Pinch roller D Erase head E Recording/Playback head q After long use . s Cleaning the cabinet Periodically wipe the cabinet with a soft cloth and a diluted soap ...
... carefully before use , the deck's heads and capstans may malfunction. q In order to ensure proper operation of the CD player, preventative maintenance (cleaning of playing/recording time by mode, and then un- s Before transporting the unit 1. Lens cleaners are commercially available. A Playback head... B Capstan C Pinch roller D Erase head E Recording/Playback head q After long use . s Cleaning the cabinet Periodically wipe the cabinet with a soft cloth and a diluted soap ...

CDBA300 Operation Manual
Page 31
...in individual units. References - The performance specification figures indicated are nominal values of continuous improvement, SHARP reserves the right to 20 kHz, 10 % total harmonic distortion Subwoofer : 75 W/ch ... 16-50 ohms (recommended; 32 ohms) Video/Auxiliary (audio signal): 500 mV/47 kohms s CD player Type Signal readout D/A converter Frequency response Dynamic range 3-disc multi-play compact disc player Non-contact...50-14,000 Hz (Normal tape) 55 dB (TAPE 1, playback) 50 dB (TAPE 2, recording/playback) 0.25 % (WRMS) s Speaker Type Maximum input power (Total) Rated input power (...
...in individual units. References - The performance specification figures indicated are nominal values of continuous improvement, SHARP reserves the right to 20 kHz, 10 % total harmonic distortion Subwoofer : 75 W/ch ... 16-50 ohms (recommended; 32 ohms) Video/Auxiliary (audio signal): 500 mV/47 kohms s CD player Type Signal readout D/A converter Frequency response Dynamic range 3-disc multi-play compact disc player Non-contact...50-14,000 Hz (Normal tape) 55 dB (TAPE 1, playback) 50 dB (TAPE 2, recording/playback) 0.25 % (WRMS) s Speaker Type Maximum input power (Total) Rated input power (...


