

AR-M160 | AR-M205 Operation Manual
Page 11
.... (p.66) The fusing unit is installed) Place the original(s) that you wish to scan face up here. Holds up to 40 originals. 19 Original guides (when the SPF/RSPF is installed) Adjust to the size of the originals. 20 Feeding roller cover (when the SPF/RSPF is installed) Open to... while pushing on this lever. 25 Toner cartridge Contains toner. (p.70) 26 Roller rotating knob Turn to remove misfed paper. (p.65, p.66) 27 Fusing unit release levers To remove a paper misfeed in the fusing unit, push down on the photoconductive drum. 29 Fusing unit paper guide Open to the machines front cover. 9...
.... (p.66) The fusing unit is installed) Place the original(s) that you wish to scan face up here. Holds up to 40 originals. 19 Original guides (when the SPF/RSPF is installed) Adjust to the size of the originals. 20 Feeding roller cover (when the SPF/RSPF is installed) Open to... while pushing on this lever. 25 Toner cartridge Contains toner. (p.70) 26 Roller rotating knob Turn to remove misfed paper. (p.65, p.66) 27 Fusing unit release levers To remove a paper misfeed in the fusing unit, push down on the photoconductive drum. 29 Fusing unit paper guide Open to the machines front cover. 9...
AR-M160 | AR-M205 Operation Manual
Page 41
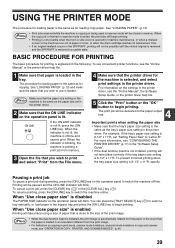
... [TRAY SELECT] key ( ) to select a tray manually, or load paper in copy and scanner mode, see the "Online Manual", the Software Setup Guide, or the printer driver help file. 1 Make sure that the ON LINE indicator on the operation panel will not be delivered to the paper output...use convenient printer functions, see "CONFIGURING THE PRINTER DRIVER" (p.11) in the "Software Setup Guide". • If the dual function board is not installed, printing will not take place using a size of paper or toner, or when the drum cartridge reaches its replacement time. • If an original misfeed ...
... [TRAY SELECT] key ( ) to select a tray manually, or load paper in copy and scanner mode, see the "Online Manual", the Software Setup Guide, or the printer driver help file. 1 Make sure that the ON LINE indicator on the operation panel will not be delivered to the paper output...use convenient printer functions, see "CONFIGURING THE PRINTER DRIVER" (p.11) in the "Software Setup Guide". • If the dual function board is not installed, printing will not take place using a size of paper or toner, or when the drum cartridge reaches its replacement time. • If an original misfeed ...
AR-M160 | AR-M205 Operation Manual
Page 54
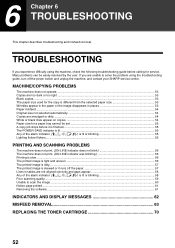
... the software ...61 INDICATORS AND DISPLAY MESSAGES 62 MISFEED REMOVAL 63 REPLACING THE TONER CARTRIDGE 70 52 6 Chapter 6 TROUBLESHOOTING This chapter describes troubleshooting and misfeed removal. If you experience difficulty using the troubleshooting guide, turn off the paper 57 Lines in places 53 Paper misfeed...54 Original size... image is dirty...57 The printed image is skewed or it runs off the power switch and unplug the machine, and contact your SHARP service center. Many problems can be set...55 A copy job stops before it is finished...55 The POWER SAVE indicator is lit......
... the software ...61 INDICATORS AND DISPLAY MESSAGES 62 MISFEED REMOVAL 63 REPLACING THE TONER CARTRIDGE 70 52 6 Chapter 6 TROUBLESHOOTING This chapter describes troubleshooting and misfeed removal. If you experience difficulty using the troubleshooting guide, turn off the paper 57 Lines in places 53 Paper misfeed...54 Original size... image is dirty...57 The printed image is skewed or it runs off the power switch and unplug the machine, and contact your SHARP service center. Many problems can be set...55 A copy job stops before it is finished...55 The POWER SAVE indicator is lit......
AR-M160 | AR-M205 Operation Manual
Page 58
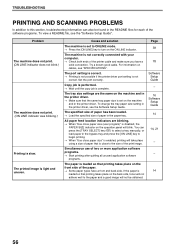
...close paper size" is enabled, printing will take place using a size of paper that is loaded so that printing takes place on the back side, toner will not adhere well to the paper and a good image will blink. The port setting is correct. → Printing is not possible if the ...printer driver port setting is loaded so that printing takes place on cables, see the Software Setup Guide. The specified size of paper has been loaded. → Load the specified size of two or more application software programs. → Start printing after ...
...close paper size" is enabled, printing will take place using a size of paper that is loaded so that printing takes place on the back side, toner will not adhere well to the paper and a good image will blink. The port setting is correct. → Printing is not possible if the ...printer driver port setting is loaded so that printing takes place on cables, see the Software Setup Guide. The specified size of paper has been loaded. → Load the specified size of two or more application software programs. → Start printing after ...
AR-M160 | AR-M205 Operation Manual
Page 72
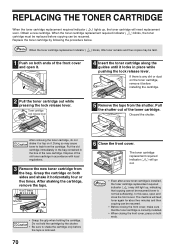
.... In this case, open it. 4 Insert the toner cartridge along the guides until it locks in place while pushing the lock release lever. Note When the toner cartridge replacement indicator ( ) blinks, little toner remains and thus copies may be resumed (toner is not fed sufficiently). After removing the toner cartridge, do not Caution shake it or...
.... In this case, open it. 4 Insert the toner cartridge along the guides until it locks in place while pushing the lock release lever. Note When the toner cartridge replacement indicator ( ) blinks, little toner remains and thus copies may be resumed (toner is not fed sufficiently). After removing the toner cartridge, do not Caution shake it or...
AR-M160 | AR-M205 Operation Manual
Page 92
... Document glass 28 - Installation site 3 Changing a tray's paper size setting 16 Charger cleaner 8, 73 Checking the total output count 71 Checking the toner level 72 Cleaning - Transfer charger 73 CLEAR ALL key 11, 12 CLEAR key 11, 18, 19 Conventions used in this manual 6 90 Copy ...indicator 10, 37 ERASE key 10, 37 Erase width adjustment 45 Exit area 9 F Feeding roller cover 63 Front cover 8 Fusing paper guide 67 Fusing unit paper guide 9 Fusing unit release lever 9, 66 H Handles 8 I Image rotation in duplex copying 29, 45 Indicators and display messages 62 Initial ...
... Document glass 28 - Installation site 3 Changing a tray's paper size setting 16 Charger cleaner 8, 73 Checking the total output count 71 Checking the toner level 72 Cleaning - Transfer charger 73 CLEAR ALL key 11, 12 CLEAR key 11, 18, 19 Conventions used in this manual 6 90 Copy ...indicator 10, 37 ERASE key 10, 37 Erase width adjustment 45 Exit area 9 F Feeding roller cover 63 Front cover 8 Fusing paper guide 67 Fusing unit paper guide 9 Fusing unit release lever 9, 66 H Handles 8 I Image rotation in duplex copying 29, 45 Indicators and display messages 62 Initial ...

AR-M160 | AR-M205 Operation Manual
Page 93
...- PHOTO 21 - Upper paper tray 68 N Normal copying 18 - XY ZOOM copying 24 Removing the document cover 20 Removing the software 61 Replacing the toner cartridge 70, 72 Reversing single pass feeder (RSPF 6, 75 Reversing tray 9, 64 Right side cover 9, 63 Roller rotating knob 9, 65, 66 Rotation copy... LINE key 10, 39 Operation in copy, printer, and scanner modes ...... 41 Operation panel 8, 10 ORIGINAL DATA indicator 10, 33, 35 Original guides 9, 19 ORIGINAL SIZE ENTER key 11, 16, 18 ORIGINAL SIZE indicator 11, 19 ORIGINAL TO COPY indicator 10, 28, 29 ORIGINAL TO COPY key...
...- PHOTO 21 - Upper paper tray 68 N Normal copying 18 - XY ZOOM copying 24 Removing the document cover 20 Removing the software 61 Replacing the toner cartridge 70, 72 Reversing single pass feeder (RSPF 6, 75 Reversing tray 9, 64 Right side cover 9, 63 Roller rotating knob 9, 65, 66 Rotation copy... LINE key 10, 39 Operation in copy, printer, and scanner modes ...... 41 Operation panel 8, 10 ORIGINAL DATA indicator 10, 33, 35 Original guides 9, 19 ORIGINAL SIZE ENTER key 11, 16, 18 ORIGINAL SIZE indicator 11, 19 ORIGINAL TO COPY indicator 10, 28, 29 ORIGINAL TO COPY key...


