
Instructions for Use
Page 2
... tips 29 If a problem occurs 30 Accessories and spare parts 31 Specifications 32 Connector assignment 33 Polar diagrams and frequency response curves of the operating menu 17 Working with the operating menu 18 Adjusting settings via the operating menu 20 The main menu "Menu 20 The extended menu "Advanced Menu 22 Synchronizing the bodypack transmitter with a receiver 27 Synchronizing the bodypack transmitter with receivers - Contents Contents Important safety instructions 2 The SK 300 G3 bodypack transmitter 3 The frequency bank system 3 Areas...
... tips 29 If a problem occurs 30 Accessories and spare parts 31 Specifications 32 Connector assignment 33 Polar diagrams and frequency response curves of the operating menu 17 Working with the operating menu 18 Adjusting settings via the operating menu 20 The main menu "Menu 20 The extended menu "Advanced Menu 22 Synchronizing the bodypack transmitter with a receiver 27 Synchronizing the bodypack transmitter with receivers - Contents Contents Important safety instructions 2 The SK 300 G3 bodypack transmitter 3 The frequency bank system 3 Areas...
Instructions for Use
Page 4
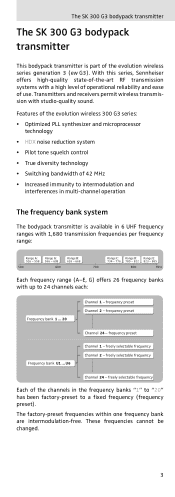
... - 668 Range C: Range D: Range E: 734 - 776 780 - 822 823 - 865 Each frequency range (A-E, G) offers 26 frequency banks with studio-quality sound. freely selectable frequency Channel 24 - The SK 300 G3 bodypack transmitter The SK 300 G3 bodypack transmitter This bodypack transmitter is available in the frequency banks "1" to "20" has been factory-preset to 24 channels each: Frequency bank 1 ... 20 Channel 1 - The factory-preset frequencies within one frequency bank are intermodulation-free. frequency preset Frequency bank U1 ... Transmitters and receivers permit wireless...
... - 668 Range C: Range D: Range E: 734 - 776 780 - 822 823 - 865 Each frequency range (A-E, G) offers 26 frequency banks with studio-quality sound. freely selectable frequency Channel 24 - The SK 300 G3 bodypack transmitter The SK 300 G3 bodypack transmitter This bodypack transmitter is available in the frequency banks "1" to "20" has been factory-preset to 24 channels each: Frequency bank 1 ... 20 Channel 1 - The factory-preset frequencies within one frequency bank are intermodulation-free. frequency preset Frequency bank U1 ... Transmitters and receivers permit wireless...

Instructions for Use
Page 5
... cables: Microphone/ line cable ME 2 clip-on microphone ME 4 clip-on our website at www.sennheiser.com. Updated versions of application The bodypack transmitter can be downloaded from the SK 300 G3 product page on microphone ME 3 headmic CL 2 line cable Microphone type pre-polarized condenser microphone Pick-up pattern - The EM 300 G3 rack-mount receiver is available in the same UHF frequency ranges and is ready for immediate use after switch...
... cables: Microphone/ line cable ME 2 clip-on microphone ME 4 clip-on our website at www.sennheiser.com. Updated versions of application The bodypack transmitter can be downloaded from the SK 300 G3 product page on microphone ME 3 headmic CL 2 line cable Microphone type pre-polarized condenser microphone Pick-up pattern - The EM 300 G3 rack-mount receiver is available in the same UHF frequency ranges and is ready for immediate use after switch...
Instructions for Use
Page 7
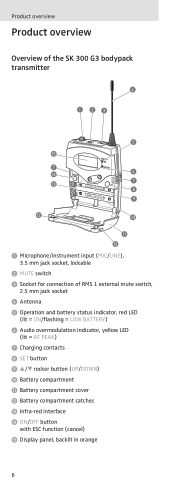
... Overview of the SK 300 G3 bodypack transmitter ¿ ³ ·» ´ ƺ ¶ ƹ ² Ƹ ¶ º ¾ ¹ µ ¸ ¹ ³ Microphone/instrument input (MIC/LINE), 3.5 mm jack socket, lockable · MUTE switch » Socket for connection of RMS 1 external mute switch, 2.5 mm jack socket ¿ Antenna ´ Operation and battery status indicator, red LED (lit = ON/flashing = LOW BATTERY) ² Audio overmodulation indicator, yellow...
... Overview of the SK 300 G3 bodypack transmitter ¿ ³ ·» ´ ƺ ¶ ƹ ² Ƹ ¶ º ¾ ¹ µ ¸ ¹ ³ Microphone/instrument input (MIC/LINE), 3.5 mm jack socket, lockable · MUTE switch » Socket for connection of RMS 1 external mute switch, 2.5 mm jack socket ¿ Antenna ´ Operation and battery status indicator, red LED (lit = ON/flashing = LOW BATTERY) ² Audio overmodulation indicator, yellow...
Instructions for Use
Page 9
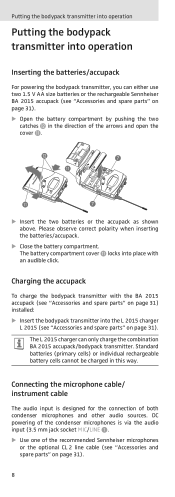
... cable (see "Accessories and spare parts" on page 31). 8 Charging the accupack To charge the bodypack transmitter with an audible click. Connecting the microphone cable/ instrument cable The audio input is via the audio input (3.5 mm jack socket MIC/LINE ³. ̈ Use one of both condenser microphones and other audio sources. The L 2015 charger can either use two 1.5 V AA size batteries or the rechargeable Sennheiser BA 2015 accupack (see "Accessories and spare parts...
... cable (see "Accessories and spare parts" on page 31). 8 Charging the accupack To charge the bodypack transmitter with an audible click. Connecting the microphone cable/ instrument cable The audio input is via the audio input (3.5 mm jack socket MIC/LINE ³. ̈ Use one of both condenser microphones and other audio sources. The L 2015 charger can either use two 1.5 V AA size batteries or the rechargeable Sennheiser BA 2015 accupack (see "Accessories and spare parts...
Instructions for Use
Page 10
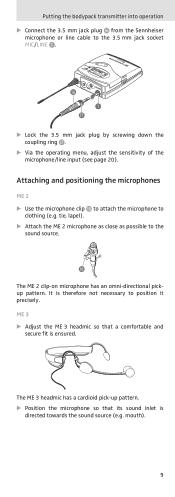
... operating menu, adjust the sensitivity of the microphone/line input (see page 20). It is directed towards the sound source (e.g. Attaching and positioning the microphones ME 2 ̈ Use the microphone clip ƽ to attach the microphone to the sound source. ƽ The ME 2 clip-on microphone has an omni-directional pickup pattern. Putting the bodypack transmitter into operation ̈ Connect the 3.5 mm jack plug ƻ from the Sennheiser microphone or line cable...
... operating menu, adjust the sensitivity of the microphone/line input (see page 20). It is directed towards the sound source (e.g. Attaching and positioning the microphones ME 2 ̈ Use the microphone clip ƽ to attach the microphone to the sound source. ƽ The ME 2 clip-on microphone has an omni-directional pickup pattern. Putting the bodypack transmitter into operation ̈ Connect the 3.5 mm jack plug ƻ from the Sennheiser microphone or line cable...

Instructions for Use
Page 13
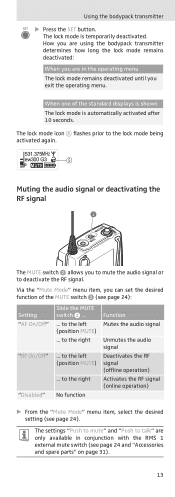
... receiver's display panel. 531.375MHz ብ ew300 G3 AF P MUTE Use this function to save battery power or to prepare a bodypack transmitter for use during live operation without causing interference to the current standard display. appears on the display panel. ̈ Press the SET button. If the lock mode is activated, you to existing transmission links. "Unlock?" The red ON LED ´ goes off and the display panel turns...
... receiver's display panel. 531.375MHz ብ ew300 G3 AF P MUTE Use this function to save battery power or to prepare a bodypack transmitter for use during live operation without causing interference to the current standard display. appears on the display panel. ̈ Press the SET button. If the lock mode is activated, you to existing transmission links. "Unlock?" The red ON LED ´ goes off and the display panel turns...
Instructions for Use
Page 14
... right No function Function Mutes the audio signal Unmutes the audio signal Deactivates the RF signal (offline operation) Activates the RF signal (online operation) ̈ From the "Mute Mode" menu item, select the desired setting (see page 24). When one of the MUTE switch · (see page 24 and "Accessories and spare parts" on page 31). 13 The lock mode icon ቦ flashes prior to the left (position...
... right No function Function Mutes the audio signal Unmutes the audio signal Deactivates the RF signal (offline operation) Activates the RF signal (online operation) ̈ From the "Mute Mode" menu item, select the desired setting (see page 24). When one of the MUTE switch · (see page 24 and "Accessories and spare parts" on page 31). 13 The lock mode icon ቦ flashes prior to the left (position...
Instructions for Use
Page 17
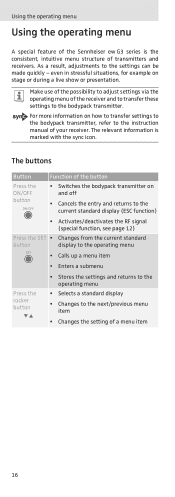
... next/previous menu item • Changes the setting of your receiver. The relevant information is the consistent, intuitive menu structure of transmitters and receivers. As a result, adjustments to the bodypack transmitter. The buttons Button Press the ON/OFF button ON/OFF Function of the button • Switches the bodypack transmitter on stage or during a live show or presentation. Using the operating menu Using the operating menu A special feature of the Sennheiser ew G3 series...
... next/previous menu item • Changes the setting of your receiver. The relevant information is the consistent, intuitive menu structure of transmitters and receivers. As a result, adjustments to the bodypack transmitter. The buttons Button Press the ON/OFF button ON/OFF Function of the button • Switches the bodypack transmitter on stage or during a live show or presentation. Using the operating menu Using the operating menu A special feature of the Sennheiser ew G3 series...
Instructions for Use
Page 18
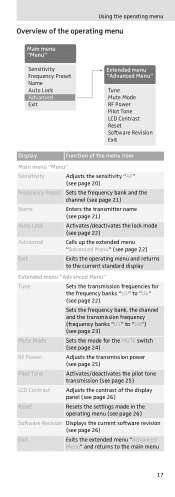
Using the operating menu Overview of the operating menu Main menu "Menu" Sensitivity Frequency Preset Name Auto Lock Advanced Exit Extended menu "Advanced Menu" Tune Mute Mode RF Power Pilot Tone LCD Contrast Reset Software Revision Exit Display Function of the menu item Main menu "Menu" Sensitivity Adjusts the sensitivity "AF" (see page 20) Frequency Preset Sets the frequency bank and the channel (see page 21) Name Enters the transmitter name (see page 21) Auto Lock Activates/deactivates the...
Using the operating menu Overview of the operating menu Main menu "Menu" Sensitivity Frequency Preset Name Auto Lock Advanced Exit Extended menu "Advanced Menu" Tune Mute Mode RF Power Pilot Tone LCD Contrast Reset Software Revision Exit Display Function of the menu item Main menu "Menu" Sensitivity Adjusts the sensitivity "AF" (see page 20) Frequency Preset Sets the frequency bank and the channel (see page 21) Name Enters the transmitter name (see page 21) Auto Lock Activates/deactivates the...

Instructions for Use
Page 21
... operating menu Make use of the possibility to adjust settings via the operating menu of 3 dB The audio level display "AF" ቢ always indicates the audio level, even if the bodypack transmitter is muted, e.g. The main menu "Menu" Adjusting the input sensitivity - too high Close talking distances, speakers with loud voices or loud music passages cause overmodulation in a signal with the sync icon. too low The transmission link...
... operating menu Make use of the possibility to adjust settings via the operating menu of 3 dB The audio level display "AF" ቢ always indicates the audio level, even if the bodypack transmitter is muted, e.g. The main menu "Menu" Adjusting the input sensitivity - too high Close talking distances, speakers with loud voices or loud music passages cause overmodulation in a signal with the sync icon. too low The transmission link...

Instructions for Use
Page 23
... frequency. 22 Activating/deactivating the automatic lock mode - For information on the standard displays "Frequency/Name" and "Name/Frequency bank/Channel". Upon delivery, the channels of the frequency banks "U1" to "U6" and assign this case, "U1.1" briefly appears on the current standard display indicates that the bodypack transmitter is accidentally switched off or programed during operation. When you are not assigned a transmission frequency. Adjusting settings via the operating menu...
... frequency. 22 Activating/deactivating the automatic lock mode - For information on the standard displays "Frequency/Name" and "Name/Frequency bank/Channel". Upon delivery, the channels of the frequency banks "U1" to "U6" and assign this case, "U1.1" briefly appears on the current standard display indicates that the bodypack transmitter is accidentally switched off or programed during operation. When you are not assigned a transmission frequency. Adjusting settings via the operating menu...

Instructions for Use
Page 25
... RF signal is reactivated. Adjusting settings via the operating menu Setting the mode for the MUTE switch and the RMS 1 external mute switch - "Push To Mute" RMS 1 external mute switch* The audio signal is pressed. 24 "Disabled" MUTE switch or RMS 1 external mute switch* The function is deactivated. * see "Accessories and spare parts" on page 31 ** If you select "Push To Talk", the bodypack transmitter will be muted until the MIC button...
... RF signal is reactivated. Adjusting settings via the operating menu Setting the mode for the MUTE switch and the RMS 1 external mute switch - "Push To Mute" RMS 1 external mute switch* The audio signal is pressed. 24 "Disabled" MUTE switch or RMS 1 external mute switch* The function is deactivated. * see "Accessories and spare parts" on page 31 ** If you select "Push To Talk", the bodypack transmitter will be muted until the MIC button...

Instructions for Use
Page 26
... bodypack transmitter and receiver. ... The pilot tone supports the receiver's squelch function (Squelch) and protects against interference due to RF signals from an earlier evolution wireless generation: Transmitter Receiver w G3/ w G2 w G3/ w G2 w G3 w G1 w G1 w G3 Make sure to the transmitted signal. deactivate the pilot tone function on the ew 300 G3 receiver. 25 Adjusting settings via the RMS 1. "Pilot Tone" Advanced Menu NPialomt eTone Active Call up "RF Power" RF Power...
... bodypack transmitter and receiver. ... The pilot tone supports the receiver's squelch function (Squelch) and protects against interference due to RF signals from an earlier evolution wireless generation: Transmitter Receiver w G3/ w G2 w G3/ w G2 w G3 w G1 w G1 w G3 Make sure to the transmitted signal. deactivate the pilot tone function on the ew 300 G3 receiver. 25 Adjusting settings via the RMS 1. "Pilot Tone" Advanced Menu NPialomt eTone Active Call up "RF Power" RF Power...
Instructions for Use
Page 27
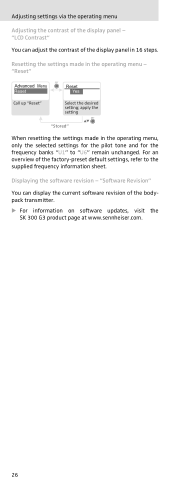
... can display the current software revision of the display panel in the operating menu - "Software Revision" You can adjust the contrast of the bodypack transmitter. ̈ For information on software updates, visit the SK 300 G3 product page at www.sennheiser.com. 26 "Reset" Advanced Menu Reset Call up "Reset" Reset Yes Select the desired setting; For an overview of the display panel - Displaying the software revision - Adjusting settings via the operating menu Adjusting the contrast of the factory-preset default settings...
... can display the current software revision of the display panel in the operating menu - "Software Revision" You can adjust the contrast of the bodypack transmitter. ̈ For information on software updates, visit the SK 300 G3 product page at www.sennheiser.com. 26 "Reset" Advanced Menu Reset Call up "Reset" Reset Yes Select the desired setting; For an overview of the display panel - Displaying the software revision - Adjusting settings via the operating menu Adjusting the contrast of the factory-preset default settings...
Instructions for Use
Page 28
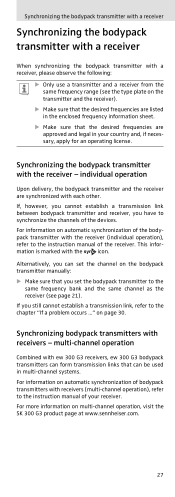
... enclosed frequency information sheet. ̈ Make sure that you can be used in your receiver. Synchronizing the bodypack transmitter with a receiver Synchronizing the bodypack transmitter with a receiver When synchronizing the bodypack transmitter with a receiver, please observe the following: ̈ Only use a transmitter and a receiver from the same frequency range (see page 21). multi-channel operation Combined with ew 300 G3 receivers, ew 300 G3 bodypack transmitters can form transmission links that can set the bodypack transmitter...
... enclosed frequency information sheet. ̈ Make sure that you can be used in your receiver. Synchronizing the bodypack transmitter with a receiver Synchronizing the bodypack transmitter with a receiver When synchronizing the bodypack transmitter with a receiver, please observe the following: ̈ Only use a transmitter and a receiver from the same frequency range (see page 21). multi-channel operation Combined with ew 300 G3 receivers, ew 300 G3 bodypack transmitters can form transmission links that can set the bodypack transmitter...
Instructions for Use
Page 31
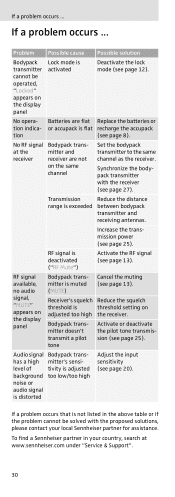
... channel as the receiver. To find a Sennheiser partner in the above table or if the problem cannot be operated, "Locked" appears on the display panel Bodypack transmitter is activated Deactivate the lock mode (see page 13). If a problem occurs ... No opera- or accupack is deactivated ("RF Mute") Activate the RF signal (see page 20). at www.sennheiser.com under "Service & Support". 30 Increase the transmission power...
... channel as the receiver. To find a Sennheiser partner in the above table or if the problem cannot be operated, "Locked" appears on the display panel Bodypack transmitter is activated Deactivate the lock mode (see page 13). If a problem occurs ... No opera- or accupack is deactivated ("RF Mute") Activate the RF signal (see page 20). at www.sennheiser.com under "Service & Support". 30 Increase the transmission power...

Instructions for Use
Page 38
... 10 cleaning 28 resetting (Reset) 26 switching on/off 11 synchronizing with receiver 27 Buttons (function of the ~) 16 C Channel assigning a frequency 23 overview 3 selecting (Frequency Preset) 21 selecting (Tune) 22 Charging accupack 8 battery status display 7 Cleaning (bodypack transmitter) 28 Connecting (microphone/line cable) 8 D Deactivating lock mode temporarily 12 Displays adjusting the contrast (LCD Contrast) 26 charge status 7 overview 7 standard displays 15 F Factory default settings (resetting the settings in the operating menu) 26 Frequency preset frequencies 3 ~ ranges 3 selecting...
... 10 cleaning 28 resetting (Reset) 26 switching on/off 11 synchronizing with receiver 27 Buttons (function of the ~) 16 C Channel assigning a frequency 23 overview 3 selecting (Frequency Preset) 21 selecting (Tune) 22 Charging accupack 8 battery status display 7 Cleaning (bodypack transmitter) 28 Connecting (microphone/line cable) 8 D Deactivating lock mode temporarily 12 Displays adjusting the contrast (LCD Contrast) 26 charge status 7 overview 7 standard displays 15 F Factory default settings (resetting the settings in the operating menu) 26 Frequency preset frequencies 3 ~ ranges 3 selecting...

Instructions for Use
Page 39
... transmission 25 R Reset (resetting the settings in the operating menu) 26 RF Mute On/Off (activating/deactivating the RF signal) 12 RF Power (adjusting the transmission power) 25 RF signal activating (online operation) 11 deactivating (during operation) 15 deactivating (offline operation) 12, 13 RMS 1 external mute switch 24 S Sensitivity (adjusting the input sensitivity) 20 Setting MUTE switch (Mute Mode) 24 transmission frequency (Tune) 22 Setting up transmission link 27 Software Revision (displaying the software revision) 26 38
... transmission 25 R Reset (resetting the settings in the operating menu) 26 RF Mute On/Off (activating/deactivating the RF signal) 12 RF Power (adjusting the transmission power) 25 RF signal activating (online operation) 11 deactivating (during operation) 15 deactivating (offline operation) 12, 13 RMS 1 external mute switch 24 S Sensitivity (adjusting the input sensitivity) 20 Setting MUTE switch (Mute Mode) 24 transmission frequency (Tune) 22 Setting up transmission link 27 Software Revision (displaying the software revision) 26 38

Instructions for Use
Page 40
Index Switching on/off bodypack transmitter 11 Synchronizing (bodypack transmitter/receiver) 27 T Transmission frequency selecting (Frequency Preset) 21 setting (Tune) 22 Transmission power, optimizing 29 Troubleshooting 30 Tune (setting a transmission frequency) 22 U Unlock (deactivating the lock mode) 12 Using bodypack transmitter 11 operating menu 18 39
Index Switching on/off bodypack transmitter 11 Synchronizing (bodypack transmitter/receiver) 27 T Transmission frequency selecting (Frequency Preset) 21 setting (Tune) 22 Transmission power, optimizing 29 Troubleshooting 30 Tune (setting a transmission frequency) 22 U Unlock (deactivating the lock mode) 12 Using bodypack transmitter 11 operating menu 18 39


