
Instructions for use
Page 2
... Switching the transmitter on and off 18 Switching the headphones on and off 20 Adjusting the volume on the headphones 21 Adjusting the sound of the RS 170 to your needs 22 Associating the headphones to the transmitter 24 Listening with several headphones simultaneously 27 Cleaning the RS 170 28 If a problem occurs 29 Accessories and spare parts...
... Switching the transmitter on and off 18 Switching the headphones on and off 20 Adjusting the volume on the headphones 21 Adjusting the sound of the RS 170 to your needs 22 Associating the headphones to the transmitter 24 Listening with several headphones simultaneously 27 Cleaning the RS 170 28 If a problem occurs 29 Accessories and spare parts...
Instructions for use
Page 3
...in order to rain or moisture. • Unplug the power supply unit from the mains - Sennheiser headphones also sound exceptionally good at low volumes. • Only use the Sennheiser supplied power supply units. • To reduce the risk of fire or electric shock, do ... generate a magnetic field which require special attention (e.g. during lightning storms or - when unused for long periods of time. • The headphones contain magnets that the power supply unit is - properly plugged into the wall socket, - Important safety information Important safety information • Please...
...in order to rain or moisture. • Unplug the power supply unit from the mains - Sennheiser headphones also sound exceptionally good at low volumes. • Only use the Sennheiser supplied power supply units. • To reduce the risk of fire or electric shock, do ... generate a magnetic field which require special attention (e.g. during lightning storms or - when unused for long periods of time. • The headphones contain magnets that the power supply unit is - properly plugged into the wall socket, - Important safety information Important safety information • Please...
Instructions for use
Page 5
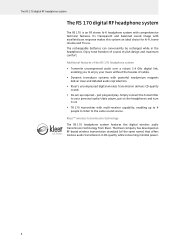
... can conveniently be recharged while in CD-quality while consuming minimal power. 4 The RS 170 digital RF headphone system The RS 170 digital RF headphone system The RS 170 is an RF stereo hi-fi headphone system with excellent bass response makes this system an ideal choice for hi-fi, home... cinema and TV use. KleerTM wireless transmission technology The RS 170 headphone system features the digital wireless audio transmission technology from Kleer. Its transparent and balanced sound image with comprehensive technical features. ...
... can conveniently be recharged while in CD-quality while consuming minimal power. 4 The RS 170 digital RF headphone system The RS 170 digital RF headphone system The RS 170 is an RF stereo hi-fi headphone system with excellent bass response makes this system an ideal choice for hi-fi, home... cinema and TV use. KleerTM wireless transmission technology The RS 170 headphone system features the digital wireless audio transmission technology from Kleer. Its transparent and balanced sound image with comprehensive technical features. ...
Instructions for use
Page 6
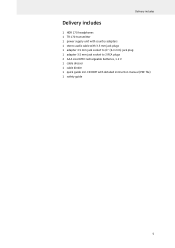
CD ROM with 3.5 mm jack plugs 1 adapter 3.5 mm jack socket to ¼" (6.3 mm) jack plug 1 adapter 3.5 mm jack socket to 2 RCA plugs 2 AAA size NiMH rechargeable batteries, 1.2 V 1 cable dresser 1 cable binder 1 quick guide incl. Delivery includes Delivery includes 1 HDR 170 headphones 1 TR 170 transmitter 1 power supply unit with country adapters 1 stereo audio cable with detailed instruction manual (PDF file) 1 safety guide 5
CD ROM with 3.5 mm jack plugs 1 adapter 3.5 mm jack socket to ¼" (6.3 mm) jack plug 1 adapter 3.5 mm jack socket to 2 RCA plugs 2 AAA size NiMH rechargeable batteries, 1.2 V 1 cable dresser 1 cable binder 1 quick guide incl. Delivery includes Delivery includes 1 HDR 170 headphones 1 TR 170 transmitter 1 power supply unit with country adapters 1 stereo audio cable with detailed instruction manual (PDF file) 1 safety guide 5
Instructions for use
Page 7
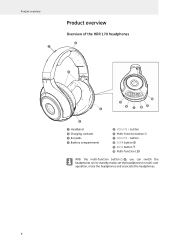
button º SURR button ¾ BASS button µ Multi-function LED With the multi-function button ², you can switch the headphones on/to standby mode, set the headphones to multi-user operation, mute the headphones and associate the headphones. 6 Product overview ³ Product overview Overview of the HDR 170 headphones · » HDR 170 µ ´ ¿ ² ¶ º¾ ¿ ³ Headband · Charging contacts » Ear pads ¿ Battery compartments ´ VOLUME + button ² Multi-function button ¶ VOLUME -
button º SURR button ¾ BASS button µ Multi-function LED With the multi-function button ², you can switch the headphones on/to standby mode, set the headphones to multi-user operation, mute the headphones and associate the headphones. 6 Product overview ³ Product overview Overview of the HDR 170 headphones · » HDR 170 µ ´ ¿ ² ¶ º¾ ¿ ³ Headband · Charging contacts » Ear pads ¿ Battery compartments ´ VOLUME + button ² Multi-function button ¶ VOLUME -
Instructions for use
Page 8
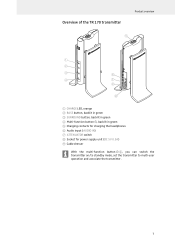
Overview of the TR 170 transmitter Product overview 5 1 2 3 6 4 7 8 9 ቢ CHARGE LED, orange ባ BASS button, backlit in green ቤ SURROUND button, backlit in green ብ Multi-function button , backlit in green ቦ Charging contacts for charging the headphones ቧ Audio input (AUDIO IN) ቨ ATTENUATOR switch ቩ Socket for power supply unit (DC 5V 0.5A) ቪ Cable dresser With the multi-function button ብ, you can switch the transmitter on/to standby mode, set the transmitter to multi-user operation and associate the transmitter. 7
Overview of the TR 170 transmitter Product overview 5 1 2 3 6 4 7 8 9 ቢ CHARGE LED, orange ባ BASS button, backlit in green ቤ SURROUND button, backlit in green ብ Multi-function button , backlit in green ቦ Charging contacts for charging the headphones ቧ Audio input (AUDIO IN) ቨ ATTENUATOR switch ቩ Socket for power supply unit (DC 5V 0.5A) ቪ Cable dresser With the multi-function button ብ, you can switch the transmitter on/to standby mode, set the transmitter to multi-user operation and associate the transmitter. 7
Instructions for use
Page 9
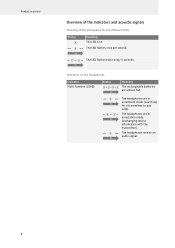
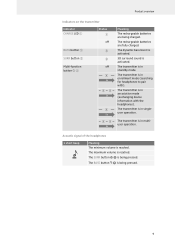
... LEDs Status 1s Meaning The LED is lit. The headphones receive an audio signal. 8 Product overview Overview of the indicators and acoustic signals Meaning of the pictograms for a transmitter to pair with the transmitter). The headphones are almost flat. The LED flashes twice every 5 ...seconds. 5s Indicators on the headphones Indicator Multi-function LED µ Status 1s 1s 1s 5s Meaning The rechargeable batteries are...
... LEDs Status 1s Meaning The LED is lit. The headphones receive an audio signal. 8 Product overview Overview of the indicators and acoustic signals Meaning of the pictograms for a transmitter to pair with the transmitter). The headphones are almost flat. The LED flashes twice every 5 ...seconds. 5s Indicators on the headphones Indicator Multi-function LED µ Status 1s 1s 1s 5s Meaning The rechargeable batteries are...
Instructions for use
Page 10
The maximum volume is reached. The transmitter is in enrollment mode (searching for headphones to pair with the headphones). The transmitter is in multiuser operation. Acoustic signal of the headphones 1 short beep Meaning The minimum volume is reached. The BASS button ¾ is in standby mode. The rechargeable batteries are being charged. The transmitter...
The maximum volume is reached. The transmitter is in enrollment mode (searching for headphones to pair with the headphones). The transmitter is in multiuser operation. Acoustic signal of the headphones 1 short beep Meaning The minimum volume is reached. The BASS button ¾ is in standby mode. The rechargeable batteries are being charged. The transmitter...
Instructions for use
Page 11
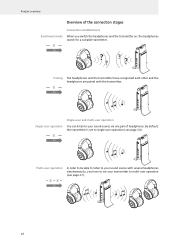
... be able to listen to your sound source with several headphones simultaneously, you switch the headphones and the transmitter on, the headphones search for a suitable transmitter. 1s HDR 170 Pairing The headphones and the transmitter have to set to your sound source via one pair of headphones. Product overview Overview of the connection stages Connection establishment...
... be able to listen to your sound source with several headphones simultaneously, you switch the headphones and the transmitter on, the headphones search for a suitable transmitter. 1s HDR 170 Pairing The headphones and the transmitter have to set to your sound source via one pair of headphones. Product overview Overview of the connection stages Connection establishment...
Instructions for use
Page 12
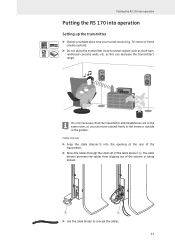
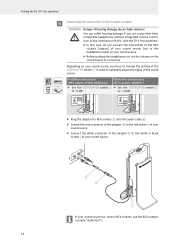
It is not necessary that the transmitter and headphones are in the same room, so you can decrease the transmitter's range. Putting the RS 170 into operation Putting the RS 170 into the opening at the rear of the transmitter. ̈ Dress the cables through the small slit of the sockets or being kinked. 9 9 ̈ Use...
It is not necessary that the transmitter and headphones are in the same room, so you can decrease the transmitter's range. Putting the RS 170 into operation Putting the RS 170 into the opening at the rear of the transmitter. ̈ Dress the cables through the small slit of the sockets or being kinked. 9 9 ̈ Use...
Instructions for use
Page 13
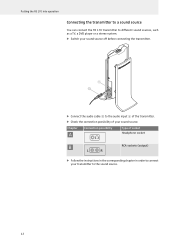
Putting the RS 170 into operation Connecting the transmitter to a sound source You can connect the TR 170 transmitter to different sound sources, such as a TV, a DVD player or a stereo system. ̈ Switch your sound source off before connecting the transmitter. 6... 0 ̈ Connect the audio cable ቫ to the audio input ቧ of the transmitter. ̈ Check the connection possibility of socket Headphone socket B ...
Putting the RS 170 into operation Connecting the transmitter to a sound source You can connect the TR 170 transmitter to different sound sources, such as a TV, a DVD player or a stereo system. ̈ Switch your sound source off before connecting the transmitter. 6... 0 ̈ Connect the audio cable ቫ to the audio input ቧ of the transmitter. ̈ Check the connection possibility of socket Headphone socket B ...
Instructions for use
Page 14
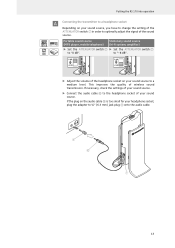
If necessary, check the settings of your sound source. ̈ Connect the audio cable ቫ to the headphone socket of the headphone socket on your sound source. to "-8 dB". ̈ Adjust the volume of your sound source to a medium level. If the plug on...the setting of the ATTENUATOR switch ቨ in order to optimally adjust the signal of wireless sound transmission. Putting the RS 170 into operation A Connecting the transmitter to a headphone socket Depending on your headphone socket, plug the adapter to ¼" (6.3 mm) jack plug ቭ onto the audio cable. Portable sound ...
If necessary, check the settings of your sound source. ̈ Connect the audio cable ቫ to the headphone socket of the headphone socket on your sound source. to "-8 dB". ̈ Adjust the volume of your sound source to a medium level. If the plug on...the setting of the ATTENUATOR switch ቨ in order to optimally adjust the signal of wireless sound transmission. Putting the RS 170 into operation A Connecting the transmitter to a headphone socket Depending on your headphone socket, plug the adapter to ¼" (6.3 mm) jack plug ቭ onto the audio cable. Portable sound ...
Instructions for use
Page 15
... adjust the signal of the sound source. You can suffer hearing damage if you are using other Kleer compatible headphones without integrated volume control, such as the Sennheiser MX W1, with the TR 170 transmitter: ̈ In this case, do not connect the transmitter to the RCA sockets (output) of your...Music Photos ̈ Set the ATTENUATOR switch ቨ ̈ Set the ATTENUATOR switch ቨ Videos Extras Settings Shuffle Songs to high volumes! Putting the RS 170 into operation B Connecting the transmitter to RCA sockets (output) WARNING Danger of hearing damage due to "0 dB".
... adjust the signal of the sound source. You can suffer hearing damage if you are using other Kleer compatible headphones without integrated volume control, such as the Sennheiser MX W1, with the TR 170 transmitter: ̈ In this case, do not connect the transmitter to the RCA sockets (output) of your...Music Photos ̈ Set the ATTENUATOR switch ቨ ̈ Set the ATTENUATOR switch ቨ Videos Extras Settings Shuffle Songs to high volumes! Putting the RS 170 into operation B Connecting the transmitter to RCA sockets (output) WARNING Danger of hearing damage due to "0 dB".

Instructions for use
Page 17
Putting the RS 170 into operation Inserting and changing the rechargeable batteries For powering the headphones, you can use: • standard batteries (AAA size, 1.5 V) • NiMH rechargeable batteries (AAA size, 1.2 V, 600 mAh) If you are using standard batteries, the headphones must not be placed on the headphone holder/charger of the transmitter. ̈ Remove the ear...
Putting the RS 170 into operation Inserting and changing the rechargeable batteries For powering the headphones, you can use: • standard batteries (AAA size, 1.5 V) • NiMH rechargeable batteries (AAA size, 1.2 V, 600 mAh) If you are using standard batteries, the headphones must not be placed on the headphone holder/charger of the transmitter. ̈ Remove the ear...
Instructions for use
Page 18
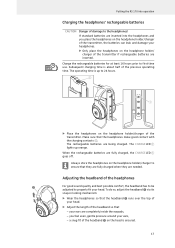
...RS 170 into the headphones and you feel even, gentle pressure around your ears, - a snug fit of damage to the headphones! If standard batteries are inserted. When the rechargeable batteries are completely inside the earpads, - Subsequent charging time is about half of the transmitter if rechargeable batteries are inserted into operation Charging the headphones... comfort, the headband has to be adjusted to 24 hours. 5 HDR 170 1 ³ HDR 170 ̈ Place the headphones on the headphone holder/ charger of the previous operating time. your ears are fully charged,...
...RS 170 into the headphones and you feel even, gentle pressure around your ears, - a snug fit of damage to the headphones! If standard batteries are inserted. When the rechargeable batteries are completely inside the earpads, - Subsequent charging time is about half of the transmitter if rechargeable batteries are inserted into operation Charging the headphones... comfort, the headband has to be adjusted to 24 hours. 5 HDR 170 1 ³ HDR 170 ̈ Place the headphones on the headphone holder/ charger of the previous operating time. your ears are fully charged,...
Instructions for use
Page 19
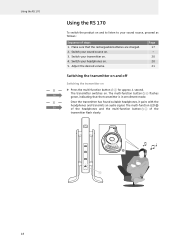
...; 4 18 The transmitter switches on . 4. The multi-function LED µ 5s of the headphones and the multi-function button ብ of steps 1. Adjust the desired volume. Using the RS 170 Using the RS 170 To switch the product on . 5. Switch your headphones on and to listen to your transmitter on . The multi-function button ብ flashes...
...; 4 18 The transmitter switches on . 4. The multi-function LED µ 5s of the headphones and the multi-function button ብ of steps 1. Adjust the desired volume. Using the RS 170 Using the RS 170 To switch the product on . 5. Switch your headphones on and to listen to your transmitter on . The multi-function button ብ flashes...
Instructions for use
Page 20
... mains. 19 Please note that it can remain connected to standby mode. Using the RS 170 Switching the transmitter off . The transmitter is very low so that In this case, the headphones' rechargeable batteries will not be recharged. If the headphones are outside the transmission range or switched off . In standby mode, the transmitter...
... mains. 19 Please note that it can remain connected to standby mode. Using the RS 170 Switching the transmitter off . The transmitter is very low so that In this case, the headphones' rechargeable batteries will not be recharged. If the headphones are outside the transmission range or switched off . In standby mode, the transmitter...

Instructions for use
Page 21
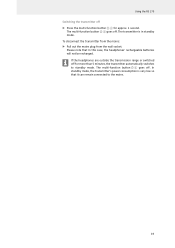
... multi-function LED µ goes off ̈ Press the multi-function button ² for approx. 1 second. The headphones are in standby mode. Using the RS 170 Switching the headphones on . Once the headphones have found a suitable transmitter, the transmitter pairs with the headphones and transmits an audio signal. 5s The multi-function LED µ of the...
... multi-function LED µ goes off ̈ Press the multi-function button ² for approx. 1 second. The headphones are in standby mode. Using the RS 170 Switching the headphones on . Once the headphones have found a suitable transmitter, the transmitter pairs with the headphones and transmits an audio signal. 5s The multi-function LED µ of the...
Instructions for use
Page 22
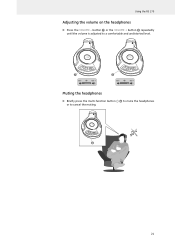
button ¶ or the VOLUME + button ´ repeatedly until the volume is adjusted to cancel the muting. ² 21 Vol + ´ Vol - Using the RS 170 Adjusting the volume on the headphones ̈ Press the VOLUME - Vol + Muting the headphones ̈ Briefly press the multi-function button ² to mute the headphones or to a comfortable and undistorted level. ¶ Vol -
button ¶ or the VOLUME + button ´ repeatedly until the volume is adjusted to cancel the muting. ² 21 Vol + ´ Vol - Using the RS 170 Adjusting the volume on the headphones ̈ Press the VOLUME - Vol + Muting the headphones ̈ Briefly press the multi-function button ² to mute the headphones or to a comfortable and undistorted level. ¶ Vol -
Instructions for use
Page 23
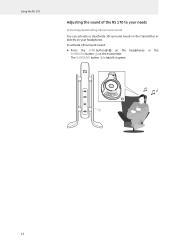
The SURROUND button ቤ is backlit in green. º 3 22 Using the RS 170 Adjusting the sound of the RS 170 to your headphones. To activate 3D surround sound: ̈ Press the SURR button º on the headphones or the SURROUND button ቤ on your needs Activating/deactivating 3D surround sound You can activate or deactivate 3D surround sound on the transmitter or directly on the transmitter.
The SURROUND button ቤ is backlit in green. º 3 22 Using the RS 170 Adjusting the sound of the RS 170 to your headphones. To activate 3D surround sound: ̈ Press the SURR button º on the headphones or the SURROUND button ቤ on your needs Activating/deactivating 3D surround sound You can activate or deactivate 3D surround sound on the transmitter or directly on the transmitter.


