Product Information
Page 2
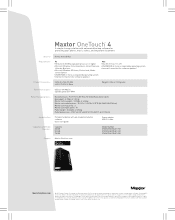
..., Home Office Requirements PC •Pentium III, 500Mhz equivalent processor or higher •Microsoft Windows Vista Home Basic, Home Premium, Ultimate, Business •Microsoft Windows XP Home, Professional, Media Center Edition •256MB RAM or more as required by operating...750GB Model Number STM302503OTA3E1-RK STM305004OTA3E1-RK STM307504OTA3E1-RK Support MaxtorSolutions.com MaxtorSolutions.com © 2007 Seagate, Seagate Technology, the Wave logo, Maxtor, OneTouch, and the Maxtor stylized logo are the property of their respective owners. All other functions, and thus will ...
..., Home Office Requirements PC •Pentium III, 500Mhz equivalent processor or higher •Microsoft Windows Vista Home Basic, Home Premium, Ultimate, Business •Microsoft Windows XP Home, Professional, Media Center Edition •256MB RAM or more as required by operating...750GB Model Number STM302503OTA3E1-RK STM305004OTA3E1-RK STM307504OTA3E1-RK Support MaxtorSolutions.com MaxtorSolutions.com © 2007 Seagate, Seagate Technology, the Wave logo, Maxtor, OneTouch, and the Maxtor stylized logo are the property of their respective owners. All other functions, and thus will ...

User Guide for Mac
Page 3
Removing Folders from Sync 65 Checking Sync Status 65 Synchronizing Manually 66 Using the Maxtor Synchronization Window 66 Using Automatic Overwrite 68 Using RAID 68 Frequently Asked Questions 76 Index i 072407 Maxtor OneTouch IV ii
Removing Folders from Sync 65 Checking Sync Status 65 Synchronizing Manually 66 Using the Maxtor Synchronization Window 66 Using Automatic Overwrite 68 Using RAID 68 Frequently Asked Questions 76 Index i 072407 Maxtor OneTouch IV ii

User Guide for Mac
Page 4
... 1 A New Volume icon appears on your Macintosh, To use the Mac OneTouch 4 Formatting Tool, Step 1: Connect your OneTouch 4 drive to password-protect your drive The Maxtor OneTouch software is configured for a Windows operating system, the software must be prepared for installation on your desktop: Step 2: Double-click the New Volume icon. Because the software is...
... 1 A New Volume icon appears on your Macintosh, To use the Mac OneTouch 4 Formatting Tool, Step 1: Connect your OneTouch 4 drive to password-protect your drive The Maxtor OneTouch software is configured for a Windows operating system, the software must be prepared for installation on your desktop: Step 2: Double-click the New Volume icon. Because the software is...
User Guide for Mac
Page 5
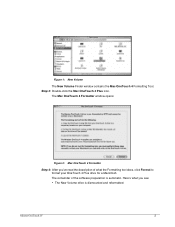
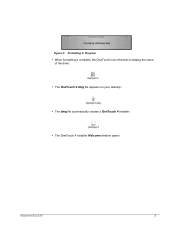
Here's what the Formatting tool does, click Format to format your OneTouch 4 Plus drive for a Macintosh. The Mac OneTouch 4 Formatter window opens: Figure 2: Mac OneTouch 4 Formatter Step 4: After you've read the description of the software preparation is dismounted and reformatted: Maxtor OneTouch IV 2 The remainder of what you see: • The New Volume drive is automatic. Step 3: Double-click the Mac OneTouch 4 Plus icon. Figure 1: New Volume The New Volume Finder window contains the Mac OneTouch 4 Formatting Tool.
Here's what the Formatting tool does, click Format to format your OneTouch 4 Plus drive for a Macintosh. The Mac OneTouch 4 Formatter window opens: Figure 2: Mac OneTouch 4 Formatter Step 4: After you've read the description of the software preparation is dismounted and reformatted: Maxtor OneTouch IV 2 The remainder of what you see: • The New Volume drive is automatic. Step 3: Double-click the Mac OneTouch 4 Plus icon. Figure 1: New Volume The New Volume Finder window contains the Mac OneTouch 4 Formatting Tool.
User Guide for Mac
Page 6
Figure 3: Formatting In Progress • When formatting is complete, the OneTouch icon refreshes to display the name of the drive: • The OneTouch 4.dmg file appears on your desktop: • The dmg file automatically creates a OneTouch 4 installer: • The OneTouch 4 Installer Welcome window opens Maxtor OneTouch IV 3
Figure 3: Formatting In Progress • When formatting is complete, the OneTouch icon refreshes to display the name of the drive: • The OneTouch 4.dmg file appears on your desktop: • The dmg file automatically creates a OneTouch 4 installer: • The OneTouch 4 Installer Welcome window opens Maxtor OneTouch IV 3
User Guide for Mac
Page 7
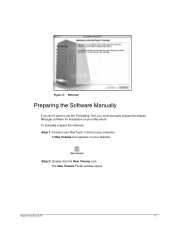
The New Volume Finder window opens: Maxtor OneTouch IV 4 Figure 4: Welcome Preparing the Software Manually If you must manually prepare the Maxtor Manager software for installation on your desktop: Step 2: Double-click the New Volume icon. To manually prepare the software, Step 1: Connect your OneTouch 4 drive to use the Formatting Tool, you don't want to your Macintosh. A New Volume icon appears on your computer.
The New Volume Finder window opens: Maxtor OneTouch IV 4 Figure 4: Welcome Preparing the Software Manually If you must manually prepare the Maxtor Manager software for installation on your desktop: Step 2: Double-click the New Volume icon. To manually prepare the software, Step 1: Connect your OneTouch 4 drive to use the Formatting Tool, you don't want to your Macintosh. A New Volume icon appears on your computer.
User Guide for Mac
Page 8
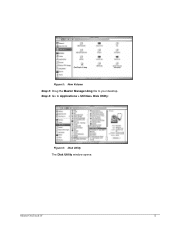
Figure 5: New Volume Step 3: Drag the Maxtor Manager.dmg file to Applications > Utilities> Disk Utility: Figure 6: Disk Utility The Disk Utility window opens: Maxtor OneTouch IV 5 Step 4: Go to your desktop.
Figure 5: New Volume Step 3: Drag the Maxtor Manager.dmg file to Applications > Utilities> Disk Utility: Figure 6: Disk Utility The Disk Utility window opens: Maxtor OneTouch IV 5 Step 4: Go to your desktop.
User Guide for Mac
Page 11
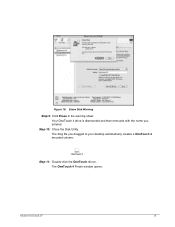
Your OneTouch 4 drive is dismounted and then remounts with the name you dragged to your desktop automatically creates a OneTouch 4 mounted volume: Step 11: Double-click the OneTouch 4 icon. Step 10: Close the Disk Utility. The OneTouch 4 Finder window opens: Maxtor OneTouch IV 8 The dmg file you entered. Figure 10: Erase Disk Warning Step 9: Click Erase in the warning sheet.
Your OneTouch 4 drive is dismounted and then remounts with the name you dragged to your desktop automatically creates a OneTouch 4 mounted volume: Step 11: Double-click the OneTouch 4 icon. Step 10: Close the Disk Utility. The OneTouch 4 Finder window opens: Maxtor OneTouch IV 8 The dmg file you entered. Figure 10: Erase Disk Warning Step 9: Click Erase in the warning sheet.
User Guide for Mac
Page 12
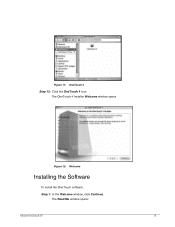
The OneTouch 4 Installer Welcome window opens Figure 12: Welcome Installing the Software To install the OneTouch software, Step 1: In the Welcome window, click Continue. Figure 11: OneTouch 4 Step 12: Click the OneTouch 4 icon. The Read Me window opens: Maxtor OneTouch IV 9
The OneTouch 4 Installer Welcome window opens Figure 12: Welcome Installing the Software To install the OneTouch software, Step 1: In the Welcome window, click Continue. Figure 11: OneTouch 4 Step 12: Click the OneTouch 4 icon. The Read Me window opens: Maxtor OneTouch IV 9
User Guide for Mac
Page 13
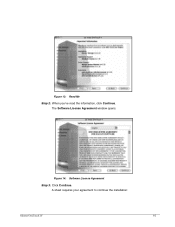
Figure 13: Read Me Step 2: When you've read the information, click Continue. The Software License Agreement window opens: Figure 14: Software License Agreement Step 3: Click Continue. A sheet requires your agreement to continue the installation: Maxtor OneTouch IV 10
Figure 13: Read Me Step 2: When you've read the information, click Continue. The Software License Agreement window opens: Figure 14: Software License Agreement Step 3: Click Continue. A sheet requires your agreement to continue the installation: Maxtor OneTouch IV 10
User Guide for Mac
Page 14
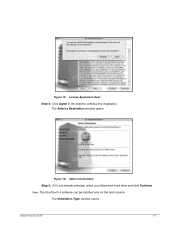
Figure 15: License Agreement sheet Step 4: Click Agree in the sheet to continue the installation. Note: The OneTouch 4 software can be installed only on the boot volume. The Installation Type window opens: Maxtor OneTouch IV 11 The Select a Destination window opens: Figure 16: Select a Destination Step 5: If it's not already selected, select your Macintosh hard drive and click Continue.
Figure 15: License Agreement sheet Step 4: Click Agree in the sheet to continue the installation. Note: The OneTouch 4 software can be installed only on the boot volume. The Installation Type window opens: Maxtor OneTouch IV 11 The Select a Destination window opens: Figure 16: Select a Destination Step 5: If it's not already selected, select your Macintosh hard drive and click Continue.
User Guide for Mac
Page 15
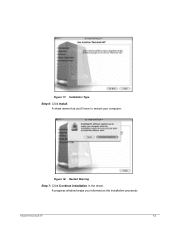
A sheet warns that you informed as the installation proceeds: Maxtor OneTouch IV 12 A progress window keeps you 'll have to restart your computer: Figure 18: Restart Warning Step 7: Click Continue Installation in the sheet. Figure 17: Installation Type Step 6: Click Install.
A sheet warns that you informed as the installation proceeds: Maxtor OneTouch IV 12 A progress window keeps you 'll have to restart your computer: Figure 18: Restart Warning Step 7: Click Continue Installation in the sheet. Figure 17: Installation Type Step 6: Click Install.

User Guide for Mac
Page 16
When your computer has restarted, a Maxtor Manager icon appears on your computer and complete the installation. Figure 19: Installing OneTouch 4 When the installation is complete, a Restart window opens: Figure 20: Restart Step 8: Click Restart to restart your desktop: Maxtor OneTouch IV 13
When your computer has restarted, a Maxtor Manager icon appears on your computer and complete the installation. Figure 19: Installing OneTouch 4 When the installation is complete, a Restart window opens: Figure 20: Restart Step 8: Click Restart to restart your desktop: Maxtor OneTouch IV 13
User Guide for Mac
Page 18
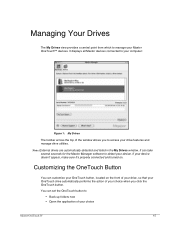
... Drives The toolbar across the top of the window allows you click the OneTouch button. Note: External drives are automatically detected and listed in the My Drives window. Customizing the OneTouch Button You can set the OneTouch button to manage your Maxtor OneTouch™ devices. You can customize your OneTouch button, located on . Managing Your Drives The My...
... Drives The toolbar across the top of the window allows you click the OneTouch button. Note: External drives are automatically detected and listed in the My Drives window. Customizing the OneTouch Button You can set the OneTouch button to manage your Maxtor OneTouch™ devices. You can customize your OneTouch button, located on . Managing Your Drives The My...
User Guide for Mac
Page 19
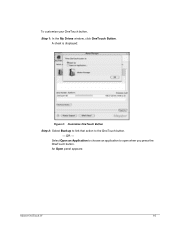
An Open panel appears: Maxtor OneTouch IV 16 Select Open an Application to choose an application to the OneTouch button. - A sheet is displayed: Figure 2: Customize OneTouch Button Step 2: Select Backup to link that action to open when you press the OneTouch button. OR - To customize your OneTouch button, Step 1: In the My Drives window, click OneTouch Button.
An Open panel appears: Maxtor OneTouch IV 16 Select Open an Application to choose an application to the OneTouch button. - A sheet is displayed: Figure 2: Customize OneTouch Button Step 2: Select Backup to link that action to open when you press the OneTouch button. OR - To customize your OneTouch button, Step 1: In the My Drives window, click OneTouch Button.
User Guide for Mac
Page 23
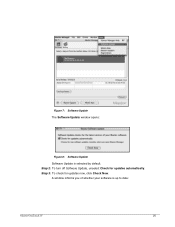
Figure 7: Software Update The Software Update window opens: Figure 8: Software Update Software Update is up to date: Maxtor OneTouch IV 20 Step 2: To turn off Software Update, unselect Check for updates now, click Check Now. Step 3: To check for updates automatically. A window informs you of whether your software is selected by default.
Figure 7: Software Update The Software Update window opens: Figure 8: Software Update Software Update is up to date: Maxtor OneTouch IV 20 Step 2: To turn off Software Update, unselect Check for updates now, click Check Now. Step 3: To check for updates automatically. A window informs you of whether your software is selected by default.
User Guide for Mac
Page 48
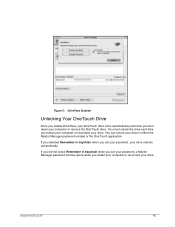
.... If you did not select Remember in keychain when you set your password, a Maxtor Manager password window opens when you set your password, your drive: Maxtor OneTouch IV 45 You can unlock your drive in either the Maxtor Manager password window or the OneTouch application If you selected Remember in keychain when you restart your computer or...
.... If you did not select Remember in keychain when you set your password, a Maxtor Manager password window opens when you set your password, your drive: Maxtor OneTouch IV 45 You can unlock your drive in either the Maxtor Manager password window or the OneTouch application If you selected Remember in keychain when you restart your computer or...
User Guide for Mac
Page 49
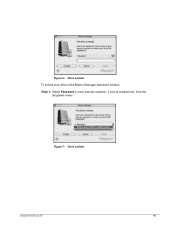
Figure 6: Drive Locked To unlock your drive in the Maxtor Manager password window, Step 1: Select Password or your security question, if you've created one, from the dropdown menu: Figure 7: Drive Locked Maxtor OneTouch IV 46
Figure 6: Drive Locked To unlock your drive in the Maxtor Manager password window, Step 1: Select Password or your security question, if you've created one, from the dropdown menu: Figure 7: Drive Locked Maxtor OneTouch IV 46
User Guide for Mac
Page 53
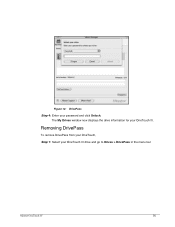
Figure 12: DrivePass Step 4: Enter your OneTouch III drive and go to Drives > DrivePass in the menu bar: Maxtor OneTouch IV 50 Removing DrivePass To remove DrivePass from your OneTouch, Step 1: Select your password and click Unlock. The My Drives window now displays the drive information for your OneTouch III.
Figure 12: DrivePass Step 4: Enter your OneTouch III drive and go to Drives > DrivePass in the menu bar: Maxtor OneTouch IV 50 Removing DrivePass To remove DrivePass from your OneTouch, Step 1: Select your password and click Unlock. The My Drives window now displays the drive information for your OneTouch III.

User Guide for Mac
Page 58
To securely erase your drive, you must reformat the drive in either the Maxtor Manager password window Figure 20: Password Window Maxtor OneTouch IV 55 Reformatting erases all data stored on the drive. Figure 19: Change DrivePass Password Confirmation Step 6: Click OK. If You Forget Your Password... If you forget your password and are unable to unlock your drive, Step 1: Click I Forgot in order to continue to use it.
To securely erase your drive, you must reformat the drive in either the Maxtor Manager password window Figure 20: Password Window Maxtor OneTouch IV 55 Reformatting erases all data stored on the drive. Figure 19: Change DrivePass Password Confirmation Step 6: Click OK. If You Forget Your Password... If you forget your password and are unable to unlock your drive, Step 1: Click I Forgot in order to continue to use it.


