Assembly Manual
Page 2
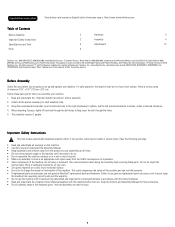
... with the Owner's Manual. • Read and understand the complete Owner's Manual supplied with this machine before assembly. 2. Failure to use the machine until instructed to injury. 2 Nautilus, Inc. (www.NautilusInc.com) trademarks include NAUTILUS®, BOWFLEX®, SCHWINN® and UNIVERSAL® and respective logos. Important Safety Instructions This icon means a potentially...
... with the Owner's Manual. • Read and understand the complete Owner's Manual supplied with this machine before assembly. 2. Failure to use the machine until instructed to injury. 2 Nautilus, Inc. (www.NautilusInc.com) trademarks include NAUTILUS®, BOWFLEX®, SCHWINN® and UNIVERSAL® and respective logos. Important Safety Instructions This icon means a potentially...
Assembly Manual
Page 4
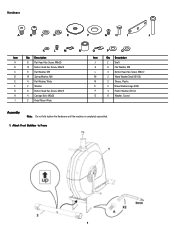
... M 2 Wave Washer,Small (D16.5) N 2 Sleeve, Plastic O 2 Wave Washer,Large (D20) P 4 Plastic Washer (D16.2) Q 6 Washer, Curved Assembly Note: Do not fully tighten the Hardware until the machine is completely assembled. 1. Attach Front Stabilizer to Frame 4
... M 2 Wave Washer,Small (D16.5) N 2 Sleeve, Plastic O 2 Wave Washer,Large (D20) P 4 Plastic Washer (D16.2) Q 6 Washer, Curved Assembly Note: Do not fully tighten the Hardware until the machine is completely assembled. 1. Attach Front Stabilizer to Frame 4
Assembly Manual
Page 10
...the previous steps except where noted to ensure that the batteries point in accordance with the Owner's Manual. 10 If you use until the machine has been fully assembled and inspected for correct performance in the direction of the +/- Do not mix alkaline, standard (carbon-zinc), or ...rechargeable (Ni-Cd, Ni-MH, etc) batteries. Final Inspection Inspect your machine to only secure. 13. 12. Do not mix old and new batteries. Do not use rechargeable batteries, the optional power adapter will not recharge ...
...the previous steps except where noted to ensure that the batteries point in accordance with the Owner's Manual. 10 If you use until the machine has been fully assembled and inspected for correct performance in the direction of the +/- Do not mix alkaline, standard (carbon-zinc), or ...rechargeable (Ni-Cd, Ni-MH, etc) batteries. Final Inspection Inspect your machine to only secure. 13. 12. Do not mix old and new batteries. Do not use rechargeable batteries, the optional power adapter will not recharge ...

Assembly Manual
Page 11
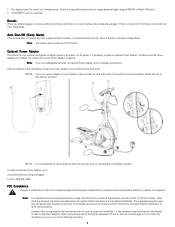
...on battery power or AC power. NOTICE: If you use rechargeable batteries, the optional Power Adapter will use a power adapter for your machine can operate on a circuit different from battery corrosion. FCC Compliance Changes or modifications to comply with the instructions, may cause harmful interference ...to order the optional Power Adapter. Optional Power Adapter The console for your elliptical, make sure that the cord stays clear of the path of the arms and pedals. Note: This equipment has been tested and...
...on battery power or AC power. NOTICE: If you use rechargeable batteries, the optional Power Adapter will use a power adapter for your machine can operate on a circuit different from battery corrosion. FCC Compliance Changes or modifications to comply with the instructions, may cause harmful interference ...to order the optional Power Adapter. Optional Power Adapter The console for your elliptical, make sure that the cord stays clear of the path of the arms and pedals. Note: This equipment has been tested and...
Assembly Manual
Page 12
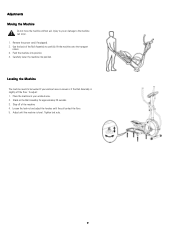
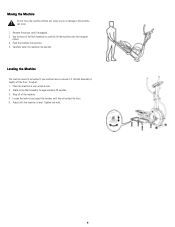
... Tighten lock nuts. 12 Push the machine into position. Leveling the Machine The machine needs to the machine can occur. 1. Adjust until they all contact the floor. 5. Stand on the Rail Assembly for approximately 20 seconds. 3. Place the machine in your workout area is uneven or... and adjust the levelers until the machine is slightly off of the Rail Assembly to carefully lift the machine onto the transport rollers. 3. Adjustments Moving the Machine Do not move the machine without aid. Use the back of the machine 4. Carefully lower the machine into position. 4. To adjust: ...
... Tighten lock nuts. 12 Push the machine into position. Leveling the Machine The machine needs to the machine can occur. 1. Adjust until they all contact the floor. 5. Stand on the Rail Assembly for approximately 20 seconds. 3. Place the machine in your workout area is uneven or... and adjust the levelers until the machine is slightly off of the Rail Assembly to carefully lift the machine onto the transport rollers. 3. Adjustments Moving the Machine Do not move the machine without aid. Use the back of the machine 4. Carefully lower the machine into position. 4. To adjust: ...
Owner's Manual
Page 2
...ñol Latino Americano vaya a: http://www.schwinnfitness.com. Nautilus, Inc. (www.NautilusInc.com) trademarks include NAUTILUS®, BOWFLEX®, SCHWINN® and UNIVERSAL® and respective logos. See Product for more information. | Printed in China | © 2010 Nautilus, Inc.,... 3 Contact Heart Rate Sensors 9 Safety Warning Labels and Serial Number 3 Maintenance 10 Features 4 Leveling the Machine 11 Specifications 4 Moving the Machine 11 Operations 4 Troubleshooting 13 Console 5 Nautilus, Inc., (800) NAUTILUS / (800) 628-8458, www.NautilusInc.com -
...ñol Latino Americano vaya a: http://www.schwinnfitness.com. Nautilus, Inc. (www.NautilusInc.com) trademarks include NAUTILUS®, BOWFLEX®, SCHWINN® and UNIVERSAL® and respective logos. See Product for more information. | Printed in China | © 2010 Nautilus, Inc.,... 3 Contact Heart Rate Sensors 9 Safety Warning Labels and Serial Number 3 Maintenance 10 Features 4 Leveling the Machine 11 Specifications 4 Moving the Machine 11 Operations 4 Troubleshooting 13 Console 5 Nautilus, Inc., (800) NAUTILUS / (800) 628-8458, www.NautilusInc.com -
Owner's Manual
Page 3
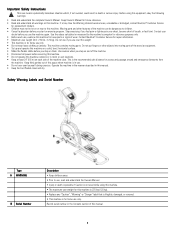
... and Serial Number Type A WARNING B Serial Number Description • Keep children away. • Prior to this machine. Do not put fingers or other features of this space when machine is the recommended safe distance for home use only. • Do not wear loose clothing or jewelry. If at...or wet locations. • Keep at any "Caution", "Warning" or "Danger" label that is illegible, damaged, or removed. • This machine is for this machine is 275 lbs (125 kg). • Replace any time the Warning stickers become short of the exercise equipment. • Set up and operate ...
... and Serial Number Type A WARNING B Serial Number Description • Keep children away. • Prior to this machine. Do not put fingers or other features of this space when machine is the recommended safe distance for home use only. • Do not wear loose clothing or jewelry. If at...or wet locations. • Keep at any "Caution", "Warning" or "Danger" label that is illegible, damaged, or removed. • This machine is for this machine is 275 lbs (125 kg). • Replace any time the Warning stickers become short of the exercise equipment. • Set up and operate ...
Owner's Manual
Page 4
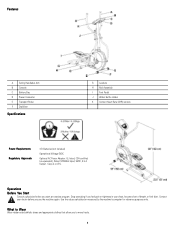
... move freely. 4 Operations Before You Start Consult a physician before you to Wear Wear rubber-soled athletic shoes and appropriate clothes that allow you use the machine again. Features A Swing Handlebar Arm B Console C Battery Bay D Power Connector E Transport Roller F Stabilizer Specifications G Levelers H Rail Assembly I Foot Pedal J Water ...Adapter: UL listed, CSA certified (or equivalent), Rated 120V60Hz Input, 9VDC, 0.5 A Output. Use the values calculated or measured by the machine's computer for reference purposes only. Stop exercising if you start an exercise program.
... move freely. 4 Operations Before You Start Consult a physician before you to Wear Wear rubber-soled athletic shoes and appropriate clothes that allow you use the machine again. Features A Swing Handlebar Arm B Console C Battery Bay D Power Connector E Transport Roller F Stabilizer Specifications G Levelers H Rail Assembly I Foot Pedal J Water ...Adapter: UL listed, CSA certified (or equivalent), Rated 120V60Hz Input, 9VDC, 0.5 A Output. Use the values calculated or measured by the machine's computer for reference purposes only. Stop exercising if you start an exercise program.
Owner's Manual
Page 5
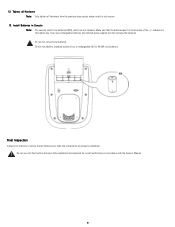
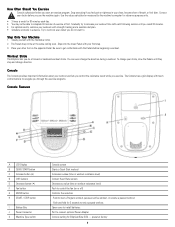
...control the resistance levels while you do a forward or backward workout stride. Open cover to connect optional Power Adapter Console setting for Elliptical/Bike (E/B) - Contact your chest, become short of exercise at first. You can even change your first step. 3. Step onto... workout. · Push and hold for 30 minutes each following session until they stop and change direction. Workout Stride The Elliptical lets you use the machine again. Port to install batteries. Gradually try to increase your workout time with strength training and a sensible diet plan. ...
...control the resistance levels while you do a forward or backward workout stride. Open cover to connect optional Power Adapter Console setting for Elliptical/Bike (E/B) - Contact your chest, become short of exercise at first. You can even change your first step. 3. Step onto... workout. · Push and hold for 30 minutes each following session until they stop and change direction. Workout Stride The Elliptical lets you use the machine again. Port to install batteries. Gradually try to increase your workout time with strength training and a sensible diet plan. ...
Owner's Manual
Page 6
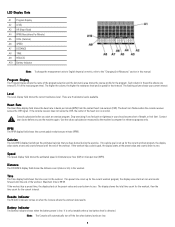
... Calories The CALORIES display field shows the estimated calories that interval. If no calorie goal is set up for that you use the machine again. The display shows the total time count for the workout, then the time count for reference purposes only. The flashing column ... The Console will automatically turn off the fan when battery levels are 8 resistance levels available. Use the values calculated or measured by the machine's computer for the current interval. Results Indicator The RESULTS indicator comes on solid. Time The Time display field shows the time count in ...
... Calories The CALORIES display field shows the estimated calories that interval. If no calorie goal is set up for that you use the machine again. The display shows the total time count for the workout, then the time count for reference purposes only. The flashing column ... The Console will automatically turn off the fan when battery levels are 8 resistance levels available. Use the values calculated or measured by the machine's computer for the current interval. Results Indicator The RESULTS indicator comes on solid. Time The Time display field shows the time count in ...
Owner's Manual
Page 7
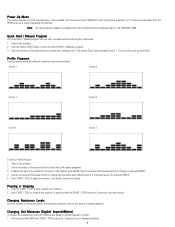
...change it receives an indication from the RPM sensor as a result of the above programs. 3. Power-Up Mode The Console operates on the machine. 2. Profile Programs These programs automate different resistances and workout levels. Your Profile workout will begin the workout. Use the Increase and Decrease ... Start / Manual program lets you start a Profile Program: 1. Push the Increase or Decrease buttons to end the workout. Step on the machine. 2. Use the Increase or Decrease buttons to pause your workout. 2. Push the START / STOP button to select one of pedaling the...
...change it receives an indication from the RPM sensor as a result of the above programs. 3. Power-Up Mode The Console operates on the machine. 2. Profile Programs These programs automate different resistances and workout levels. Your Profile workout will begin the workout. Use the Increase and Decrease ... Start / Manual program lets you start a Profile Program: 1. Push the Increase or Decrease buttons to end the workout. Step on the machine. 2. Use the Increase or Decrease buttons to pause your workout. 2. Push the START / STOP button to select one of pedaling the...
Owner's Manual
Page 8
...of the following measures: 8 Auto Shut-Off (Sleep Mode) If the Console does not receive any input in accordance with the limits for your elliptical, make sure that interference will show your selection. Note: If you use rechargeable batteries, the optional Power Adapter will use a power adapter for... a Class B digital device, pursuant to the machine as shown: NOTICE: It is off and on battery power or AC power. Note: This equipment has been tested and found to comply with...
...of the following measures: 8 Auto Shut-Off (Sleep Mode) If the Console does not receive any input in accordance with the limits for your elliptical, make sure that interference will show your selection. Note: If you use rechargeable batteries, the optional Power Adapter will use a power adapter for... a Class B digital device, pursuant to the machine as shown: NOTICE: It is off and on battery power or AC power. Note: This equipment has been tested and found to comply with...
Owner's Manual
Page 10
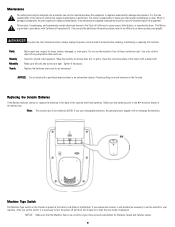
...is necessary to turn the power off any of these conditions exist. Maintenance The safety and integrity designed into a machine can only be maintained when the equipment is regularly examined for smooth roller operation. It is the sole responsibility of...: Do not clean with California's Proposition 65. Make sure the batteries point in the battery bay. Machine Type Switch The Machine Type switch on to make sure that regular maintenance is preset at www.nautilus.com/prop65 To reduce ...with fresh batteries. Clean the rails and surface of California to B (bike) or E (elliptical).
...is necessary to turn the power off any of these conditions exist. Maintenance The safety and integrity designed into a machine can only be maintained when the equipment is regularly examined for smooth roller operation. It is the sole responsibility of...: Do not clean with California's Proposition 65. Make sure the batteries point in the battery bay. Machine Type Switch The Machine Type switch on to make sure that regular maintenance is preset at www.nautilus.com/prop65 To reduce ...with fresh batteries. Clean the rails and surface of California to B (bike) or E (elliptical).
Owner's Manual
Page 11
...Stand on the Rail Assembly for approximately 20 seconds. 3. Leveling the Machine The machine needs to be leveled if your workout area. 2. Use the back of the machine 4. Adjust until they all contact the floor. 5. Push the machine into position. To adjust: 1. Step off the floor. Tighten ...lock nuts. 11 Moving the Machine Do not move the machine without aid. Remove the power cord (if equipped). 2. Carefully lower the machine into position. 4. Place the machine in your workout area is uneven or if the Rail Assembly is level...
...Stand on the Rail Assembly for approximately 20 seconds. 3. Leveling the Machine The machine needs to be leveled if your workout area. 2. Use the back of the machine 4. Adjust until they all contact the floor. 5. Push the machine into position. To adjust: 1. Step off the floor. Tighten ...lock nuts. 11 Moving the Machine Do not move the machine without aid. Remove the power cord (if equipped). 2. Carefully lower the machine into position. 4. Place the machine in your workout area is uneven or if the Rail Assembly is level...
Owner's Manual
Page 14
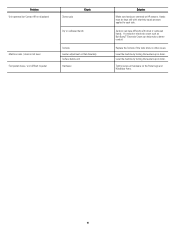
...Hardware Solution Make sure hands are centered on the Pedal Legs and Handlebar Arms. 14 Tightly secure all hardware on HR sensors. Level the machine by turning the levelers up or down .. Replace the Console if the tests show no other issues. Problem Unit operates but Contact HR not... displayed Sensor grip Check Dry or calloused hands Machine rocks / does not sit level Foot pedals loose / unit difficult to each side. Level the machine by turning the levelers up or down . Hands must be kept still with dried or calloused...
...Hardware Solution Make sure hands are centered on the Pedal Legs and Handlebar Arms. 14 Tightly secure all hardware on HR sensors. Level the machine by turning the levelers up or down .. Replace the Console if the tests show no other issues. Problem Unit operates but Contact HR not... displayed Sensor grip Check Dry or calloused hands Machine rocks / does not sit level Foot pedals loose / unit difficult to each side. Level the machine by turning the levelers up or down . Hands must be kept still with dried or calloused...
Warranty
Page 1
...related charges. Contact a Nautilus® office for the purpose intended, under this warranty. trademarks include NAUTILUS®, BOWFLEX®, SCHWINN® and UNIVERSAL® and respective logos. 1-800-NAUTILUS www.nautilus.com. Warranty Who Is Covered This warranty is valid... or on the Contacts page of the Product's physical location, misuse, mishandling, accident, natural disasters, power surges. • A machine placed or used exclusively for any prior, contrary or additional representations, whether oral or written. IN NO EVENT WILL NAUTILUS, INC. Nautilus...
...related charges. Contact a Nautilus® office for the purpose intended, under this warranty. trademarks include NAUTILUS®, BOWFLEX®, SCHWINN® and UNIVERSAL® and respective logos. 1-800-NAUTILUS www.nautilus.com. Warranty Who Is Covered This warranty is valid... or on the Contacts page of the Product's physical location, misuse, mishandling, accident, natural disasters, power surges. • A machine placed or used exclusively for any prior, contrary or additional representations, whether oral or written. IN NO EVENT WILL NAUTILUS, INC. Nautilus...


