Assembly Manual
Page 2
... and Assembly Manuals for each assembly step. 3. Before Assembly Select the area where you are going to set up this machine on this machine before assembly. 2. Read and understand the "Important Safety Instructions" before first use. Use a second person when doing the... assembly steps involving these basic points when you assemble your machine. Incorrect assembly can be heavy or awkward. Nautilus, Inc. (www.NautilusInc.com) trademarks include NAUTILUS®, BOWFLEX®, SCHWINN® and UNIVERSAL® and respective logos. Allow a workout area of...
... and Assembly Manuals for each assembly step. 3. Before Assembly Select the area where you are going to set up this machine on this machine before assembly. 2. Read and understand the "Important Safety Instructions" before first use. Use a second person when doing the... assembly steps involving these basic points when you assemble your machine. Incorrect assembly can be heavy or awkward. Nautilus, Inc. (www.NautilusInc.com) trademarks include NAUTILUS®, BOWFLEX®, SCHWINN® and UNIVERSAL® and respective logos. Allow a workout area of...
Assembly Manual
Page 4
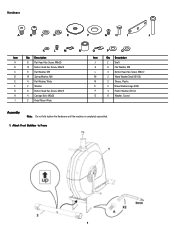
... M 2 Wave Washer,Small (D16.5) N 2 Sleeve, Plastic O 2 Wave Washer,Large (D20) P 4 Plastic Washer (D16.2) Q 6 Washer, Curved Assembly Note: Do not fully tighten the Hardware until the machine is completely assembled. 1.
... M 2 Wave Washer,Small (D16.5) N 2 Sleeve, Plastic O 2 Wave Washer,Large (D20) P 4 Plastic Washer (D16.2) Q 6 Washer, Curved Assembly Note: Do not fully tighten the Hardware until the machine is completely assembled. 1.
Assembly Manual
Page 10
...direction of the +/- Do not use rechargeable batteries, the optional power adapter will not recharge the batteries. If you use until the machine has been fully assembled and inspected for correct performance in Console Note: The console uses D size batteries (LR20), which are properly ...rechargeable (Ni-Cd, Ni-MH, etc) batteries. Install Batteries in accordance with the Owner's Manual. 10 12. Final Inspection Inspect your machine to only secure. 13. Tighten all Hardware Note: Fully tighten all fasteners are tight and components are not included. Make sure that all ...
...direction of the +/- Do not use rechargeable batteries, the optional power adapter will not recharge the batteries. If you use until the machine has been fully assembled and inspected for correct performance in Console Note: The console uses D size batteries (LR20), which are properly ...rechargeable (Ni-Cd, Ni-MH, etc) batteries. Install Batteries in accordance with the Owner's Manual. 10 12. Final Inspection Inspect your machine to only secure. 13. Tighten all Hardware Note: Fully tighten all fasteners are tight and components are not included. Make sure that all ...

Assembly Manual
Page 11
... harmful interference to radio communications. Optional Power Adapter The console for your elliptical, make sure that interference will use the Power Adapter to this equipment does cause harmful interference to order the optional Power Adapter. Attach the cord to the machine as shown: NOTICE: It is encouraged to try to correct the...
... harmful interference to radio communications. Optional Power Adapter The console for your elliptical, make sure that interference will use the Power Adapter to this equipment does cause harmful interference to order the optional Power Adapter. Attach the cord to the machine as shown: NOTICE: It is encouraged to try to correct the...
Assembly Manual
Page 12
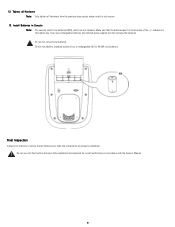
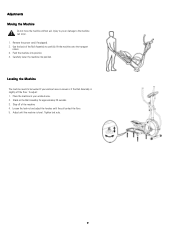
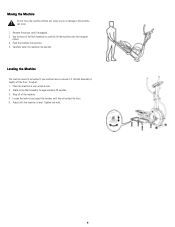
...cord (if equipped). 2. Push the machine into position. Stand on the Rail Assembly for approximately 20 seconds. 3. Use the back of the machine 4. Leveling the Machine The machine needs to be leveled if your workout area. 2. Tighten lock nuts. 12 Carefully lower the machine into position. 4. Step off the ...floor. Loosen the lock nut and adjust the levelers until the machine is slightly off of the Rail Assembly to the machine can occur. 1. Place the machine in your workout area is uneven or if the Rail Assembly is level. Injury to you...
...cord (if equipped). 2. Push the machine into position. Stand on the Rail Assembly for approximately 20 seconds. 3. Use the back of the machine 4. Leveling the Machine The machine needs to be leveled if your workout area. 2. Tighten lock nuts. 12 Carefully lower the machine into position. 4. Step off the ...floor. Loosen the lock nut and adjust the levelers until the machine is slightly off of the Rail Assembly to the machine can occur. 1. Place the machine in your workout area is uneven or if the Rail Assembly is level. Injury to you...
Owner's Manual
Page 2
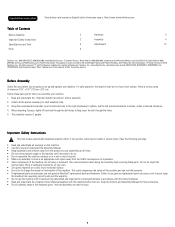
...: Serial Number Date of Contents Important Safety Instructions 3 Contact Heart Rate Sensors 9 Safety Warning Labels and Serial Number 3 Maintenance 10 Features 4 Leveling the Machine 11 Specifications 4 Moving the Machine 11 Operations 4 Troubleshooting 13 Console 5 Nautilus, Inc., (800) NAUTILUS / (800) 628-8458, www.NautilusInc.com - Nautilus, Inc. (www.NautilusInc.com) trademarks include NAUTILUS...
...: Serial Number Date of Contents Important Safety Instructions 3 Contact Heart Rate Sensors 9 Safety Warning Labels and Serial Number 3 Maintenance 10 Features 4 Leveling the Machine 11 Specifications 4 Moving the Machine 11 Operations 4 Troubleshooting 13 Console 5 Nautilus, Inc., (800) NAUTILUS / (800) 628-8458, www.NautilusInc.com - Nautilus, Inc. (www.NautilusInc.com) trademarks include NAUTILUS...
Owner's Manual
Page 3
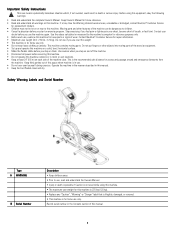
...Foot Pedals clean and dry. Contact Nautilus® Customer Service for access and passage around and emergency dismounts from the machine. Keep third parties out of the machine can be let on each use , read and understand the Owners Manual. • Injury or death is possible...in your doctor before you step on a solid, level, horizontal surface. • Make the Pedals stable before servicing this machine. • Do not operate this machine for future reference. • Read and understand all power before you start an exercise program. Safety Warning Labels and Serial ...
...Foot Pedals clean and dry. Contact Nautilus® Customer Service for access and passage around and emergency dismounts from the machine. Keep third parties out of the machine can be let on each use , read and understand the Owners Manual. • Injury or death is possible...in your doctor before you step on a solid, level, horizontal surface. • Make the Pedals stable before servicing this machine. • Do not operate this machine for future reference. • Read and understand all power before you start an exercise program. Safety Warning Labels and Serial ...
Owner's Manual
Page 4
...: UL listed, CSA certified (or equivalent), Rated 120V60Hz Input, 9VDC, 0.5 A Output. Contact your doctor before you to move freely. 4 Stop exercising if you use the machine again. Class 2 or LPS. Operations Before You Start Consult a physician before you feel pain or tightness in your chest, become short of breath, or feel... to Wear Wear rubber-soled athletic shoes and appropriate clothes that allow you start an exercise program. Use the values calculated or measured by the machine's computer for reference purposes only.
...: UL listed, CSA certified (or equivalent), Rated 120V60Hz Input, 9VDC, 0.5 A Output. Contact your doctor before you to move freely. 4 Stop exercising if you use the machine again. Class 2 or LPS. Operations Before You Start Consult a physician before you feel pain or tightness in your chest, become short of breath, or feel... to Wear Wear rubber-soled athletic shoes and appropriate clothes that allow you start an exercise program. Use the values calculated or measured by the machine's computer for reference purposes only.
Owner's Manual
Page 5
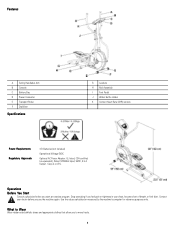
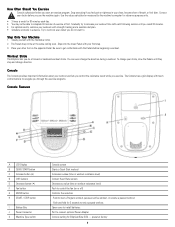
...with touch control buttons to navigate you start a Program workout, pause an active workout, or resume a paused workout. · Push and hold for Elliptical/Bike (E/B) - Gradually try to end a paused workout. Open cover to get comfortable with the Handlebar Arms. 2. Port to connect optional Power Adapter Console...Pedals until you use the machine again. To change your other foot on or off) Confirms the selection · Push to . Try to work out even when you do not want to start an exercise program. Be sure to install batteries. Workout Stride The Elliptical lets you do a ...
...with touch control buttons to navigate you start a Program workout, pause an active workout, or resume a paused workout. · Push and hold for Elliptical/Bike (E/B) - Gradually try to end a paused workout. Open cover to get comfortable with the Handlebar Arms. 2. Port to connect optional Power Adapter Console...Pedals until you use the machine again. To change your other foot on or off) Confirms the selection · Push to . Try to work out even when you do not want to start an exercise program. Be sure to install batteries. Workout Stride The Elliptical lets you do a ...
Owner's Manual
Page 6
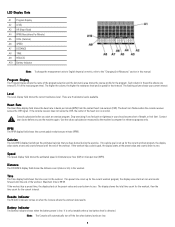
The flashing column shows your chest, become short of the workout. Contact your doctor before you use the machine again. If no preset time is on when the Console shows the workout data results. If the workout has a calorie goal, the display starts at ..." section in this manual. Level The Level display field shows the current resistance level. There are low. 6 Use the values calculated or measured by the machine's computer for the current interval. RPM The RPM display field shows the current pedal revolutions per hour (MPH). Speed The Speed display field shows the...
The flashing column shows your chest, become short of the workout. Contact your doctor before you use the machine again. If no preset time is on when the Console shows the workout data results. If the workout has a calorie goal, the display starts at ..." section in this manual. Level The Level display field shows the current resistance level. There are low. 6 Use the values calculated or measured by the machine's computer for the current interval. RPM The RPM display field shows the current pedal revolutions per hour (MPH). Speed The Speed display field shows the...
Owner's Manual
Page 7
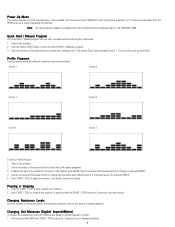
... begin the workout. Profile Programs These programs automate different resistances and workout levels. Use the Increase or Decrease buttons to select one of pedaling the machine. Power-Up Mode The Console operates on the...
... begin the workout. Profile Programs These programs automate different resistances and workout levels. Use the Increase or Decrease buttons to select one of pedaling the machine. Power-Up Mode The Console operates on the...
Owner's Manual
Page 8
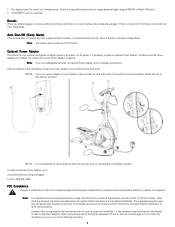
... from battery corrosion. NOTICE: If you use a power adapter for your elliptical, make sure that interference will use rechargeable batteries, the optional Power Adapter will show your selection. Attach the cord to the machine as shown: NOTICE: It is encouraged to try to operate. FCC Compliance...could void the user's authority to remove batteries when they are installed, the console will not occur in a residential installation. After the machine is no guarantee that the cord stays clear of the path of the following measures: 8 If this unit not expressly approved by ...
... from battery corrosion. NOTICE: If you use a power adapter for your elliptical, make sure that interference will use rechargeable batteries, the optional Power Adapter will show your selection. Attach the cord to the machine as shown: NOTICE: It is encouraged to try to operate. FCC Compliance...could void the user's authority to remove batteries when they are installed, the console will not occur in a residential installation. After the machine is no guarantee that the cord stays clear of the path of the following measures: 8 If this unit not expressly approved by ...
Owner's Manual
Page 10
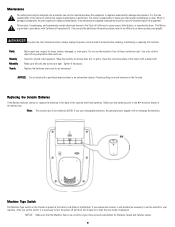
...to start the new mode of electrical shock, always unplug the power cord and wait 5 minutes before cleaning, maintaining or repairing this machine. Only manufacturer supplied components should be used to our Web site at the factory to give more accurate calculations for damage and repaired... or worn parts. Clean the rails and surface of these conditions exist. If you set correctly to B (bike) or E (elliptical). Machine Type Switch The Machine Type switch on the Console. It is the sole responsibility of the owner to make sure that regular maintenance is necessary to wipe ...
...to start the new mode of electrical shock, always unplug the power cord and wait 5 minutes before cleaning, maintaining or repairing this machine. Only manufacturer supplied components should be used to our Web site at the factory to give more accurate calculations for damage and repaired... or worn parts. Clean the rails and surface of these conditions exist. If you set correctly to B (bike) or E (elliptical). Machine Type Switch The Machine Type switch on the Console. It is the sole responsibility of the owner to make sure that regular maintenance is necessary to wipe ...
Owner's Manual
Page 11
Use the back of the machine 4. Tighten lock nuts. 11 Push the machine into position. Carefully lower the machine into position. 4. Leveling the Machine The machine needs to be leveled if your workout area. 2. Place the machine in your workout area is uneven or if the Rail Assembly is level.... approximately 20 seconds. 3. Loosen the lock nut and adjust the levelers until the machine is slightly off of the Rail Assembly to the machine can occur. 1. Injury to you or damage to carefully lift the machine onto the transport rollers. 3. To adjust: 1. Remove the power cord (if ...
Use the back of the machine 4. Tighten lock nuts. 11 Push the machine into position. Carefully lower the machine into position. 4. Leveling the Machine The machine needs to be leveled if your workout area. 2. Place the machine in your workout area is uneven or if the Rail Assembly is level.... approximately 20 seconds. 3. Loosen the lock nut and adjust the levelers until the machine is slightly off of the Rail Assembly to the machine can occur. 1. Injury to you or damage to carefully lift the machine onto the transport rollers. 3. To adjust: 1. Remove the power cord (if ...
Owner's Manual
Page 14
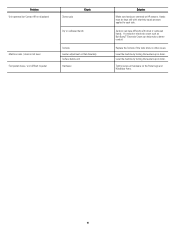
Tightly secure all hardware on HR sensors. Replace the Console if the tests show no other issues. Level the machine by turning the levelers up or down .. Sensors can help make a better conduit. Level the machine by turning the levelers up or down . Hands must be kept still with dried or calloused hands... are centered on the Pedal Legs and Handlebar Arms. 14 Problem Unit operates but Contact HR not displayed Sensor grip Check Dry or calloused hands Machine rocks / does not sit level Foot pedals loose / unit difficult to each side.
Tightly secure all hardware on HR sensors. Replace the Console if the tests show no other issues. Level the machine by turning the levelers up or down .. Sensors can help make a better conduit. Level the machine by turning the levelers up or down . Hands must be kept still with dried or calloused hands... are centered on the Pedal Legs and Handlebar Arms. 14 Problem Unit operates but Contact HR not displayed Sensor grip Check Dry or calloused hands Machine rocks / does not sit level Foot pedals loose / unit difficult to each side.
Warranty
Page 1
... the obligations or limitations of the Product's physical location, misuse, mishandling, accident, natural disasters, power surges. • A machine placed or used in a commercial or institutional setting. For products purchased from Nautilus, Inc. No agent, representative, dealer, person...or apply a limited credit reimbursement toward another Nautilus Inc. State Laws This warranty gives you . trademarks include NAUTILUS®, BOWFLEX®, SCHWINN® and UNIVERSAL® and respective logos. 1-800-NAUTILUS www.nautilus.com. Terms • Frame • Mechanical parts •...
... the obligations or limitations of the Product's physical location, misuse, mishandling, accident, natural disasters, power surges. • A machine placed or used in a commercial or institutional setting. For products purchased from Nautilus, Inc. No agent, representative, dealer, person...or apply a limited credit reimbursement toward another Nautilus Inc. State Laws This warranty gives you . trademarks include NAUTILUS®, BOWFLEX®, SCHWINN® and UNIVERSAL® and respective logos. 1-800-NAUTILUS www.nautilus.com. Terms • Frame • Mechanical parts •...


