
Assembly Manual
Page 2
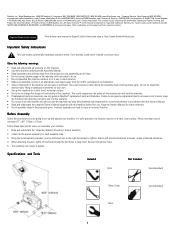
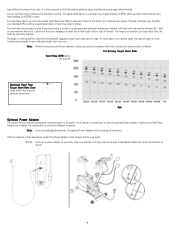
... appropriate work space away from the product you assemble your machine. Use a second person when doing the assembly steps involving these basic points when you are going to change the design or functionality of minimum 67" x 56" (170cm x 142cm). Incorrect assembly can require 2 people. Follow these parts. Read and understand the "Important Safety Instructions" before first use only genuine Nautilus® replacement parts and...
... appropriate work space away from the product you assemble your machine. Use a second person when doing the assembly steps involving these basic points when you are going to change the design or functionality of minimum 67" x 56" (170cm x 142cm). Incorrect assembly can require 2 people. Follow these parts. Read and understand the "Important Safety Instructions" before first use only genuine Nautilus® replacement parts and...
Assembly Manual
Page 4
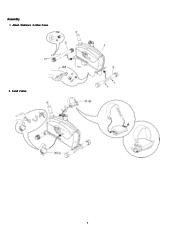
Assembly 1. Attach Stabilizers to Main Frame 2. Install Pedals 4
Assembly 1. Attach Stabilizers to Main Frame 2. Install Pedals 4

Assembly Manual
Page 5
Attach Seat Post to Main Assembly Note: Hardware is pre-installed on Hardware Card. 4. 3. Attach Seat Note: The Adjustment Knob is pre-installed on Seat and not on the Main Frame. 5
Attach Seat Post to Main Assembly Note: Hardware is pre-installed on Hardware Card. 4. 3. Attach Seat Note: The Adjustment Knob is pre-installed on Seat and not on the Main Frame. 5
Assembly Manual
Page 8
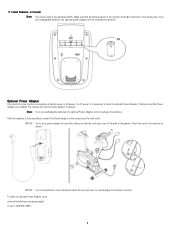
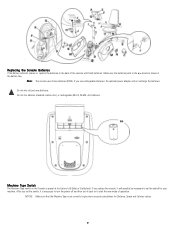
... console for your machine can operate on battery power or AC power. After the machine is fully assembled, connect the Power Adaptor to : www.schwinnfitness.com/powersupply Or call 1 (800) 605-3369. 8 NOTICE: If you use a power adapter for your bike, make sure that the batteries point in Console Note: The console uses D size batteries (LR20). Make sure that the cord stays clear of the path of the +/- 9. Install Batteries in the direction...
... console for your machine can operate on battery power or AC power. After the machine is fully assembled, connect the Power Adaptor to : www.schwinnfitness.com/powersupply Or call 1 (800) 605-3369. 8 NOTICE: If you use a power adapter for your bike, make sure that the batteries point in Console Note: The console uses D size batteries (LR20). Make sure that the cord stays clear of the path of the +/- 9. Install Batteries in the direction...
Assembly Manual
Page 9
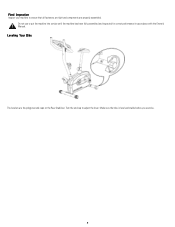
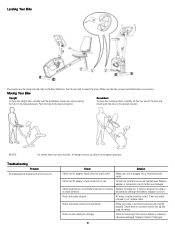
Leveling Your Bike The levelers are properly assembled. Final Inspection Inspect your machine to adjust the level. Make sure the bike is level and stable before you exercise. 9 Do not use or put the machine into service until the machine has been fully assembled and inspected for correct performance in accordance with the Owner's Manual. Turn the end cap to ensure that all fasteners are tight and components are the polygonal end caps on the Rear Stabilizer.
Leveling Your Bike The levelers are properly assembled. Final Inspection Inspect your machine to adjust the level. Make sure the bike is level and stable before you exercise. 9 Do not use or put the machine into service until the machine has been fully assembled and inspected for correct performance in accordance with the Owner's Manual. Turn the end cap to ensure that all fasteners are tight and components are the polygonal end caps on the Rear Stabilizer.
Owner's Manual
Page 2
[email protected] | Patent information: This product may be covered by US and Foreign Patents and Patents Pending. Other trademarks are the property of Contents Important Safety Instructions 3 Operations 9 Safety Warning Labels and Serial Number 3 Changing Unit Measures 10 Specifications 4 Maintenance 11 Features 4 Leveling Your Bike 13 Console Features 5 Moving Your Bike 13 Contact Heart Rate Sensors 6 Troubleshooting 13 2 See Product for more information. | Printed in China...
[email protected] | Patent information: This product may be covered by US and Foreign Patents and Patents Pending. Other trademarks are the property of Contents Important Safety Instructions 3 Operations 9 Safety Warning Labels and Serial Number 3 Changing Unit Measures 10 Specifications 4 Maintenance 11 Features 4 Leveling Your Bike 13 Console Features 5 Moving Your Bike 13 Contact Heart Rate Sensors 6 Troubleshooting 13 2 See Product for more information. | Printed in China...
Owner's Manual
Page 3
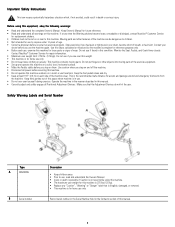
... understand the complete Owner's Manual. Monitor the Seat, Pedals, and Crank Arms closely. Moving parts and other objects into moving parts. Record serial number in the Serial Number field in moist or wet locations. Important Safety Instructions This icon means a potentially hazardous situation which, if not avoided, could result in this condition. Keep Owner's Manual for replacement stickers. • Children must not be dangerous to use if you step on each use if found...
... understand the complete Owner's Manual. Monitor the Seat, Pedals, and Crank Arms closely. Moving parts and other objects into moving parts. Record serial number in the Serial Number field in moist or wet locations. Important Safety Instructions This icon means a potentially hazardous situation which, if not avoided, could result in this condition. Keep Owner's Manual for replacement stickers. • Children must not be dangerous to use if you step on each use if found...
Owner's Manual
Page 4
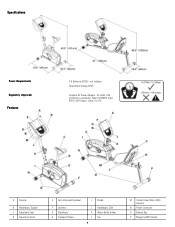
Specifications Power Requirements Regulatory Approvals Features 4 D Batteries (LR20) - A Console B Handlebars, Upright C Adjustable Seat D Adjustment Knob E Fully Shrouded Flywheel F Levelers G Stabilizers H Transport Rollers I Pedals J K L 4 Handlebars, Side Water Bottle Holder Fan M Contact Heart Rate (CHR) Sensors N Power Connector O Battery Bay P Magazine/MP3 Holder Class 2 or LPS. not included Operational Voltage 6VDC Optional AC Power Adapter: UL listed, CSA certified (or equivalent), Rated 120V60Hz Input, 9VDC, 0.5A Output.
Specifications Power Requirements Regulatory Approvals Features 4 D Batteries (LR20) - A Console B Handlebars, Upright C Adjustable Seat D Adjustment Knob E Fully Shrouded Flywheel F Levelers G Stabilizers H Transport Rollers I Pedals J K L 4 Handlebars, Side Water Bottle Holder Fan M Contact Heart Rate (CHR) Sensors N Power Connector O Battery Bay P Magazine/MP3 Holder Class 2 or LPS. not included Operational Voltage 6VDC Optional AC Power Adapter: UL listed, CSA certified (or equivalent), Rated 120V60Hz Input, 9VDC, 0.5A Output.
Owner's Manual
Page 5
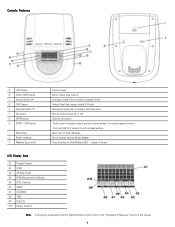
... setting for 3 seconds to install batteries. Port to the "Changing Unit Measures" section in this manual. 5 Open cover to end a paused workout. Console Features A LCD Display B QUICK START button C Increase button (▲) D CHR Sensors E Decrease button (▼) F Fan button G ENTER button H START / STOP button I Battery Bay J Power Connector K Machine Type switch Console screen Starts a Quick Start workout Increases a value (time or workout resistance level) Contact Heart Rate sensors (model A10 only) Decreases a value (time or workout resistance level) Push to control...
... setting for 3 seconds to install batteries. Port to the "Changing Unit Measures" section in this manual. 5 Open cover to end a paused workout. Console Features A LCD Display B QUICK START button C Increase button (▲) D CHR Sensors E Decrease button (▼) F Fan button G ENTER button H START / STOP button I Battery Bay J Power Connector K Machine Type switch Console screen Starts a Quick Start workout Increases a value (time or workout resistance level) Contact Heart Rate sensors (model A10 only) Decreases a value (time or workout resistance level) Push to control...

Owner's Manual
Page 6
... Console will automatically turn off your hands and the sensors and try again. The A20 bike has the CHR sensors on when the Console shows the workout data results. Once the Console has your initial heart rate, do not move or shift your heart rate signals to detect your initial pulse rate will now validate the heart rate. Level The Level display field shows the current resistance level. Heart Rate The Heart Rate display...
... Console will automatically turn off your hands and the sensors and try again. The A20 bike has the CHR sensors on when the Console shows the workout data results. Once the Console has your initial heart rate, do not move or shift your heart rate signals to detect your initial pulse rate will now validate the heart rate. Level The Level display field shows the current resistance level. Heart Rate The Heart Rate display...
Owner's Manual
Page 7
The Heart Rate table is fully assembled, connect the Power Adaptor to order the optional Power Adapter. Continue at rest heart rate of approximately 72 BPM, where as shown: 7 Note: As with all exercises and fitness regimens, always use your exercise time or intensity. Note: If you increase your best judgment when you use rechargeable batteries, the optional Power Adapter will not recharge the batteries. After the machine is an...
The Heart Rate table is fully assembled, connect the Power Adaptor to order the optional Power Adapter. Continue at rest heart rate of approximately 72 BPM, where as shown: 7 Note: As with all exercises and fitness regimens, always use your exercise time or intensity. Note: If you increase your best judgment when you use rechargeable batteries, the optional Power Adapter will not recharge the batteries. After the machine is an...

Owner's Manual
Page 8
...Part 15 of the following measures: • Reorient or relocate the receiving antenna. • Increase the separation between the equipment and receiver. • Connect the equipment into an outlet on , the user is no guarantee that to operate the equipment. FCC Compliance Changes... installation. To order the optional Power Adapter, go to provide reasonable protection against harmful interference in accordance with the limits for help. 8 This equipment generates, uses and can be determined by turning the equipment off and on a circuit different from battery corrosion...
...Part 15 of the following measures: • Reorient or relocate the receiving antenna. • Increase the separation between the equipment and receiver. • Connect the equipment into an outlet on , the user is no guarantee that to operate the equipment. FCC Compliance Changes... installation. To order the optional Power Adapter, go to provide reasonable protection against harmful interference in accordance with the limits for help. 8 This equipment generates, uses and can be determined by turning the equipment off and on a circuit different from battery corrosion...
Owner's Manual
Page 9
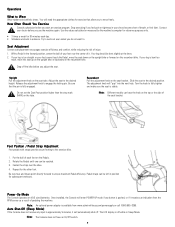
... you use the machine again. Do not set the Seat Post position higher than the stop mark (MAX) on the seat bracket. Repeat for exercise that the pin is off while in approximately 5 minutes, it will "pop" into the next hole. Power-Up Mode The Console operates on the seat tube. Note: The Console does not have the knob on the recumbent bike. Seat Adjustment Correct seat placement encourages exercise efficiency...
... you use the machine again. Do not set the Seat Post position higher than the stop mark (MAX) on the seat bracket. Repeat for exercise that the pin is off while in approximately 5 minutes, it will "pop" into the next hole. Power-Up Mode The Console operates on the seat tube. Note: The Console does not have the knob on the recumbent bike. Seat Adjustment Correct seat placement encourages exercise efficiency...
Owner's Manual
Page 10
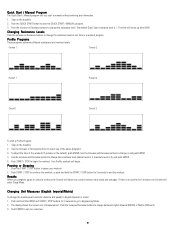
... begin . The display shows the current unit of the workout (15 minutes is 1. Quick Start / Manual Program The Quick Start / Manual program lets you complete, pause or cancel a workout, the Console will count up from 00:00. Step on the machine. 2. Use the Increase or Decrease buttons to change the resistance level at any information. 1. Push START / STOP to change the resistance level. Results When you start a workout without entering any time in a workout program.
... begin . The display shows the current unit of the workout (15 minutes is 1. Quick Start / Manual Program The Quick Start / Manual program lets you complete, pause or cancel a workout, the Console will count up from 00:00. Step on the machine. 2. Use the Increase or Decrease buttons to change the resistance level at any information. 1. Push START / STOP to change the resistance level. Results When you start a workout without entering any time in a workout program.
Owner's Manual
Page 11
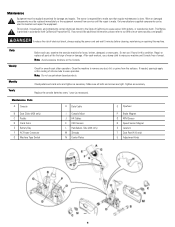
... sweat. Maintenance Parts A Console H Data Cable O Flywheel B Seat Slider (A20 only) C Pedals D Crank Arms E Battery Bay F AC Power Connector G Machine Type Switch I Console Mast J HR Cables K CHR Sensors L Handlebars, Side (A20 only) M Shrouds N Center Plates P Brake Magnet Q RPM Sensor R Speed Sensor Magnet S Levelers T Seat Post (A10 only) U Adjustment Knob 11 The owner is done. Check for damage and repairs. Note: Avoid excessive moisture on the Console. Check pedals and crank arms and tighten as necessary. Maintenance Equipment must be replaced immediately...
... sweat. Maintenance Parts A Console H Data Cable O Flywheel B Seat Slider (A20 only) C Pedals D Crank Arms E Battery Bay F AC Power Connector G Machine Type Switch I Console Mast J HR Cables K CHR Sensors L Handlebars, Side (A20 only) M Shrouds N Center Plates P Brake Magnet Q RPM Sensor R Speed Sensor Magnet S Levelers T Seat Post (A10 only) U Adjustment Knob 11 The owner is done. Check for damage and repairs. Note: Avoid excessive moisture on the Console. Check pedals and crank arms and tighten as necessary. Maintenance Equipment must be replaced immediately...
Owner's Manual
Page 12
... console uses D size batteries (LR20). If you set the switch, it is necessary to turn the power off and then turn it will not recharge the batteries. NOTICE: Make sure that the Machine Type is preset at the factory to give more accurate calculations for your machine. Machine Type Switch The Machine Type switch on to set correctly to B (bike) or E (elliptical). If you replace the console, it back on the Console...
... console uses D size batteries (LR20). If you set the switch, it is necessary to turn the power off and then turn it will not recharge the batteries. NOTICE: Make sure that the Machine Type is preset at the factory to give more accurate calculations for your machine. Machine Type Switch The Machine Type switch on to set correctly to B (bike) or E (elliptical). If you replace the console, it back on the Console...
Owner's Manual
Page 13
... damaged. Troubleshooting Problem No display/partial display/unit will not turn on . Replace adapter or connection at unit Connection should be intact. Replace Console if damaged. 13 All abrupt motions can affect the computer operation. Check data cable integrity All wires in cable should line up and snap into a functioning wall outlet. Turn the end cap to the desired location. Recumbent To move the bike. Make sure the bike is...
... damaged. Troubleshooting Problem No display/partial display/unit will not turn on . Replace adapter or connection at unit Connection should be intact. Replace Console if damaged. 13 All abrupt motions can affect the computer operation. Check data cable integrity All wires in cable should line up and snap into a functioning wall outlet. Turn the end cap to the desired location. Recumbent To move the bike. Make sure the bike is...
Owner's Manual
Page 14
..., Handlebars should be replaced. If any are cut or crimped, replace cable. Unplug unit from handlebars and cable to data cable. Reconnect to Console. Check magnet position (requires shroud removal) Check RPM Sensor If Console only has partial display and all connections are centered on connector should be intact. Some models may have difficulty with reset button) If bike has batteries, check Battery Level icon on connector should...
..., Handlebars should be replaced. If any are cut or crimped, replace cable. Unplug unit from handlebars and cable to data cable. Reconnect to Console. Check magnet position (requires shroud removal) Check RPM Sensor If Console only has partial display and all connections are centered on connector should be intact. Some models may have difficulty with reset button) If bike has batteries, check Battery Level icon on connector should...
Owner's Manual
Page 15
... connected securely and oriented properly. Reset Machine (if equipped with removal. Replace the Console if unable to outlet. Check surface under unit Adjustment may be tightened securely to compensate for 3 minutes. Small latch on or will not turn off (remove batteries or unplug power adapter). After Console powers up and snap into one of fan Turn power off Check data cable integrity All wires in cable should be able to axle. Seat...
... connected securely and oriented properly. Reset Machine (if equipped with removal. Replace the Console if unable to outlet. Check surface under unit Adjustment may be tightened securely to compensate for 3 minutes. Small latch on or will not turn off (remove batteries or unplug power adapter). After Console powers up and snap into one of fan Turn power off Check data cable integrity All wires in cable should be able to axle. Seat...
Warranty
Page 1
... OF ITS ESSENTIAL PURPOSE. warrants that replacement parts or components do not allow limitations on post-warranty parts and services. For products purchased from Nautilus, Inc. may be used in accordance with any Nautilus instructions. • Perform diagnostic procedures with replacements or repairs to contact your local distributor or dealer for authentic, original, legitimate machines manufactured by Nautilus, Inc. No agent...
... OF ITS ESSENTIAL PURPOSE. warrants that replacement parts or components do not allow limitations on post-warranty parts and services. For products purchased from Nautilus, Inc. may be used in accordance with any Nautilus instructions. • Perform diagnostic procedures with replacements or repairs to contact your local distributor or dealer for authentic, original, legitimate machines manufactured by Nautilus, Inc. No agent...


