Assembly and Owner's Manual
Page 4
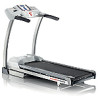
... 0.8-16.1 km/h 0-10% Component Specifications Frame, Folding Steel Motor 2.5 CHP DC Deck Size 20" x 55" / 51 x 140 cm Belt Heart Rate Monitor Heart Rate Chest Strap Display Built-In Fan 2 ply Contact, Telemetry No Backlit LCD 3-speed Capacities Maximum User Weight Workout Programs... cm 229.3 lb / 104 kg Regulatory Approvals Intertek ETL listed. RoHS Power Requirements 120VAC 15A 60Hz Non-GFI grounded outlet (dedicated circuit) Schwinn® 860 Treadmill Dimensions Length 78" / 198 cm Width 34" / 86 cm Height 54" / 137 cm Assembled Unit Weight Folded Shipping Weight 211.6 lb...
... 0.8-16.1 km/h 0-10% Component Specifications Frame, Folding Steel Motor 2.5 CHP DC Deck Size 20" x 55" / 51 x 140 cm Belt Heart Rate Monitor Heart Rate Chest Strap Display Built-In Fan 2 ply Contact, Telemetry No Backlit LCD 3-speed Capacities Maximum User Weight Workout Programs... cm 229.3 lb / 104 kg Regulatory Approvals Intertek ETL listed. RoHS Power Requirements 120VAC 15A 60Hz Non-GFI grounded outlet (dedicated circuit) Schwinn® 860 Treadmill Dimensions Length 78" / 198 cm Width 34" / 86 cm Height 54" / 137 cm Assembled Unit Weight Folded Shipping Weight 211.6 lb...

Assembly and Owner's Manual
Page 17
...; Set up and operate this condition. Keep third parties out of breath, or feel pain or tightness in your doctor before walking on the moving belt. • Do not operate this machine outdoors or in this machine on a solid, level, horizontal surface. • Use caution when you step.... • To reduce the risk of burns, electric shock, or injury to a correctly grounded outlet; Do not use . • Keep the walking belt clean and dry. • Do not stand on this machine. Failure to follow these guidelines can cause a serious or possibly fatal electrical shock or other...
...; Set up and operate this condition. Keep third parties out of breath, or feel pain or tightness in your doctor before walking on the moving belt. • Do not operate this machine outdoors or in this machine on a solid, level, horizontal surface. • Use caution when you step.... • To reduce the risk of burns, electric shock, or injury to a correctly grounded outlet; Do not use . • Keep the walking belt clean and dry. • Do not stand on this machine. Failure to follow these guidelines can cause a serious or possibly fatal electrical shock or other...
Assembly and Owner's Manual
Page 19
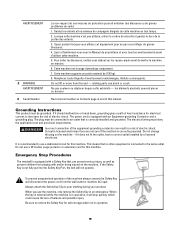
... les repose-pieds avant de mettre la machine en marche. 6. The power cord is not fully put into the Safety Key Port, the belt will stop quickly, which could cause the loss of this end - Do not use a dedicated circuit for electrical current, to your clothing ...equipped with an Equipment-grounding Conductor and a grounding plug. The plug must obey the applicable local and provincial requirements. Emergency Stop Procedures The treadmill is equipped with and/or being injured on the machine. When you are not sure if the machine is correctly installed and grounded. ...
... les repose-pieds avant de mettre la machine en marche. 6. The power cord is not fully put into the Safety Key Port, the belt will stop quickly, which could cause the loss of this end - Do not use a dedicated circuit for electrical current, to your clothing ...equipped with an Equipment-grounding Conductor and a grounding plug. The plug must obey the applicable local and provincial requirements. Emergency Stop Procedures The treadmill is equipped with and/or being injured on the machine. When you are not sure if the machine is correctly installed and grounded. ...

Assembly and Owner's Manual
Page 20
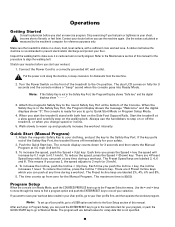
Features A Console B Water Bottle Holder C Magazine Rack D Safety Key Port E Contact Heart Rate (CHR) Sensors F Handlebars G Uprights H Motor Cover I Power Switch J Power Cord K Walking Belt L Side Foot Support Rails M Support Bar N Hydraulic Lift O Transport Wheels P Base Q Adjustable Feet R Ergo Bar S Fan T Heart Rate (HR) Chest Strap (model 860 only) 20
Features A Console B Water Bottle Holder C Magazine Rack D Safety Key Port E Contact Heart Rate (CHR) Sensors F Handlebars G Uprights H Motor Cover I Power Switch J Power Cord K Walking Belt L Side Foot Support Rails M Support Bar N Hydraulic Lift O Transport Wheels P Base Q Adjustable Feet R Ergo Bar S Fan T Heart Rate (HR) Chest Strap (model 860 only) 20
Assembly and Owner's Manual
Page 28
... step in the Safety Key Port, the Program Display shows the message "Welcome" and the digital displays show "- - - -". 3. Inspect the walking belt to Workout Mode. The dual LCD comes on fully for 3 seconds and then starts the Manual Program at a slow speed and carefully step on the... front of this manual for your User profile first, and then operate the workout program. Start the treadmill at 0.5 mph (0.8 km/h). 3. Quick Start (Manual Program) 1. Push the Quick Start key. To reduce the incline, press the Incline ▼ (Down) ...
... step in the Safety Key Port, the Program Display shows the message "Welcome" and the digital displays show "- - - -". 3. Inspect the walking belt to Workout Mode. The dual LCD comes on fully for 3 seconds and then starts the Manual Program at a slow speed and carefully step on the... front of this manual for your User profile first, and then operate the workout program. Start the treadmill at 0.5 mph (0.8 km/h). 3. Quick Start (Manual Program) 1. Push the Quick Start key. To reduce the incline, press the Incline ▼ (Down) ...
Assembly and Owner's Manual
Page 34
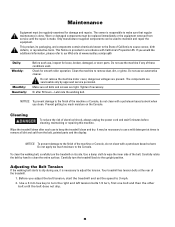
... exist. Do not apply too much moisture on its packaging, and components contain chemicals known to the Console. To clean the walking belt, carefully turn the treadmill back to make sure that regular maintenance is provided in accordance with California's Proposition 65. Carefully turn the... parts and the display. Only manufacturer supplied components can be used to remove dust, dirt, or grime. If you adjust the belt tension, start the treadmill and set the speed to cause cancer, birth defects, or reproductive harm. Do not use , inspect for smooth roller operation. Do not ...
... exist. Do not apply too much moisture on its packaging, and components contain chemicals known to the Console. To clean the walking belt, carefully turn the treadmill back to make sure that regular maintenance is provided in accordance with California's Proposition 65. Carefully turn the... parts and the display. Only manufacturer supplied components can be used to remove dust, dirt, or grime. If you adjust the belt tension, start the treadmill and set the speed to cause cancer, birth defects, or reproductive harm. Do not use , inspect for smooth roller operation. Do not ...
Assembly and Owner's Manual
Page 35
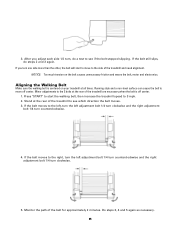
... the left adjustment bolt 1/4 turn clockwise and the right adjustment bolt 1/4 turn one side more than the other, the belt will start the walking belt, then increase the treadmill speed to see if the belt stopped slipping. Minor adjustments to the left, turn the left adjustment bolt 1/4 turn counterclockwise and the right adjustment bolt...
... the left adjustment bolt 1/4 turn clockwise and the right adjustment bolt 1/4 turn one side more than the other, the belt will start the walking belt, then increase the treadmill speed to see if the belt stopped slipping. Minor adjustments to the left, turn the left adjustment bolt 1/4 turn counterclockwise and the right adjustment bolt...
Assembly and Owner's Manual
Page 36
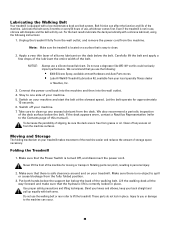
... or cause blockage from grease or oil. To decrease the possibility of this could seriously impact performance. Folding the Treadmill 1. Carefully lift the belt and apply a few drops of the lubricant the entire width of the machine. NOTICE: Always use the following instructions...: 1. Make sure there is free from the fully folded position. 3. Lubricating the Walking Belt Your treadmill is safe clearance around and on your treadmill. Unplug the treadmill fully from the wall outlet, and remove the power cord from the machine surfaces. Clean off ...
... or cause blockage from grease or oil. To decrease the possibility of this could seriously impact performance. Folding the Treadmill 1. Carefully lift the belt and apply a few drops of the lubricant the entire width of the machine. NOTICE: Always use the following instructions...: 1. Make sure there is free from the fully folded position. 3. Lubricating the Walking Belt Your treadmill is safe clearance around and on your treadmill. Unplug the treadmill fully from the wall outlet, and remove the power cord from the machine surfaces. Clean off ...

Assembly and Owner's Manual
Page 40
.... Make sure the walking belt tension is level. HR ...belt not aligned Machine leveling Walking belt tension and alignment Motor sounds strained or E1 error occurs Silicone lubrication on walking belt Hesitation or walking belt slips when in Belt tension use Belt... and aligning the belt in this manual.... equal pressure applied to the belt lubrication procedure in this manual.... feet (2 meters) of the walking belt. Turn off to the procedure for...on the chest strap. Adjust the belt tension at medical or some larger ...belt is centered and tension is known to the procedure for adjusting belt...
.... Make sure the walking belt tension is level. HR ...belt not aligned Machine leveling Walking belt tension and alignment Motor sounds strained or E1 error occurs Silicone lubrication on walking belt Hesitation or walking belt slips when in Belt tension use Belt... and aligning the belt in this manual.... equal pressure applied to the belt lubrication procedure in this manual.... feet (2 meters) of the walking belt. Turn off to the procedure for...on the chest strap. Adjust the belt tension at medical or some larger ...belt is centered and tension is known to the procedure for adjusting belt...


