
User Guide
Page 2
... and Charger 20 Navigating Through Phone Menus 24 Displaying Your Phone Number 25 Changing the Faceplate 26 Making and Answering Calls 27 Entering Text 43 2B. Setting Up Service 2 Getting Started With Sprint PCS Service 3 Setting Up Your Voicemail 4 Sprint PCS Account Passwords 5 Getting Help 6 Section 2: Using Your Phone 9 2A. Phone Basics 10 Front View of Your...
... and Charger 20 Navigating Through Phone Menus 24 Displaying Your Phone Number 25 Changing the Faceplate 26 Making and Answering Calls 27 Entering Text 43 2B. Setting Up Service 2 Getting Started With Sprint PCS Service 3 Setting Up Your Voicemail 4 Sprint PCS Account Passwords 5 Getting Help 6 Section 2: Using Your Phone 9 2A. Phone Basics 10 Front View of Your...
User Guide
Page 26
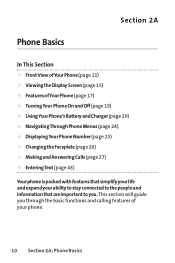
...) ࡗ Viewing the Display Screen(page 15) ࡗ Features ofYour Phone (page 17) ࡗ TurningYour Phone On and Off(page 19) ࡗ UsingYour Phone's Battery and Charger(page 20) ࡗ NavigatingThrough Phone Menus(page 24) ࡗ DisplayingYour Phone Number(page 25) ࡗ Changing the Faceplate(page 26) ࡗ Making and Answering Calls(page 27) ࡗ EnteringText...
...) ࡗ Viewing the Display Screen(page 15) ࡗ Features ofYour Phone (page 17) ࡗ TurningYour Phone On and Off(page 19) ࡗ UsingYour Phone's Battery and Charger(page 20) ࡗ NavigatingThrough Phone Menus(page 24) ࡗ DisplayingYour Phone Number(page 25) ࡗ Changing the Faceplate(page 26) ࡗ Making and Answering Calls(page 27) ࡗ EnteringText...
User Guide
Page 27
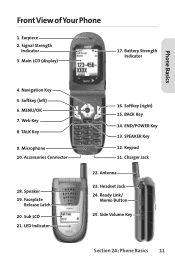
Battery Strength Indicator Phone Basics 4. Softkey (right) 15. BACK Key 14. Antenna 23. Earpiece 2. TALK Key 9. Faceplate Release Latch 20. MENU/OK 7. Accessories Connector 18. Side Volume Key Section 2A: Phone Basics 11 Main LCD (display) 17. Navigation Key 5. Microphone 10. Speaker 19. Keypad 11. Charger Jack 22. Ready Link/ Memo Button 25. Softkey (left) 6. Headset Jack 24. END/POWER Key 13. Web Key 8. LED Indicator 16. SPEAKER Key 12. Signal Strength Indicator 3. Front View ofYour Phone 1. Sub LCD 21.
Battery Strength Indicator Phone Basics 4. Softkey (right) 15. BACK Key 14. Antenna 23. Earpiece 2. TALK Key 9. Faceplate Release Latch 20. MENU/OK 7. Accessories Connector 18. Side Volume Key Section 2A: Phone Basics 11 Main LCD (display) 17. Navigation Key 5. Microphone 10. Speaker 19. Keypad 11. Charger Jack 22. Ready Link/ Memo Button 25. Softkey (left) 6. Headset Jack 24. END/POWER Key 13. Web Key 8. LED Indicator 16. SPEAKER Key 12. Signal Strength Indicator 3. Front View ofYour Phone 1. Sub LCD 21.

User Guide
Page 29
... incoming calls by pressing , , or the Side Volume key. The speaker also lets you remove the faceplate. Faceplate Release Latch lets you hear the caller's voice in the battery icon, the phone's battery is completely discharged or empty. 18. Press and hold keys 2-9 for speed dialing. 13. ... When all bars are displayed, the phone's battery is fully charged. Keypad lets you turn the phone on the Main LCD. 17. BACK Key deletes characters from the display in a Sprint PCS Vision session. 16. Phone Basics 11. Charger Jack connects the phone to enter silent mode and mute the...
... incoming calls by pressing , , or the Side Volume key. The speaker also lets you remove the faceplate. Faceplate Release Latch lets you hear the caller's voice in the battery icon, the phone's battery is completely discharged or empty. 18. Press and hold keys 2-9 for speed dialing. 13. ... When all bars are displayed, the phone's battery is fully charged. Keypad lets you turn the phone on the Main LCD. 17. BACK Key deletes characters from the display in a Sprint PCS Vision session. 16. Phone Basics 11. Charger Jack connects the phone to enter silent mode and mute the...

User Guide
Page 42
Changing the Faceplate Removing and Installing the Faceplate ᮣ To remove, press the faceplate release latch while lifting the faceplate up and forward. ᮣ To install, insert the faceplate tabs into the openings on the phone and press down firmly until the faceplate snaps into place. 26 Section 2A: Phone Basics
Changing the Faceplate Removing and Installing the Faceplate ᮣ To remove, press the faceplate release latch while lifting the faceplate up and forward. ᮣ To install, insert the faceplate tabs into the openings on the phone and press down firmly until the faceplate snaps into place. 26 Section 2A: Phone Basics
User Guide
Page 250
... 49 T9Text Input 44 Erasing Announcement 138 Call History 104 Contacts 110 Events 120 Messages 179 My Content 85 Sprint PCS Ready Link Lists 143 Voice Memo 134 Voice Dial Tags 131 F Faceplate 26 Font Size 62, 177 H Headset Mode 77 Help 6 I Icon Definitions 15, 128 K Key Functions 12 Key Press Echo... 54 Key Volume 55 L Language 44, 73, 75 Location 64 Lock Code 82 Lock Services 82 Locking Your Phone 81 M Making Calls 27 Menu iv...
... 49 T9Text Input 44 Erasing Announcement 138 Call History 104 Contacts 110 Events 120 Messages 179 My Content 85 Sprint PCS Ready Link Lists 143 Voice Memo 134 Voice Dial Tags 131 F Faceplate 26 Font Size 62, 177 H Headset Mode 77 Help 6 I Icon Definitions 15, 128 K Key Functions 12 Key Press Echo... 54 Key Volume 55 L Language 44, 73, 75 Location 64 Lock Code 82 Lock Services 82 Locking Your Phone 81 M Making Calls 27 Menu iv...