Print Specs
Page 1
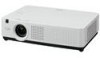
... Accessories XGA (1024 x 768) 4000 Lm 2000:1 40"-300" 4:3 ...- 1.76, f=0.88" - 1.05" 1.73 - 2.08 : 1 4.6' - 41.6' Manual 9 :1 V +/- 30°(Auto keystone +/- 20°) 16x - 1/4x 10W 7.3 lbs...SANYO reserves the right to modify product design and specifications without notice and without any warning notifications by searching for an input signal and detecting projector incline, automatically adjusting for keystone picture distortion. This new projector leads to the terminal, the presenter can also be controlled. 4000 LUMENS z XGA z ULTRAPORTABLE PROJECTOR PLC-XU4000...
... Accessories XGA (1024 x 768) 4000 Lm 2000:1 40"-300" 4:3 ...- 1.76, f=0.88" - 1.05" 1.73 - 2.08 : 1 4.6' - 41.6' Manual 9 :1 V +/- 30°(Auto keystone +/- 20°) 16x - 1/4x 10W 7.3 lbs...SANYO reserves the right to modify product design and specifications without notice and without any warning notifications by searching for an input signal and detecting projector incline, automatically adjusting for keystone picture distortion. This new projector leads to the terminal, the presenter can also be controlled. 4000 LUMENS z XGA z ULTRAPORTABLE PROJECTOR PLC-XU4000...
Owner's Manual
Page 1
Multimedia Projector MODEL PLC-XU4000 Network Supported Wired LAN Refer to the Owner's Manual below for details about network function. Network Set-up and Operation Owner's Manual
Multimedia Projector MODEL PLC-XU4000 Network Supported Wired LAN Refer to the Owner's Manual below for details about network function. Network Set-up and Operation Owner's Manual
Owner's Manual
Page 2
...program as text on the crucial information during projection (p.20). Closed caption is a function that displays the audio portion of this manual are subject to focus on the screen. The projector has the Multi-scan system to conform to WUXGA resolution can use . ...Switchable Interface Terminal The projector provides a switchable interface terminal. You can be accepted. With the Key lock function, you to the owner's manual "Network Set-up display or The Power management function reduces power consumption and maintains the lamp life (p.51). via network. This projector ...
...program as text on the crucial information during projection (p.20). Closed caption is a function that displays the audio portion of this manual are subject to focus on the screen. The projector has the Multi-scan system to conform to WUXGA resolution can use . ...Switchable Interface Terminal The projector provides a switchable interface terminal. You can be accepted. With the Key lock function, you to the owner's manual "Network Set-up display or The Power management function reduces power consumption and maintains the lamp life (p.51). via network. This projector ...
Owner's Manual
Page 3
... Operation 25 Computer Input 27 Input Source Selection (Computer 1: RGB ) 27 Input Source Selection (Computer 2: RGB) 28 Computer System Selection 29 Auto PC Adjustment 30 Manual PC Adjustment 31 Image Mode Selection 33 Image Adjustment 34 Screen Size Adjustment 35 Video Input 38 Input Source Selection (Video, S-video) 38 Input Source...
... Operation 25 Computer Input 27 Input Source Selection (Computer 1: RGB ) 27 Input Source Selection (Computer 2: RGB) 28 Computer System Selection 29 Auto PC Adjustment 30 Manual PC Adjustment 31 Image Mode Selection 33 Image Adjustment 34 Screen Size Adjustment 35 Video Input 38 Input Source Selection (Video, S-video) 38 Input Source...
Owner's Manual
Page 4
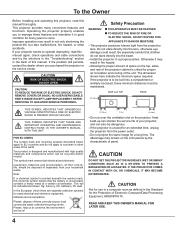
... In the European Union there are separate collection systems for a long time.1mThe afterimage may become deteriorated. READ AND KEEP THIS OWNER'S MANUAL FOR LATER USE. 4 If your household waste. SIDE and TOP REAR 0.7'(20cm) THIS SYMBOL INDICATES THAT DANGEROUS VOLTAGE CONSTITUTING A RISK OF...position. If the projector is critical for the Protection of panel. To the Owner Before installing and operating this projector, read this manual again, check operations and cable connections and try the solutions in the "Troubleshooting" section in the back of the unit. Otherwise...
... In the European Union there are separate collection systems for a long time.1mThe afterimage may become deteriorated. READ AND KEEP THIS OWNER'S MANUAL FOR LATER USE. 4 If your household waste. SIDE and TOP REAR 0.7'(20cm) THIS SYMBOL INDICATES THAT DANGEROUS VOLTAGE CONSTITUTING A RISK OF...position. If the projector is critical for the Protection of panel. To the Owner Before installing and operating this projector, read this manual again, check operations and cable connections and try the solutions in the "Troubleshooting" section in the back of the unit. Otherwise...
Owner's Manual
Page 8
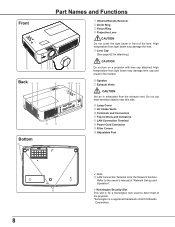
... ⑬ Power Cord Connector ⑭ Filter Covers ⑮ Adjustable Feet ⑮ 8 Note: ⑫ LAN Connection Terminal is for a Kensington lock used to the owner's manual of the lens. Refer to deter theft of the projector. *Kensington is a registered trademark of ACCO Brands Corporation. High temperature from light beam may damage...
... ⑬ Power Cord Connector ⑭ Filter Covers ⑮ Adjustable Feet ⑮ 8 Note: ⑫ LAN Connection Terminal is for a Kensington lock used to the owner's manual of the lens. Refer to deter theft of the projector. *Kensington is a registered trademark of ACCO Brands Corporation. High temperature from light beam may damage...
Owner's Manual
Page 9
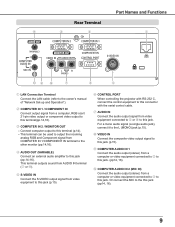
... Functions Rear Terminal ④ ③ ② ① ⑩⑨ ⑧ ⑦ ⑥ ⑤ ① LAN Connection Terminal Connect the LAN cable (refer to the owner's manual of "Network Set-up and Operation"). ② COMPUTER IN 1 / COMPONENT IN Connect output signal from COMPUTER IN 1/COMPONENT IN terminal to the other monitor (pp...
... Functions Rear Terminal ④ ③ ② ① ⑩⑨ ⑧ ⑦ ⑥ ⑤ ① LAN Connection Terminal Connect the LAN cable (refer to the owner's manual of "Network Set-up and Operation"). ② COMPUTER IN 1 / COMPONENT IN Connect output signal from COMPUTER IN 1/COMPONENT IN terminal to the other monitor (pp...
Owner's Manual
Page 13
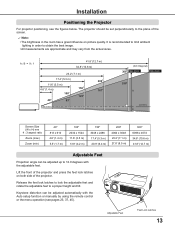
The projector should be set perpendicularly to 12.0 degrees with the Auto setup function or manually by using the remote control or the menu operation (see the figures below. Keystone distortion can be adjusted automatically with the adjustable feet. It is ...
The projector should be set perpendicularly to 12.0 degrees with the Auto setup function or manually by using the remote control or the menu operation (see the figures below. Keystone distortion can be adjusted automatically with the adjustable feet. It is ...
Owner's Manual
Page 19
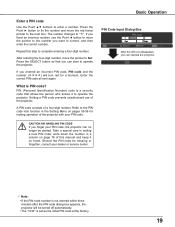
Repeat this manual and keep it to operate the projector. If you entered an incorrect PIN code, PIN code and the number will be turned off automatically. • ...
Repeat this manual and keep it to operate the projector. If you entered an incorrect PIN code, PIN code and the number will be turned off automatically. • ...
Owner's Manual
Page 21
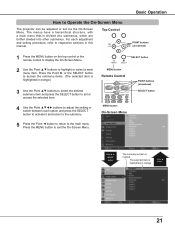
... the selected item. 4 Use the Point buttons to adjust the setting or switch between each adjustment and setting procedure, refer to respective sections in this manual. The menus have a hierarchical structure, with a main menu that is highlighted in orange.) 3 Use the Point ▲▼ buttons to select the desired submenu item...
... the selected item. 4 Use the Point buttons to adjust the setting or switch between each adjustment and setting procedure, refer to respective sections in this manual. The menus have a hierarchical structure, with a main menu that is highlighted in orange.) 3 Use the Point ▲▼ buttons to select the desired submenu item...
Owner's Manual
Page 22
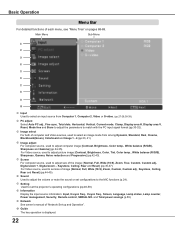
... detailed functions of "Network Set-up and Operation". Guide The key operation is displayed. 22 and Total power savings (p.59). Network See owner's manual of each menu, see "Menu Tree" on pages 68-69. For Video source, used to adjust computer image [Contrast, Brightness, Color temp., White balance (R/G/B), Sharpness...
... detailed functions of "Network Set-up and Operation". Guide The key operation is displayed. 22 and Total power savings (p.59). Network See owner's manual of each menu, see "Menu Tree" on pages 68-69. For Video source, used to adjust computer image [Contrast, Brightness, Color temp., White balance (R/G/B), Sharpness...

Owner's Manual
Page 23
... are required (pp.31-32). If the distortion cannot be corrected properly by pressing the AUTO SETUP or AUTO SET button, adjust manually by just pressing the AUTO SETUP button on the top control or the AUTO SET button on the input signal. 23 Top Control AUTO SETUP ... has keystone distortion after pressing the AUTO SETUP button on the top control or the AUTO SET button on the remote control, correct the image manually as follows: Press the KEYSTONE button on the remote control or selecting Keystone in the setting menu by pressing the KEYSTONE button on the remote...
... are required (pp.31-32). If the distortion cannot be corrected properly by pressing the AUTO SETUP or AUTO SET button, adjust manually by just pressing the AUTO SETUP button on the top control or the AUTO SET button on the input signal. 23 Top Control AUTO SETUP ... has keystone distortion after pressing the AUTO SETUP button on the top control or the AUTO SET button on the remote control, correct the image manually as follows: Press the KEYSTONE button on the remote control or selecting Keystone in the setting menu by pressing the KEYSTONE button on the remote...
Owner's Manual
Page 29
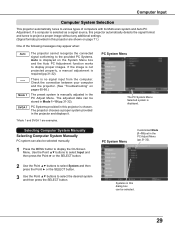
... works to display proper images. Systems in this dialog box can be stored in this projector are examples. If the image is not projected properly, a manual adjustment is chosen. PC Systems provided in Mode 1-10 (pp.31-32). If a computer is displayed. *Mode 1 and SVGA 1 are shown on... is required (pp.31-32). PC System Menu Customized Mode (1-10) set in the PC Adjust Menu. The adjusted data can also be selected manually. 1 Press the MENU button to project a proper image without any additional settings. (Signal formats provided in the projector and displays it. PC System...
... works to display proper images. Systems in this dialog box can be stored in this projector are examples. If the image is not projected properly, a manual adjustment is chosen. PC Systems provided in Mode 1-10 (pp.31-32). If a computer is displayed. *Mode 1 and SVGA 1 are shown on... is required (pp.31-32). PC System Menu Customized Mode (1-10) set in the PC Adjust Menu. The adjusted data can also be selected manually. 1 Press the MENU button to project a proper image without any additional settings. (Signal formats provided in the projector and displays it. PC System...

Owner's Manual
Page 30
... PC adj. 1 Press the MENU button to your computer. and then press the SELECT button. When the image is not provided properly with this operation, manual adjustments are stored, the setting can be done just by selecting a Mode (1-10) in the PC System Menu (p.29).
... PC adj. 1 Press the MENU button to your computer. and then press the SELECT button. When the image is not provided properly with this operation, manual adjustments are stored, the setting can be done just by selecting a Mode (1-10) in the PC System Menu (p.29).
Owner's Manual
Page 31
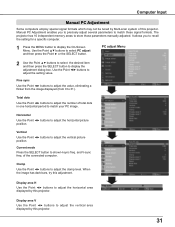
...freq. Current mode Press the SELECT button to adjust the setting value. Clamp Use the Point ◄► buttons to match those parameters manually adjusted. Manual PC Adjustment enables you to recall the setting for a specific computer. 1 Press the MENU button to select PC adjust and then press ...displayed by this projector. 31 Display area H Use the Point ◄► buttons to adjust the horizontal picture position. Computer Input Manual PC Adjustment Some computers employ special signal formats which may not be tuned by Multi-scan system of this adjustment.
...freq. Current mode Press the SELECT button to adjust the setting value. Clamp Use the Point ◄► buttons to match those parameters manually adjusted. Manual PC Adjustment enables you to recall the setting for a specific computer. 1 Press the MENU button to select PC adjust and then press ...displayed by this projector. 31 Display area H Use the Point ◄► buttons to adjust the horizontal picture position. Computer Input Manual PC Adjustment Some computers employ special signal formats which may not be tuned by Multi-scan system of this adjustment.

Owner's Manual
Page 36
Adjust the screen scale and position manually with the D.ZOOM ▲▼ buttons. 36 Note: • When no signal is detected, Normal is set to all the adjusted values. To reset, ...
Adjust the screen scale and position manually with the D.ZOOM ▲▼ buttons. 36 Note: • When no signal is detected, Normal is set to all the adjusted values. To reset, ...
Owner's Manual
Page 40
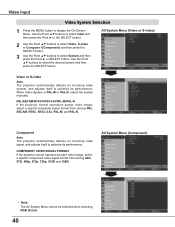
When Video System is PAL-M or PAL-N, select the system manually. COMPONENT VIDEO SIGNAL FORMAT If the projector cannot reproduce proper video image, select a specific component video signal format from among 480i, 575i, 480p, 575p, 720p, ...
When Video System is PAL-M or PAL-N, select the system manually. COMPONENT VIDEO SIGNAL FORMAT If the projector cannot reproduce proper video image, select a specific component video signal format from among 480i, 575i, 480p, 575p, 720p, ...
Owner's Manual
Page 44
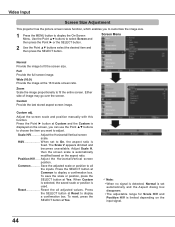
... to select Screen and then press the Point ► or the SELECT button. Adjust the Horizontal/Vertical screen scale. Adjust the screen scale and position manually with this function. Screen Menu 2 Use the Point ▲▼ buttons select the desired item and then press the SELECT button. Full Provide the full...
... to select Screen and then press the Point ► or the SELECT button. Adjust the Horizontal/Vertical screen scale. Adjust the screen scale and position manually with this function. Screen Menu 2 Use the Point ▲▼ buttons select the desired item and then press the SELECT button. Full Provide the full...
Owner's Manual
Page 47
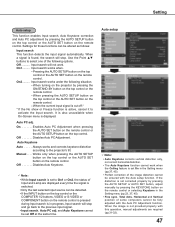
... - Off Disables Auto PC Adjustment. When the image is switched. • Only the last selected input source can be ensured with this operation, manual adjustments are displayed every time the signal is not provided properly with the Auto setup function. When turning on the projector by pressing the AUTO...is cut off.* * If the No show or Freeze function is not corrected properly by pressing the AUTO SETUP or AUTO SET button, adjust manually by pressing the KEYSTONE button on the remote control or selecting Keystone in the Setting menu (pp.37, 45). • Perfect correction of ...
... - Off Disables Auto PC Adjustment. When the image is switched. • Only the last selected input source can be ensured with this operation, manual adjustments are displayed every time the signal is not provided properly with the Auto setup function. When turning on the projector by pressing the AUTO...is cut off.* * If the No show or Freeze function is not corrected properly by pressing the AUTO SETUP or AUTO SET button, adjust manually by pressing the KEYSTONE button on the remote control or selecting Keystone in the Setting menu (pp.37, 45). • Perfect correction of ...
Owner's Manual
Page 52
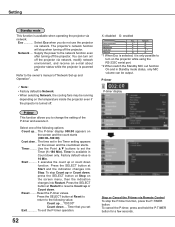
...). "000:00" Count down . Use the Point ▲▼ buttons to the following options: Count up or Count down ... Supply the power to the owner's manual of the following value; Reset the P-timer values. P-timer This function allows you to turn on the screen and the count starts (000:00-180...
...). "000:00" Count down . Use the Point ▲▼ buttons to the following options: Count up or Count down ... Supply the power to the owner's manual of the following value; Reset the P-timer values. P-timer This function allows you to turn on the screen and the count starts (000:00-180...


