

Owners Manual
Page 2
... them to minimize the risk of 16.77 million colors, and matrix liquid crystal display (LCD) technology. ◆ Large Screen in Limited Space - Make sure not to lose the remote control. ✔Note: • The On-Screen Menu and figures in this manual are subject... You can user the terminal as a projection screen. (pp. 31, 38) ✳ The board color is limited to focus on or operate the projector ONLY via the remote control. English, German, French, Italian, Spanish, Portuguese, Dutch, Swedish, Finnish, Polish, Hungarian, Romanian, Russian, Chinese, Korean, or Japanese. (p. 42)...
... them to minimize the risk of 16.77 million colors, and matrix liquid crystal display (LCD) technology. ◆ Large Screen in Limited Space - Make sure not to lose the remote control. ✔Note: • The On-Screen Menu and figures in this manual are subject... You can user the terminal as a projection screen. (pp. 31, 38) ✳ The board color is limited to focus on or operate the projector ONLY via the remote control. English, German, French, Italian, Spanish, Portuguese, Dutch, Swedish, Finnish, Polish, Hungarian, Romanian, Russian, Chinese, Korean, or Japanese. (p. 42)...

Owners Manual
Page 3
... Features and Design 2 Table of Contents 3 To the Owner 4 Safety Instructions 5 Air Circulation 6 Installing the Projector in Proper Position 6 Moving the Projector 6 Compliance 7 Part Names and Functions 8 Front 8 Back 8 Bottom 8 Rear Terminal 9 Top Control 10 Antitheft Alarm Setting Buttons 11 Remote Control 12 Remote Control Battery Installation 13 Operating Range 13 Installation 14 Positioning the...
... Features and Design 2 Table of Contents 3 To the Owner 4 Safety Instructions 5 Air Circulation 6 Installing the Projector in Proper Position 6 Moving the Projector 6 Compliance 7 Part Names and Functions 8 Front 8 Back 8 Bottom 8 Rear Terminal 9 Top Control 10 Antitheft Alarm Setting Buttons 11 Remote Control 12 Remote Control Battery Installation 13 Operating Range 13 Installation 14 Positioning the...

Owners Manual
Page 5
...warnings and instructions marked on a bed, sofa, rug, or other controls may touch dangerous voltage points or short out parts that have the same characteristics as the original part. b. If the projector has been dropped or the cabinet has been damaged. Do not allow ...Do not place this can result in safe operating condition. If liquid has been spilled into this projector through cabinet slots as this projector on the projector. Adjust only those controls that the projector is operated. Wanneer deze leeg zijn, moet u ze niet weggooien maar inleveren als KCA. 5...
...warnings and instructions marked on a bed, sofa, rug, or other controls may touch dangerous voltage points or short out parts that have the same characteristics as the original part. b. If the projector has been dropped or the cabinet has been damaged. Do not allow ...Do not place this can result in safe operating condition. If liquid has been spilled into this projector through cabinet slots as this projector on the projector. Adjust only those controls that the projector is operated. Wanneer deze leeg zijn, moet u ze niet weggooien maar inleveren als KCA. 5...
Owners Manual
Page 9
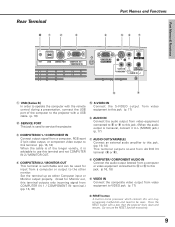
...pin video output, or component video output to this terminal. (pp. 16, 18) When the cable is of the computer to the projector with a pen, then the projector shuts down and restarts. e COMPUTER IN 1 / COMPONENT IN Connect output signal from AUDIO IN terminal (y or i). Part Names & Functions... AUDIO OUT VIDEO IN L (MONO) COMPUTER / COMPONENT S-VIDEO IN AUDIO IN o i q USB (Series B) In order to operate the computer with the remote control during a presentation, connect the USB port of the longer variety, it is monaural, connect it to L (MONO) jack.) (p. 17) u AUDIO OUT(VARIABLE) ...
...pin video output, or component video output to this terminal. (pp. 16, 18) When the cable is of the computer to the projector with a pen, then the projector shuts down and restarts. e COMPUTER IN 1 / COMPONENT IN Connect output signal from AUDIO IN terminal (y or i). Part Names & Functions... AUDIO OUT VIDEO IN L (MONO) COMPUTER / COMPONENT S-VIDEO IN AUDIO IN o i q USB (Series B) In order to operate the computer with the remote control during a presentation, connect the USB port of the longer variety, it is monaural, connect it to L (MONO) jack.) (p. 17) u AUDIO OUT(VARIABLE) ...
Owners Manual
Page 10
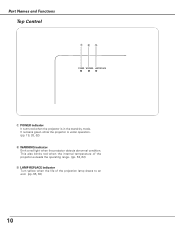
It remains green while the projector is in the stand-by mode. Part Names and Functions Top Control q we POWER WARNING LAMP REPLACE q POWER indicator It turns red when the projector is under operation. (pp. 19, 20, 62) w WARNING indicator Emit a red light when the projector detects abnormal condition. This also blinks red when the internal temperature of the projector exceeds the operating range. (pp. 53, 62) e LAMP REPLACE indicator Turn yellow when the life of the projection lamp draws to an end. (pp. 56, 62) 10
It remains green while the projector is in the stand-by mode. Part Names and Functions Top Control q we POWER WARNING LAMP REPLACE q POWER indicator It turns red when the projector is under operation. (pp. 19, 20, 62) w WARNING indicator Emit a red light when the projector detects abnormal condition. This also blinks red when the internal temperature of the projector exceeds the operating range. (pp. 53, 62) e LAMP REPLACE indicator Turn yellow when the life of the projection lamp draws to an end. (pp. 56, 62) 10
Owners Manual
Page 12
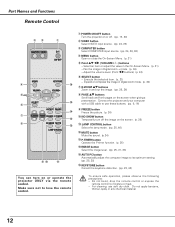
...and forth pages on the screen when giving a y !5 presentation. Part Names and Functions Remote Control ew q q POWER ON-OFF button Turn the projector on or off the image on the screen. (p. 25) i !2 !1 LAMP CONTROL button Select the lamp mode. (pp. 25, 46) !2 MUTE button Mute the sound.... expose the remote control to lose the remote control. For cleaning, use these buttons. (pp. 9, 16) o FREEZE button !4 Freeze the picture. (p. 24) u !0 NO SHOW button !3 Temporarily turn on or operate the projector ONLY via the remote control. Make sure not to moisture or heat. -...
...and forth pages on the screen when giving a y !5 presentation. Part Names and Functions Remote Control ew q q POWER ON-OFF button Turn the projector on or off the image on the screen. (p. 25) i !2 !1 LAMP CONTROL button Select the lamp mode. (pp. 25, 46) !2 MUTE button Mute the sound.... expose the remote control to lose the remote control. For cleaning, use these buttons. (pp. 9, 16) o FREEZE button !4 Freeze the picture. (p. 24) u !0 NO SHOW button !3 Temporarily turn on or operate the projector ONLY via the remote control. Make sure not to moisture or heat. -...

Owners Manual
Page 13
...button. Replace the compartment lid. Maximum operating range for the remote control is replaced by an incorrect type. ● Dispose of the projector. 30° 30° 16.4' (5 m) 13 Part Names & Functions Remote Control Battery Installation Part Names and Functions 1 Open the battery compartment ... For correct polarity (+ and -), be sure battery terminals are in contact with water or liquid. ● Do not expose the remote control to the instructions. To insure safe operation, please observe the following precautions: ● Use (2) AA or LR6 type alkaline batteries. ...
...button. Replace the compartment lid. Maximum operating range for the remote control is replaced by an incorrect type. ● Dispose of the projector. 30° 30° 16.4' (5 m) 13 Part Names & Functions Remote Control Battery Installation Part Names and Functions 1 Open the battery compartment ... For correct polarity (+ and -), be sure battery terminals are in contact with water or liquid. ● Do not expose the remote control to the instructions. To insure safe operation, please observe the following precautions: ● Use (2) AA or LR6 type alkaline batteries. ...

Owners Manual
Page 19
... the Point 7 8 buttons and fix the number with a computer, VCR, etc.) before turning on the remote control. If the projector is automatically move the pointer to operate the projector. Enter the PIN code as the initial PIN code at hand. When the four-digit number is fixed, the ...the input source that you fixed an incorrect number, move to operate. Setting PIN code prevents others except the specific users from operating the projector. The preparation display appears on the screen. What is set as instructed below. The number changes to complete entering a four-digit number...
... the Point 7 8 buttons and fix the number with a computer, VCR, etc.) before turning on the remote control. If the projector is automatically move the pointer to operate the projector. Enter the PIN code as the initial PIN code at hand. When the four-digit number is fixed, the ...the input source that you fixed an incorrect number, move to operate. Setting PIN code prevents others except the specific users from operating the projector. The preparation display appears on the screen. What is set as instructed below. The number changes to complete entering a four-digit number...
Owners Manual
Page 20
... YOU TURN THE PROJECTOR ON, WAIT AT LEAST 5 MINUTES BEFORE TURNING IT OFF. The message disappears after 4 seconds. ✔Note: • When the On start function is "On", this time you can select the level of cooling fans is changed according to be turned on the remote control, and "Power ...off the projector and give it a rest about an hour in every 24 hours. • The running . 3 When the projector has cooled down and the projector cannot be turned on the screen. 2 Press the POWER ON-OFF...
... YOU TURN THE PROJECTOR ON, WAIT AT LEAST 5 MINUTES BEFORE TURNING IT OFF. The message disappears after 4 seconds. ✔Note: • When the On start function is "On", this time you can select the level of cooling fans is changed according to be turned on the remote control, and "Power ...off the projector and give it a rest about an hour in every 24 hours. • The running . 3 When the projector has cooled down and the projector cannot be turned on the screen. 2 Press the POWER ON-OFF...
Owners Manual
Page 21
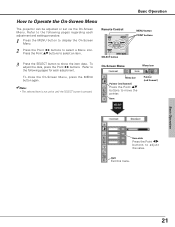
... move the pointer. Menu bar Pointer (red framed ) Press the Point ed buttons to Operate the On-Screen Menu The projector can be adjusted or set via the On-Screen Menu. Remote Control SELECT button MENU button POINT buttons 3 Press the SELECT button to select a Menu icon. Quit Exit this menu. Refer...
... move the pointer. Menu bar Pointer (red framed ) Press the Point ed buttons to Operate the On-Screen Menu The projector can be adjusted or set via the On-Screen Menu. Remote Control SELECT button MENU button POINT buttons 3 Press the SELECT button to select a Menu icon. Quit Exit this menu. Refer...
Owners Manual
Page 28
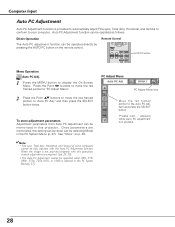
Remote Control AUTO PC button Menu Operation Auto PC Adj. 1 Press the MENU button to your computer. When the image is not provided properly with this projector. "Please wait..." Computer Input Auto PC Adjustment Auto PC Adjustment function is provided to automatically adjust Fine sync, Total dots, ... fully adjusted with this operation, manual adjustments are memorized, the setting can be done just by pressing the AUTO PC button on the remote control. item and press the SELECT button. Press the Point 7 8 buttons to move the red framed pointer to "PC Adjust Menu". 2 ...
Remote Control AUTO PC button Menu Operation Auto PC Adj. 1 Press the MENU button to your computer. When the image is not provided properly with this projector. "Please wait..." Computer Input Auto PC Adjustment Auto PC Adjustment function is provided to automatically adjust Fine sync, Total dots, ... fully adjusted with this operation, manual adjustments are memorized, the setting can be done just by pressing the AUTO PC button on the remote control. item and press the SELECT button. Press the Point 7 8 buttons to move the red framed pointer to "PC Adjust Menu". 2 ...
Owners Manual
Page 31
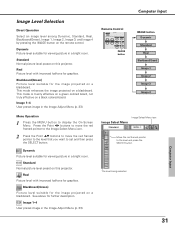
...(Green) Picture level suitable for graphics. This mode is mainly effective on a green colored board, not truly effective on the remote control. Computer Input 31 Image Level Selection Direct Operation Select an image level among Dynamic, Standard, Real, Blackboard(Green), Image 1, Image ...Image 4 by pressing the IMAGE button on a black colored board. Real Picture level with improved halftone for the image projected on this projector. See above for viewing picture in the Image Adjust Menu (p. 33). The level being selected. Standard Normal picture level preset on ...
...(Green) Picture level suitable for graphics. This mode is mainly effective on a green colored board, not truly effective on the remote control. Computer Input 31 Image Level Selection Direct Operation Select an image level among Dynamic, Standard, Real, Blackboard(Green), Image 1, Image ...Image 4 by pressing the IMAGE button on a black colored board. Real Picture level with improved halftone for the image projected on this projector. See above for viewing picture in the Image Adjust Menu (p. 33). The level being selected. Standard Normal picture level preset on ...
Owners Manual
Page 35
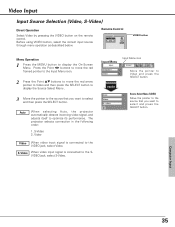
...press the SELECT button. Computer Input 35 S-Video When video input signal is connected to optimize its performance. Auto When selecting Auto, the projector automatically detects incoming video signal, and adjusts itself to the VIDEO jack, select Video. S-Video 2. Video Video When video input signal ...the following order: 1. Video Input Input Source Selection (Video, S-Video) Direct Operation Select Video by pressing the VIDEO button on the remote control. Press the Point 7 8 buttons to move the red framed pointer to the Input Menu icon. 2 Press the Point ed buttons to move...
...press the SELECT button. Computer Input 35 S-Video When video input signal is connected to optimize its performance. Auto When selecting Auto, the projector automatically detects incoming video signal, and adjusts itself to the VIDEO jack, select Video. S-Video 2. Video Video When video input signal ...the following order: 1. Video Input Input Source Selection (Video, S-Video) Direct Operation Select Video by pressing the VIDEO button on the remote control. Press the Point 7 8 buttons to move the red framed pointer to the Input Menu icon. 2 Press the Point ed buttons to move...

Owners Manual
Page 38
...the MENU button to set and then press the SELECT button. Blackboard(Green) Picture level suitable for the image projected on the remote control. Standard Normal picture level preset on a blackboard. Cinema Picture level adjusted for the picture with fine tone. Standard Normal picture level ... a black colored board. The level being selected. This mode is mainly effective on a green colored board, not truly effective on this projector. Cinema Picture level adjusted for the picture with fine tone. See above for viewing picture in a bright room. Image 1~4 User preset ...
...the MENU button to set and then press the SELECT button. Blackboard(Green) Picture level suitable for the image projected on the remote control. Standard Normal picture level preset on a blackboard. Cinema Picture level adjusted for the picture with fine tone. Standard Normal picture level ... a black colored board. The level being selected. This mode is mainly effective on a green colored board, not truly effective on this projector. Cinema Picture level adjusted for the picture with fine tone. See above for viewing picture in a bright room. Image 1~4 User preset ...

Owners Manual
Page 45
..."No signal" appears. When the input signal is interrupted and no button is turned off. Terminal The COMPUTER IN 2/MONITOR OUT terminal on the remote control is not available when selecting Computer 2 to turn off the lamp. Off Power management function is switchable for a certain period. Change the input source to...right reversed. In this condition, the projection lamp is turned on if the input signal is reconnected or any button on the back of the projector is off. Then set time with the Point 7 8 buttons, and go to project the image from a ceiling mounting the...
..."No signal" appears. When the input signal is interrupted and no button is turned off. Terminal The COMPUTER IN 2/MONITOR OUT terminal on the remote control is not available when selecting Computer 2 to turn off the lamp. Off Power management function is switchable for a certain period. Change the input source to...right reversed. In this condition, the projection lamp is turned on if the input signal is reconnected or any button on the back of the projector is off. Then set time with the Point 7 8 buttons, and go to project the image from a ceiling mounting the...
Owners Manual
Page 46
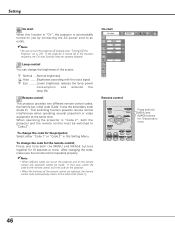
...operate properly. Press and hold MENU and IMAGE buttons for 10 seconds or more . Remote control This projector provides two different remote control codes; To change the brightness of the remote control are set , initial code (Code 1) and the secondary code (Code 2). This switching function...the initial code (Code 1). After changing the code, make sure the remote control operates properly. ✔Note: • When different codes are replaced, the remote control code automatically returns to turn the projector off in "Code 2", both the MENU and IMAGE buttons together for 10 ...
...operate properly. Press and hold MENU and IMAGE buttons for 10 seconds or more . Remote control This projector provides two different remote control codes; To change the brightness of the remote control are set , initial code (Code 1) and the secondary code (Code 2). This switching function...the initial code (Code 1). After changing the code, make sure the remote control operates properly. ✔Note: • When different codes are replaced, the remote control code automatically returns to turn the projector off in "Code 2", both the MENU and IMAGE buttons together for 10 ...

Owners Manual
Page 50
... time". (p. 48) • If you want to turn the alarm function on. Side Control ALARM indicator F button button 1, 2, 3 50 The ALARM indicator blinks for a few seconds and the projector enters the warning mode. When the projector does not detect a vibration for a few seconds after the sound, it again. When the...within about 10 seconds. (The default PIN code is "1111".) When the alarm is always accompanied by a sound. If you need to move the projector. ✔Note: • This function is not a guarantee against stealing. • The alarm does not ring while the AC power cord is ...
... time". (p. 48) • If you want to turn the alarm function on. Side Control ALARM indicator F button button 1, 2, 3 50 The ALARM indicator blinks for a few seconds and the projector enters the warning mode. When the projector does not detect a vibration for a few seconds after the sound, it again. When the...within about 10 seconds. (The default PIN code is "1111".) When the alarm is always accompanied by a sound. If you need to move the projector. ✔Note: • This function is not a guarantee against stealing. • The alarm does not ring while the AC power cord is ...

Owners Manual
Page 53
... down and the WARNING indicator emits a red light. Clean the air filters periodically. (p. 54) The projector is blinking red. Is the projector not installed near the ventilation duct of air-conditioning equipment which protects the projector. Top Control WARNING emit a red light POWER WARNING LAMP REPLACE 53 Maintenance & Cleaning Maintenance and Cleaning Warning Indicator...
... down and the WARNING indicator emits a red light. Clean the air filters periodically. (p. 54) The projector is blinking red. Is the projector not installed near the ventilation duct of air-conditioning equipment which protects the projector. Top Control WARNING emit a red light POWER WARNING LAMP REPLACE 53 Maintenance & Cleaning Maintenance and Cleaning Warning Indicator...
Owners Manual
Page 56
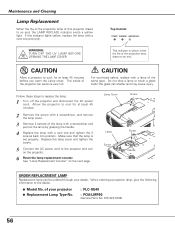
...UV LAMP BEFORE OPENING THE LAMP COVER Top Control POWER WARNING LAMP REPLACE This indicator is set properly. Replace the lamp cover and tighten the screw. 5 Connect the AC power cord to an end. See "Lamp Replacement Counter" on the projector. 6 Reset the lamp replacement counter. When... 45 minutes before you open the Lamp cover. of your dealer. CAUTION Allow a projector to the dealer. ● Model No. The glass can be ordered through your projector ● Replacement Lamp Type No. : PLC-XE40 : POA-LMP90 (Service Parts No. 610 323 0726) 56 Maintenance and Cleaning Lamp...
...UV LAMP BEFORE OPENING THE LAMP COVER Top Control POWER WARNING LAMP REPLACE This indicator is set properly. Replace the lamp cover and tighten the screw. 5 Connect the AC power cord to an end. See "Lamp Replacement Counter" on the projector. 6 Reset the lamp replacement counter. When... 45 minutes before you open the Lamp cover. of your dealer. CAUTION Allow a projector to the dealer. ● Model No. The glass can be ordered through your projector ● Replacement Lamp Type No. : PLC-XE40 : POA-LMP90 (Service Parts No. 610 323 0726) 56 Maintenance and Cleaning Lamp...
Owners Manual
Page 59
... not work. -Check the batteries. -Make sure no obstruction is between the projector and the remote control. -Make sure you purchased the projector or the service center. WARNING : High voltages are used . 59 If problems still persist after Computer 2 is selected. Give the model..., contact the dealer where you are not too far from the projector when using the remote control. Maximum operating range is 16.4' (5m). -Make sure the code of the European Community (EC). Do not attempt to operate this projector. Fans keep running after disconnecting the AC plug. Enter a PIN...
... not work. -Check the batteries. -Make sure no obstruction is between the projector and the remote control. -Make sure you purchased the projector or the service center. WARNING : High voltages are used . 59 If problems still persist after Computer 2 is selected. Give the model..., contact the dealer where you are not too far from the projector when using the remote control. Maximum operating range is 16.4' (5m). -Make sure the code of the European Community (EC). Do not attempt to operate this projector. Fans keep running after disconnecting the AC plug. Enter a PIN...


