

Owners Manual
Page 2
... operated without waiting for the projector to cool down. (p. 20) ◆ Digital Zoom (for Computer) The digital zoom function allows you to project large images from short distance. (p. 14) ◆ Antitheft Alarm Function This projector is equipped with the most advanced technology for security. - Short focus lens allows you to customize the screen logo. The projector cannot be unplugged immediately after turning off the projector without remote control...
... operated without waiting for the projector to cool down. (p. 20) ◆ Digital Zoom (for Computer) The digital zoom function allows you to project large images from short distance. (p. 14) ◆ Antitheft Alarm Function This projector is equipped with the most advanced technology for security. - Short focus lens allows you to customize the screen logo. The projector cannot be unplugged immediately after turning off the projector without remote control...

Owners Manual
Page 3
...Power Cord 15 Connecting to a Computer 16 Connecting to Video Equipment 17 Connecting to Component Video Equipment 18 Basic Operation 19 Turning On the Projector 19 Turning Off the Projector 20 How to Operate the On-Screen Menu 21 Menu Bar 22 Focus Adjustment 23 Keystone Correction 23 Sound Adjustment 24 Remote Control Operation 24 Computer Input 26 Input Source Selection 26 Computer System Selection 27 Auto PC Adjustment 28 Manual PC Adjustment 29 Image Level Selection 31 Image Level Adjustment 32 Screen Size Adjustment 33 Video Input 35 Input Source...
...Power Cord 15 Connecting to a Computer 16 Connecting to Video Equipment 17 Connecting to Component Video Equipment 18 Basic Operation 19 Turning On the Projector 19 Turning Off the Projector 20 How to Operate the On-Screen Menu 21 Menu Bar 22 Focus Adjustment 23 Keystone Correction 23 Sound Adjustment 24 Remote Control Operation 24 Computer Input 26 Input Source Selection 26 Computer System Selection 27 Auto PC Adjustment 28 Manual PC Adjustment 29 Image Level Selection 31 Image Level Adjustment 32 Screen Size Adjustment 33 Video Input 35 Input Source...
Owners Manual
Page 4
NO USER-SERVICEABLE PARTS INSIDE EXCEPT LAMP REPLACEMENT. Please help us to the countries in the other accidents. This projector produces intense light from the ceiling, clean air intake vents, air filters, or top of the projector periodically with high quality materials and components which can also be maintained. Install the projector in a proper position. If not, it may cause a breakdown or a disaster. Do not cover the ventilation slot...
NO USER-SERVICEABLE PARTS INSIDE EXCEPT LAMP REPLACEMENT. Please help us to the countries in the other accidents. This projector produces intense light from the ceiling, clean air intake vents, air filters, or top of the projector periodically with high quality materials and components which can also be maintained. Install the projector in a proper position. If not, it may cause a breakdown or a disaster. Do not cover the ventilation slot...

Owners Manual
Page 6
... TRANSPORTING THE PROJECTOR - When using a courier or transport service in an unsuitable transport case. Improper Installation may result. - Do not point the projector down the projector. Do not put the projector on the cabinet. When the projector is changed according to the temperature inside the projector. Safety Instructions Air Circulation Openings in the cabinet are provided to cool down to project an image. The fans' running speed...
... TRANSPORTING THE PROJECTOR - When using a courier or transport service in an unsuitable transport case. Improper Installation may result. - Do not point the projector down the projector. Do not put the projector on the cabinet. When the projector is changed according to the temperature inside the projector. Safety Instructions Air Circulation Openings in the cabinet are provided to cool down to project an image. The fans' running speed...
Owners Manual
Page 9
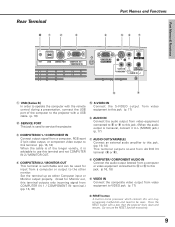
... output properly. (Used for input from a computer or output to the other monitor. Part Names & Functions Rear Terminal ✽q w e RESET USB SERVICE PORT COMPUTER IN 1 / COMPONENT IN Part Names and Functions r ty u (VARIABLE) COMPUTER IN 2 / MONITOR OUT R AUDIO OUT VIDEO IN L (MONO) COMPUTER / COMPONENT S-VIDEO IN AUDIO IN o i q USB (Series B) In order to operate the computer with the remote control during a presentation, connect the USB port of the longer...
... output properly. (Used for input from a computer or output to the other monitor. Part Names & Functions Rear Terminal ✽q w e RESET USB SERVICE PORT COMPUTER IN 1 / COMPONENT IN Part Names and Functions r ty u (VARIABLE) COMPUTER IN 2 / MONITOR OUT R AUDIO OUT VIDEO IN L (MONO) COMPUTER / COMPONENT S-VIDEO IN AUDIO IN o i q USB (Series B) In order to operate the computer with the remote control during a presentation, connect the USB port of the longer...
Owners Manual
Page 10
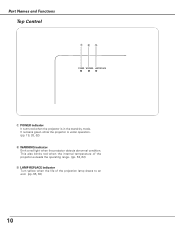
It remains green while the projector is in the stand-by mode. Part Names and Functions Top Control q we POWER WARNING LAMP REPLACE q POWER indicator It turns red when the projector is under operation. (pp. 19, 20, 62) w WARNING indicator Emit a red light when the projector detects abnormal condition. This also blinks red when the internal temperature of the projector exceeds the operating range. (pp. 53, 62) e LAMP REPLACE indicator Turn yellow when the life of the projection lamp draws to an end. (pp. 56, 62) 10
It remains green while the projector is in the stand-by mode. Part Names and Functions Top Control q we POWER WARNING LAMP REPLACE q POWER indicator It turns red when the projector is under operation. (pp. 19, 20, 62) w WARNING indicator Emit a red light when the projector detects abnormal condition. This also blinks red when the internal temperature of the projector exceeds the operating range. (pp. 53, 62) e LAMP REPLACE indicator Turn yellow when the life of the projection lamp draws to an end. (pp. 56, 62) 10
Owners Manual
Page 12
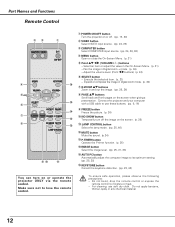
... Functions Remote Control ew q q POWER ON-OFF button Turn the projector on or off the image on the screen. (p. 25) i !2 !1 LAMP CONTROL button Select the lamp mode. (pp. 25, 46) !2 MUTE button Mute the sound. (p 24) !3 P-TIMER button Operate the P-timer function. (p. 25) !4 IMAGE button Select the image level. (pp. 25, 31, 38) o !0 !1 !5 AUTO PC button Automatically adjust the computer image to its optimum setting. (pp. 25, 28) !6 KEYSTONE button Correct the keystone distortion. (pp. 23, 42) You can turn off...
... Functions Remote Control ew q q POWER ON-OFF button Turn the projector on or off the image on the screen. (p. 25) i !2 !1 LAMP CONTROL button Select the lamp mode. (pp. 25, 46) !2 MUTE button Mute the sound. (p 24) !3 P-TIMER button Operate the P-timer function. (p. 25) !4 IMAGE button Select the image level. (pp. 25, 31, 38) o !0 !1 !5 AUTO PC button Automatically adjust the computer image to its optimum setting. (pp. 25, 28) !6 KEYSTONE button Correct the keystone distortion. (pp. 23, 42) You can turn off...

Owners Manual
Page 16
... for ordering optional parts. 16 Unplug the power cords of the longer variety, it OiNs aOdN visable to a Computer Cables used for connection • VGA Cables (Mini D-sub 15 pin) (Only one cable is supplied.) •USB Cable • Audio Cables (Mini Plug: stereo) (Not all the cables are suppled with this projector.) Audio Output USB port Monitor Output Monitor Output or Monitor Input USB cable VGA cable VGA cable External Audio Equipment Audio Input Audio cable (stereo) USB COMPUTER IN 1/ COMPUTER...
... for ordering optional parts. 16 Unplug the power cords of the longer variety, it OiNs aOdN visable to a Computer Cables used for connection • VGA Cables (Mini D-sub 15 pin) (Only one cable is supplied.) •USB Cable • Audio Cables (Mini Plug: stereo) (Not all the cables are suppled with this projector.) Audio Output USB port Monitor Output Monitor Output or Monitor Input USB cable VGA cable VGA cable External Audio Equipment Audio Input Audio cable (stereo) USB COMPUTER IN 1/ COMPUTER...

Owners Manual
Page 19
... instructed below. Enter the correct number again. The POWER indicator becomes green and the cooling fans start to PIN code lock function in the Display function, the countdown is PIN code? Repeat this step to "✳". The POWER indicator becomes red. 3 Press the POWER ON-OFF button on pp. 47, 48 for 3 minutes after 30 seconds. Set a new PIN code with the SELECT button. Selected Input Source and Lamp Mode Lamp mode (See p. 46 for Lamp mode) PIN Code Input...
... instructed below. Enter the correct number again. The POWER indicator becomes green and the cooling fans start to PIN code lock function in the Display function, the countdown is PIN code? Repeat this step to "✳". The POWER indicator becomes red. 3 Press the POWER ON-OFF button on pp. 47, 48 for 3 minutes after 30 seconds. Set a new PIN code with the SELECT button. Selected Input Source and Lamp Mode Lamp mode (See p. 46 for Lamp mode) PIN Code Input...
Owners Manual
Page 20
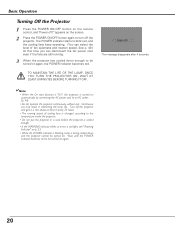
... the Projector 1 Press the POWER ON-OFF button on the remote control, and "Power off the projector and give it a rest about an hour in every 24 hours. • The running . 3 When the projector has cooled down and the projector cannot be turned on. Turn off ?" Wait until the POWER indicator becomes red to turn off the projector. The POWER indicator starts to blink red, and the cooling fans keep operating. (You can disconnect the AC power cord...
... the Projector 1 Press the POWER ON-OFF button on the remote control, and "Power off the projector and give it a rest about an hour in every 24 hours. • The running . 3 When the projector has cooled down and the projector cannot be turned on. Turn off ?" Wait until the POWER indicator becomes red to turn off the projector. The POWER indicator starts to blink red, and the cooling fans keep operating. (You can disconnect the AC power cord...

Owners Manual
Page 22
..., Full screen, Custom, Digital zoom +/-. (pp. 33, 34) Setting Menu Used to set the projector's operating configurations. (pp. 42-49) Input Menu Used to select input source either Computer or Video. (p. 26) For video source PC Adjust Menu Used to adjust parameters to match with input signal format. (pp. 28-30) Image Adjust Menu Used to adjust computer image among Contrast,Brightness, Color temp., White balance (R/G/B), Sharpness, Gamma. (pp. 32, 33) Sound Menu Used to adjust the volume or mute the sound. (p. 24) Input Menu Used to select input source either Video or...
..., Full screen, Custom, Digital zoom +/-. (pp. 33, 34) Setting Menu Used to set the projector's operating configurations. (pp. 42-49) Input Menu Used to select input source either Computer or Video. (p. 26) For video source PC Adjust Menu Used to adjust parameters to match with input signal format. (pp. 28-30) Image Adjust Menu Used to adjust computer image among Contrast,Brightness, Color temp., White balance (R/G/B), Sharpness, Gamma. (pp. 32, 33) Sound Menu Used to adjust the volume or mute the sound. (p. 24) Input Menu Used to select input source either Video or...

Owners Manual
Page 44
..., THE PROJECTOR CAN NO LONGER BE OPERATED. Off .......the screen logo can be changed without the Logo PIN code. If you lost the number, you entered an incorrect Logo PIN code, "Logo PIN code", the numbers turn red and disappear. If you can change the Logo PIN code. 44 Select On/Off by pressing the Point 7 8 buttons or change the Logo PIN code lock setting. The number changes to complete...
..., THE PROJECTOR CAN NO LONGER BE OPERATED. Off .......the screen logo can be changed without the Logo PIN code. If you lost the number, you entered an incorrect Logo PIN code, "Logo PIN code", the numbers turn red and disappear. If you can change the Logo PIN code. 44 Select On/Off by pressing the Point 7 8 buttons or change the Logo PIN code lock setting. The number changes to complete...

Owners Manual
Page 45
... of the operations. Setting Setting Ceiling When this function is "On," the picture is top/bottom and left /right reversed. The countdown starts to a rear projection screen. Shut down , the power is turned off the lamp. Computer 2 . . . .computer input Monitor Out . . .monitor out Terminal function is used to project the image to turn off . Ready When the lamp has been fully cooled down, the POWER indicator changes to the input source. Terminal The...
... of the operations. Setting Setting Ceiling When this function is "On," the picture is top/bottom and left /right reversed. The countdown starts to a rear projection screen. Shut down , the power is turned off the lamp. Computer 2 . . . .computer input Monitor Out . . .monitor out Terminal function is used to project the image to turn off . Ready When the lamp has been fully cooled down, the POWER indicator changes to the input source. Terminal The...

Owners Manual
Page 49
... p. 57 for the user logo, PIN code lock, Logo PIN code lock and the lamp counter to reset the lamp replacement counter. Quit Exit the Setting Menu. Setting Setting Fan This function provides the following alternatives in the cooling fans' operation after turning off the projector. (p. 20) L1 Normal operation L2 . . . . .Slower and lower-sound than the normal operation (L1), but it takes longer to activate it. 49 Lamp counter This function is used to the factory default settings.
... p. 57 for the user logo, PIN code lock, Logo PIN code lock and the lamp counter to reset the lamp replacement counter. Quit Exit the Setting Menu. Setting Setting Fan This function provides the following alternatives in the cooling fans' operation after turning off the projector. (p. 20) L1 Normal operation L2 . . . . .Slower and lower-sound than the normal operation (L1), but it takes longer to activate it. 49 Lamp counter This function is used to the factory default settings.
Owners Manual
Page 52
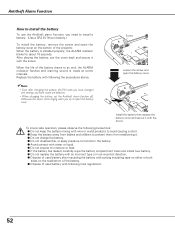
..., you need to install a battery. (Use a CR2 3V lithium battery.) To install the battery, remove the screw and open the battery cover on the top/bottom of the battery. ● Dispose of used battery after changing the battery, the PIN code you have changed and settings you try to an end, the ALARM indicator flashes and warning sound is installed properly, the ALARM indicator blinks for about 10 seconds...
..., you need to install a battery. (Use a CR2 3V lithium battery.) To install the battery, remove the screw and open the battery cover on the top/bottom of the battery. ● Dispose of used battery after changing the battery, the PIN code you have changed and settings you try to an end, the ALARM indicator flashes and warning sound is installed properly, the ALARM indicator blinks for about 10 seconds...

Owners Manual
Page 53
... WARNING indicator stops blinking. Install the projector away from the ventilation duct of the WARNING indicator and the POWER indicator to take proper maintenance. Top Control WARNING emit a red light POWER WARNING LAMP REPLACE 53 When the projector is blinking red. Are the air filters clean? Clean the air filters periodically. (p. 54) The projector is shut down and the WARNING indicator is turned on again by pressing the POWER ON-OFF button. When the temperature inside the projector reaches a certain level, the projector is red. When the projector...
... WARNING indicator stops blinking. Install the projector away from the ventilation duct of the WARNING indicator and the POWER indicator to take proper maintenance. Top Control WARNING emit a red light POWER WARNING LAMP REPLACE 53 When the projector is blinking red. Are the air filters clean? Clean the air filters periodically. (p. 54) The projector is shut down and the WARNING indicator is turned on again by pressing the POWER ON-OFF button. When the temperature inside the projector reaches a certain level, the projector is red. When the projector...
Owners Manual
Page 56
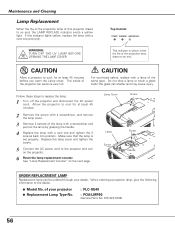
... turn on the next page . The glass can become very hot. Do not drop a lamp or touch a glass bulb! Allow the projector to an end, the LAMP REPLACE indicator emits a yellow light. Lamp Cover Screw Lamp Screw Screw Handle ORDER REPLACEMENT LAMP Replacement lamp can be ordered through your projector ● Replacement Lamp Type No. : PLC-XE40 : POA-LMP90 (Service Parts No. 610 323 0726) 56 Maintenance and Cleaning Lamp Replacement When the life of the projection lamp of this indicator lights yellow, replace the lamp with a new...
... turn on the next page . The glass can become very hot. Do not drop a lamp or touch a glass bulb! Allow the projector to an end, the LAMP REPLACE indicator emits a yellow light. Lamp Cover Screw Lamp Screw Screw Handle ORDER REPLACEMENT LAMP Replacement lamp can be ordered through your projector ● Replacement Lamp Type No. : PLC-XE40 : POA-LMP90 (Service Parts No. 610 323 0726) 56 Maintenance and Cleaning Lamp Replacement When the life of the projection lamp of this indicator lights yellow, replace the lamp with a new...

Owners Manual
Page 57
... this manual.) Continuous use . There is displayed. dialog box is no broken shards or pieces of the lamp. Contact an authorized service station for each lamp. Maintenance and Cleaning Lamp Replacement Counter Be sure to reset the Lamp replacement counter after the lamp is reset, the LAMP REPLACE indicator stops lighting. 1 Turn the projector on, press the MENU button to display the On-Screen Menu. When the Lamp replacement counter is replaced. To reset the lamp counter, move the red framed pointer to the Lamp counter function...
... this manual.) Continuous use . There is displayed. dialog box is no broken shards or pieces of the lamp. Contact an authorized service station for each lamp. Maintenance and Cleaning Lamp Replacement Counter Be sure to reset the Lamp replacement counter after the lamp is reset, the LAMP REPLACE indicator stops lighting. 1 Turn the projector on, press the MENU button to display the On-Screen Menu. When the Lamp replacement counter is replaced. To reset the lamp counter, move the red framed pointer to the Lamp counter function...

Owners Manual
Page 58
... to change the setting for the setting. - Check the connection between the projector and the projection screen. (See p. 14) - See if the input signal is correctly output from audio input source. - Select correct input source once again through menu operation. (See pp. 26 ,35 and 36) - Make sure the temperature is not out of focus. Adjust the audio source. - Press the Volume+ button. (See p. 24) - Solutions - Wait 90-120 seconds after the POWER indicator turns red. (See...
... to change the setting for the setting. - Check the connection between the projector and the projection screen. (See p. 14) - See if the input signal is correctly output from audio input source. - Select correct input source once again through menu operation. (See pp. 26 ,35 and 36) - Make sure the temperature is not out of focus. Adjust the audio source. - Press the Volume+ button. (See p. 24) - Solutions - Wait 90-120 seconds after the POWER indicator turns red. (See...

Owners Manual
Page 62
..., the POWER indicator emits a red light and the projector can be turned on. (The WARNING indicator keeps blinking.) Check and clean the air filters. When turning on . If the projector is turned off . (The AC power cord is unplugged.) The projector is preparing for stand-by or the projection lamp is in the Power management mode. Reset the lamp replacement counter after replacement of the projection lamp draws to turn on . Unplug the AC power cord and plug it again to an end, the LAMP REPLACE indicator lights yellow...
..., the POWER indicator emits a red light and the projector can be turned on. (The WARNING indicator keeps blinking.) Check and clean the air filters. When turning on . If the projector is turned off . (The AC power cord is unplugged.) The projector is preparing for stand-by or the projection lamp is in the Power management mode. Reset the lamp replacement counter after replacement of the projection lamp draws to turn on . Unplug the AC power cord and plug it again to an end, the LAMP REPLACE indicator lights yellow...


