Owners Manual
Page 3
... 12 Wireless Mouse Operation 13 Operating Range 13 Remote Control Code 14 Remote Control Battery Installation 14 Installation 15 Positioning the Projector 15 Adjustable Feet 15 Connecting the AC Power Cord 16 Connecting to a Computer 17 Connecting to Video Equipment 18 Connecting...P-Timer Function 26 Sound Adjustment 26 Computer Input 27 Input Source Selection 27 Computer System Selection 28 Auto PC Adjustment 29 Manual PC Adjustment 30 Image Level Selection 32 Image Level Adjustment 33 Screen Size Adjustment 34 Video Input 35 Input Source Selection (...
... 12 Wireless Mouse Operation 13 Operating Range 13 Remote Control Code 14 Remote Control Battery Installation 14 Installation 15 Positioning the Projector 15 Adjustable Feet 15 Connecting the AC Power Cord 16 Connecting to a Computer 17 Connecting to Video Equipment 18 Connecting...P-Timer Function 26 Sound Adjustment 26 Computer Input 27 Input Source Selection 27 Computer System Selection 28 Auto PC Adjustment 29 Manual PC Adjustment 30 Image Level Selection 32 Image Level Adjustment 33 Screen Size Adjustment 34 Video Input 35 Input Source Selection (...
Owners Manual
Page 4
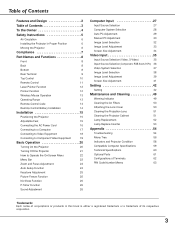
... clearance must be dangerous. Heat build- REFER SERVICING TO QUALIFIED SERVICE PERSONNEL. To the Owner Before operating this projector, read this manual again, check operations and cable connections and try the solutions in the "Troubleshooting" section in the end of this... manual thoroughly and operate the projector properly. This projector provides many convenient features and functions. If the problem still persists, contact the dealer where you to be built ...
... clearance must be dangerous. Heat build- REFER SERVICING TO QUALIFIED SERVICE PERSONNEL. To the Owner Before operating this projector, read this manual again, check operations and cable connections and try the solutions in the "Troubleshooting" section in the end of this... manual thoroughly and operate the projector properly. This projector provides many convenient features and functions. If the problem still persists, contact the dealer where you to be built ...

Owners Manual
Page 15
...Keystone distortion of the projected image can be adjusted automatically with Auto Setup function or manually with the adjustable feet. 1 Lift the front of the projector and pull upward the feet lock latches on both sides of the projector. 2 Release the feet lock latches to lock the adjustable feet and rotate the... size. Adjustable Feet Projection angle can be adjusted up to the figure and the table below for the screen size and the distance between the projector and the screen. Refer to 11.8 degrees with the remote control or the menu operation. (p24, 25, and 42) Adjustable Feet Feet ...
...Keystone distortion of the projected image can be adjusted automatically with Auto Setup function or manually with the adjustable feet. 1 Lift the front of the projector and pull upward the feet lock latches on both sides of the projector. 2 Release the feet lock latches to lock the adjustable feet and rotate the... size. Adjustable Feet Projection angle can be adjusted up to the figure and the table below for the screen size and the distance between the projector and the screen. Refer to 11.8 degrees with the remote control or the menu operation. (p24, 25, and 42) Adjustable Feet Feet ...

Owners Manual
Page 20
The number will appear. Repeat this manual, and keep it at hand. Enter a correct PIN code all over again. The POWER indicator turns green lighting and the cooling fans start to operate the projector. Refer to "Set" or "Clear" once by pressing the Point 7 8 button and fix the number... and the number will automatically move the pointer to PIN Code Lock function in column on the remote control. Basic Operation Turning On the Projector 1 Complete peripheral connections (with your PIN code. Press the SELECT button so that allows the person who knows it down , the input...
The number will appear. Repeat this manual, and keep it at hand. Enter a correct PIN code all over again. The POWER indicator turns green lighting and the cooling fans start to operate the projector. Refer to "Set" or "Clear" once by pressing the Point 7 8 button and fix the number... and the number will automatically move the pointer to PIN Code Lock function in column on the remote control. Basic Operation Turning On the Projector 1 Complete peripheral connections (with your PIN code. Press the SELECT button so that allows the person who knows it down , the input...

Owners Manual
Page 24
... Setting menu. (p44) • Perfect correction of the image distortion cannot be corrected properly by pressing the AUTO SETUP/ AUTO SET button, adjust manually by just pressing the AUTO SETUP button on the top control or the AUTO SET button on the remote control. VOLUME + AUTO SET UP MENU... SELECT LA REP AUTO SETUP button 24 OFF INPUT POWER WARN VOLUME - Rotate the Focus Ring to the projector's tilt and adjust the computer display parameters (Fine sync, Total dots and Picture position) by pressing the KEYSTONE button on the remote control or ...
... Setting menu. (p44) • Perfect correction of the image distortion cannot be corrected properly by pressing the AUTO SETUP/ AUTO SET button, adjust manually by just pressing the AUTO SETUP button on the top control or the AUTO SET button on the remote control. VOLUME + AUTO SET UP MENU... SELECT LA REP AUTO SETUP button 24 OFF INPUT POWER WARN VOLUME - Rotate the Focus Ring to the projector's tilt and adjust the computer display parameters (Fine sync, Total dots and Picture position) by pressing the KEYSTONE button on the remote control or ...

Owners Manual
Page 25
...; normal The message disappears after pressing the AUTO SETUP button on the top control or the AUTO SET on the remote control, correct the image manually as follows. Basic Operation Picture Freeze Function Press the FREEZE button on the screen. To restore to freeze the picture on the remote control to...
...; normal The message disappears after pressing the AUTO SETUP button on the top control or the AUTO SET on the remote control, correct the image manually as follows. Basic Operation Picture Freeze Function Press the FREEZE button on the screen. To restore to freeze the picture on the remote control to...

Owners Manual
Page 28
... (1~5) set , and then press the SELECT button. The projector chooses a proper system and displays it. *Mode 1 and SVGA 1 are examples. Selecting Computer System Manually PC system can also be stored in Mode 1 - 5. (p30, 31) SVGA 1 PC Systems provided in the projector. Computer Input Computer System Selection This projector automatically tunes to various types of computers based...
... (1~5) set , and then press the SELECT button. The projector chooses a proper system and displays it. *Mode 1 and SVGA 1 are examples. Selecting Computer System Manually PC system can also be stored in Mode 1 - 5. (p30, 31) SVGA 1 PC Systems provided in the projector. Computer Input Computer System Selection This projector automatically tunes to various types of computers based...

Owners Manual
Page 29
... Adjust Menu icon Move the red frame pointer to Auto PC Adj. This Auto PC Adjustment can not be fully adjusted with this operation, manual adjustments are memorized, the setting can be operated when 480i, 575i, 480p, 575p, 720p,1035i, or 1080i is selected in the PC System... PC Adjust cannot be operated as follows. icon and then press the SELECT button twice. When the image is not provided properly with this projector. Computer Input Auto PC Adjustment Auto PC Adjustment function is provided to automatically adjust Fine sync, Total dots, Horizontal, and Vertical to conform...
... Adjust Menu icon Move the red frame pointer to Auto PC Adj. This Auto PC Adjustment can not be fully adjusted with this operation, manual adjustments are memorized, the setting can be operated when 480i, 575i, 480p, 575p, 720p,1035i, or 1080i is selected in the PC System... PC Adjust cannot be operated as follows. icon and then press the SELECT button twice. When the image is not provided properly with this projector. Computer Input Auto PC Adjustment Auto PC Adjustment function is provided to automatically adjust Fine sync, Total dots, Horizontal, and Vertical to conform...

Owners Manual
Page 30
...adjust the position. Fine sync Eliminates flicker from the image displayed. When the image has dark bars, try this icon to show H-Freq. The projector has 5 independent memory areas to the PC Adjust Menu icon. PC Adjust Menu PC Adjust Menu icon 2 Press the Point d button to move... Press the SELECT button at this adjustment. Current mode Press the SELECT button to 31) Total dots Adjusts the number of this projector. Computer Input Manual PC Adjustment Some computers employ special signal formats which may not be tuned by Multi-scan system of total dots in one horizontal...
...adjust the position. Fine sync Eliminates flicker from the image displayed. When the image has dark bars, try this icon to show H-Freq. The projector has 5 independent memory areas to the PC Adjust Menu icon. PC Adjust Menu PC Adjust Menu icon 2 Press the Point d button to move... Press the SELECT button at this adjustment. Current mode Press the SELECT button to 31) Total dots Adjusts the number of this projector. Computer Input Manual PC Adjustment Some computers employ special signal formats which may not be tuned by Multi-scan system of total dots in one horizontal...

Owners Manual
Page 33
... the Point d button to move the red frame pointer to set and then press the SELECT button. 33 Store To store the image data adjusted manually, move the red frame pointer to the item that you want to select. (XLow, Low, Mid, or High) White balance (Red) Press the Point 7 button...
... the Point d button to move the red frame pointer to set and then press the SELECT button. 33 Store To store the image data adjusted manually, move the red frame pointer to the item that you want to select. (XLow, Low, Mid, or High) White balance (Red) Press the Point 7 button...

Owners Manual
Page 37
...and adjusts itself to optimize its performance. When Video System is necessary to a system and press the SELECT button. Component Auto The projector automatically detects incoming video signal, and adjusts itself to select a specific component video signal format among PAL, SECAM, NTSC, NTSC 4.... Menu icon This box indicates the system being selected. COMPONENT VIDEO SIGNAL FORMAT If the projector cannot reproduce proper video image, it is PAL-M or PAL-N, select system manually. AV System Menu (Component) AV System Menu icon This box indicates the system being selected...
...and adjusts itself to optimize its performance. When Video System is necessary to a system and press the SELECT button. Component Auto The projector automatically detects incoming video signal, and adjusts itself to select a specific component video signal format among PAL, SECAM, NTSC, NTSC 4.... Menu icon This box indicates the system being selected. COMPONENT VIDEO SIGNAL FORMAT If the projector cannot reproduce proper video image, it is PAL-M or PAL-N, select system manually. AV System Menu (Component) AV System Menu icon This box indicates the system being selected...

Owners Manual
Page 42
...with the Auto Setup function. Adjust keystone with the Point 7 8 button. 42 Setting Menu (Language) Set the red frame pointer to the projector's tilt. If the distortion is available in the Setting menu. (See p25 or Keystone feature below.) Keystone This function corrects distortion of the image... This function enables Auto Keystone correction and Auto PC adjustment by pressing the KEYSTONE button on the top control. Off disables Auto PC Adjustment. Manual . . . .works only when pressing the AUTO SET button on the remote control or the AUTO SETUP button on the remote control. ...
...with the Auto Setup function. Adjust keystone with the Point 7 8 button. 42 Setting Menu (Language) Set the red frame pointer to the projector's tilt. If the distortion is available in the Setting menu. (See p25 or Keystone feature below.) Keystone This function corrects distortion of the image... This function enables Auto Keystone correction and Auto PC adjustment by pressing the KEYSTONE button on the top control. Off disables Auto PC Adjustment. Manual . . . .works only when pressing the AUTO SET button on the remote control or the AUTO SETUP button on the remote control. ...

Owners Manual
Page 53
... than other similar lamps. ● If the projector indicates that there are familiar with projector service. Inappropriate attempts to do so, may result in the Lamp Replacement section of this manual. ) Continuous use of glass around the projector or coming out from the cooling air circulation holes.... The message "Lamp replace counter Reset?" If a lamp explodes, disconnect the projector's AC plug from lamp to lamp and ...
... than other similar lamps. ● If the projector indicates that there are familiar with projector service. Inappropriate attempts to do so, may result in the Lamp Replacement section of this manual. ) Continuous use of glass around the projector or coming out from the cooling air circulation holes.... The message "Lamp replace counter Reset?" If a lamp explodes, disconnect the projector's AC plug from lamp to lamp and ...
Owners Manual
Page 54
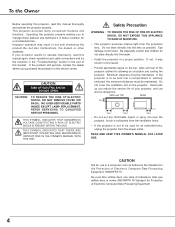
... Before calling your computer or video equipment. (See page 28 and 37) - Provide proper distance between your computer or video equipment and the projector. (See page 17-19) - Some laptop computers may result in the Setting Menu. (See page 46.) - Check the Ceiling / Rear...- Make sure the temperature is turned on page 49.) - Check audio cable connection from your computer's instruction manual for monitor output when connecting to Video Equipment" on the projector. - Plug the power cord of the specified Operating Temperature (5°C ~ 35°C). - Wait 90-120 ...
... Before calling your computer or video equipment. (See page 28 and 37) - Provide proper distance between your computer or video equipment and the projector. (See page 17-19) - Some laptop computers may result in the Setting Menu. (See page 46.) - Check the Ceiling / Rear...- Make sure the temperature is turned on page 49.) - Check audio cable connection from your computer's instruction manual for monitor output when connecting to Video Equipment" on the projector. - Plug the power cord of the specified Operating Temperature (5°C ~ 35°C). - Wait 90-120 ...
Owners Manual
Page 60
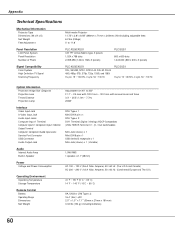
...Projector 11.73" x 2.8" x 8.58" (298mm x 71mm x 218mm) (Not including adjustable feet) 6.2 lbs (2.8kgs) 0˚ to 11.8˚ Panel Resolution LCD Panel System Panel Resolution Number of Pixels PLC-XU56/XU51 0.8" TFT Active Matrix type, 3 panels 1,024 x 768 dots 2,359,296 (1,024 x 768 x 3 panels) PLC-SU51 ...(Diagonal) Projection Lens Throw Distance Projection Lamp Adjustable from 40" to 300" F 1.7 ~ 2.5 lens with f 20.0 mm ~ 30.0 mm with manual zoom and focus 3.3' ~ 25.3' (1.0m ~ 7.7m) 200W Interface Video Input Jack S-Video Input Jack Audio Input Jacks Computer Input 1 Terminal Computer ...
...Projector 11.73" x 2.8" x 8.58" (298mm x 71mm x 218mm) (Not including adjustable feet) 6.2 lbs (2.8kgs) 0˚ to 11.8˚ Panel Resolution LCD Panel System Panel Resolution Number of Pixels PLC-XU56/XU51 0.8" TFT Active Matrix type, 3 panels 1,024 x 768 dots 2,359,296 (1,024 x 768 x 3 panels) PLC-SU51 ...(Diagonal) Projection Lens Throw Distance Projection Lamp Adjustable from 40" to 300" F 1.7 ~ 2.5 lens with f 20.0 mm ~ 30.0 mm with manual zoom and focus 3.3' ~ 25.3' (1.0m ~ 7.7m) 200W Interface Video Input Jack S-Video Input Jack Audio Input Jacks Computer Input 1 Terminal Computer ...
Owners Manual
Page 61
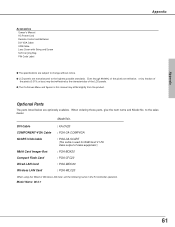
...Card : POA-WLC20 When using the Wired or Wireless LAN Card, set the following name in this manual may differ slightly from the product. Appendix Appendix Accessories Owner's Manual AC Power Cord Remote Control and Batteries DVI-VGA Cable USB Cable Lens Cover with String and Screw ...Soft Carrying Bag PIN Code Label ● The specifications are subject to change without notice. ● LCD panels are manufactured to the sales dealer...
...Card : POA-WLC20 When using the Wired or Wireless LAN Card, set the following name in this manual may differ slightly from the product. Appendix Appendix Accessories Owner's Manual AC Power Cord Remote Control and Batteries DVI-VGA Cable USB Cable Lens Cover with String and Screw ...Soft Carrying Bag PIN Code Label ● The specifications are subject to change without notice. ● LCD panels are manufactured to the sales dealer...
Owners Manual
Page 63
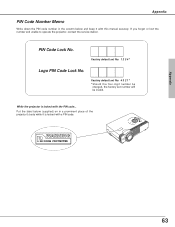
... locked with a PIN code. Appendix PIN Code Number Memo Write down the PIN code number in a prominent place of the projector's body while it with this manual securely. Factory default set No: 4 3 2 1* *Should the four-digit number be changed, the factory set No: 1 2 3 4* Logo PIN Code Lock No. If you forgot or...
... locked with a PIN code. Appendix PIN Code Number Memo Write down the PIN code number in a prominent place of the projector's body while it with this manual securely. Factory default set No: 4 3 2 1* *Should the four-digit number be changed, the factory set No: 1 2 3 4* Logo PIN Code Lock No. If you forgot or...


