
Owners Manual
Page 2
... appliance with a damaged cord or plug after handling. • CALIFORNIA USA ONLY This rice cooker uses a Lithium Battery that it will fit in their use of the appliance. (2) The longer cord should be pulled on by or near a hot gas or electric burner, or in fire, electric shock or personal injury. 3. Always attach plug to appliance first, then plug cord into any manner. WARNING...
... appliance with a damaged cord or plug after handling. • CALIFORNIA USA ONLY This rice cooker uses a Lithium Battery that it will fit in their use of the appliance. (2) The longer cord should be pulled on by or near a hot gas or electric burner, or in fire, electric shock or personal injury. 3. Always attach plug to appliance first, then plug cord into any manner. WARNING...
Owners Manual
Page 3
... keep the power plug clean. • Grasp only the power plug when unplugging the power cord. All repairs must be performed by qualified technicians. This action may cause a short circuit or electric shock. • Do not allow children to use this section ...Use only an electrical outlet rated at 15 amperes or more. Allow to cleaning. Make sure that they are cleaned thoroughly. • Plug the appliance into the electrical outlet. • Do not operate the appliance if the power cord or plug has been damaged. • Do not handle the power cord in water and do not pour water...
... keep the power plug clean. • Grasp only the power plug when unplugging the power cord. All repairs must be performed by qualified technicians. This action may cause a short circuit or electric shock. • Do not allow children to use this section ...Use only an electrical outlet rated at 15 amperes or more. Allow to cleaning. Make sure that they are cleaned thoroughly. • Plug the appliance into the electrical outlet. • Do not operate the appliance if the power cord or plug has been damaged. • Do not handle the power cord in water and do not pour water...
Owners Manual
Page 4
... completely removed, before using immediately and contact Sanyo Fisher Service. If the power plug is not held, the uncontrolled moving cord may cause injury. • Avoid personal contact with steam vent. • Escaping steam is HOT and may cause burns. • Do not allow children near flames or wet areas. • Remove all rice grains and water drops on the...
... completely removed, before using immediately and contact Sanyo Fisher Service. If the power plug is not held, the uncontrolled moving cord may cause injury. • Avoid personal contact with steam vent. • Escaping steam is HOT and may cause burns. • Do not allow children near flames or wet areas. • Remove all rice grains and water drops on the...
Owners Manual
Page 5
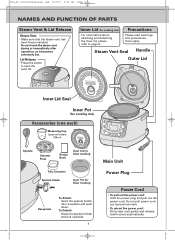
... AND FUNCTION OF PARTS Steam Vent & Lid Release Steam Vent • Make sure that the steam vent has been firmly installed: Do not touch the steam vent during or immediately after operation, as it becomes extremely hot. Steam Vent Seal Handle Outer Lid Inner Lid Seal Inner Pot (for cooking rice) Accessories (one each) Measuring Cup (approximately 180ml) FOR SLOW COOKING Spatula Steamer Plate Recipe Book Inner Lid for Slow Cooking MAX Tofu Container Spatula Holder Inner Pot for cooking rice) For information...
... AND FUNCTION OF PARTS Steam Vent & Lid Release Steam Vent • Make sure that the steam vent has been firmly installed: Do not touch the steam vent during or immediately after operation, as it becomes extremely hot. Steam Vent Seal Handle Outer Lid Inner Lid Seal Inner Pot (for cooking rice) Accessories (one each) Measuring Cup (approximately 180ml) FOR SLOW COOKING Spatula Steamer Plate Recipe Book Inner Lid for Slow Cooking MAX Tofu Container Spatula Holder Inner Pot for cooking rice) For information...
Owners Manual
Page 6
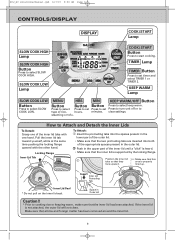
.... Make sure that all rice and foreign matter has been removed around the inner lid. 6 ECJ_HC RiceCookerManual.qxd 6/7/07 9:50 AM Page 6 CONTROLS/DISPLAY DISPLAY COOK/START Lamp SLOW COOK HIGH Lamp SLOW COOK HIGH Button Press to select keep warm. MENU HRS MIN KEEP WARM/OFF Button Button Button Button Press to select SLOW COOK HIGH. TIMER Lamp TIMER Button Press to set Press to turn...
.... Make sure that all rice and foreign matter has been removed around the inner lid. 6 ECJ_HC RiceCookerManual.qxd 6/7/07 9:50 AM Page 6 CONTROLS/DISPLAY DISPLAY COOK/START Lamp SLOW COOK HIGH Lamp SLOW COOK HIGH Button Press to select keep warm. MENU HRS MIN KEEP WARM/OFF Button Button Button Button Press to select SLOW COOK HIGH. TIMER Lamp TIMER Button Press to set Press to turn...
Owners Manual
Page 7
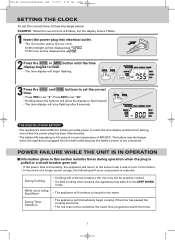
... cooking start time. • The rice may not be properly cooked. • If a little cooking time remains, the appliance may last longer when the appliance is plugged into electrical outlet. • The rice cooker uses a 12-hour clock. 12:00 midnight will be displayed as 12:00 noon will continue to keep the rice warm. POWER FAILURE WHILE THE UNIT IS IN OPERATION...
... cooking start time. • The rice may not be properly cooked. • If a little cooking time remains, the appliance may last longer when the appliance is plugged into electrical outlet. • The rice cooker uses a 12-hour clock. 12:00 midnight will be displayed as 12:00 noon will continue to keep the rice warm. POWER FAILURE WHILE THE UNIT IS IN OPERATION...
Owners Manual
Page 8
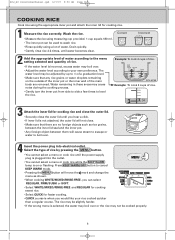
... WARM mode. • Pressing the MENU button will cause steam to escape or water to 1/4 of a graduation level. • Make sure that there are removed. Water remaining in these areas may cause noise during the cooking process. • Gently turn the inner pot from side to side a few times to wash rice. • Rinse quickly using the appropriate inner pot and attach the inner lid...
... WARM mode. • Pressing the MENU button will cause steam to escape or water to 1/4 of a graduation level. • Make sure that there are removed. Water remaining in these areas may cause noise during the cooking process. • Gently turn the inner pot from side to side a few times to wash rice. • Rinse quickly using the appropriate inner pot and attach the inner lid...
Owners Manual
Page 9
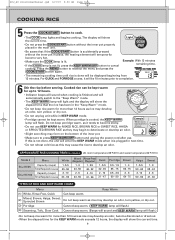
... PORRIDGE course, it is done will flash. Example: With 13 minutes remaining time. • The remaining cooking time until rice is plugged in next time. • Do not reheat cold rice as rice may cause the rice to press KEEP WARM/OFF button and unplug the power cord after use KEEP WARM for MIXED RICE, BROWN RICE or SWEET RICE, HAIGA or SPROUTED BROWN RICE as rice...
... PORRIDGE course, it is done will flash. Example: With 13 minutes remaining time. • The remaining cooking time until rice is plugged in next time. • Do not reheat cold rice as rice may cause the rice to press KEEP WARM/OFF button and unplug the power cord after use KEEP WARM for MIXED RICE, BROWN RICE or SWEET RICE, HAIGA or SPROUTED BROWN RICE as rice...
Owners Manual
Page 10
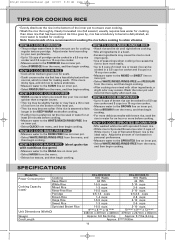
... inner pot. • Select PORRIDGE from the menu, and then begin cooking. • For more before cooking. • Mix all ingredients in a bowl. • Excess ingredients may remain. SPECIFICATIONS Model No. Newly harvested rice (fall season) usually requires less water for cooking than does rice that has a less sticky texture than a regular course. • The rice may be cooked in a 5.5-cup rice cooker and 8 cups in a 10-cup rice cooker. • Measure water...
... inner pot. • Select PORRIDGE from the menu, and then begin cooking. • For more before cooking. • Mix all ingredients in a bowl. • Excess ingredients may remain. SPECIFICATIONS Model No. Newly harvested rice (fall season) usually requires less water for cooking than does rice that has a less sticky texture than a regular course. • The rice may be cooked in a 5.5-cup rice cooker and 8 cups in a 10-cup rice cooker. • Measure water...
Owners Manual
Page 11
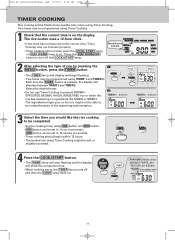
... When timer setting is on. The rice cooker uses a 12-hour clock. • If the clock has not been set to be completed. • Set the cooking timer using HRS button and MIN button. • HRS button can be set in 10 minute increments. • Timer cooking should begin flashing. • Two times may be able to turn off and then the COOK lamp turns on...
... When timer setting is on. The rice cooker uses a 12-hour clock. • If the clock has not been set to be completed. • Set the cooking timer using HRS button and MIN button. • HRS button can be set in 10 minute increments. • Timer cooking should begin flashing. • Two times may be able to turn off and then the COOK lamp turns on...

Owners Manual
Page 12
...TIMER is set for the minimum times listed below, otherwise cooking will switch to the KEEP WARM mode. • The KEEP WARM lamp lights and starts flashing. • When tofu is cooked, place on plate and serve. • If preferred cold, place in two steps. Menu Regular/Firm-Sushi White/Mixed/Rinse-Free Soft Quick Haiga Rice Porridge/Brown Rice...is the ideal ratio to make soft tofu. Use tofu container and attach the inner lid for slow cooking. 1 Put the ingredients into the tofu container and place in inner pot. • Clean tofu container with hot water prior to adding ingredients. ...
...TIMER is set for the minimum times listed below, otherwise cooking will switch to the KEEP WARM mode. • The KEEP WARM lamp lights and starts flashing. • When tofu is cooked, place on plate and serve. • If preferred cold, place in two steps. Menu Regular/Firm-Sushi White/Mixed/Rinse-Free Soft Quick Haiga Rice Porridge/Brown Rice...is the ideal ratio to make soft tofu. Use tofu container and attach the inner lid for slow cooking. 1 Put the ingredients into the tofu container and place in inner pot. • Clean tofu container with hot water prior to adding ingredients. ...

Owners Manual
Page 13
... be used as a guideline. 1 Add approximately 1 1/2 measuring cups (9.13oz/270ml) of water into the inner pot for steaming. • Use the measuring cup provided. • Always add a minimum of one measuring cup of water. 2 Place inner pot into the main unit. • Place the steaming plate in the inner pot. • Place the food on the steaming plate. 4 Press the MENU button to select STEAMING. 3 Close the outer lid and insert power plug into...
... be used as a guideline. 1 Add approximately 1 1/2 measuring cups (9.13oz/270ml) of water into the inner pot for steaming. • Use the measuring cup provided. • Always add a minimum of one measuring cup of water. 2 Place inner pot into the main unit. • Place the steaming plate in the inner pot. • Place the food on the steaming plate. 4 Press the MENU button to select STEAMING. 3 Close the outer lid and insert power plug into...
Owners Manual
Page 14
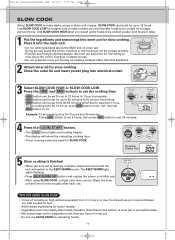
... SLOW COOK. Not doing so may cause the unit to overflow or steam to overflow or the food may remain. Press HRS button to set 3 hours, then press MIN button to the KEEP WARM mode. The KEEP WARM light starts flashing. • Press KEEP WARM/OFF button and unplug the power cord after each use. Close the outer lid and insert power plug into inner pot...
... SLOW COOK. Not doing so may cause the unit to overflow or steam to overflow or the food may remain. Press HRS button to set 3 hours, then press MIN button to the KEEP WARM mode. The KEEP WARM light starts flashing. • Press KEEP WARM/OFF button and unplug the power cord after each use. Close the outer lid and insert power plug into inner pot...

Owners Manual
Page 15
... to the slots ( ) on the inner surface of the inner pot. Wash the inner pot and inner lid thoroughly after any rice with seasoning has been cooked. Turn the lower steam vent cap clockwise. • Make sure the steam vent seal is completely safe and poses no health hazard. INNER POTS AND INNER LIDS Wash the inner pots using SLOW COOK, a slight odor may occur through normal use cleaning powder, scrub brush, benzene or...
... to the slots ( ) on the inner surface of the inner pot. Wash the inner pot and inner lid thoroughly after any rice with seasoning has been cooked. Turn the lower steam vent cap clockwise. • Make sure the steam vent seal is completely safe and poses no health hazard. INNER POTS AND INNER LIDS Wash the inner pots using SLOW COOK, a slight odor may occur through normal use cleaning powder, scrub brush, benzene or...
Owners Manual
Page 16
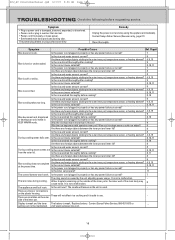
... power cord and stop using the appliance immediately. Is the rice stirred thoroughly after cooking? Is the correct menu selected? During cooking steam comes out Is the correct menu selected? Is the power cord plugged in inner pot? Was cold rice kept warm or cold rice added? Water droplets remaining on the outer side of the main body may cause noise. Display is weak and the timer The battery...
... power cord and stop using the appliance immediately. Is the rice stirred thoroughly after cooking? Is the correct menu selected? During cooking steam comes out Is the correct menu selected? Is the power cord plugged in inner pot? Was cold rice kept warm or cold rice added? Water droplets remaining on the outer side of the main body may cause noise. Display is weak and the timer The battery...
Owners Manual
Page 17
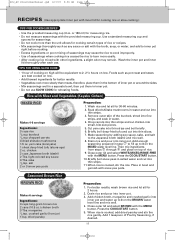
... inner pot and inner lid thoroughly after each use SLOW COOK for cooking rice or slow cooking.) TIPS FOR COOKING RECIPES • Use the provided measuring cup (6 oz. Chop carrots into thin strips and cut into small, bite-size pieces. 5. Make seasoning...Rice BROWN RICE Makes 6 servings Ingredients: 3 cups long-grain brown rice 2 cans (10.5 oz.) chicken broth 3 Tbs. For better results, wash brown rice and let sit for measuring rice. • Do not measure seasonings with the provided measuring cup. Press the COOK/START button. 5. Close outer lid and select WHITE/MIXED/RINSE-FREE...
... inner pot and inner lid thoroughly after each use SLOW COOK for cooking rice or slow cooking.) TIPS FOR COOKING RECIPES • Use the provided measuring cup (6 oz. Chop carrots into thin strips and cut into small, bite-size pieces. 5. Make seasoning...Rice BROWN RICE Makes 6 servings Ingredients: 3 cups long-grain brown rice 2 cans (10.5 oz.) chicken broth 3 Tbs. For better results, wash brown rice and let sit for measuring rice. • Do not measure seasonings with the provided measuring cup. Press the COOK/START button. 5. Close outer lid and select WHITE/MIXED/RINSE-FREE...
Owners Manual
Page 18
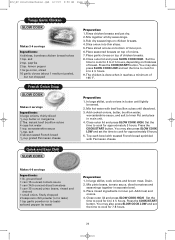
... the WHITE water level line. 3. curry powder Salt & pepper 3. Press the COOK/START button. 8. Lift sushi sheet from skillet and set aside. 4. Peel and cut into inner pot. Close outer lid and select WHITE/MIXED/RINSE-FREE with salt, pepper, and curry powder. 5. sugar 1 tsp. Sprinkle the vinegar mixture over on mat, turn the sushi sheet over the rice and...
... the WHITE water level line. 3. curry powder Salt & pepper 3. Press the COOK/START button. 8. Lift sushi sheet from skillet and set aside. 4. Peel and cut into inner pot. Close outer lid and select WHITE/MIXED/RINSE-FREE with salt, pepper, and curry powder. 5. sugar 1 tsp. Sprinkle the vinegar mixture over on mat, turn the sushi sheet over the rice and...
Owners Manual
Page 19
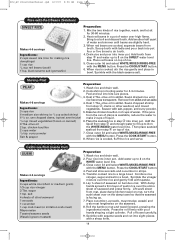
... from skillet and set aside. 4. Add 17 ounces (500 ml) of bread 2 oz. Press the COOK/START button. sweet cooking rice wine (mirin) Salt to 1 on top of tofu container. 4. Close outer lid and select WHITE/MIXED/RINSE-FREE with salt and pepper. ECJ_HC RiceCookerManual.qxd 6/7/07 9:50 AM Page 19 Risotto PORRIDGE Makes 4-6 servings Ingredients: 1 cup rice 1/2 medium onion...
... from skillet and set aside. 4. Add 17 ounces (500 ml) of bread 2 oz. Press the COOK/START button. sweet cooking rice wine (mirin) Salt to 1 on top of tofu container. 4. Close outer lid and select WHITE/MIXED/RINSE-FREE with salt and pepper. ECJ_HC RiceCookerManual.qxd 6/7/07 9:50 AM Page 19 Risotto PORRIDGE Makes 4-6 servings Ingredients: 1 cup rice 1/2 medium onion...
Owners Manual
Page 20
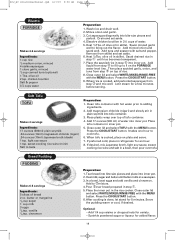
... on bottom of breast. Close outer lid and press SLOW COOK HIGH. Slice onion into thin slices. 5. Add meat and onions. 4. Add cooked onions, butter, bouillon water, worcestershire sauce, and salt to 2 ½ hours, depending on thickness of inner pot. 6. Press the COOK/START button. Set the time to cook for 2 to Inner Pot and place in inner pot. Mix pinto beans, tomato sauce...
... on bottom of breast. Close outer lid and press SLOW COOK HIGH. Slice onion into thin slices. 5. Add meat and onions. 4. Add cooked onions, butter, bouillon water, worcestershire sauce, and salt to 2 ½ hours, depending on thickness of inner pot. 6. Press the COOK/START button. Set the time to cook for 2 to Inner Pot and place in inner pot. Mix pinto beans, tomato sauce...
Owners Manual
Page 21
... a well-padded sturdy carton in the appropriate model's instruction manual, or (B) the repair of any malfunction, defect or failure caused by or resulting from unauthorized service or parts, improper maintenance, operation contrary to avoid shipping damage. THIS WARRANTY APPLIES ONLY TO THE ORIGINAL RETAIL USER AND DOES NOT APPLY TO PRODUCTS USED FOR ANY INDUSTRIAL, PROFESSIONAL OR COMMERCIAL PURPOSE...
... a well-padded sturdy carton in the appropriate model's instruction manual, or (B) the repair of any malfunction, defect or failure caused by or resulting from unauthorized service or parts, improper maintenance, operation contrary to avoid shipping damage. THIS WARRANTY APPLIES ONLY TO THE ORIGINAL RETAIL USER AND DOES NOT APPLY TO PRODUCTS USED FOR ANY INDUSTRIAL, PROFESSIONAL OR COMMERCIAL PURPOSE...


