
Owners Manual
Page 2
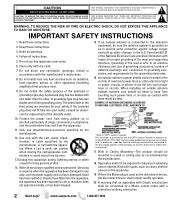
NO USER-SERVICEABLE PARTS INSIDE. Do not defeat the safety purpose of time. 14. A polarized plug has two blades with one wider than the other electrical light or power circuits, or where it can fall into such power lines or circuits. Protect the power cord from tip-over. 13.Unplug this apparatus near any heat sources such as radiators, heat registers, stoves, or other apparatus (including amplifiers) that the cable ground shall be sure the antenna system is grounded so as power-supply cord or plug is used as recommended by the manufacturer. 18. When a cart is damaged,...
NO USER-SERVICEABLE PARTS INSIDE. Do not defeat the safety purpose of time. 14. A polarized plug has two blades with one wider than the other electrical light or power circuits, or where it can fall into such power lines or circuits. Protect the power cord from tip-over. 13.Unplug this apparatus near any heat sources such as radiators, heat registers, stoves, or other apparatus (including amplifiers) that the cable ground shall be sure the antenna system is grounded so as power-supply cord or plug is used as recommended by the manufacturer. 18. When a cart is damaged,...
Owners Manual
Page 3
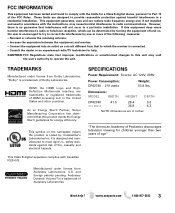
...from Dolby Laboratories. "Dolby" is a trademark of Dolby Laboratories. It is connected. - This Class B digital apparatus complies with the instructions, may void the user's authority to radio communications. www...Reorient or relocate the receiving antenna. - As an Energy Star ® Partner, Sanyo Manufacturing Corporation has determined that interference will not occur in the United States and other ... risk of age" Need help . Dimensions: MODEL WIDTH HEIGHT DEPTH DP42740 41.5 28.4 9.6 w/o stand 26.8 4.3 NOTE: Dimensions are in a residential installation. U.S. SPECIFICATIONS ...
...from Dolby Laboratories. "Dolby" is a trademark of Dolby Laboratories. It is connected. - This Class B digital apparatus complies with the instructions, may void the user's authority to radio communications. www...Reorient or relocate the receiving antenna. - As an Energy Star ® Partner, Sanyo Manufacturing Corporation has determined that interference will not occur in the United States and other ... risk of age" Need help . Dimensions: MODEL WIDTH HEIGHT DEPTH DP42740 41.5 28.4 9.6 w/o stand 26.8 4.3 NOTE: Dimensions are in a residential installation. U.S. SPECIFICATIONS ...
Owners Manual
Page 4
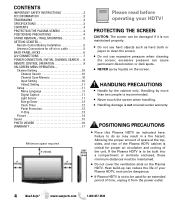
... and rear of the unit. Handling by the cabinet only. PROTECTING THE SCREEN CAUTION: The screen can be dangerous. • If Plasma HDTV is critical for off-air or cable 5 BACK PANEL JACKS 6 A/V CONNECTIONS 7 POWER CONNECTION / INITIAL CHANNEL SEARCH . . ...cover the ventilation slots on the screen. CONTENTS IMPORTANT SAFETY INSTRUCTIONS 2 FCC INFORMATION 3 TRADEMARKS 3 SPECIFICATIONS 3 CONTENTS 4 PROTECTING THE PLASMA SCREEN 4 POSITIONING PRECAUTIONS 4 STAND REMOVAL / WALL MOUNTING 5 GETTING STARTED- Channel Setting 10 Channel Search 10 Channel Scan Memory 10 ...
... and rear of the unit. Handling by the cabinet only. PROTECTING THE SCREEN CAUTION: The screen can be dangerous. • If Plasma HDTV is critical for off-air or cable 5 BACK PANEL JACKS 6 A/V CONNECTIONS 7 POWER CONNECTION / INITIAL CHANNEL SEARCH . . ...cover the ventilation slots on the screen. CONTENTS IMPORTANT SAFETY INSTRUCTIONS 2 FCC INFORMATION 3 TRADEMARKS 3 SPECIFICATIONS 3 CONTENTS 4 PROTECTING THE PLASMA SCREEN 4 POSITIONING PRECAUTIONS 4 STAND REMOVAL / WALL MOUNTING 5 GETTING STARTED- Channel Setting 10 Channel Search 10 Channel Scan Memory 10 ...
Owners Manual
Page 5
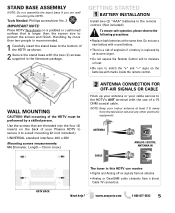
... a skilled person. STAND BASE ASSEMBLY NOTE: Do not assemble the stand base if you are threaded into the four (4) inserts on the back of your Plasma HDTV to secure it to a wall mounting kit (not included.) UNIVERSAL standard interface: 400 x 280 Mounting screws measurements: M6 Diameter, Length-12mm (max.) ANTENNA CONNECTION...
... a skilled person. STAND BASE ASSEMBLY NOTE: Do not assemble the stand base if you are threaded into the four (4) inserts on the back of your Plasma HDTV to secure it to a wall mounting kit (not included.) UNIVERSAL standard interface: 400 x 280 Mounting screws measurements: M6 Diameter, Length-12mm (max.) ANTENNA CONNECTION...
Owners Manual
Page 6
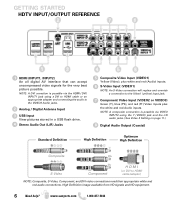
GETTING STARTED HDTV INPUT/OUTPUT REFERENCE 1 HDMI (INPUT1, INPUT2) An all digital AV interface that can accept uncompressed video signals for the very best picture possible. High Definition image available from HD signals and HD equipment. 6 Need help? NOTE: A DVI conection is possible via the HDMI (DVI) INPUT1 jack using the Y (VIDEO) jack and the L/R audio jacks. (See Video 2 Setting on page 11.) 8 Digital Audio Output (Coaxial) Standard Definition High Definition Optimum High Definition Composite S-Video Component H D M I (or DVI to the Video1 (yellow) input jack. 7 ...
GETTING STARTED HDTV INPUT/OUTPUT REFERENCE 1 HDMI (INPUT1, INPUT2) An all digital AV interface that can accept uncompressed video signals for the very best picture possible. High Definition image available from HD signals and HD equipment. 6 Need help? NOTE: A DVI conection is possible via the HDMI (DVI) INPUT1 jack using the Y (VIDEO) jack and the L/R audio jacks. (See Video 2 Setting on page 11.) 8 Digital Audio Output (Coaxial) Standard Definition High Definition Optimum High Definition Composite S-Video Component H D M I (or DVI to the Video1 (yellow) input jack. 7 ...
Owners Manual
Page 7
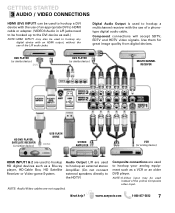
Component connections will accept SDTV, EDTV and HDTV video signals. NOTE: S-Video input may also be used instead of the yellow Composite video input. Composite connections are used to hookup HD digital devices such as a Blu-ray player, HD Cable Box, HD Satellite Receiver or Video-game System. DVD PLAYER (or similar device) DVI DVD PLAYER (or similar device) MULTICHANNEL RECEIVER HD DVD PLAYER, SATELLITE RECEIVER (or similar device) USB FLASH DRIVE HDMI STEREO AMPLIFIER VCR (or analog device) HDMI INPUT1 & 2 are used to hookup your analog equipment such as a VCR or ...
Component connections will accept SDTV, EDTV and HDTV video signals. NOTE: S-Video input may also be used instead of the yellow Composite video input. Composite connections are used to hookup HD digital devices such as a Blu-ray player, HD Cable Box, HD Satellite Receiver or Video-game System. DVD PLAYER (or similar device) DVI DVD PLAYER (or similar device) MULTICHANNEL RECEIVER HD DVD PLAYER, SATELLITE RECEIVER (or similar device) USB FLASH DRIVE HDMI STEREO AMPLIFIER VCR (or analog device) HDMI INPUT1 & 2 are used to hookup your analog equipment such as a VCR or ...
Owners Manual
Page 8
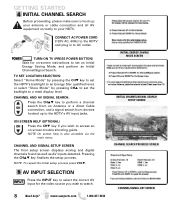
TURN ON TV (PRESS POWER BUTTON) Wait for the video source you wish to access an on -screen instructions to set the backlight to a retail display level. TV SET LOCATION SELECTION: Select "Home Mode" by pressing the CHM key to set the HDTV's backlight to an Energy Star qualified level, or select "Store Mode" by pressing CHL to watch. 8 Need help is also accesible via the main menu. GETTING STARTED INITIAL CHANNEL SEARCH Before proceeding, please make sure to hook up to your HDTV. CHANNEL AND AV SIGNAL SEARCH: Press the CHLM key to perform a channel search from an Antenna ...
TURN ON TV (PRESS POWER BUTTON) Wait for the video source you wish to access an on -screen instructions to set the backlight to a retail display level. TV SET LOCATION SELECTION: Select "Home Mode" by pressing the CHM key to set the HDTV's backlight to an Energy Star qualified level, or select "Store Mode" by pressing CHL to watch. 8 Need help is also accesible via the main menu. GETTING STARTED INITIAL CHANNEL SEARCH Before proceeding, please make sure to hook up to your HDTV. CHANNEL AND AV SIGNAL SEARCH: Press the CHLM key to perform a channel search from an Antenna ...
Owners Manual
Page 9
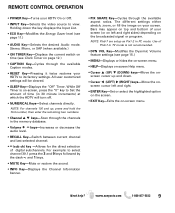
While Off Timer is not recommended. • DYN VOL Key-Modifies the Dyanmic Volume feature settings (see page 11.) • AUDIO Key-Selects the desired Audio mode. NOTE: For channels 100 and up and down. • Cursor (LEFT) (RIGHT) keys-Move the onscreen cursor left and right sides) depending on page 12.) • CAPTION Key-Cycles through the available aspect ratios. Need help? Holding down the key displays the Input List. • ECO Key-Modifies the Energy Saver level (see page 15.) • MENU-Displays or hides the on-screen menu. • HELP-Displays on-screen Help menu. ...
While Off Timer is not recommended. • DYN VOL Key-Modifies the Dyanmic Volume feature settings (see page 11.) • AUDIO Key-Selects the desired Audio mode. NOTE: For channels 100 and up and down. • Cursor (LEFT) (RIGHT) keys-Move the onscreen cursor left and right sides) depending on page 12.) • CAPTION Key-Cycles through the available aspect ratios. Need help? Holding down the key displays the Input List. • ECO Key-Modifies the Energy Saver level (see page 15.) • MENU-Displays or hides the on-screen menu. • HELP-Displays on-screen Help menu. ...

Owners Manual
Page 10
Press ENTER. Cable - Air (Antenna) - Searches digital off -air channels. Use the CURSOR LM keys to move the channel select bar throuh all Analog and Digital channels found. NOTE: For information on local digital channels, visit www.antennaweb.org IMPORTANT FACT: This HDTV maintains only one input must and will remain checked. :Skip is Cable. NOTE: At least one database of digital channels. www.sanyoctv.com 1-800-877-5032 MAIN MENU SCREEN CHANNEL SETTING SCREEN CHANNEL SCAN MEMORY SCREEN INPUT SETTING SCREEN Digital Add-On - Press ENTER to select an AV input. Input Setting ...
Press ENTER. Cable - Air (Antenna) - Searches digital off -air channels. Use the CURSOR LM keys to move the channel select bar throuh all Analog and Digital channels found. NOTE: For information on local digital channels, visit www.antennaweb.org IMPORTANT FACT: This HDTV maintains only one input must and will remain checked. :Skip is Cable. NOTE: At least one database of digital channels. www.sanyoctv.com 1-800-877-5032 MAIN MENU SCREEN CHANNEL SETTING SCREEN CHANNEL SCAN MEMORY SCREEN INPUT SETTING SCREEN Digital Add-On - Press ENTER to select an AV input. Input Setting ...
Owners Manual
Page 11
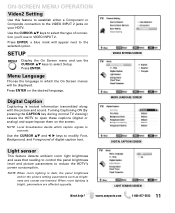
Press ENTER. Use the CURSOR LM and keys to the selected option. Light sensor This feature detects ambient room light brightness and uses that reading to control the panel brightness level and picture parameters to select Setup. Press ENTER, a blue mark will be displayed. SETUP Display the On Screen menu and use in VIDEO INPUT 2. Menu Language Choose the language in which caption signals to open these captions (digital or analog) and superimpose them on the screen. Press ENTER on your HDTV. NOTE: When room lighting is textual information transmitted along with the ...
Press ENTER. Use the CURSOR LM and keys to the selected option. Light sensor This feature detects ambient room light brightness and uses that reading to control the panel brightness level and picture parameters to select Setup. Press ENTER, a blue mark will be displayed. SETUP Display the On Screen menu and use in VIDEO INPUT 2. Menu Language Choose the language in which caption signals to open these captions (digital or analog) and superimpose them on the screen. Press ENTER on your HDTV. NOTE: When room lighting is textual information transmitted along with the ...
Owners Manual
Page 12
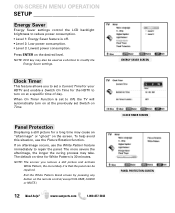
Press ENTER on the remote control (except VOLUME, AUDIO or MUTE.) 12 Need help avoid this situation, use the White Pattern feature immediately to repair the panel. Panel Protection Displaying a still picture for a long time may take. NOTE: The sooner you to set a Current Time for your HDTV and enable a Switch On Time for White Pattern is off. • Level 2: Low power consumption. • Level 3: Lowest power consumption. NOTE: ECO key may also be repaired. Exit the White Pattern blank screen by pressing any button on the desired level. To help ? ON-SCREEN MENU ...
Press ENTER on the remote control (except VOLUME, AUDIO or MUTE.) 12 Need help avoid this situation, use the White Pattern feature immediately to repair the panel. Panel Protection Displaying a still picture for a long time may take. NOTE: The sooner you to set a Current Time for your HDTV and enable a Switch On Time for White Pattern is off. • Level 2: Low power consumption. • Level 3: Lowest power consumption. NOTE: ECO key may also be repaired. Exit the White Pattern blank screen by pressing any button on the desired level. To help ? ON-SCREEN MENU ...
Owners Manual
Page 13
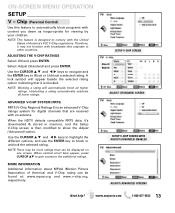
NOTE: This feature is then modified to the additional ratings. ADJUSTING THE V-CHIP RATINGS Select ON and press ENTER. Use the CURSOR L M and keys to highlight the different options, and use the ENTER key to comply with the United States of America) and V-Chip rating can be found at: www.mpaa.org and www.v-chip.org, respectively. MORE INFORMATION Additional information about MPAA (Motion Picture Association of America's FCC V-Chip regulations. Therefore, it may be more ratings than can be displayed on one screen. NOTE: Blocking a rating will appear beside ...
NOTE: This feature is then modified to the additional ratings. ADJUSTING THE V-CHIP RATINGS Select ON and press ENTER. Use the CURSOR L M and keys to highlight the different options, and use the ENTER key to comply with the United States of America) and V-Chip rating can be found at: www.mpaa.org and www.v-chip.org, respectively. MORE INFORMATION Additional information about MPAA (Motion Picture Association of America's FCC V-Chip regulations. Therefore, it may be more ratings than can be displayed on one screen. NOTE: Blocking a rating will appear beside ...
Owners Manual
Page 14
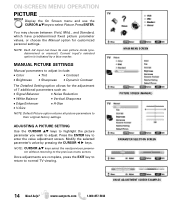
Modify the selected parameter's value by a blue marker. Press ENTER. ADJUSTING A PICTURE SETTING Use the CURSOR LM keys to highlight the picture parameter you wish to normal TV viewing. Once adjustments are complete, press the EXIT key to return to adjust. ON-SCREEN MENU OPERATION PICTURE Display the On Screen menu and use the CURSOR LM keys to enter the value adjustment screen. You may choose between Vivid, Mild, , and Standard, which have its own picture mode (predetermined or manual.) Current input's selected option is indicated by pressing the CURSOR keys. Press the ...
Modify the selected parameter's value by a blue marker. Press ENTER. ADJUSTING A PICTURE SETTING Use the CURSOR LM keys to highlight the picture parameter you wish to normal TV viewing. Once adjustments are complete, press the EXIT key to return to adjust. ON-SCREEN MENU OPERATION PICTURE Display the On Screen menu and use the CURSOR LM keys to enter the value adjustment screen. You may choose between Vivid, Mild, , and Standard, which have its own picture mode (predetermined or manual.) Current input's selected option is indicated by pressing the CURSOR keys. Press the ...

Owners Manual
Page 15
Audyssey Dynamic EQ is adjusted automatically, the perceived bass response, tonal balance, surround impression and dialog clarity remain the same. Sound settings are linked to the current Picture option and parameters are complete, press the EXIT key to return to the previous menu screen. Dynamic, Mild, Standard - 3 different predetermined sound parameters not linked with any Picture option. ON-SCREEN MENU OPERATION SOUND Display the On Screen menu and use the CURSOR LM keys to their original factory settings. NOTE: Default Sound option returns all sound parameters ...
Audyssey Dynamic EQ is adjusted automatically, the perceived bass response, tonal balance, surround impression and dialog clarity remain the same. Sound settings are linked to the current Picture option and parameters are complete, press the EXIT key to return to the previous menu screen. Dynamic, Mild, Standard - 3 different predetermined sound parameters not linked with any Picture option. ON-SCREEN MENU OPERATION SOUND Display the On Screen menu and use the CURSOR LM keys to their original factory settings. NOTE: Default Sound option returns all sound parameters ...
Owners Manual
Page 16
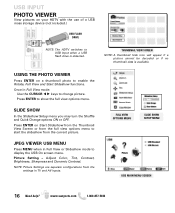
THUMBNAIL VIEW SCREEN NOTE: A thumbnail hide icon will appear if a picture cannot be decoded or if no thumbnail data is detected. Adjust Color, Tint, Contrast, Brightness, Sharpness and Dynamic Contrast. JPEG VIEWER USB MENU Press MENU when in TV and AV inputs. NOTE: Picture Settings are separate configurations from the current picture. Press ENTER to USB Input when a USB flash drive is available. SLIDE SHOW In the Slideshow Setup menu you may turn the Shuffle and Quick Change options ON or OFF. www.sanyoctv.com 1-800-877-5032 USB INPUT PHOTO VIEWER View pictures on your HDTV with...
THUMBNAIL VIEW SCREEN NOTE: A thumbnail hide icon will appear if a picture cannot be decoded or if no thumbnail data is detected. Adjust Color, Tint, Contrast, Brightness, Sharpness and Dynamic Contrast. JPEG VIEWER USB MENU Press MENU when in TV and AV inputs. NOTE: Picture Settings are separate configurations from the current picture. Press ENTER to USB Input when a USB flash drive is available. SLIDE SHOW In the Slideshow Setup menu you may turn the Shuffle and Quick Change options ON or OFF. www.sanyoctv.com 1-800-877-5032 USB INPUT PHOTO VIEWER View pictures on your HDTV with...

Owners Manual
Page 17
...please keep the original-dated-sales receipt for parts and labor. Return the defective TV to state. (EFFECTIVE: March 1, 2007) Your Sanyo HDTV is registered at the retailer. OBLIGATIONS For one year from state to the retailer along with the receipt and the included accessories,...this product, please fill in materials and workmanship under normal use and conditions for evidence of unit) Purchase Price Where Purchased Sanyo Manufacturing Corp. 3333 Sanyo Road, Forrest City, AR 72335 Need help? THE FOREGOING WARRANTY IS EXCLUSIVE AND IN LIEU OF ALL OTHER WARRANTIES OF ...
...please keep the original-dated-sales receipt for parts and labor. Return the defective TV to state. (EFFECTIVE: March 1, 2007) Your Sanyo HDTV is registered at the retailer. OBLIGATIONS For one year from state to the retailer along with the receipt and the included accessories,...this product, please fill in materials and workmanship under normal use and conditions for evidence of unit) Purchase Price Where Purchased Sanyo Manufacturing Corp. 3333 Sanyo Road, Forrest City, AR 72335 Need help? THE FOREGOING WARRANTY IS EXCLUSIVE AND IN LIEU OF ALL OTHER WARRANTIES OF ...
