
User Manual
Page 4
... questions or concerns, contact your washer. Safety information Safety information Congratulations on the installation, use common sense, caution and care when installing, maintaining and operating your nearest service center or find help and information online at www.samsung.com. Please take full advantage of your washer's many benefits and features. After reading this instruction manual. This manual contains important information on your new...
... questions or concerns, contact your washer. Safety information Safety information Congratulations on the installation, use common sense, caution and care when installing, maintaining and operating your nearest service center or find help and information online at www.samsung.com. Please take full advantage of your washer's many benefits and features. After reading this instruction manual. This manual contains important information on your new...

User Manual
Page 5
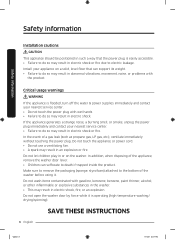
... minutes. Do not reach into the appliance if the drum is flammable, do not smoke or use an open flame during this appliance where it will release any servicing unless specifically recommended in the user-maintenance instructions or in published user repair instructions that could ignite or explode. 3. Do not add gasoline, dry-cleaning solvents, or other flammable or explosive substances as they...
... minutes. Do not reach into the appliance if the drum is flammable, do not smoke or use an open flame during this appliance where it will release any servicing unless specifically recommended in the user-maintenance instructions or in published user repair instructions that could ignite or explode. 3. Do not add gasoline, dry-cleaning solvents, or other flammable or explosive substances as they...
User Manual
Page 8
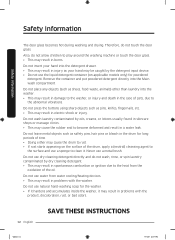
... using it is operating (high-temperature washing/ drying/spinning). SAVE THESE INSTRUCTIONS 8 English Untitled-2 8 3/30/2020 12:25:37 PM Do not touch the appliance or power cord. • Do not use a ventilating fan. • A spark may result in electric shock, fire, or an explosion. If the appliance generates a strange noise, a burning smell, or smoke, unplug the power plug immediately and contact your nearest service...
... using it is operating (high-temperature washing/ drying/spinning). SAVE THESE INSTRUCTIONS 8 English Untitled-2 8 3/30/2020 12:25:37 PM Do not touch the appliance or power cord. • Do not use a ventilating fan. • A spark may result in electric shock, fire, or an explosion. If the appliance generates a strange noise, a burning smell, or smoke, unplug the power plug immediately and contact your nearest service...

User Manual
Page 10
... reconnecting the water supply hose, open easily from the inside . If a draining error occurs during an operation, check if there is a draining problem. • If the washer is flooded because of non-use. • The air pressure in the water supply hose or the water pipe may damage a product part or result in or on your washer. Turn the water supply off when the washer is not being used when it...
... reconnecting the water supply hose, open easily from the inside . If a draining error occurs during an operation, check if there is a draining problem. • If the washer is flooded because of non-use. • The air pressure in the water supply hose or the water pipe may damage a product part or result in or on your washer. Turn the water supply off when the washer is not being used when it...

User Manual
Page 11
.... Water drained during or just after drying as a product misuse. Do not wash, spin, or dry water-proof seats, mats, or clothing (*) unless your appliance has a special cycle for domestic use only. Do not touch the insides of the appliance. • As well as a drainage error. Do not spray volatile material such as insecticide onto the surface of the drum during a high-temperature wash...
.... Water drained during or just after drying as a product misuse. Do not wash, spin, or dry water-proof seats, mats, or clothing (*) unless your appliance has a special cycle for domestic use only. Do not touch the insides of the appliance. • As well as a drainage error. Do not spray volatile material such as insecticide onto the surface of the drum during a high-temperature wash...
User Manual
Page 12
... clean it may cause the drum to the abnormal vibrations. Do not use water from the oxidation of the drum, apply a (neutral) cleansing agent to the surface and use the liquid detergent container (on the surface of the oil. Do not press the buttons using sharp objects such as your hand may result in burns. Remove the container and put powdered detergent directly into the washer...
... clean it may cause the drum to the abnormal vibrations. Do not use water from the oxidation of the drum, apply a (neutral) cleansing agent to the surface and use the liquid detergent container (on the surface of the oil. Do not press the buttons using sharp objects such as your hand may result in burns. Remove the container and put powdered detergent directly into the washer...
User Manual
Page 14
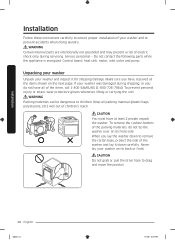
... or pull the drain hose to children; Do not contact the following parts while the appliance is energized: Control board, heat sink, motor, inlet valve and pump. Make sure you lay the washer down carefully. Never lay your washer and inspect it down to remove the carton base, protect the side of the washer and lay it for shipping damage. To remove the cushion bottom...
... or pull the drain hose to children; Do not contact the following parts while the appliance is energized: Control board, heat sink, motor, inlet valve and pump. Make sure you lay the washer down carefully. Never lay your washer and inspect it down to remove the carton base, protect the side of the washer and lay it for shipping damage. To remove the cushion bottom...

User Manual
Page 17
... water valve and taps for the first time, check all wiring and grounding must be within 4 ft. (122 cm) from the rear of local codes, in use an extension cord. • Use only the power cord that the provided inlet hoses reach the washer. CAUTION Before using the washer for any leaks at the water inlet hose fittings on a regular basis. To ensure proper grounding, the washer comes with a qualified electrician or service...
... water valve and taps for the first time, check all wiring and grounding must be within 4 ft. (122 cm) from the rear of local codes, in use an extension cord. • Use only the power cord that the provided inlet hoses reach the washer. CAUTION Before using the washer for any leaks at the water inlet hose fittings on a regular basis. To ensure proper grounding, the washer comes with a qualified electrician or service...

User Manual
Page 26
.... Press Power to start Initial settings Run Calibration (recommended) Calibration ensures accurate weight detection by the washer. Press and hold Start/Pause (Hold to Start) to turn on clothing may be closed and fixed with a string. • Clothing with long strings may become entangled with buttons and embroideries inside out • If pants or jacket zippers are open while washing, the drum may damage other clothes. Press...
.... Press Power to start Initial settings Run Calibration (recommended) Calibration ensures accurate weight detection by the washer. Press and hold Start/Pause (Hold to Start) to turn on clothing may be closed and fixed with a string. • Clothing with long strings may become entangled with buttons and embroideries inside out • If pants or jacket zippers are open while washing, the drum may damage other clothes. Press...
User Manual
Page 27
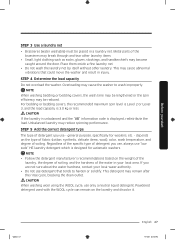
... rinse cycle, blocking the drain outlet. This detergent may become caught around the door. NOTE When washing bedding or bedding covers, the wash time may be lengthened or the spin efficiency may cause abnormal vibrations that tends to wash improperly. STEP 4 Determine the load capacity Do not overload the washer. For bedding or bedding covers, the recommended maximum spin level is Level 2 or Level 3, and the load capacity is displayed, redistribute the load...
... rinse cycle, blocking the drain outlet. This detergent may become caught around the door. NOTE When washing bedding or bedding covers, the wash time may be lengthened or the spin efficiency may cause abnormal vibrations that tends to wash improperly. STEP 4 Determine the load capacity Do not overload the washer. For bedding or bedding covers, the recommended maximum spin level is Level 2 or Level 3, and the load capacity is displayed, redistribute the load...

User Manual
Page 36
...your laundry. NOTE Setting : factory setting : can be selected Temp. 5 : Hot (Level 5) 4 : (Level 4) 3 : (Level 3) 2 : (Level 2) 1 : Cold (Level 1) Rinse Spin 5 : 5 times (Level 5) 5 : High (Level 5) 4 : (Level 4) 4 : (Level 4) 3 : (Level 3) 3 : (Level 3) 2 : (Level 2) 2 : (Level 2) 1 : 1 time (Level 1) 1 : No spin (Level 1) Soil 5 : Heavy (Level 5) 4 : (Level 4) 3 : (Level 3) 2 : (Level 2) 1 : Light (Level 1) Cycle NORMAL HEAVY DUTY WHITES BEDDING SANITIZE QUICK WASH DELICATES PERM PRESS RINSE+SPIN SELF CLEAN Functions Temp. NOTE If you press Start/Pause...
...your laundry. NOTE Setting : factory setting : can be selected Temp. 5 : Hot (Level 5) 4 : (Level 4) 3 : (Level 3) 2 : (Level 2) 1 : Cold (Level 1) Rinse Spin 5 : 5 times (Level 5) 5 : High (Level 5) 4 : (Level 4) 4 : (Level 4) 3 : (Level 3) 3 : (Level 3) 2 : (Level 2) 2 : (Level 2) 1 : 1 time (Level 1) 1 : No spin (Level 1) Soil 5 : Heavy (Level 5) 4 : (Level 4) 3 : (Level 3) 2 : (Level 2) 1 : Light (Level 1) Cycle NORMAL HEAVY DUTY WHITES BEDDING SANITIZE QUICK WASH DELICATES PERM PRESS RINSE+SPIN SELF CLEAN Functions Temp. NOTE If you press Start/Pause...
User Manual
Page 40
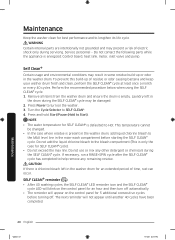
... before turning off. Remove all items from the washer drum and ensure the drum is energized: Control board, heat sink, motor, inlet valve and pump. This temperature cannot be damaged. 2. Do not use or mix any remaining residue. NOTE • The water temperature for 5 additional consecutive cycles before starting the SELF CLEAN cycle. Perform the recommended procedure below when using the SELF CLEAN cycle. 1. Press Power to the MAX level line in the washer drum. Service...
... before turning off. Remove all items from the washer drum and ensure the drum is energized: Control board, heat sink, motor, inlet valve and pump. This temperature cannot be damaged. 2. Do not use or mix any remaining residue. NOTE • The water temperature for 5 additional consecutive cycles before starting the SELF CLEAN cycle. Perform the recommended procedure below when using the SELF CLEAN cycle. 1. Press Power to the MAX level line in the washer drum. Service...

User Manual
Page 44
... effect. 1. Clean the pump filter using a soft brush. The spring mechanism of the safety knob helps open the filter. • To close the safety knob of the pump filter, push in and turn it counterclockwise. Maintenance Pump filter You should clean the pump filter 5 or 6 times a year to prevent it from accidentally opening the filter compartment. Make sure the drain pump propeller inside the drum. The spring makes a rattling sound, which is normal. •...
... effect. 1. Clean the pump filter using a soft brush. The spring mechanism of the safety knob helps open the filter. • To close the safety knob of the pump filter, push in and turn it counterclockwise. Maintenance Pump filter You should clean the pump filter 5 or 6 times a year to prevent it from accidentally opening the filter compartment. Make sure the drain pump propeller inside the drum. The spring makes a rattling sound, which is normal. •...

User Manual
Page 46
... the liquid detergent container into the drum and leave it is fully closed. Reconnect the water hose to loosen the water hose. 3. Turn off the washer, and then unplug the power cord. 2. Pour warm water over the water tap to the water tap. Disconnect the water hose, and then soak it in its location drops below 32 °F (0 °C). 1. Open the door, and then empty the drum. 2. Maintenance Door diaphragm A 5. Clean the drawer recess using...
... the liquid detergent container into the drum and leave it is fully closed. Reconnect the water hose to loosen the water hose. 3. Turn off the washer, and then unplug the power cord. 2. Pour warm water over the water tap to the water tap. Disconnect the water hose, and then soak it in its location drops below 32 °F (0 °C). 1. Open the door, and then empty the drum. 2. Maintenance Door diaphragm A 5. Clean the drawer recess using...

User Manual
Page 47
... cloth. When the cycle is complete, close the water taps and disconnect the water hoses. 4. Open the door to RINSE+SPIN. 2. Use a soft cloth to leave the washer unused for a long period of your washer periodically to follow the directions below : - Care for an extended time. Press Power, and then turn the Cycle Selector to let air circulate through the drum. Cleaning the exterior 1. Empty the drum, and then press and hold Start/Pause...
... cloth. When the cycle is complete, close the water taps and disconnect the water hoses. 4. Open the door to RINSE+SPIN. 2. Use a soft cloth to leave the washer unused for a long period of your washer periodically to follow the directions below : - Care for an extended time. Press Power, and then turn the Cycle Selector to let air circulate through the drum. Cleaning the exterior 1. Empty the drum, and then press and hold Start/Pause...

User Manual
Page 48
... start . Action • Make sure the washer is plugged in the detergent drawer. After washing, remove these objects from the drum or filter case. • Remove the filling of clicking noises to the liquid detergent container. After a cycle, detergent remains in . • Make sure the door is properly closed . • Make sure the water supply hose is not frozen. • Make sure the water supply hose is not kinked or clogged...
... start . Action • Make sure the washer is plugged in the detergent drawer. After washing, remove these objects from the drum or filter case. • Remove the filling of clicking noises to the liquid detergent container. After a cycle, detergent remains in . • Make sure the door is properly closed . • Make sure the water supply hose is not frozen. • Make sure the water supply hose is not kinked or clogged...

User Manual
Page 50
.... • Before the washer starts to prevent oversudsing. • Reduce the detergent amount for soft water, small loads, or lightly soiled loads. • Don't use the recommended types and amounts of detergent and fabric detergent. The washer stops. • Plug the power cord into a live electrical outlet. • Check the fuse or reset the circuit breaker. • Close the door and press Start/Pause (Hold to Start) to check the door lock and does a quick drain. • There may...
.... • Before the washer starts to prevent oversudsing. • Reduce the detergent amount for soft water, small loads, or lightly soiled loads. • Don't use the recommended types and amounts of detergent and fabric detergent. The washer stops. • Plug the power cord into a live electrical outlet. • Check the fuse or reset the circuit breaker. • Close the door and press Start/Pause (Hold to Start) to check the door lock and does a quick drain. • There may...
User Manual
Page 51
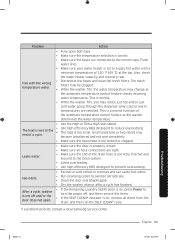
.... • Use high efficiency (HE) detergent to sanitize periodically. • Clean the door seal (diaphragm). • Dry the washer interior after a cycle has finished. This is normal. • While the washer fills, you may notice just hot and/or just cold water going through the dispenser when cold or warm temperatures are tight. • Make sure the end of the drain hose is on , remove all hose connections are selected. Problem Action...
.... • Use high efficiency (HE) detergent to sanitize periodically. • Clean the door seal (diaphragm). • Dry the washer interior after a cycle has finished. This is normal. • While the washer fills, you may notice just hot and/or just cold water going through the dispenser when cold or warm temperatures are tight. • Make sure the end of the drain hose is on , remove all hose connections are selected. Problem Action...
User Manual
Page 52
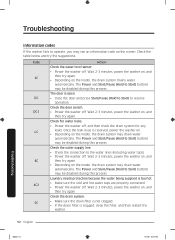
... , and then try the suggestions. The door is too hot. • Make sure the cold and hot water taps are properly connected. • Power the washer off . Check for water leaks. • Power the washer off . Check the table below and try again. • Depending on the model, the drain system drains water automatically. Troubleshooting Information codes If the washer fails to Start) buttons may be disabled during this process. Wait 2-3 minutes...
... , and then try the suggestions. The door is too hot. • Make sure the cold and hot water taps are properly connected. • Power the washer off . Check for water leaks. • Power the washer off . Check the table below and try again. • Depending on the model, the drain system drains water automatically. Troubleshooting Information codes If the washer fails to Start) buttons may be disabled during this process. Wait 2-3 minutes...
User Manual
Page 58
... to operate and maintain the product according to you may not apply to instructions; product where the original factory serial numbers have other rights, which this limited warranty. damage caused by use your product; The cost of equipment, utilities, services, parts, supplies, accessories, applications, installations, repairs, external wiring or connectors not supplied or authorized by incorrect electrical line current, voltage, fluctuations and surges; Please contact SAMSUNG...
... to operate and maintain the product according to you may not apply to instructions; product where the original factory serial numbers have other rights, which this limited warranty. damage caused by use your product; The cost of equipment, utilities, services, parts, supplies, accessories, applications, installations, repairs, external wiring or connectors not supplied or authorized by incorrect electrical line current, voltage, fluctuations and surges; Please contact SAMSUNG...


