Samsung WF350ANP/XAA Research
View Results Below
Free Samsung WF350ANP/XAA manuals!
Problems with Samsung WF350ANP/XAA?
Ask a Question
Free Samsung WF350ANP/XAA manuals!
Problems with Samsung WF350ANP/XAA?
Ask a Question
Related Manual Pages


Related Videos

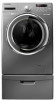
Samsung WF350ANP Front Load Washer
Duration: :48
Total Views: 131
Duration: :48
Total Views: 131
Similar Questions

Water Was Leaking Onto The Floor, Replaced Front Boot Seal And Still Leaks
(Posted by Jkroll58 3 years ago)

How Do I Run Samsung Vrt Steam Washer In Test Mode
(Posted by lydiamauric 9 years ago)


Door Diaphram
What is the part number for the door diaphram on the model of samsung washer wf350anp/xaa
What is the part number for the door diaphram on the model of samsung washer wf350anp/xaa
(Posted by Donaldoswald 11 years ago)

Samsung Washer Wf350an Xaa Test Mode
How do I start the test mode for the above washer?
How do I start the test mode for the above washer?
(Posted by nontoonyt 12 years ago)