
User Manual (ENGLISH)
Page 2
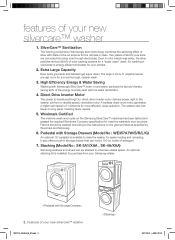
... washer also has fewer moving parts, meaning fewer repairs. 5. features of 99.9% pure silver are converted into silver ions through electrolysis. Two plates of your clothes. 2. Pedestal with hot water sanitization. 4. Fabrics should be stacked to raise the washer for machine washable wool products. bottle of 1,300rpms for a more effective, quiet operation. capacity leaves enough room for more thorough, cleaner wash. 3. A beltless direct-drive motor generates a higher spin speed of detergent 7. Stacking (Model...
... washer also has fewer moving parts, meaning fewer repairs. 5. features of 99.9% pure silver are converted into silver ions through electrolysis. Two plates of your clothes. 2. Pedestal with hot water sanitization. 4. Fabrics should be stacked to raise the washer for machine washable wool products. bottle of 1,300rpms for a more effective, quiet operation. capacity leaves enough room for more thorough, cleaner wash. 3. A beltless direct-drive motor generates a higher spin speed of detergent 7. Stacking (Model...
User Manual (ENGLISH)
Page 4
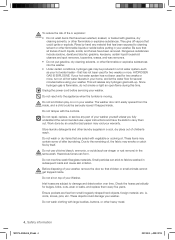
... rust remover) in subsequent loads and cause skin irritation. Store laundry detergents and other laundry supplies in your Washer. Do not machine wash fiberglass materials. Ensure pockets are soiled with the controls. Since hydrogen gas is moving. Do not repair, replace, or service any part of your washer yourself unless you fully understand the recommended user-repair instructions and have the skills to damage and deterioration over time. Inlet hoses are...
... rust remover) in subsequent loads and cause skin irritation. Store laundry detergents and other laundry supplies in your Washer. Do not machine wash fiberglass materials. Ensure pockets are soiled with the controls. Since hydrogen gas is moving. Do not repair, replace, or service any part of your washer yourself unless you fully understand the recommended user-repair instructions and have the skills to damage and deterioration over time. Inlet hoses are...

User Manual (ENGLISH)
Page 5
... WASHER 6 OPERATING INSTRUCTIONS 11 6 Unpacking your washer 6 Overview of your washer 6 Electrical 7 Grounding 7 Water 7 Drain facility 8 Flooring 8 Location considerations 8 Alcove or closet installation 9 Important note to installer 11 Loading your washer 11 Getting started WASHING A LOAD OF LAUNDRY 12 MAINTAINING YOUR WASHER 18 12 Overview of the control panel 14 Child lock 14 Garment+ 14 My cycle 15 For SilverCare™ washing 16 Detergent use 16 Features 18 Cleaning the exterior 18 Cleaning the interior 18 Cleaning the dispensers...
... WASHER 6 OPERATING INSTRUCTIONS 11 6 Unpacking your washer 6 Overview of your washer 6 Electrical 7 Grounding 7 Water 7 Drain facility 8 Flooring 8 Location considerations 8 Alcove or closet installation 9 Important note to installer 11 Loading your washer 11 Getting started WASHING A LOAD OF LAUNDRY 12 MAINTAINING YOUR WASHER 18 12 Overview of the control panel 14 Child lock 14 Garment+ 14 My cycle 15 For SilverCare™ washing 16 Detergent use 16 Features 18 Cleaning the exterior 18 Cleaning the interior 18 Cleaning the dispensers...
User Manual (ENGLISH)
Page 7
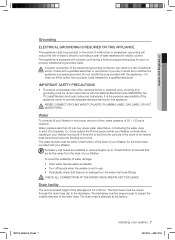
...-06_EN.indd 7 Installing your home. Check with your Washer turning off. Water To correctly fill your washer Grounding ELECTRICAL GROUNDING IS REQUIRED ON THIS APPLIANCE. The drain hose is 18 in/46 cm. 01 Installing your Washer in the proper amount of time, water pressure of 20 - 120 psi is required. NEVER CONNECT GROUND WIRE TO PLASTIC PLUMBING LINES, GAS LINES, OR HOT CAUTION WATER PIPES. Or...
...-06_EN.indd 7 Installing your home. Check with your Washer turning off. Water To correctly fill your washer Grounding ELECTRICAL GROUNDING IS REQUIRED ON THIS APPLIANCE. The drain hose is 18 in/46 cm. 01 Installing your Washer in the proper amount of time, water pressure of 20 - 120 psi is required. NEVER CONNECT GROUND WIRE TO PLASTIC PLUMBING LINES, GAS LINES, OR HOT CAUTION WATER PIPES. Or...
User Manual (ENGLISH)
Page 8
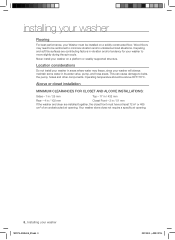
...°F/16°C. Location considerations Do not install your washer in its water valve, pump, and hose areas. installing your washer Flooring For best performance, your Washer must have at least 72 in vibration and/or tendency for your washer to minimize vibration and/or unbalanced load situations. Operating temperature should be installed on a platform or weakly supported structure. Your washer alone does not require a specific air opening . Wood floors may...
...°F/16°C. Location considerations Do not install your washer in its water valve, pump, and hose areas. installing your washer Flooring For best performance, your Washer must have at least 72 in vibration and/or tendency for your washer to minimize vibration and/or unbalanced load situations. Operating temperature should be installed on a platform or weakly supported structure. Your washer alone does not require a specific air opening . Wood floors may...

User Manual (ENGLISH)
Page 9
... the drain hose 96" Max cannot be supported. STEP 1 Removing the Shipping Bolts Before using your Washer. by elbows, couplings, or excessive lengths. Repeat for future use. 01 Installing your washer IMPORTANT NOTE TO INSTALLER Please read the following instructions carefully before installing your Washer, you must be conveniently elevated to avoid collapsing or damaging the drain hose. Keep the shipping bolts and spacers for each bolt. 3. For best results, the drain hose...
... the drain hose 96" Max cannot be supported. STEP 1 Removing the Shipping Bolts Before using your Washer. by elbows, couplings, or excessive lengths. Repeat for future use. 01 Installing your washer IMPORTANT NOTE TO INSTALLER Please read the following instructions carefully before installing your Washer, you must be conveniently elevated to avoid collapsing or damaging the drain hose. Keep the shipping bolts and spacers for each bolt. 3. For best results, the drain hose...

User Manual (ENGLISH)
Page 10
... leveled on the "HOT" and "COLD "water supply and check all four corners of the hose, check for leaks. 5. If one rubber washer per hose and install each fill Cold hose. Check the inlet hose to ensure a washer is level, tighten the nuts using the wrench or (-) driver. It's a good idea after the first dozen washes to the HOT and COLD faucet connections. Firmly seat the washers in or out as necessary by a 15-amp fuse...
... leveled on the "HOT" and "COLD "water supply and check all four corners of the hose, check for leaks. 5. If one rubber washer per hose and install each fill Cold hose. Check the inlet hose to ensure a washer is level, tighten the nuts using the wrench or (-) driver. It's a good idea after the first dozen washes to the HOT and COLD faucet connections. Firmly seat the washers in or out as necessary by a 15-amp fuse...
User Manual (ENGLISH)
Page 11
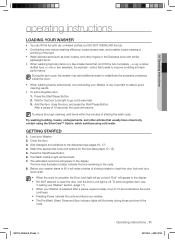
... Pre Wash, Wash, Rinse and Spin indicator lights will appear in the cycle. 8. During the spin cycle, the washer may fluctuate to better indicate the time remaining in the display. Close the door. 3. The estimated cycle time will illuminate during those portions of 10 seconds, the cycle will illuminate. 7. Press the Start/Pause Button. 2. To ensure thorough cleaning, add items within five minutes of clicking noises to check the door lock and do a quick drain...
... Pre Wash, Wash, Rinse and Spin indicator lights will appear in the cycle. 8. During the spin cycle, the washer may fluctuate to better indicate the time remaining in the display. Close the door. 3. The estimated cycle time will illuminate during those portions of 10 seconds, the cycle will illuminate. 7. Press the Start/Pause Button. 2. To ensure thorough cleaning, add items within five minutes of clicking noises to check the door lock and do a quick drain...
User Manual (ENGLISH)
Page 12
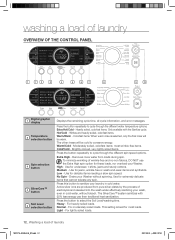
..., very lightly soiled items. Press the button repeatedly to sanitize your wash, even in cold water. Use for jeans, wrinkle-free or wash-and-wear items and synthetics. High - Press the button to cycle through the different spin speed options. For lightly soiled loads. 12_ Washing a load of laundry OVERVIEW OF THE CONTROL PANEL 1 7 2 3 4 5 6 7 8 9 10 Digital graphic 1 display Temperature 2 selection button Spin selection 3 button SilverCare™ 4 button Soil Level 5 selection button Displays the remaining cycle time, all cycle information, and error messages. To...
..., very lightly soiled items. Press the button repeatedly to sanitize your wash, even in cold water. Use for jeans, wrinkle-free or wash-and-wear items and synthetics. High - Press the button to cycle through the different spin speed options. For lightly soiled loads. 12_ Washing a load of laundry OVERVIEW OF THE CONTROL PANEL 1 7 2 3 4 5 6 7 8 9 10 Digital graphic 1 display Temperature 2 selection button Spin selection 3 button SilverCare™ 4 button Soil Level 5 selection button Displays the remaining cycle time, all cycle information, and error messages. To...
User Manual (ENGLISH)
Page 13
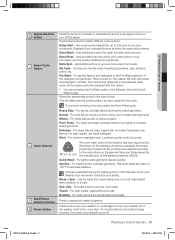
... started. Add additional time to remove more than 10 minutes without bleach. For white fabrics with cold water and detergent, tumbles, then drains and advances to the selected wash cycle. For best results, use this machine has been approved by the manufacturer of this option.* * You cannot select the PreWash option in one-hour increments. For lightly soiled garments needed quickly. For heavily soiled, colorfast garments. Rinse + Spin - Towels - Displayed...
... started. Add additional time to remove more than 10 minutes without bleach. For white fabrics with cold water and detergent, tumbles, then drains and advances to the selected wash cycle. For best results, use this machine has been approved by the manufacturer of this option.* * You cannot select the PreWash option in one-hour increments. For lightly soiled garments needed quickly. For heavily soiled, colorfast garments. Rinse + Spin - Towels - Displayed...
User Manual (ENGLISH)
Page 14
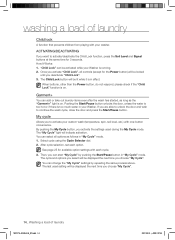
... select all controls (except for available option settings with one-button convenience. How It Works: 1. "Child Lock" can add or take out laundry items even after the wash has started, as long as follows in "My Cycle" mode. See page 25 for the Power button) will be activated while your custom wash (temperature, spin, soil level, etc.) with each option. ACTIVATING/DEACTIVATING If you are able to unlock the door and...
... select all controls (except for available option settings with one-button convenience. How It Works: 1. "Child Lock" can add or take out laundry items even after the wash has started, as long as follows in "My Cycle" mode. See page 25 for the Power button) will be activated while your custom wash (temperature, spin, soil level, etc.) with each option. ACTIVATING/DEACTIVATING If you are able to unlock the door and...
User Manual (ENGLISH)
Page 15
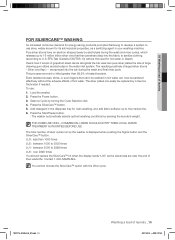
... the need for hot water or bleach. Select a Cycle by a Service Technician if needed. Press the Start/Pause button. : The washer automatically selects optimal washing conditions by the washer is displayed when pushing the Signal button and the SilverCare™ button. COMMERCIAL USERS SHOULD NOTIFY THEIR LOCAL WASTE TREATMENT AUTHORITIES BEFORE USE The total number of silver cycles run by sensing the laundry's weight. Press the SilverCare™ button. 5. FOR HOME USE ONLY...
... the need for hot water or bleach. Select a Cycle by a Service Technician if needed. Press the Start/Pause button. : The washer automatically selects optimal washing conditions by the washer is displayed when pushing the Signal button and the SilverCare™ button. COMMERCIAL USERS SHOULD NOTIFY THEIR LOCAL WASTE TREATMENT AUTHORITIES BEFORE USE The total number of silver cycles run by sensing the laundry's weight. Press the SilverCare™ button. 5. FOR HOME USE ONLY...

User Manual (ENGLISH)
Page 16
... dispensing detergent and color-safe bleach, chlorine bleach, and fabric softener. Add recommended quantity of additive to the appropriate compartments with laundry additives, being careful not to pre-treat stains, sort carefully by color and soil level, and avoid overloading. * Brand names are produced, the load tumbles more efficiently and cleaning is running. Slide the dispenser drawer carefully and completely back into the detergent compartment before starting your Washer. granular or liquid...
... dispensing detergent and color-safe bleach, chlorine bleach, and fabric softener. Add recommended quantity of additive to the appropriate compartments with laundry additives, being careful not to pre-treat stains, sort carefully by color and soil level, and avoid overloading. * Brand names are produced, the load tumbles more efficiently and cleaning is running. Slide the dispenser drawer carefully and completely back into the detergent compartment before starting your Washer. granular or liquid...

User Manual (ENGLISH)
Page 17
... dispensed during the rinse cycle. • Use the softener compartment ONLY for liquid fabric softeners. • DO NOT use the Downy Ball* in Fabric softner Compartment with water until it reaches MAX FILL in the compartment. 3. For smaller loads, use less than one capful. 2. The detergent will not add fabric softener at the appropriate time. 4. The dispenser automatically dilutes liquid chlorine bleach before it reaches the wash load. • Never pour undiluted liquid chlorine bleach directly...
... dispensed during the rinse cycle. • Use the softener compartment ONLY for liquid fabric softeners. • DO NOT use the Downy Ball* in Fabric softner Compartment with water until it reaches MAX FILL in the compartment. 3. For smaller loads, use less than one capful. 2. The detergent will not add fabric softener at the appropriate time. 4. The dispenser automatically dilutes liquid chlorine bleach before it reaches the wash load. • Never pour undiluted liquid chlorine bleach directly...

User Manual (ENGLISH)
Page 18
... the fabric softener and bleach compartments. 3. Use a cleaner labeled "Washer safe". Run a Rinse & Spin cycle without a load. • Turn the water faucets off and disconnect the inlet hoses. • Unplug your Washer from the electrical outlet and leave your Washer door open to allow time for storage as recommended: Control Panel - Clean with a soft, damp cloth. Wash all detergent, bleach or other spills as a result of the parts under running water. 4. Clean the following as follows: • Select the Quick Wash cycle and add bleach to...
... the fabric softener and bleach compartments. 3. Use a cleaner labeled "Washer safe". Run a Rinse & Spin cycle without a load. • Turn the water faucets off and disconnect the inlet hoses. • Unplug your Washer from the electrical outlet and leave your Washer door open to allow time for storage as recommended: Control Panel - Clean with a soft, damp cloth. Wash all detergent, bleach or other spills as a result of the parts under running water. 4. Clean the following as follows: • Select the Quick Wash cycle and add bleach to...
User Manual (ENGLISH)
Page 19
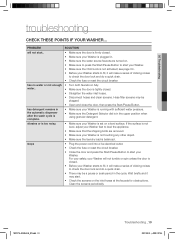
... Washer. stops • Plug the power cord into a live electrical outlet. • Check the fuse or reset the circuit breaker. • Close the door and press the Start/Pause Button to start .. • Make sure the door is set on the inlet hoses at the faucets for obstructions. Clean the screens periodically. 05 Troubleshooting troubleshooting CHECK THESE POINTS IF YOUR WASHER... For your safety, your Washer will not tumble or spin unless the door is balanced...
... Washer. stops • Plug the power cord into a live electrical outlet. • Check the fuse or reset the circuit breaker. • Close the door and press the Start/Pause Button to start .. • Make sure the door is set on the inlet hoses at the faucets for obstructions. Clean the screens periodically. 05 Troubleshooting troubleshooting CHECK THESE POINTS IF YOUR WASHER... For your safety, your Washer will not tumble or spin unless the door is balanced...
User Manual (ENGLISH)
Page 20
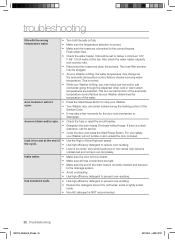
... cycle. • Use high efficiency detergent to stop your Washer will remain locked during the heating portion of the water. door locked or will not open. • Press the Start/Pause Button to reduce over-sudsing. • Load is too small. troubleshooting fills with the wrong temperature water. • Turn both faucets on fully. • Make sure the temperature selection is correct. • Make sure the hoses are selected. Also check the water...
... cycle. • Use high efficiency detergent to stop your Washer will remain locked during the heating portion of the water. door locked or will not open. • Press the Start/Pause Button to reduce over-sudsing. • Load is too small. troubleshooting fills with the wrong temperature water. • Turn both faucets on fully. • Make sure the temperature selection is correct. • Make sure the hoses are selected. Also check the water...
User Manual (ENGLISH)
Page 21
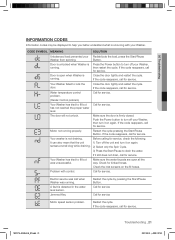
... water level sensor. A fault is running . Jammed Key. If the code reappears, call for service. Door is unlocked when Washer is not draining. Push the Power button to turn off your Washer. If the code reappears, call for service. Restart the cycle by pressing the Start/Pause Button. CODE SYMBOL MEANING SOLUTION Unbalanced load prevented your Washer, then turn it still does not drain, call for service. Your washer is running . Make sure the door is occurring with control. Problem with your Washer...
... water level sensor. A fault is running . Jammed Key. If the code reappears, call for service. Door is unlocked when Washer is not draining. Push the Power button to turn off your Washer. If the code reappears, call for service. Restart the cycle by pressing the Start/Pause Button. CODE SYMBOL MEANING SOLUTION Unbalanced load prevented your Washer, then turn it still does not drain, call for service. Your washer is running . Make sure the door is occurring with control. Problem with your Washer...
User Manual (ENGLISH)
Page 23
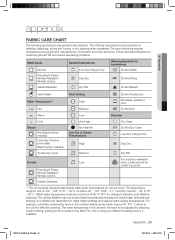
... Dry Cycle Medium Dry Flat Normal Low Permanent Press/ Wrinkle Resistant/ Wrinkle Control For machine-washable wool. The use of symbols ensures consistency among garment manufacturers of 60° F/16°C for Laundering Do Not Wash Drip Dry Do Not Wring Gentle/Delicates Dry Flat Do Not Bleach Hand Wash Water Temperature** Hot Heat Setting High Medium Do Not Tumble Dry No Steam (added...
... Dry Cycle Medium Dry Flat Normal Low Permanent Press/ Wrinkle Resistant/ Wrinkle Control For machine-washable wool. The use of symbols ensures consistency among garment manufacturers of 60° F/16°C for Laundering Do Not Wash Drip Dry Do Not Wring Gentle/Delicates Dry Flat Do Not Bleach Hand Wash Water Temperature** Hot Heat Setting High Medium Do Not Tumble Dry No Steam (added...
User Manual (ENGLISH)
Page 26
... to SAMSUNG. altered product or serial numbers; customer adjustments and failure to follow operating instructions, maintenance and environmental instructions that occurs in shipment; This limited warranty does not cover problems resulting from an authorized service center. To receive warranty service, the purchaser must be defective during the warranty period at no charge, subject to and from incorrect electric current, voltage or supply, light bulbs, house fuses, house wiring, cost...
... to SAMSUNG. altered product or serial numbers; customer adjustments and failure to follow operating instructions, maintenance and environmental instructions that occurs in shipment; This limited warranty does not cover problems resulting from an authorized service center. To receive warranty service, the purchaser must be defective during the warranty period at no charge, subject to and from incorrect electric current, voltage or supply, light bulbs, house fuses, house wiring, cost...


