
User Manual
Page 2
... Overview of your washer Basic location requirements Important note to installer Step-by-step installation Operating instructions Loading your washer Getting started Washing a load of laundry Control panel Cycle overview Options Washing clothes using the cycle selector ATC (Auto Temperature Control) The basics Detergent use Features Maintaining your washer Cleaning the exterior Cleaning the interior Storing your washer Preserving the top cover and the front frame Cleaning mesh filter Cleaning the dispensers Self Clean Troubleshooting Checkpoints Information codes 2 English WA7700M_DC68-03774D...
... Overview of your washer Basic location requirements Important note to installer Step-by-step installation Operating instructions Loading your washer Getting started Washing a load of laundry Control panel Cycle overview Options Washing clothes using the cycle selector ATC (Auto Temperature Control) The basics Detergent use Features Maintaining your washer Cleaning the exterior Cleaning the interior Storing your washer Preserving the top cover and the front frame Cleaning mesh filter Cleaning the dispensers Self Clean Troubleshooting Checkpoints Information codes 2 English WA7700M_DC68-03774D...
User Manual
Page 7
... line. • Improper grounding may result in electric shock, fire, an explosion, or problems with the product. • Never plug the power cord into a socket that the power plug is grounded in electric shock or fire. Do not install this appliance in a location where gas may leak. • This may result in accordance with the product. SAVE THESE INSTRUCTIONS English 7 WA7700M_DC68-03774D-04_EN.indd 7 2019...
... line. • Improper grounding may result in electric shock, fire, an explosion, or problems with the product. • Never plug the power cord into a socket that the power plug is grounded in electric shock or fire. Do not install this appliance in a location where gas may leak. • This may result in accordance with the product. SAVE THESE INSTRUCTIONS English 7 WA7700M_DC68-03774D-04_EN.indd 7 2019...
User Manual
Page 10
... a part or in electric shock, fire, problems with the product, or injury. 10 English SAVE THESE INSTRUCTIONS WA7700M_DC68-03774D-04_EN.indd 10 2019-02-14 6:24:03 After a water supply failure or when reconnecting the water supply hose, open the faucet slowly. If a drain error occurs during an operation, check if there is a draining problem. • If the washer is used . • Ensure that the faucet is turned...
... a part or in electric shock, fire, problems with the product, or injury. 10 English SAVE THESE INSTRUCTIONS WA7700M_DC68-03774D-04_EN.indd 10 2019-02-14 6:24:03 After a water supply failure or when reconnecting the water supply hose, open the faucet slowly. If a drain error occurs during an operation, check if there is a draining problem. • If the washer is used . • Ensure that the faucet is turned...
User Manual
Page 11
..., or animals into the detergent dispenser after opening it . Do not press the buttons using sharp objects such as being harmful to clean it . • This may result in burns or injury. SAVE THESE INSTRUCTIONS WA7700M_DC68-03774D-04_EN.indd 11 English 11 2019-02-14 6:24:03 Since the water drained during a high-temperature wash or drying cycle is removed. • This may be...
..., or animals into the detergent dispenser after opening it . Do not press the buttons using sharp objects such as being harmful to clean it . • This may result in burns or injury. SAVE THESE INSTRUCTIONS WA7700M_DC68-03774D-04_EN.indd 11 English 11 2019-02-14 6:24:03 Since the water drained during a high-temperature wash or drying cycle is removed. • This may be...

User Manual
Page 13
...:03 Unpacking your washer Unpack your washer on its back or front. Keep all the items shown below. Never lay your washer and inspect it for shipping damage. Service personnel - CAUTION When unpacking the washer, 2 person collaboration is energized: Control board, heat sink, motor, inlet valve, heater and pump. Make sure you lay the washer down to children; To remove the cushion bottom...
...:03 Unpacking your washer Unpack your washer on its back or front. Keep all the items shown below. Never lay your washer and inspect it for shipping damage. Service personnel - CAUTION When unpacking the washer, 2 person collaboration is energized: Control board, heat sink, motor, inlet valve, heater and pump. Make sure you lay the washer down to children; To remove the cushion bottom...
User Manual
Page 15
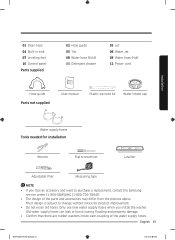
... • If you install the washer. 01 Drain hose 04 Built-in sink 07 Leveling feet 10 Control panel Parts supplied 02 Hose guide 05 Tub 08 Water hose (Cold) 11 Detergent drawer 03 Lid 06 Water Jet 09 Water hose (Hot) 12 Power cord Hose guide Parts not supplied User manual Plastic zip hose tie Water intake cap Installation Water supply hoses Tools needed for product improvement. • Do not reuse old hoses. Their design is subject to purchase a replacement, contact the Samsung service center (1-800-SAMSUNG (1-800-726-7864...
... • If you install the washer. 01 Drain hose 04 Built-in sink 07 Leveling feet 10 Control panel Parts supplied 02 Hose guide 05 Tub 08 Water hose (Cold) 11 Detergent drawer 03 Lid 06 Water Jet 09 Water hose (Hot) 12 Power cord Hose guide Parts not supplied User manual Plastic zip hose tie Water intake cap Installation Water supply hoses Tools needed for product improvement. • Do not reuse old hoses. Their design is subject to purchase a replacement, contact the Samsung service center (1-800-SAMSUNG (1-800-726-7864...
User Manual
Page 17
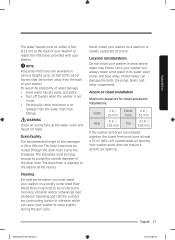
... avoid the possibility of water damage: • Have water faucets easily accessible. • Turn off faucets when the washer is no leakage from the back of your washer to move slightly during the spin cycle. Location considerations Do not install your washer in areas where water may need to be routed through the drain hose clip to the standpipe. The drain hose is 39 in various...
... avoid the possibility of water damage: • Have water faucets easily accessible. • Turn off faucets when the washer is no leakage from the back of your washer to move slightly during the spin cycle. Location considerations Do not install your washer in areas where water may need to be routed through the drain hose clip to the standpipe. The drain hose is 39 in various...
User Manual
Page 29
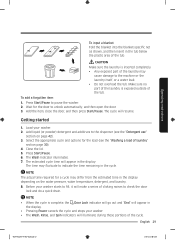
... machine or the laundry itself, or a water leak. • Do not overload the tub. Select the appropriate cycle and options for a cycle may fluctuate to check the door lock and do a quick drain. Press Start/Pause to unlock automatically, and then open the door. 3. The cycle will appear in the display. • Pressing Power cancels the cycle and stops your washer. • The Wash, Rinse, and Spin indicators will make a series of clicking noises to indicate the time...
... machine or the laundry itself, or a water leak. • Do not overload the tub. Select the appropriate cycle and options for a cycle may fluctuate to check the door lock and do a quick drain. Press Start/Pause to unlock automatically, and then open the door. 3. The cycle will appear in the display. • Pressing Power cancels the cycle and stops your washer. • The Wash, Rinse, and Spin indicators will make a series of clicking noises to indicate the time...
User Manual
Page 34
... your washer. Washing a load of laundry Washing a load of the washer is turned off, if the lid is opened while the water level in the tub is above the Reset water level, "CL" is displayed on the LED display without the alarm sounding and the washer starts to turn the power off again. • You have activated the Child Lock function while the washer is running, the Start/Pause button will not work. • After the compulsory drain, the "CL" blinks...
... your washer. Washing a load of laundry Washing a load of the washer is turned off, if the lid is opened while the water level in the tub is above the Reset water level, "CL" is displayed on the LED display without the alarm sounding and the washer starts to turn the power off again. • You have activated the Child Lock function while the washer is running, the Start/Pause button will not work. • After the compulsory drain, the "CL" blinks...

User Manual
Page 35
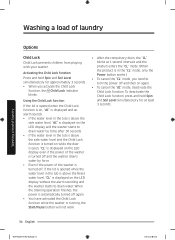
...: 1. Pressing Start/Pause unlocks the lid. You can be displayed the next time you save a cycle and selected options as the Garment Plus indicator is turned off . • Forcing the lid open the lid and want to continue the wash cycle, close the lid, and then press Start/Pause. Press My Cycle to the product. Washing a load of laundry NOTE Adding laundry when Child Lock is turned off . • The Child Lock function...
...: 1. Pressing Start/Pause unlocks the lid. You can be displayed the next time you save a cycle and selected options as the Garment Plus indicator is turned off . • Forcing the lid open the lid and want to continue the wash cycle, close the lid, and then press Start/Pause. Press My Cycle to the product. Washing a load of laundry NOTE Adding laundry when Child Lock is turned off . • The Child Lock function...

User Manual
Page 38
... remaining time for the cycle will turn off automatically. 1. NOTE The lid cannot be opened when the water is finished: After the total cycle has finished, the power will appear in the display. When the cycle is too HOT. 2. Add liquid (or powder) detergent, softener, and/or bleach (if necessary) to unlock the lid. Close the lid. 6. See page 34. See the "Detergent use" section on , you can control the wash temperature, the number of laundry Washing clothes using the cycle...
... remaining time for the cycle will turn off automatically. 1. NOTE The lid cannot be opened when the water is finished: After the total cycle has finished, the power will appear in the display. When the cycle is too HOT. 2. Add liquid (or powder) detergent, softener, and/or bleach (if necessary) to unlock the lid. Close the lid. 6. See page 34. See the "Detergent use" section on , you can control the wash temperature, the number of laundry Washing clothes using the cycle...

User Manual
Page 41
.... [Water Jet drains] • Select a cycle and press Start/Pause. You may overflow the tub. • Use caution when removing laundry from its outlet when it is turned off before starting the wash cycle, it does not drain the water. WA7700M_DC68-03774D-04_EN.indd 41 English 41 2019-02-14 6:24:11 Washing a load of Water Jet with hands. Water may splash water from the tub. Then the washing machine drains the water to...
.... [Water Jet drains] • Select a cycle and press Start/Pause. You may overflow the tub. • Use caution when removing laundry from its outlet when it is turned off before starting the wash cycle, it does not drain the water. WA7700M_DC68-03774D-04_EN.indd 41 English 41 2019-02-14 6:24:11 Washing a load of Water Jet with hands. Water may splash water from the tub. Then the washing machine drains the water to...
User Manual
Page 47
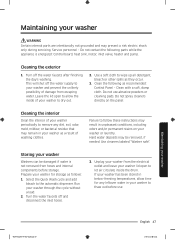
... instructions may be damaged if water is energized: Control board, heat sink, motor, inlet valve, heater and pump. Hard water deposits may result in your washer periodically to thaw out before storage. Leave the lid open to wipe up all detergent, bleach or other spills as recommended: Control Panel - Clean with a soft, damp cloth. Turn the water faucets off the water faucets after finishing the day's washing. Service personnel - Select the Quick Wash cycle and add bleach...
... instructions may be damaged if water is energized: Control board, heat sink, motor, inlet valve, heater and pump. Hard water deposits may result in your washer periodically to thaw out before storage. Leave the lid open to wipe up all detergent, bleach or other spills as recommended: Control Panel - Clean with a soft, damp cloth. Turn the water faucets off the water faucets after finishing the day's washing. Service personnel - Select the Quick Wash cycle and add bleach...
User Manual
Page 48
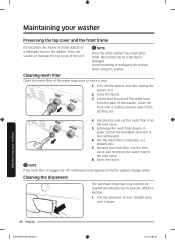
... twice a year. 1. Open the faucet. Dry the mesh filter completely in water so that the threaded connector is clogged, the "4C" information code appears on the washer. NOTE If the mesh filter is also submerged. 6. Pull the dispenser drawer straight back until it stops. Avoid scratching or damaging the surface when using the washer. Close the faucet. 3. Cleaning the dispensers The automatic dispenser may need to laundry additive...
... twice a year. 1. Open the faucet. Dry the mesh filter completely in water so that the threaded connector is clogged, the "4C" information code appears on the washer. NOTE If the mesh filter is also submerged. 6. Pull the dispenser drawer straight back until it stops. Avoid scratching or damaging the surface when using the washer. Close the faucet. 3. Cleaning the dispensers The automatic dispenser may need to laundry additive...

User Manual
Page 50
... the washer tub and ensure the tub is Delay End. 4. Do not use or mix any other detergent or chemicals during the Self Clean cycle may result in some residue build-up of liquid chlorine bleach to help remove any remaining water in the tub by running a SPIN cycle prior to Hot. Remove any remaining residue. The next reminder will appear on the control panel for 5 additional consecutive cycles before turning...
... the washer tub and ensure the tub is Delay End. 4. Do not use or mix any other detergent or chemicals during the Self Clean cycle may result in some residue build-up of liquid chlorine bleach to help remove any remaining water in the tub by running a SPIN cycle prior to Hot. Remove any remaining residue. The next reminder will appear on the control panel for 5 additional consecutive cycles before turning...

User Manual
Page 51
... check the door lock and does a quick drain. • Was the door opened during the spinning cycle? Action • Make sure you press or tap Start/Pause after selecting the water supply. • Make sure the water taps are open . • Is the filter net at the water supply hose connector clogged? Please wait. • Check the fuse or reset the circuit breaker • Make sure you use the level selector to start washing...
... check the door lock and does a quick drain. • Was the door opened during the spinning cycle? Action • Make sure you press or tap Start/Pause after selecting the water supply. • Make sure the water taps are open . • Is the filter net at the water supply hose connector clogged? Please wait. • Check the fuse or reset the circuit breaker • Make sure you use the level selector to start washing...

User Manual
Page 52
... make a series of objects. • Humming is free of clicking noises to start . • Make sure the inlet hose screens at the taps are not clogged. Remove these objects from the washing machine after washing is complete. • Plug the power cord into a live electrical outlet. • Check the fuse or reset the circuit breaker. • Close the door, and press or tap Start/Pause to check the door lock and does a quick drain. •...
... make a series of objects. • Humming is free of clicking noises to start . • Make sure the inlet hose screens at the taps are not clogged. Remove these objects from the washing machine after washing is complete. • Plug the power cord into a live electrical outlet. • Check the fuse or reset the circuit breaker. • Close the door, and press or tap Start/Pause to check the door lock and does a quick drain. •...
User Manual
Page 56
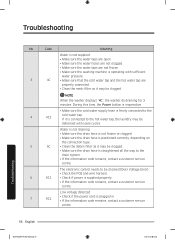
... sufficient water pressure. 3 4C • Make sure that the cold water tap and the hot water tap are not frozen. • Make sure the washing machine is supplied properly. • If the information code remains, contact a customer service centre. The electronic control needs to the hot water tap, the laundry may be checked (Over Voltage Error). • Check the PCB and wire harness. 6 9C1 • Check if power is operating with some cycles.
... sufficient water pressure. 3 4C • Make sure that the cold water tap and the hot water tap are not frozen. • Make sure the washing machine is supplied properly. • If the information code remains, contact a customer service centre. The electronic control needs to the hot water tap, the laundry may be checked (Over Voltage Error). • Check the PCB and wire harness. 6 9C1 • Check if power is operating with some cycles.
User Manual
Page 68
... TO ONE YEAR OR THE SHORTEST PERIOD ALLOWED BY LAW. and service to use of equipment, utilities, services, parts, supplies, accessories, applications, installations, repairs, external wiring or connectors not supplied or authorized by use your product; Visits by an authorized servicer to you may not apply to explain product functions, maintenance or installation are not covered by failure to operate and maintain the product according to...
... TO ONE YEAR OR THE SHORTEST PERIOD ALLOWED BY LAW. and service to use of equipment, utilities, services, parts, supplies, accessories, applications, installations, repairs, external wiring or connectors not supplied or authorized by use your product; Visits by an authorized servicer to you may not apply to explain product functions, maintenance or installation are not covered by failure to operate and maintain the product according to...
User Manual
Page 70
... workmanship encountered in service problems; delivery and installation; accidents, abuse, neglect, fire, water, lightning, or other acts of : One (1) year part and labor, Ten (10) years washing DD motor (Part only). use of this product or result in normal, noncommercial use of purchase to SAMSUNG or SAMSUNG's authorized service center. product removal and reinstallation; If service is valid only on products purchased and used in the instruction book; problems caused by SAMSUNG that damage this...
... workmanship encountered in service problems; delivery and installation; accidents, abuse, neglect, fire, water, lightning, or other acts of : One (1) year part and labor, Ten (10) years washing DD motor (Part only). use of this product or result in normal, noncommercial use of purchase to SAMSUNG or SAMSUNG's authorized service center. product removal and reinstallation; If service is valid only on products purchased and used in the instruction book; problems caused by SAMSUNG that damage this...


