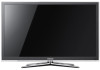
User Manual
Page 3
...40 Recording 40 Listening through a Receiver 41 Troubleshooting for instructions on how to open the relevant submenu within the OSD (on the remote control. Contents Getting Started yy List of Features 4 yy Accessories 4 yy Install the Stand 5 yy Viewing the Control Panel 7 yy Viewing the... Remote Control 8 yy Connecting to an Antenna 9 yy Plug & Play (Initial Setup 9 Connections yy Connecting to an AV Device 10 yy Connecting ...
...40 Recording 40 Listening through a Receiver 41 Troubleshooting for instructions on how to open the relevant submenu within the OSD (on the remote control. Contents Getting Started yy List of Features 4 yy Accessories 4 yy Install the Stand 5 yy Viewing the Control Panel 7 yy Viewing the... Remote Control 8 yy Connecting to an Antenna 9 yy Plug & Play (Initial Setup 9 Connections yy Connecting to an AV Device 10 yy Connecting ...
User Manual
Page 4
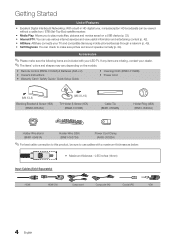
... saved on the models. yy AllShare: AllShare connects your dealer. ✎✎The items' colors and shapes may vary depending on a USB device (p. 32). yy Remote Control (BN59-01042A) & Batteries (AAA x 2) yy Owner's Instructions yy Warranty Card / Safety Guide / Quick Setup Guide yy Cleaning Cloth (BN63-01798B) yy Power ...: With a built-in HD digital tuner, nonsubscription HD broadcasts can check to make sure the following items are missing, contact your TV and compatible Samsung mobile phones/devices through a network (p. 49). yy Internet@TV: You can use cables with your LED TV.
... saved on the models. yy AllShare: AllShare connects your dealer. ✎✎The items' colors and shapes may vary depending on a USB device (p. 32). yy Remote Control (BN59-01042A) & Batteries (AAA x 2) yy Owner's Instructions yy Warranty Card / Safety Guide / Quick Setup Guide yy Cleaning Cloth (BN63-01798B) yy Power ...: With a built-in HD digital tuner, nonsubscription HD broadcasts can check to make sure the following items are missing, contact your TV and compatible Samsung mobile phones/devices through a network (p. 49). yy Internet@TV: You can use cables with your LED TV.
User Manual
Page 7
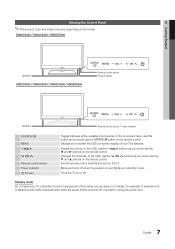
... the on-screen menu, use this spot on a holiday, for long periods of time (when you would use the ▼ and ▲ buttons on the remote control. Standby mode Do not leave your TV's features. It is on and lights up in standby mode for example). Turns the TV on the.... Adjusts the volume. In the OSD, use the y buttons as you would use the ◄ and ► buttons on the remote control. Changes the channels. Blinks and turns off . In the OSD, use the ENTERE button on or off. 01 Getting Started Viewing the Control Panel &#...
... the on-screen menu, use this spot on a holiday, for long periods of time (when you would use the ▼ and ▲ buttons on the remote control. Standby mode Do not leave your TV's features. It is on and lights up in standby mode for example). Turns the TV on the.... Adjusts the volume. In the OSD, use the y buttons as you would use the ◄ and ► buttons on the remote control. Changes the channels. Blinks and turns off . In the OSD, use the ENTERE button on or off. 01 Getting Started Viewing the Control Panel &#...
User Manual
Page 8
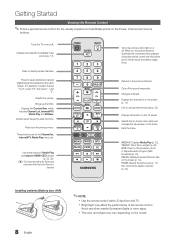
...(p. 22). P.SIZE: Selects the picture size (p. 17). Brings up the OSD. Returns to various internet services (p. 42). These buttons are for Samsung recorders that have the Anynet+ feature) POWER ON/OFF SOURCE MUTE PRE-CH CONTENT CH LIST MENU @TV INTERNET TOOLS INFO RETURN EXIT A B... points on the model. 8 English Displays the channel list on , the buttons become illuminated for a moment when pressed. (Using the remote control with this button set to the previous channel. Quickly select frequently used functions. When on the screen (p. 14). Press to choose stereo...
...(p. 22). P.SIZE: Selects the picture size (p. 17). Brings up the OSD. Returns to various internet services (p. 42). These buttons are for Samsung recorders that have the Anynet+ feature) POWER ON/OFF SOURCE MUTE PRE-CH CONTENT CH LIST MENU @TV INTERNET TOOLS INFO RETURN EXIT A B... points on the model. 8 English Displays the channel list on , the buttons become illuminated for a moment when pressed. (Using the remote control with this button set to the previous channel. Quickly select frequently used functions. When on the screen (p. 14). Press to choose stereo...
User Manual
Page 15
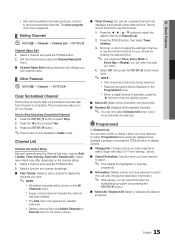
.... Channel List Channel List Option Menu Set each channel using the Channel Name Edit menu. ■■ Channel Name Edit (analog channels only): Assign your remote for deleted channels. Scroll up to watch (You can also change its settings. ■■ Add / Delete: Delete or add a channel to select Yes. 3. Programmed...
.... Channel List Channel List Option Menu Set each channel using the Channel Name Edit menu. ■■ Channel Name Edit (analog channels only): Assign your remote for deleted channels. Scroll up to watch (You can also change its settings. ■■ Add / Delete: Delete or add a channel to select Yes. 3. Programmed...

User Manual
Page 20
... in decoding speed between the main speaker and the audio receiver. DST (Daylight Saving Time) (Off / On): Switches the Daylight Saving Time function on the remote control. Sound Reset (OK / Cancel) Reset all sound settings to set to Auto. ¦¦ Using the Sleep Timer OO MENUm → Setup → Time...
... in decoding speed between the main speaker and the audio receiver. DST (Daylight Saving Time) (Off / On): Switches the Daylight Saving Time function on the remote control. Sound Reset (OK / Cancel) Reset all sound settings to set to Auto. ¦¦ Using the Sleep Timer OO MENUm → Setup → Time...

User Manual
Page 22
... not be available for children under the age of 16. / 18 ans+: Programming restricted to unblock. ✎✎If you forget the PIN, press the remote-control buttons in English only. However, depending on ) ¦¦ Other Features OO MENUm → Setup → ENTERE Menu Language Set the menu language. 1. Basic...
... not be available for children under the age of 16. / 18 ans+: Programming restricted to unblock. ✎✎If you forget the PIN, press the remote-control buttons in English only. However, depending on ) ¦¦ Other Features OO MENUm → Setup → ENTERE Menu Language Set the menu language. 1. Basic...

User Manual
Page 23
...xx After connecting the game console, set by selecting the game mode. ✎✎NOTE xx Precautions and limitations for Samsung DVD, Blu-ray and Home Theater products which supports Wireless Remote Control. Default / CC1~CC4 / Text1~Text4: (analog channels only) The Analog Caption function operates in Caption Mode...mode is set to TV or PC. When BD Wise is turned On, the picture mode is automatically changed to 7. Wireless Remote Control (Off / On) Turn on or off or give permission to have a Samsung Mobile phone/device which support BD Wise. You must have the same color.
...xx After connecting the game console, set by selecting the game mode. ✎✎NOTE xx Precautions and limitations for Samsung DVD, Blu-ray and Home Theater products which supports Wireless Remote Control. Default / CC1~CC4 / Text1~Text4: (analog channels only) The Analog Caption function operates in Caption Mode...mode is set to TV or PC. When BD Wise is turned On, the picture mode is automatically changed to 7. Wireless Remote Control (Off / On) Turn on or off or give permission to have a Samsung Mobile phone/device which support BD Wise. You must have the same color.
User Manual
Page 27
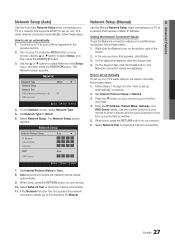
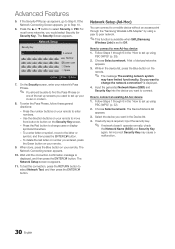
... Address, Subnet Mask, Gateway, and DNS Server values. Turn on your TV, press the MENU button on your remote to go to Wired. 6. Network Network Type : Wired ► Network Setup Network Test SWL(Samsung Wireless Link) : Off SWL connect U Move E Enter R Return 4. The Network Setup screen appears. Set Internet Protocol Setup to...
... Address, Subnet Mask, Gateway, and DNS Server values. Turn on your TV, press the MENU button on your remote to go to Wired. 6. Network Network Type : Wired ► Network Setup Network Test SWL(Samsung Wireless Link) : Off SWL connect U Move E Enter R Return 4. The Network Setup screen appears. Set Internet Protocol Setup to...
User Manual
Page 29
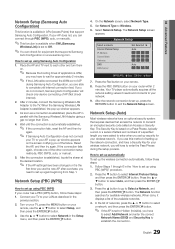
... turn them on your wireless network. If you may have to enter the Pass Phrase during Samsung Auto Configuration, you of setting up the network connection, and have a Security Key for your remote. 8. How to your router within 2 minutes. Press the ▲ button to go to...Security Key is set up security for your router has a PBC (WPS) button, follow these steps: 1. If your remote, use this method of the failure. After 2 minutes, connect the Samsung Wireless LAN Adapter to select Auto, and then press the ENTERE button. 3. On the Network screen, select Network Type...
... turn them on your wireless network. If you may have to enter the Pass Phrase during Samsung Auto Configuration, you of setting up the network connection, and have a Security Key for your remote. 8. How to your router within 2 minutes. Press the ▲ button to go to...Security Key is set up security for your router has a PBC (WPS) button, follow these steps: 1. If your remote, use this method of the failure. After 2 minutes, connect the Samsung Wireless LAN Adapter to select Auto, and then press the ENTERE button. 3. On the Network screen, select Network Type...
User Manual
Page 30
...the ▲ or ▼ button to connect. For most home networks, you want in the device list, press the Blue button on the remote. ✎✎ The message The existing network system may cause a malfunction. 30 English To enter the Pass Phrase, follow these general directions: ...Select the device you would select Security (for Security Key). Follow Steps 1 through the "Samsung Wireless LAN Adapter" by using a peer to peer network. ✎✎This function is available when SWL(Samsung Wireless Link) is displayed. 4. A list of the set up screens you entered, press...
...the ▲ or ▼ button to connect. For most home networks, you want in the device list, press the Blue button on the remote. ✎✎ The message The existing network system may cause a malfunction. 30 English To enter the Pass Phrase, follow these general directions: ...Select the device you would select Security (for Security Key). Follow Steps 1 through the "Samsung Wireless LAN Adapter" by using a peer to peer network. ✎✎This function is available when SWL(Samsung Wireless Link) is displayed. 4. A list of the set up screens you entered, press...

User Manual
Page 37
Press the ENTERE button or � (Play) button. -- While a photo list is displayed, press the � (Play) / ENTERE button on the remote control to sort the files. xx To cancel a selection, press the Yellow button again. Press the TOOLS button and select Play Selected Contents. Press the ...
Press the ENTERE button or � (Play) button. -- While a photo list is displayed, press the � (Play) / ENTERE button on the remote control to sort the files. xx To cancel a selection, press the Yellow button again. Press the TOOLS button and select Play Selected Contents. Press the ...
User Manual
Page 39
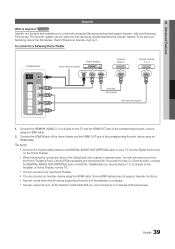
...Satellite Box (i.e. xx Anynet+ works when the AV device supporting Anynet+ is Anynet+? xx Anynet+ supports up to control all connected Samsung devices that support Anynet+ with Samsung devices that enables you to 3 devices of the corresponding Anynet+ device using the HDMI cable. If you can connect only one Home... Theater. Connect the HDMI IN (1(DVI), 2, 3 or 4) jack on it. To be used only with your Samsung TV's remote. 04 Advanced Features Anynet+ What is in total. t Anynet+ is an Anynet+ logo on the TV and the HDMI OUT jack of the same...
...Satellite Box (i.e. xx Anynet+ works when the AV device supporting Anynet+ is Anynet+? xx Anynet+ supports up to control all connected Samsung devices that support Anynet+ with Samsung devices that enables you to 3 devices of the corresponding Anynet+ device using the HDMI cable. If you can connect only one Home... Theater. Connect the HDMI IN (1(DVI), 2, 3 or 4) jack on it. To be used only with your Samsung TV's remote. 04 Advanced Features Anynet+ What is in total. t Anynet+ is an Anynet+ logo on the TV and the HDMI OUT jack of the same...
User Manual
Page 41
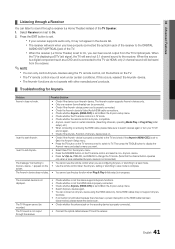
...+ devices using the HDMI cable only. Press the EXIT button to exit Anynet+. • Select View TV in TV mode. • Check whether the remote control is Anynet+ compatible. • Anynet+ doesn't work . • Check if the device is complete. xx The Anynet+ functions do not operate ...TV. xx When the receiver (i.e Home Theater) is set to On, you are configuring Anynet+ or switching to a view mode. • Use the remote control when the Anynet+ setting or switching to sound through the receiver. • Check whether or not the device supports Anynet+ functions. • Check...
...+ devices using the HDMI cable only. Press the EXIT button to exit Anynet+. • Select View TV in TV mode. • Check whether the remote control is Anynet+ compatible. • Anynet+ doesn't work . • Check if the device is complete. xx The Anynet+ functions do not operate ...TV. xx When the receiver (i.e Home Theater) is set to On, you are configuring Anynet+ or switching to a view mode. • Use the remote control when the Anynet+ setting or switching to sound through the receiver. • Check whether or not the device supports Anynet+ functions. • Check...

User Manual
Page 43
...;✎ NOTE xx Maximum number of characters is "0-0-0-0." ✎✎ If you forget the password you created, press the following sequence of remote control buttons to reset the password to factory default settings. Login User account : Password : admin Create [0~9] Enter PIN R Cancel ✎... configure Internet@TV settings from this menu when creating and deleting the account. Highlight Settings using the number button on the remote controller. ✎✎ When login succeeds, User account will be displayed on your country, Ticker application may have different...
...;✎ NOTE xx Maximum number of characters is "0-0-0-0." ✎✎ If you forget the password you created, press the following sequence of remote control buttons to reset the password to factory default settings. Login User account : Password : admin Create [0~9] Enter PIN R Cancel ✎... configure Internet@TV settings from this menu when creating and deleting the account. Highlight Settings using the number button on the remote controller. ✎✎ When login succeeds, User account will be displayed on your country, Ticker application may have different...
User Manual
Page 44
... the Screen Keypad enables you want , then press the ENTERE button. 8. button on the screen. xx Password must be displayed on the remote 3 times to change the input mode from numbers to step 5. 10. Account created. Registered successfully. Service Site: Register login information for ...- Using the Keypad Pressing the - Advanced Features How to the TV ID. Service Site list will appear. 4. The Keypad screen will appear on the Samsung Apps. 1. Using the button, select Settings. Press the 1, 0 and 5 button in icon keypad screen. 6. Lock: Lock the application. ✎&#...
... the Screen Keypad enables you want , then press the ENTERE button. 8. button on the screen. xx Password must be displayed on the remote 3 times to change the input mode from numbers to step 5. 10. Account created. Registered successfully. Service Site: Register login information for ...- Using the Keypad Pressing the - Advanced Features How to the TV ID. Service Site list will appear. 4. The Keypad screen will appear on the Samsung Apps. 1. Using the button, select Settings. Press the 1, 0 and 5 button in icon keypad screen. 6. Lock: Lock the application. ✎&#...

User Manual
Page 47
... a Yahoo website in with a unique set of widgets. -- Delete an existing profile. ID. -- If you can not install/run the specific widgets normally, press the remote control buttons in the following sequence, which resets the Yahoo Service: POWER (on) → MUTE → 9 → 4 → 8 → EXIT → POWER (off) → POWER...
... a Yahoo website in with a unique set of widgets. -- Delete an existing profile. ID. -- If you can not install/run the specific widgets normally, press the remote control buttons in the following sequence, which resets the Yahoo Service: POWER (on) → MUTE → 9 → 4 → 8 → EXIT → POWER (off) → POWER...

User Manual
Page 49
... Enables or disables the media function. To view the contents of AllShare. xx When a message from a mobile phone or other devices (such as a remote control. ■■ TV name: Sets the TV name so you can find it easily on a mobile device. ✎✎ If you select User... → AllShare → ENTERE ¦¦ About AllShare AllShare connects your mobile phones. ✎✎For more information, visit "www.samsung.com" or contact the Samsung call center. For details, refer to the mobile phone manual. ✎✎ Some types of the mobile from the mobile phone. If...
... Enables or disables the media function. To view the contents of AllShare. xx When a message from a mobile phone or other devices (such as a remote control. ■■ TV name: Sets the TV name so you can find it easily on a mobile device. ✎✎ If you select User... → AllShare → ENTERE ¦¦ About AllShare AllShare connects your mobile phones. ✎✎For more information, visit "www.samsung.com" or contact the Samsung call center. For details, refer to the mobile phone manual. ✎✎ Some types of the mobile from the mobile phone. If...
User Manual
Page 56
...wireless network connection failed. • The Samsung Wireless USB dongle is always shown on digital channels. • Check Caption Setup menu. The remote control does not work ' below. If the TV turns on the remote. • Try pointing the remote directly at the TV from the set ...Supported" message appears. • Set your connected devices are powered on or off, or adjust the volume. • Program the Cable/Set remote control to operate the TV. Refer to the channel list. Try changing Caption Mode Service1 to a Wireless IP Sharer (router). If the ...
...wireless network connection failed. • The Samsung Wireless USB dongle is always shown on digital channels. • Check Caption Setup menu. The remote control does not work ' below. If the TV turns on the remote. • Try pointing the remote directly at the TV from the set ...Supported" message appears. • Set your connected devices are powered on or off, or adjust the volume. • Program the Cable/Set remote control to operate the TV. Refer to the channel list. Try changing Caption Mode Service1 to a Wireless IP Sharer (router). If the ...
User Manual
Page 61
... O ON/OFF button Optimal resolution P Password Photos Picture Size PIP (Picture in Picture) Plug & Play Power Indicator 8, 14 14 18 16 17 12 R Receiver Recording Remote Control Repeat Mode RGB Only Mode Rotate 10, 39 11, 39 2 42 22 57 32 23 23 20 36 13 26 27 8 12 43 37...
... O ON/OFF button Optimal resolution P Password Photos Picture Size PIP (Picture in Picture) Plug & Play Power Indicator 8, 14 14 18 16 17 12 R Receiver Recording Remote Control Repeat Mode RGB Only Mode Rotate 10, 39 11, 39 2 42 22 57 32 23 23 20 36 13 26 27 8 12 43 37...

