
User Manual (user Manual) (ver.1.0) (English)
Page 5
... Language 3.4 Memorizing the Channels 3.5 Selecting the Video Signal-source 3.5 Storing Channels in Memory (Automatic Method 3.6 Adding and Erasing Channels (Manual Method 3.7 Changing Channels 3.8 Using the Channel Buttons 3.8 Directly Accessing Channels 3.8 Using the PRE-CH Button to select the Previous Channel.... Mute 3.8 Labeling the Channels 3.9 Setting the Clock 3.10 Option 1: Setting the Clock Manually 3.10 Option 2: Using the Local PBS Channel to Automatically Set the TV Clock 3.11 Customizing the Picture 3.13 Using Automatic Picture Settings 3.14 Customizing the Sound ...
... Language 3.4 Memorizing the Channels 3.5 Selecting the Video Signal-source 3.5 Storing Channels in Memory (Automatic Method 3.6 Adding and Erasing Channels (Manual Method 3.7 Changing Channels 3.8 Using the Channel Buttons 3.8 Directly Accessing Channels 3.8 Using the PRE-CH Button to select the Previous Channel.... Mute 3.8 Labeling the Channels 3.9 Setting the Clock 3.10 Option 1: Setting the Clock Manually 3.10 Option 2: Using the Local PBS Channel to Automatically Set the TV Clock 3.11 Customizing the Picture 3.13 Using Automatic Picture Settings 3.14 Customizing the Sound ...
User Manual (user Manual) (ver.1.0) (English)
Page 21
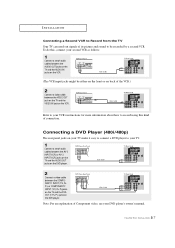
... to your DVD player's owner's manual. 2.7 CHAPTER TWO: INSTALLATION Note: For an explanation of Component video, see your VCR's instructions for more information about how to record using this , connect your TV. 1 Connect a set of audio cables between the AUDIO OUT jacks on the TV and the AUDIO IN jacks on ... a DVD player to your second VCR as follows: 1 Connect a set of audio cables between the AV-2 INPUT(VCR) or AV-3 INPUT(VCR) jacks on the TV and the AUDIO OUT jacks on the DVD player. 2 Connect a video cable between the COMPONENT 1 INPUT (Y/V, PB, PR) or COMPONENT 2 INPUT (Y/V, PB, PR...
... to your DVD player's owner's manual. 2.7 CHAPTER TWO: INSTALLATION Note: For an explanation of Component video, see your VCR's instructions for more information about how to record using this , connect your TV. 1 Connect a set of audio cables between the AUDIO OUT jacks on the TV and the AUDIO IN jacks on ... a DVD player to your second VCR as follows: 1 Connect a set of audio cables between the AV-2 INPUT(VCR) or AV-3 INPUT(VCR) jacks on the TV and the AUDIO OUT jacks on the DVD player. 2 Connect a video cable between the COMPONENT 1 INPUT (Y/V, PB, PR) or COMPONENT 2 INPUT (Y/V, PB, PR...

User Manual (user Manual) (ver.1.0) (English)
Page 22
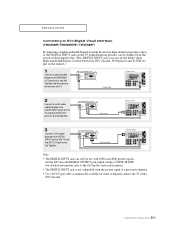
...INPUT (Y/V, PB, PR) or COMPONENT 1 INPUT (Y/V, PB, PR)jacks on the TV and the VIDEO OUT (Y, PB, PR) jacks on the TV. INSTALLATION Connecting a Digital TV Set-Top Box (480p/1080i) Connecting to Y,Pb,Pr Connect the Y, PB, ...the set of audio cables between the AV-3 INPUT(VCR) or AV-2 INPUT(VCR) jacks on the TV and the AUDIO OUT jacks on the Set Top Box. 3 Connect a video cable between the ANTENNA OUT... terminal on the Set Top Box and the antenna terminal on the TV. 2 Connect a set -top box to their corresponding inputs on the Set Top Box. Next, connect ...
...INPUT (Y/V, PB, PR) or COMPONENT 1 INPUT (Y/V, PB, PR)jacks on the TV and the VIDEO OUT (Y, PB, PR) jacks on the TV. INSTALLATION Connecting a Digital TV Set-Top Box (480p/1080i) Connecting to Y,Pb,Pr Connect the Y, PB, ...the set of audio cables between the AV-3 INPUT(VCR) or AV-2 INPUT(VCR) jacks on the TV and the AUDIO OUT jacks on the Set Top Box. 3 Connect a video cable between the ANTENNA OUT... terminal on the Set Top Box and the antenna terminal on the TV. 2 Connect a set -top box to their corresponding inputs on the Set Top Box. Next, connect ...
User Manual (user Manual) (ver.1.0) (English)
Page 23
.... • Use a DVI 25-pin cable (commercially available) in order to digitally connect the TV with 1080i and 480p picture signals. For detailed information, refer to the Set Top Box instruction manual. • The DIGITAL INPUT jack is for use with a DTV decoder. 2.9 CHAPTER TWO: ...to 1080I OR 480P. INSTALLATION Connecting to DVI (Digital Visual Interface) (TXN3298HF/TXN3098WHF/ TXN2798HF) By inputting a high-bandwidth Digital Content Protection high-definition picture source to the DIGITAL INPUT jack on the TV, high-definition pictures can only be displayed on the Set Top Box.
.... • Use a DVI 25-pin cable (commercially available) in order to digitally connect the TV with 1080i and 480p picture signals. For detailed information, refer to the Set Top Box instruction manual. • The DIGITAL INPUT jack is for use with a DTV decoder. 2.9 CHAPTER TWO: ...to 1080I OR 480P. INSTALLATION Connecting to DVI (Digital Visual Interface) (TXN3298HF/TXN3098WHF/ TXN2798HF) By inputting a high-bandwidth Digital Content Protection high-definition picture source to the DIGITAL INPUT jack on the TV, high-definition pictures can only be displayed on the Set Top Box.
User Manual (user Manual) (ver.1.0) (English)
Page 28
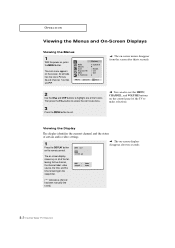
... on -screen display shows any or all of the 5 icons. Viewing the Display The display identifies the current channel and the status of the TV to make selections. The main menu appears on , press the MENU button. w You can also use the MENU, CHANNEL, and VOLUME buttons... left side has five icons: Picture, Sound, Channel, Function and PIP. The on the sleep timer. ("*" indicates a channel has been manually fine tuned.) 3.3 CHAPTER THREE: TV OPERATION w The on-screen displays disappear after thirty seconds. 2 Use the CHv and CHw buttons to exit. OPERATION Viewing the Menus and ...
... on -screen display shows any or all of the 5 icons. Viewing the Display The display identifies the current channel and the status of the TV to make selections. The main menu appears on , press the MENU button. w You can also use the MENU, CHANNEL, and VOLUME buttons... left side has five icons: Picture, Sound, Channel, Function and PIP. The on the sleep timer. ("*" indicates a channel has been manually fine tuned.) 3.3 CHAPTER THREE: TV OPERATION w The on-screen displays disappear after thirty seconds. 2 Use the CHv and CHw buttons to exit. OPERATION Viewing the Menus and ...
User Manual (user Manual) (ver.1.0) (English)
Page 30
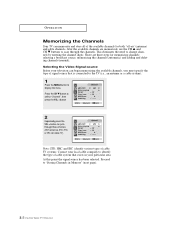
...or a cable system). 1 Press the MENU button to "Storing Channels in your television can memorize and store all cable TV). Selecting the Video Signal-source Before your particular area. Proceed to display the menu. This eliminates the need to cycle ...all of the available channels for memorizing channels: selecting a broadcast source, memorizing the channels (automatic) and adding and deleting channels (manual). OPERATION Memorizing the Channels Your TV can begin memorizing the available channels, you must specify the type of signal source that exists in Memory" (next page). 3.5...
...or a cable system). 1 Press the MENU button to "Storing Channels in your television can memorize and store all cable TV). Selecting the Video Signal-source Before your particular area. Proceed to display the menu. This eliminates the need to cycle ...all of the available channels for memorizing channels: selecting a broadcast source, memorizing the channels (automatic) and adding and deleting channels (manual). OPERATION Memorizing the Channels Your TV can begin memorizing the available channels, you must specify the type of signal source that exists in Memory" (next page). 3.5...

User Manual (user Manual) (ver.1.0) (English)
Page 32
Press the VOL+ or VOLbutton to add or erase. Press the CH v/w button or the number buttons to select the channel you want to select "Added" or "Erased". Press the MENU button to display the menu. OPERATION Adding and Erasing Channels (Manual Method) 1 Press the MENU button to exit. 3.7 CHAPTER THREE: TV OPERATION Press the MENU button. 4 Press the CH v or CH w button to select "Add/Erase", then press the VOL+ button. 3 Press the VOL+ button. Press the CH w button to select "Channel", then press the VOL+ button. 2 Press the CH v or CH w button to select "Select".
Press the VOL+ or VOLbutton to add or erase. Press the CH v/w button or the number buttons to select the channel you want to select "Added" or "Erased". Press the MENU button to display the menu. OPERATION Adding and Erasing Channels (Manual Method) 1 Press the MENU button to exit. 3.7 CHAPTER THREE: TV OPERATION Press the MENU button. 4 Press the CH v or CH w button to select "Add/Erase", then press the VOL+ button. 3 Press the VOL+ button. Press the CH w button to select "Channel", then press the VOL+ button. 2 Press the CH v or CH w button to select "Select".

User Manual (user Manual) (ver.1.0) (English)
Page 35
...then press the VOL + button. 2 Press the CH w button to exit. Press the CH v or CH w button to use the various timer features of the TV. w w When selecting the hours, be highlighted). OPERATION Setting the Clock Setting the clock is entered, Press the VOL + button. (at this point the minutes digits... the hours by pressing the CH v or CH w button repeatedly (or by holding down either of day (AM or PM). Option 1: Setting the Clock Manually 1 Press the MENU button to select the proper time of these buttons). Press the VOL + button: The Time menu will appear on the screen, and...
...then press the VOL + button. 2 Press the CH w button to exit. Press the CH v or CH w button to use the various timer features of the TV. w w When selecting the hours, be highlighted). OPERATION Setting the Clock Setting the clock is entered, Press the VOL + button. (at this point the minutes digits... the hours by pressing the CH v or CH w button repeatedly (or by holding down either of day (AM or PM). Option 1: Setting the Clock Manually 1 Press the MENU button to select the proper time of these buttons). Press the VOL + button: The Time menu will appear on the screen, and...
User Manual (user Manual) (ver.1.0) (English)
Page 46
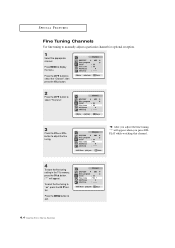
... the fine tuning to display the menu. Press the MENU button to adjust the fine tuning. 4 To store the fine tuning setting in the TV's memory, press the CH v button. ("*" will appear when you press DISPLAY while watching this channel. Press MENU to "oo", press the CH w...fine tuning to select "Fine tune". Press the CH w button to select the "Channel", then press the VOL+ button. 2 Press the CH w button to manually adjust a particular channel for optional reception. 1 Select the appropriate channel. w 3 Press the VOL+ or VOLbutton to exit. 4.4 CHAPTER FOUR: SPECIAL FEATURES After ...
... the fine tuning to display the menu. Press the MENU button to adjust the fine tuning. 4 To store the fine tuning setting in the TV's memory, press the CH v button. ("*" will appear when you press DISPLAY while watching this channel. Press MENU to "oo", press the CH w...fine tuning to select "Fine tune". Press the CH w button to select the "Channel", then press the VOL+ button. 2 Press the CH w button to manually adjust a particular channel for optional reception. 1 Select the appropriate channel. w 3 Press the VOL+ or VOLbutton to exit. 4.4 CHAPTER FOUR: SPECIAL FEATURES After ...


