User Manual (user Manual) (ver.1.0) (English)
Page 1
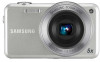
User Manual ST95 This user manual includes detailed usage instructions for your camera. Please read this manual thoroughly. Ä Click a topic Basic troubleshooting Quick reference Contents Basic functions Extended functions Shooting options Playback/Editing Settings Appendixes Index
User Manual ST95 This user manual includes detailed usage instructions for your camera. Please read this manual thoroughly. Ä Click a topic Basic troubleshooting Quick reference Contents Basic functions Extended functions Shooting options Playback/Editing Settings Appendixes Index
User Manual (user Manual) (ver.1.0) (English)
Page 2
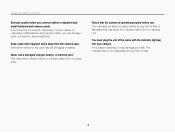
... all power sources, such as well. Keep your camera. Moving parts and accessories may present physical dangers as the battery or charger, and then contact a Samsung service center. 1 Avoid covering the camera or charger with wet hands. Health and safety information Always comply with the following precautions and usage tips to...
... all power sources, such as well. Keep your camera. Moving parts and accessories may present physical dangers as the battery or charger, and then contact a Samsung service center. 1 Avoid covering the camera or charger with wet hands. Health and safety information Always comply with the following precautions and usage tips to...
User Manual (user Manual) (ver.1.0) (English)
Page 3
... camera. This may result in fire or electric shock. Installed batteries may burn your camera, or cause injury. • Samsung is not responsible for an extended period of time. Do not damage or heat the battery. Health and safety information Caution-situations that... could cause damage to your camera or other equipment Remove the batteries from power sources when not in use. Use only Samsung-approved batteries, chargers, cables and accessories. • Unauthorized batteries, chargers, cables or accessories can cause batteries to explode, damage your ...
... camera. This may result in fire or electric shock. Installed batteries may burn your camera, or cause injury. • Samsung is not responsible for an extended period of time. Do not damage or heat the battery. Health and safety information Caution-situations that... could cause damage to your camera or other equipment Remove the batteries from power sources when not in use. Use only Samsung-approved batteries, chargers, cables and accessories. • Unauthorized batteries, chargers, cables or accessories can cause batteries to explode, damage your ...
User Manual (user Manual) (ver.1.0) (English)
Page 4
Keep cards with the indicator light (S) into your files. Information stored on the card may result in electric shock or camera malfunction or cause a fire. You must plug the end of the cable with magnetic strips away from camera malfunction or improper use. Never use . Check that may damage your camera. The manufacturer takes no responsibility for any loss of data. 3 The manufacturer is reversed, it may result from the camera case. Health and safety information Exercise caution when you can damage ports, connectors, and accessories. This may be...
Keep cards with the indicator light (S) into your files. Information stored on the card may result in electric shock or camera malfunction or cause a fire. You must plug the end of the cable with magnetic strips away from camera malfunction or improper use. Never use . Check that may damage your camera. The manufacturer takes no responsibility for any loss of data. 3 The manufacturer is reversed, it may result from the camera case. Health and safety information Exercise caution when you can damage ports, connectors, and accessories. This may be...
User Manual (user Manual) (ver.1.0) (English)
Page 5
Extended functions 32 Learn how to play back photos, videos, or voice memos and edit photos or videos. Also, learn how to connect your camera to your camera's settings. Outline of this manual without prior permission. • For Open Source License information, refer to the 'OpenSourceInfo.pdf' in the provided CD-ROM. Playback/Editing 78 Learn how to capture a photo, record a video, and voice memo by selecting a mode. Settings 105 Refer to options to configure your computer, photo printer, or TV. Appendixes 111 Get information about your camera's layout, icons, and ...
Extended functions 32 Learn how to play back photos, videos, or voice memos and edit photos or videos. Also, learn how to connect your camera to your camera's settings. Outline of this manual without prior permission. • For Open Source License information, refer to the 'OpenSourceInfo.pdf' in the provided CD-ROM. Playback/Editing 78 Learn how to capture a photo, record a video, and voice memo by selecting a mode. Settings 105 Refer to options to configure your computer, photo printer, or TV. Appendixes 111 Get information about your camera's layout, icons, and ...
User Manual (user Manual) (ver.1.0) (English)
Page 6
Page number of related information The order of options or menus you must select to perform a step; For example, [Shutter] represents the shutter button. for Standardization White Balance 5 Annotation Abbreviations used in this manual Icon [] () “ * Function Additional information Safety warnings and precautions Camera buttons. Icons used in this manual Abbreviation ACB AEB AF DIS DPOF EV ISO WB Definition Auto Contrast Balance Auto Exposure Bracket Auto Focus Digital Image Stabilization Digital Print Order Format Exposure Value International Organization for ...
Page number of related information The order of options or menus you must select to perform a step; For example, [Shutter] represents the shutter button. for Standardization White Balance 5 Annotation Abbreviations used in this manual Icon [] () “ * Function Additional information Safety warnings and precautions Camera buttons. Icons used in this manual Abbreviation ACB AEB AF DIS DPOF EV ISO WB Definition Auto Contrast Balance Auto Exposure Bracket Auto Focus Digital Image Stabilization Digital Print Order Format Exposure Value International Organization for ...
User Manual (user Manual) (ver.1.0) (English)
Page 7
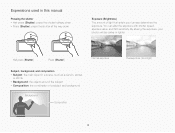
By altering the exposure, your camera determines the exposure. Half-press [Shutter] Press [Shutter] Normal exposure Subject, background, and composition • Subject: the main object in this manual Pressing the shutter • Half-press [Shutter]: press the shutter halfway down • Press [Shutter]: press the shutter all the way down Exposure (Brightness) The amount of a subject and background Background Subject Composition Overexposure (too bright) 6 You can alter the exposure with shutter speed, aperture value, and ISO sensitivity. Expressions used in a scene, such ...
By altering the exposure, your camera determines the exposure. Half-press [Shutter] Press [Shutter] Normal exposure Subject, background, and composition • Subject: the main object in this manual Pressing the shutter • Half-press [Shutter]: press the shutter halfway down • Press [Shutter]: press the shutter all the way down Exposure (Brightness) The amount of a subject and background Background Subject Composition Overexposure (too bright) 6 You can alter the exposure with shutter speed, aperture value, and ISO sensitivity. Expressions used in a scene, such ...
User Manual (user Manual) (ver.1.0) (English)
Page 8
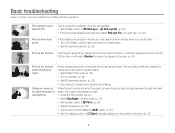
The subject's eyes appear red. Use the DIS function or half-press [Shutter] to steady the camera and may appear too dark. • Avoid shooting toward the sun. • Select Backlight in Scene mode. (p. 35) • Set the flash option to Fill in. (p. 54) • Adjust the exposure. (p. 66) • Set the Auto Contrast Balance (ACB) option. (p. 67) • Set the metering option to Spot if a bright subject is focused. (p. 30) Photos are blurred when shooting at night. Subjects come out too dark because of the frame. (p. 67) 7 This is caused by setting shooting options. ...
The subject's eyes appear red. Use the DIS function or half-press [Shutter] to steady the camera and may appear too dark. • Avoid shooting toward the sun. • Select Backlight in Scene mode. (p. 35) • Set the flash option to Fill in. (p. 54) • Adjust the exposure. (p. 66) • Set the Auto Contrast Balance (ACB) option. (p. 67) • Set the metering option to Spot if a bright subject is focused. (p. 30) Photos are blurred when shooting at night. Subjects come out too dark because of the frame. (p. 67) 7 This is caused by setting shooting options. ...
User Manual (user Manual) (ver.1.0) (English)
Page 9
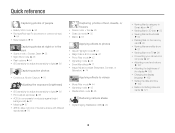
Quick reference Capturing photos of people • Beauty Shot mode f 36 • Red-eye/Red-eye Fix (to prevent or correct red-eye) f 54 • Face Detection f 61 Capturing photos at night or in the dark • Scene mode > Sunset, Dawn f 35 • Night Shot mode f 36 • Flash options f 54 • ISO sensitivity (to adjust the sensitivity to light) f 56 Capturing action photos • Continuous, Motion Capture f 70 Adjusting the exposure (brightness) • ISO sensitivity (to adjust the sensitivity to light) f 56 • EV (to adjust exposure) f 66 • ACB (to compensate ...
Quick reference Capturing photos of people • Beauty Shot mode f 36 • Red-eye/Red-eye Fix (to prevent or correct red-eye) f 54 • Face Detection f 61 Capturing photos at night or in the dark • Scene mode > Sunset, Dawn f 35 • Night Shot mode f 36 • Flash options f 54 • ISO sensitivity (to adjust the sensitivity to light) f 56 Capturing action photos • Continuous, Motion Capture f 70 Adjusting the exposure (brightness) • ISO sensitivity (to adjust the sensitivity to light) f 56 • EV (to adjust exposure) f 66 • ACB (to compensate ...
User Manual (user Manual) (ver.1.0) (English)
Page 10
Contents Basic functions 12 Unpacking 13 Camera layout 14 Inserting the battery and memory card 16 Charging the battery and turning on your camera ...... 17 Charging the battery 17 Turning on your camera 17 Performing the initial setup 18 Learning icons 20 Using the touch screen 21 Setting the touch screen and sound 23 Setting the display type for the touch screen 23 Setting the sound 23 Using the Home screen 24 Accessing the Home screen 24 Icons on the Home screen 24 Rearranging icons 25 Capturing photos 26 Zooming 27 Reducing camera shake (DIS 29 Tips for getting a clearer...
Contents Basic functions 12 Unpacking 13 Camera layout 14 Inserting the battery and memory card 16 Charging the battery and turning on your camera ...... 17 Charging the battery 17 Turning on your camera 17 Performing the initial setup 18 Learning icons 20 Using the touch screen 21 Setting the touch screen and sound 23 Setting the display type for the touch screen 23 Setting the sound 23 Using the Home screen 24 Accessing the Home screen 24 Icons on the Home screen 24 Rearranging icons 25 Capturing photos 26 Zooming 27 Reducing camera shake (DIS 29 Tips for getting a clearer...
User Manual (user Manual) (ver.1.0) (English)
Page 11
Contents Shooting options 49 Selecting a resolution and quality 50 Selecting a resolution 50 Selecting image quality 51 Using the timer 53 Shooting in the dark 54 Preventing red-eye 54 Using the flash 54 Adjusting the ISO sensitivity 56 Changing the camera's focus 57 Using macro 57 Using smart touch focus 58 Using one touch shooting 59 Adjusting the focus area 59 Using face detection 61 Detecting faces 61 Capturing a self portrait shot 62 Capturing a smile shot 62 Detecting eye blinking 63 Using Smart Face Recognition 63 Registering faces as your favorites (My Star ...
Contents Shooting options 49 Selecting a resolution and quality 50 Selecting a resolution 50 Selecting image quality 51 Using the timer 53 Shooting in the dark 54 Preventing red-eye 54 Using the flash 54 Adjusting the ISO sensitivity 56 Changing the camera's focus 57 Using macro 57 Using smart touch focus 58 Using one touch shooting 59 Adjusting the focus area 59 Using face detection 61 Detecting faces 61 Capturing a self portrait shot 62 Capturing a smile shot 62 Detecting eye blinking 63 Using Smart Face Recognition 63 Registering faces as your favorites (My Star ...

User Manual (user Manual) (ver.1.0) (English)
Page 12
Contents Playback/Editing 78 Viewing photos or videos in Playback mode 79 Starting Playback mode 79 Viewing photos 86 Playing a video 88 Playing a voice memo 90 Editing a photo 91 Resizing photos 91 Rotating a photo 92 Using Smart Crop 92 Applying Smart Filter effects 93 Adjusting your photos 93 Creating a print order (DPOF 95 Viewing files on a TV 96 Transferring files to your Windows computer 97 Transferring files with Intelli-studio 98 Transferring files by connecting the camera as a removable disk 100 Disconnecting the camera (for Windows XP 101 ...
Contents Playback/Editing 78 Viewing photos or videos in Playback mode 79 Starting Playback mode 79 Viewing photos 86 Playing a video 88 Playing a voice memo 90 Editing a photo 91 Resizing photos 91 Rotating a photo 92 Using Smart Crop 92 Applying Smart Filter effects 93 Adjusting your photos 93 Creating a print order (DPOF 95 Viewing files on a TV 96 Transferring files to your Windows computer 97 Transferring files with Intelli-studio 98 Transferring files by connecting the camera as a removable disk 100 Disconnecting the camera (for Windows XP 101 ...

User Manual (user Manual) (ver.1.0) (English)
Page 13
Basic functions Learn about your camera 17 Performing the initial setup 18 Learning icons 20 Using the touch screen 21 Setting the touch screen and sound ...... 23 Setting the display type for the touch screen 23 Setting the sound 23 Using the Home screen 24 Accessing the Home screen 24 Icons on your camera's layout, icons, and basic functions for getting a clearer photo 30 Unpacking 13 Camera layout 14 Inserting the battery and memory card ... 16 Charging the battery and turning on your camera 17 Charging the battery 17 Turning on the Home screen 24 Rearranging icons 25 ...
Basic functions Learn about your camera 17 Performing the initial setup 18 Learning icons 20 Using the touch screen 21 Setting the touch screen and sound ...... 23 Setting the display type for the touch screen 23 Setting the sound 23 Using the Home screen 24 Accessing the Home screen 24 Icons on your camera's layout, icons, and basic functions for getting a clearer photo 30 Unpacking 13 Camera layout 14 Inserting the battery and memory card ... 16 Charging the battery and turning on your camera 17 Charging the battery 17 Turning on the Home screen 24 Rearranging icons 25 ...
User Manual (user Manual) (ver.1.0) (English)
Page 14
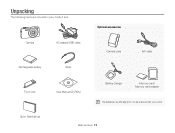
Camera AC adapter/USB cable Optional accessories Camera case A/V cable Rechargeable battery Strap Touch pen Quick Start Manual User Manual CD-ROM Battery charger Memory card/ Memory card adapter The illustrations may differ slightly from the items shipped with your product box. Basic functions 13 Unpacking The following items are included in your product.
Camera AC adapter/USB cable Optional accessories Camera case A/V cable Rechargeable battery Strap Touch pen Quick Start Manual User Manual CD-ROM Battery charger Memory card/ Memory card adapter The illustrations may differ slightly from the items shipped with your product box. Basic functions 13 Unpacking The following items are included in your product.
User Manual (user Manual) (ver.1.0) (English)
Page 15
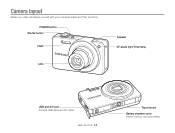
POWER button Shutter button Flash Lens Speaker AF-assist light/Timer lamp USB and A/V port Accepts USB cable and A/V cable Basic functions 14 Tripod mount Battery chamber cover Insert a memory card and battery Camera layout Before you start, familiarize yourself with your camera's parts and their functions.
POWER button Shutter button Flash Lens Speaker AF-assist light/Timer lamp USB and A/V port Accepts USB cable and A/V cable Basic functions 14 Tripod mount Battery chamber cover Insert a memory card and battery Camera layout Before you start, familiarize yourself with your camera's parts and their functions.
User Manual (user Manual) (ver.1.0) (English)
Page 16
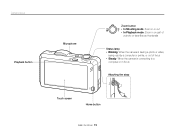
Camera layout Playback button Microphone Zoom button • In Shooting mode: Zoom in or out • In Playback mode: Zoom in on part of a photo or view files as thumbnails Status lamp • Blinking: When the camera is saving a photo or video, being read by a computer or printer, or out of focus • Steady: When the camera is connecting to a computer or in focus Attaching the strap x y Touch screen Home button Basic functions 15
Camera layout Playback button Microphone Zoom button • In Shooting mode: Zoom in or out • In Playback mode: Zoom in on part of a photo or view files as thumbnails Status lamp • Blinking: When the camera is saving a photo or video, being read by a computer or printer, or out of focus • Steady: When the camera is connecting to a computer or in focus Attaching the strap x y Touch screen Home button Basic functions 15
User Manual (user Manual) (ver.1.0) (English)
Page 17
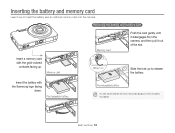
... Memory card Push the card gently until it disengages from the camera, and then pull it out of the slot. Insert a memory card with the Samsung logo facing down. Basic functions 16 Memory card Battery lock Slide the lock up . Inserting the battery and memory card Learn how to release the...
... Memory card Push the card gently until it disengages from the camera, and then pull it out of the slot. Insert a memory card with the Samsung logo facing down. Basic functions 16 Memory card Battery lock Slide the lock up . Inserting the battery and memory card Learn how to release the...
User Manual (user Manual) (ver.1.0) (English)
Page 18
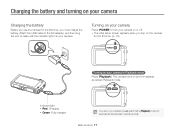
The camera turns on your camera Press [POWER] to the AC adapter, and then plug the end of cable with the indicator light into your camera in Playback mode Press [Playback]. Indicator light • Red: Charging • Green: Fully charged If you must charge the battery. Basic functions 17 Attach the USB cable to turn your camera on or off. • The initial setup screen appears when you turn on your camera by pressing and holding [Playback] for the first time. (p. 18) Turning on your camera. Charging the battery and turning on your camera Charging the battery ...
The camera turns on your camera Press [POWER] to the AC adapter, and then plug the end of cable with the indicator light into your camera in Playback mode Press [Playback]. Indicator light • Red: Charging • Green: Fully charged If you must charge the battery. Basic functions 17 Attach the USB cable to turn your camera on or off. • The initial setup screen appears when you turn on your camera by pressing and holding [Playback] for the first time. (p. 18) Turning on your camera. Charging the battery and turning on your camera Charging the battery ...

User Manual (user Manual) (ver.1.0) (English)
Page 19
Performing the initial setup When the initial setup screen appears, follow the steps below to configure the camera's basic settings. 1 Touch Language. 4 Touch Home, and then touch z or x to select a time zone. • When you travel to save. 6 Touch Date/Time Set. 3 Touch Time Zone. Time Zone 2 Select a language, and then touch o. London, Lisbon 5 Touch o to another country, touch Visit, and then select a new time zone. Basic functions 18
Performing the initial setup When the initial setup screen appears, follow the steps below to configure the camera's basic settings. 1 Touch Language. 4 Touch Home, and then touch z or x to select a time zone. • When you travel to save. 6 Touch Date/Time Set. 3 Touch Time Zone. Time Zone 2 Select a language, and then touch o. London, Lisbon 5 Touch o to another country, touch Visit, and then select a new time zone. Basic functions 18

User Manual (user Manual) (ver.1.0) (English)
Page 20
Touch Calibration 8 Touch , and then set daylight-saving time, touch . 9 Touch o to save . Basic functions 19 Performing the initial setup 7 Set the date. Date/Time Set Year Month Day 10 Touch Touch Calibration. 11 Touch the target on the screen with your touch pen. Date/Time Set Hr Min • To set the time. Touch directly in the center of the target for optimal performance. 12 Touch o to save settings.
Touch Calibration 8 Touch , and then set daylight-saving time, touch . 9 Touch o to save . Basic functions 19 Performing the initial setup 7 Set the date. Date/Time Set Year Month Day 10 Touch Touch Calibration. 11 Touch the target on the screen with your touch pen. Date/Time Set Hr Min • To set the time. Touch directly in the center of the target for optimal performance. 12 Touch o to save settings.
