
Quick Guide (easy Manual) (ver.1.0) (English)
Page 4
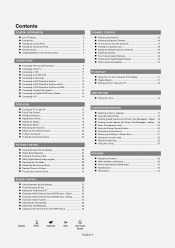
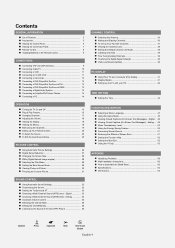
... 5 Viewing the Control Panel 6 Viewing the Connection Panel 7 Remote Control 8 Installing Batteries in the Remote Control 9 CONNECTIONS Connecting VHF and UHF Antennas 9 Connecting Cable TV 10 Connecting a VCR 11 Connecting an S-VHS VCR 11 Connecting a Camcorder 12 Connecting a DVD Player/Set-Top Box 12 Connecting a DVD Player/Set-Top Box via DVI 12 Connecting a DVD Player/Set-Top Box via...
... 5 Viewing the Control Panel 6 Viewing the Connection Panel 7 Remote Control 8 Installing Batteries in the Remote Control 9 CONNECTIONS Connecting VHF and UHF Antennas 9 Connecting Cable TV 10 Connecting a VCR 11 Connecting an S-VHS VCR 11 Connecting a Camcorder 12 Connecting a DVD Player/Set-Top Box 12 Connecting a DVD Player/Set-Top Box via DVI 12 Connecting a DVD Player/Set-Top Box via...
Quick Guide (easy Manual) (ver.1.0) (English)
Page 7
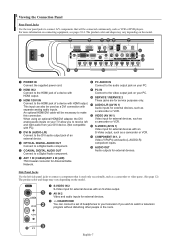
... an optional HDMI/DVI adapter, the DVI Video input for external devices, such as analog audio inputs on your PC. ´ HDMI IN 2 ' PC IN Connect to the HDMI jack of an external device. Ú COMPONENT IN 1, 2 Video (Y/PB/PR) and audio (L-AUDIO-R) ˆ OPTICAL DIGITAL AUDIO OUT component ... that is used only occasionally, such as a camcorder or video game. (See page 12) The product color and shape may vary depending on connecting equipment, see pages 9-14. An optional HDMI/DVI cable will be necessary to make Ô AUDIO-L/R (AV IN 1) Audio inputs for external devices, such...
... an optional HDMI/DVI adapter, the DVI Video input for external devices, such as analog audio inputs on your PC. ´ HDMI IN 2 ' PC IN Connect to the HDMI jack of an external device. Ú COMPONENT IN 1, 2 Video (Y/PB/PR) and audio (L-AUDIO-R) ˆ OPTICAL DIGITAL AUDIO OUT component ... that is used only occasionally, such as a camcorder or video game. (See page 12) The product color and shape may vary depending on connecting equipment, see pages 9-14. An optional HDMI/DVI cable will be necessary to make Ô AUDIO-L/R (AV IN 1) Audio inputs for external devices, such...

Quick Guide (easy Manual) (ver.1.0) (English)
Page 9
... ANT 2 IN (AIR) English-9 Plug the combiner into the ANT 2 IN (AIR) terminal on ? 2. If you must combine the two antenna signals before connecting the antennas to match the "+" and "-" ends of the remote control upward as a roof antenna or "rabbit ears") that look like this , see "Separate ..., or is the power cord unplugged? 5. Installing Batteries in a cool, dry place if you are using the remote control for a long time. Connections Connecting VHF and UHF Antennas If your TV (one VHF and one UHF), you have two separate antennas for about 23 feet from the twin leads...
... ANT 2 IN (AIR) English-9 Plug the combiner into the ANT 2 IN (AIR) terminal on ? 2. If you must combine the two antenna signals before connecting the antennas to match the "+" and "-" ends of the remote control upward as a roof antenna or "rabbit ears") that look like this , see "Separate ..., or is the power cord unplugged? 5. Installing Batteries in a cool, dry place if you are using the remote control for a long time. Connections Connecting VHF and UHF Antennas If your TV (one VHF and one UHF), you have two separate antennas for about 23 feet from the twin leads...
Quick Guide (easy Manual) (ver.1.0) (English)
Page 10
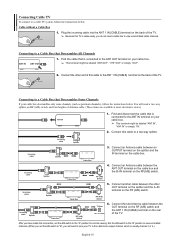
... and the A-IN terminal on your cable box. ➢ This terminal might be labeled "ANT OUT", "VHF OUT" or simply, "OUT". Connecting to the ANT 1 IN (CABLE) terminal on the back of the TV. Incoming cable Splitter Incoming cable Splitter Cable Box 3. RF (A/B) Switch ...Incoming cable Splitter Cable Box RF (A/B) Switch 6. Connect another cable between an OUTPUT terminal on the splitter and the IN terminal on the RF(A/B) switch. After you set the A/B switch to "B", ...
... and the A-IN terminal on your cable box. ➢ This terminal might be labeled "ANT OUT", "VHF OUT" or simply, "OUT". Connecting to the ANT 1 IN (CABLE) terminal on the back of the TV. Incoming cable Splitter Incoming cable Splitter Cable Box 3. RF (A/B) Switch ...Incoming cable Splitter Cable Box RF (A/B) Switch 6. Connect another cable between an OUTPUT terminal on the splitter and the IN terminal on the RF(A/B) switch. After you set the A/B switch to "B", ...

Quick Guide (easy Manual) (ver.1.0) (English)
Page 11
...) 1 Antenna Cable (Not supplied) An S-Video cable is stereo, you must connect two cables. Connect a Video Cable between the AUDIO OUT jacks on the VCR and the AV IN 1 [R-AUDIO-L] jacks on the TV. 3. Connecting an S-VHS VCR Your Samsung TV can be connected to an S-Video signal from the back of the VCR.... 3. Connect Audio Cables between the ANT OUT terminal on the VCR and the ANT 1 IN (CABLE) or ANT...
...) 1 Antenna Cable (Not supplied) An S-Video cable is stereo, you must connect two cables. Connect a Video Cable between the AUDIO OUT jacks on the VCR and the AV IN 1 [R-AUDIO-L] jacks on the TV. 3. Connecting an S-VHS VCR Your Samsung TV can be connected to an S-Video signal from the back of the VCR.... 3. Connect Audio Cables between the ANT OUT terminal on the VCR and the ANT 1 IN (CABLE) or ANT...

Quick Guide (easy Manual) (ver.1.0) (English)
Page 12
... Cable (Not supplied) ➢ Component video separates the video into Y (Luminance (brightness)), PB (Blue) and PR (Red) for enhanced video quality. Connect a Component Cable between the AV IN 2 [VIDEO] (or S-VIDEO) jack on the TV and the VIDEO OUT jack on the DVD player/Set-Top... to HDMI Cable (Not supplied) ➢ Each external input source device has a different back panel configuration. ➢ When connecting an external device, match the color of the connection terminal to the cable. They allow you to view the camcorder tapes without using a VCR Camcorder 1 S-Video Cable (Not ...
... Cable (Not supplied) ➢ Component video separates the video into Y (Luminance (brightness)), PB (Blue) and PR (Red) for enhanced video quality. Connect a Component Cable between the AV IN 2 [VIDEO] (or S-VIDEO) jack on the TV and the VIDEO OUT jack on the DVD player/Set-Top... to HDMI Cable (Not supplied) ➢ Each external input source device has a different back panel configuration. ➢ When connecting an external device, match the color of the connection terminal to the cable. They allow you to view the camcorder tapes without using a VCR Camcorder 1 S-Video Cable (Not ...
Quick Guide (easy Manual) (ver.1.0) (English)
Page 13
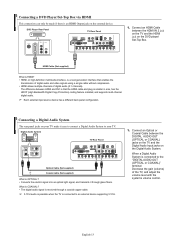
... on the TV and the HDMI jack on your TV make it through a coaxial copper cable. ➢ 5.1CH audio is possible when the TV is connected to the "DIGITAL AUDIO OUT (OPTICAL or COAXIAL)" terminal: Decrease the gain (volume) of digital audio (5.1 channels). HDMI Cable (Not supplied) What is ...) or Coaxial cable (Not supplied) What is OPTICAL:? • Converts the electric signal into an optical light signal, and transmits it easy to connect a Digital Audio System to your TV. English-13 The difference between the DIGITAL AUDIO OUT (OPTICAL or COAXIAL) jacks on the TV and the Digital...
... on the TV and the HDMI jack on your TV make it through a coaxial copper cable. ➢ 5.1CH audio is possible when the TV is connected to the "DIGITAL AUDIO OUT (OPTICAL or COAXIAL)" terminal: Decrease the gain (volume) of digital audio (5.1 channels). HDMI Cable (Not supplied) What is ...) or Coaxial cable (Not supplied) What is OPTICAL:? • Converts the electric signal into an optical light signal, and transmits it easy to connect a Digital Audio System to your TV. English-13 The difference between the DIGITAL AUDIO OUT (OPTICAL or COAXIAL) jacks on the TV and the Digital...
Quick Guide (easy Manual) (ver.1.0) (English)
Page 14
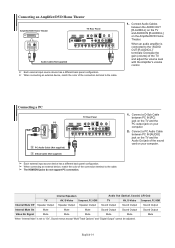
... Cable (Not supplied) ➢ Each external input source device has a different back panel configuration. ➢ When connecting an external device, match the color of the connection terminal to the "AUDIO OUT [R-AUDIO-L]" terminals: Decrease the gain (volume) of the TV, and adjust the volume...Cable (Not supplied) ➢ Each external input source device has a different back panel configuration. ➢ When connecting an external device, match the color of the connection terminal to "On", Sound menus except "Multi-Track Options" and "Digital Output" cannot be adjusted. Internal Speakers...
... Cable (Not supplied) ➢ Each external input source device has a different back panel configuration. ➢ When connecting an external device, match the color of the connection terminal to the "AUDIO OUT [R-AUDIO-L]" terminals: Decrease the gain (volume) of the TV, and adjust the volume...Cable (Not supplied) ➢ Each external input source device has a different back panel configuration. ➢ When connecting an external device, match the color of the connection terminal to "On", Sound menus except "Multi-Track Options" and "Digital Output" cannot be adjusted. Internal Speakers...

Quick Guide (easy Manual) (ver.1.0) (English)
Page 15
... ANT 1 IN (CABLE), select "Cable". ➢ If both ANT 2 IN (AIR) and ANT 1 IN (CABLE) are connected, select the "Air + Cable". ➢ In Cable mode, you can also use the POWER button on the remote control. You can select the correct signal ... When the TV is Start automatically displayed. Press the POWER button on the TV. Press the ENTER button, then "Select the language of the selected connection. Plug & Play Select the language of cable system that exists in your local cable company to memorize the channels of the OSD" menu is initially...
... ANT 1 IN (CABLE), select "Cable". ➢ If both ANT 2 IN (AIR) and ANT 1 IN (CABLE) are connected, select the "Air + Cable". ➢ In Cable mode, you can also use the POWER button on the remote control. You can select the correct signal ... When the TV is Start automatically displayed. Press the POWER button on the TV. Press the ENTER button, then "Select the language of the selected connection. Plug & Play Select the language of cable system that exists in your local cable company to memorize the channels of the OSD" menu is initially...

Quick Guide (easy Manual) (ver.1.0) (English)
Page 19
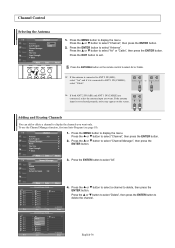
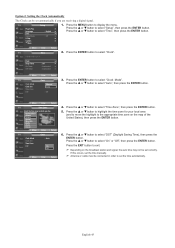
... in memory. • It takes approximately 3 to 10 minutes to memorize channels. Press the ENTER button at any time to select the antenna connection, then press the ENTER button. ➢ Air: "Air" antenna signal. Air Start Cable Start Air + Cable Start Move Enter Return TV ...on the remote control. ➢ • All available DTV and analog channels are automatically stored in progress. Even if a particular channel is connected to the TV (i.e. Press the MENU button to scan through the channels. After the available channels are memorized, use the CH or CH button...
... in memory. • It takes approximately 3 to 10 minutes to memorize channels. Press the ENTER button at any time to select the antenna connection, then press the ENTER button. ➢ Air: "Air" antenna signal. Air Start Cable Start Air + Cable Start Move Enter Return TV ...on the remote control. ➢ • All available DTV and analog channels are automatically stored in progress. Even if a particular channel is connected to the TV (i.e. Press the MENU button to scan through the channels. After the available channels are memorized, use the CH or CH button...

Quick Guide (easy Manual) (ver.1.0) (English)
Page 25
...the ... or † button to select "Input". √ 2. Move Enter Return Press the SOURCE button on and connected via HDMI. ➢ You can choose only those external devices that are connected to the TV. or † button to view an external signal source. Press the ... Press the ENTER button to... choose between the following sets of your input source selection easier. To Edit the Input Source Name Name the device connected to the input jacks to the TV, you connect equipment to make your choice. To Select the Source Use to select TV or other external input sources...
...the ... or † button to select "Input". √ 2. Move Enter Return Press the SOURCE button on and connected via HDMI. ➢ You can choose only those external devices that are connected to the TV. or † button to view an external signal source. Press the ... Press the ENTER button to... choose between the following sets of your input source selection easier. To Edit the Input Source Name Name the device connected to the input jacks to the TV, you connect equipment to make your choice. To Select the Source Use to select TV or other external input sources...
Quick Guide (easy Manual) (ver.1.0) (English)
Page 36
... input is not selected properly, noise may appear on the remote control to select Air or Cable. ➢ If the antenna is connected to ANT 2 IN (AIR), select "Air" and if it is connected to ANT 1 IN (CABLE), or select "Cable". ➢ If both ANT 2 IN (AIR) and ANT 1 IN (CABLE) are... connected, select the antenna input you want . English-36 To use the Channel Manager function, first run Auto Program (see page 19). Air 2 Air 2 Air 3 Air 4 ...
... input is not selected properly, noise may appear on the remote control to select Air or Cable. ➢ If the antenna is connected to ANT 2 IN (AIR), select "Air" and if it is connected to ANT 1 IN (CABLE), or select "Cable". ➢ If both ANT 2 IN (AIR) and ANT 1 IN (CABLE) are... connected, select the antenna input you want . English-36 To use the Channel Manager function, first run Auto Program (see page 19). Air 2 Air 2 Air 3 Air 4 ...
Quick Guide (easy Manual) (ver.1.0) (English)
Page 41
...In some cases, abnormal signals (such as stripes) might appear different. (and depending on your particular version of Windows and your computer manufacturer or Samsung Dealer.) 1. PC Display Using Your TV as a Computer (PC) Display Setting Up Your PC Software (Based on Windows XP) The Windows display-...settings for information about connecting your display settings dialog box, the correct value is disconnected). First, click on "Control Panel" on the TV screen when the PC power ...
...In some cases, abnormal signals (such as stripes) might appear different. (and depending on your particular version of Windows and your computer manufacturer or Samsung Dealer.) 1. PC Display Using Your TV as a Computer (PC) Display Setting Up Your PC Software (Based on Windows XP) The Windows display-...settings for information about connecting your display settings dialog box, the correct value is disconnected). First, click on "Control Panel" on the TV screen when the PC power ...
Quick Guide (easy Manual) (ver.1.0) (English)
Page 43
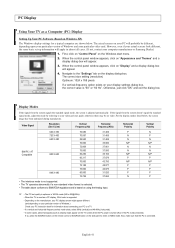
... Adjustment Image Reset Move Enter √ √ Return 1. appears on the screen. or † button to the PC mode first. Changing the Screen Position After connecting the TV to your PC, adjust the position of the screen if it is not well-aligned. ➢ Change to select "Setup", then press the...
... Adjustment Image Reset Move Enter √ √ Return 1. appears on the screen. or † button to the PC mode first. Changing the Screen Position After connecting the TV to your PC, adjust the position of the screen if it is not well-aligned. ➢ Change to select "Setup", then press the...
Quick Guide (easy Manual) (ver.1.0) (English)
Page 45
... the ... Press the ENTER button to display the menu. Press the EXIT button to set correctly. Option 2: Setting the Clock Automatically The Clock can be connected in which you are receiving a digital signal. Press the MENU button to select "Clock". Press the ...
... the ... Press the ENTER button to display the menu. Press the EXIT button to set correctly. Option 2: Setting the Clock Automatically The Clock can be connected in which you are receiving a digital signal. Press the MENU button to select "Clock". Press the ...

Quick Guide (easy Manual) (ver.1.0) (English)
Page 47
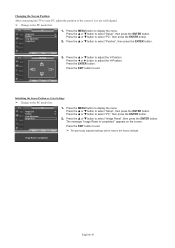
...† More Setup √ : English √ √ : Off √ √ √ 1. Move Enter Return Using the Game Mode When connecting to a game console such as PlayStationTM or XboxTM, you display the TV menu in the Sound menu is automatically changed to exit. Press the MENU... to TV, check if Game Mode is activated. Set Game Mode to select "Setup", then press the ENTER button. or † button to Off and connect external devices. TV Plug & Play Language Time Game Mode V-Chip Caption † More Setup √ : English √ √ : Off √ √...
...† More Setup √ : English √ √ : Off √ √ √ 1. Move Enter Return Using the Game Mode When connecting to a game console such as PlayStationTM or XboxTM, you display the TV menu in the Sound menu is automatically changed to exit. Press the MENU... to TV, check if Game Mode is activated. Set Game Mode to select "Setup", then press the ENTER button. or † button to Off and connect external devices. TV Plug & Play Language Time Game Mode V-Chip Caption † More Setup √ : English √ √ : Off √ √...

Quick Guide (easy Manual) (ver.1.0) (English)
Page 59
...perfect. Move the computer's mouse or press any key on the keyboard. The HD caption that the "+" and "-" ends of units connected to your remote in . The TV won't turn on the remote control means the selected channel is too large or too small. Try...then try this list of these troubleshooting tips apply, call your computer check; On your nearest Samsung service center. The visual qualities of the remote control (transmission window). Check the antenna connections. If none of possible problems and solutions. The image is a digital channel. Appendix Identifying ...
...perfect. Move the computer's mouse or press any key on the keyboard. The HD caption that the "+" and "-" ends of units connected to your remote in . The TV won't turn on the remote control means the selected channel is too large or too small. Try...then try this list of these troubleshooting tips apply, call your computer check; On your nearest Samsung service center. The visual qualities of the remote control (transmission window). Check the antenna connections. If none of possible problems and solutions. The image is a digital channel. Appendix Identifying ...
Quick Guide (easy Manual) (ver.1.0) (English)
Page 60
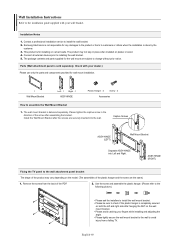
Samsung Electronics is not responsible for installing on cement walls. This product is for any damages to the product or harm to customers or others when ... : 4 Accessories How to the installation guide supplied with your dealer.) Please use only the parts and components provided for the wall mount are the same) 1. Connect all external devices prior to install the wall bracket. 2. Installation Notes 1. Install the Wall Mount Bracket after the screws are securely inserted into Left and...
Samsung Electronics is not responsible for installing on cement walls. This product is for any damages to the product or harm to customers or others when ... : 4 Accessories How to the installation guide supplied with your dealer.) Please use only the parts and components provided for the wall mount are the same) 1. Connect all external devices prior to install the wall bracket. 2. Installation Notes 1. Install the Wall Mount Bracket after the screws are securely inserted into Left and...
Quick Guide (easy Manual) (ver.1.0) (English)
Page 61
...refer to the PDP. 2. Note: If the safety pins are not used, the PDP may cause damage to following instructions.) 2. Remove the Safety Pins. Connecting External Devices to secure the PDP on the right.) 3. Be sure to the front guide holes on both sides as illustrated in the direction of... at 0° 1. English-61 PDP Wall Bracket Wall How to Adjust Mounting Angle Note: Please secure the mounting bracket on the wall surface after connecting the external devices Remove the Safety Pins to adjust the angle to 0°, and then secure the Safety Pins again. • For safety, be...
...refer to the PDP. 2. Note: If the safety pins are not used, the PDP may cause damage to following instructions.) 2. Remove the Safety Pins. Connecting External Devices to secure the PDP on the right.) 3. Be sure to the front guide holes on both sides as illustrated in the direction of... at 0° 1. English-61 PDP Wall Bracket Wall How to Adjust Mounting Angle Note: Please secure the mounting bracket on the wall surface after connecting the external devices Remove the Safety Pins to adjust the angle to 0°, and then secure the Safety Pins again. • For safety, be...
User Manual (user Manual) (ver.1.0) (English)
Page 4
... 5 Viewing the Control Panel 6 Viewing the Connection Panel 7 Remote Control 8 Installing Batteries in the Remote Control 9 CONNECTIONS Connecting VHF and UHF Antennas 9 Connecting Cable TV 10 Connecting a VCR 11 Connecting an S-VHS VCR 11 Connecting a Camcorder 12 Connecting a DVD Player/Set-Top Box 12 Connecting a DVD Player/Set-Top Box via DVI 12 Connecting a DVD Player/Set-Top Box via...
... 5 Viewing the Control Panel 6 Viewing the Connection Panel 7 Remote Control 8 Installing Batteries in the Remote Control 9 CONNECTIONS Connecting VHF and UHF Antennas 9 Connecting Cable TV 10 Connecting a VCR 11 Connecting an S-VHS VCR 11 Connecting a Camcorder 12 Connecting a DVD Player/Set-Top Box 12 Connecting a DVD Player/Set-Top Box via DVI 12 Connecting a DVD Player/Set-Top Box via...

