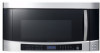
User Manual (user Manual) (ver.1.0) (English)
Page 2
...operate the oven if it is also as silent as other kitchen appliances perfectly, providing a harmonious and complete kitchen solution. • Turbo vent With 400 CFM(Cubic Feet per Minute, Ft³/min) of ventilation power, your new Over The Range (OTR) oven offers optimal...oven with 1,100 watts of output guarantees superior cooking results. • Sensor Cooking Don't know how to cook? Door (bent), 2. Samsung's new OTR sensor technology offers preset functions resulting in harmful exposure to microwave energy. safety information PRECAUTIONS TO AVOID POSSIBLE EXPOSURE TO EXCESSIVE ...
User Manual (user Manual) (ver.1.0) (English)
Page 5
...defeat the grounding plug. - If the power-supply cord is equipped with this appliance. Clean Ventilating Hoods Frequently - Use care when cleaning the vent-hood filter. When flaming foods under the hood, turn the fan on by providing an escape wire for the electrical current. Use of Extension...should not be plugged into a grounded 3 prong outlet. When flaming foods under the hood, turn the fan on . Use care when cleaning the vent-hood filter. Do not remove the third (grounding) prong.Do not use an extension cord, read and follow the "Use of Extension Cords" ...
User Manual (user Manual) (ver.1.0) (English)
Page 7
... leave surface units beneath your nearest service center : Failing to electric leakage. If the door is opened, the fire may ignite and spread if the vent fan is damaged, contact your nearest service center. - You may result in such a way that it may result in the beginning of time or during...
User Manual (user Manual) (ver.1.0) (English)
Page 10
Button 18 Using The More/Less Button 18 Using The Hi/Mid/Lo/Off Vent Button 19 Using The Vent Delay Off Button 19 Using The Light Hi/Lo/Off Button 19 Using The Light Timer Button 20 Using The Turntable On/Off Button 20 ...
User Manual (user Manual) (ver.1.0) (English)
Page 15
VENT DELAY 27 OFF Press this button on the cooktop light. • If you press the button, light will appear in ... button to turn on to set the kitchen timer. 21 mY SETTINGS Press this button while cooking is in the table above. VENT HI/Mid/ 28 LO/OFF Press this button to turn On, Press this button again. 23 STOP/CLEAR Press this button to...detailed information on /off the turntable. setting up your microwave oven Timer Hi/Lo/Off Light Delay Off Hi/Mid/Lo/Off Vent 16 15 21 22 24 27 28 15 MORE(9) 16 NUMBER 17 POWER LEVEL 18 ADD 30 SEC. 19 CLOCK Press this...
User Manual (user Manual) (ver.1.0) (English)
Page 18
...sec.", "Custom Cook", "Kitchen Timer", "Soften/ Melt", "Kids Meals", "Snack Bar" and "Time Cook" modes. Press the Vent Hi/Mid/Lo/Off button four times to use your new Samsung microwave oven. Use the Number buttons to press the Start button. 1. Button ( 1 8 ) This simplified control saves you time...speed mode while the microwave is working. 18_ setting up to cook it by 10 seconds. Add 30 sec. You can manually select the vent setting. 1. This is displayed and the oven starts automatically. 2. Press the Kitchen Timer button. 2. Using The Add 30 Sec. using...
User Manual (user Manual) (ver.1.0) (English)
Page 19
... Enter / Start button. 8. using your microwave oven _19 Press the Delay Off button four times to stop vent moter after 10 minutes. 5. Press the Enter / Start button. 4. 02 Using your microwave oven Using The Vent Delay Off Button ( 2 7 ) The button will be set so the light turns on and off automatically at...
User Manual (user Manual) (ver.1.0) (English)
Page 22
... slices on the turntable in a microwavesafe ceramic, glass or plastic dish and add 24 tbs. Let the oven cool for pizzas with a lid or vented plastic wrap while cooking and stir before standing for at least 5 minutes before using it again. Pizza Slice ( 1 0 ) 1 to increase the... More (9)/Less (1) button to 16 oz. After heating, stir well. Cook to 6 potatoes Pierce each potato several times with a lid or vented plastic wrap while cooking and stir before standing. Let the oven cool for 3-5 minutes. Place the frozen vegetables in a spoke-like fashion. Let...
User Manual (user Manual) (ver.1.0) (English)
Page 23
...current time at refrigerator temperature. FOOD Dinner plate Casserole Pasta AMOUNT 1 serving (1 plate) 1 to 6 oz. Cover the plate with a lid or vented plastic wrap. meat, poultry or fish (up to 4 servings PROCEDURE Use only precooked, refrigerated foods. Stir the food once before serving. The display ...with bone) ½ cup starch (potatoes, pasta, rice, etc.) ½ cup vegetables (about 3 - 4 oz.) Cover the plate with vented plastic wrap or waxed paper tucked under the plate. By actually sensing the humidity that escapes as you would like after using the "Sensor Reheat...
User Manual (user Manual) (ver.1.0) (English)
Page 33
... a dish with plastic wrap, vent the plastic wrap by turning back one corner to shield any bone tips or thin pieces of aluminum foil to let excess steam escape. Cooking ...
User Manual (user Manual) (ver.1.0) (English)
Page 35
... come out of the oven). If dense vegetables such as potatoes, carrots and green beans are just set as asparagus and broccoli with a lid or vented microwavable plastic wrap. Whole vegetables, such as potatoes, acorn squash or corn on the cob, should have their shells as potatoes, squash, eggplant, etc., should...
User Manual (user Manual) (ver.1.0) (English)
Page 37
... into ½-inch pieces ¼ cup chopped onion 2 tsp. flour ½ tsp. Cover with lid. apple cider vinegar 1. Reserve 1 Tbs. Stir well. Reduce power to vent steam. Cook at High until tender. 2. sugar 1 tsp. celery seed 1/8 tsp. Stir in sugar, salt, flour, celery seed, and pepper. 04 Cooking guide cooking guide...
User Manual (user Manual) (ver.1.0) (English)
Page 38
... (oven cavity) of your microwave using a solution of your microwave oven periodically to ensure that the door closes properly. Do not get water into the vents. Let it to use abrasive products or chemical solvents such as ammonia CAUTION or alcohol as required. Cleaning the door and door seals Always ensure...
User Manual (user Manual) (ver.1.0) (English)
Page 39
...night light, make sure that you are damaged. Reassemnbly by remove screw. 5. Replace bulb with a 40 watt incandescent bulb. 6. Next, remove the top vent grille. 4. Replace the bulb with 40 watt incandescent bulb. 4. Do not repair, replace or service any parts of time, choose a dust-free, dry ...to perform repairs. Unplug the oven or turn off the power at the main power supply. 2. screw screw bracket duct upper bulb top vent grille cleaning and maintaining your microwave oven _39 Dust and dampness may adversely affect the ability of WARNING the bulb. 1. This could be a...
User Manual (user Manual) (ver.1.0) (English)
Page 41
...Assembling is noticeably dirty or discolored (every 6 to disassembling (it must be assembled ductupper hook). charcoal filter screw duct-upper hook top vent grille cleaning and maintaining your microwave oven _41 Unplug the oven plug or turn off the power at your nearest Authorized Service Center or... Samsung dealer (Charcoal filter part no.: DE63-00367D). 1. The charcoal filter cannot be cleaned. To order a new charcoal filter, contact the Parts ...
User Manual (user Manual) (ver.1.0) (English)
Page 5
...over accidentally. The extension cord must be longer, too. The longer cord should be plugged into a grounded 3 prong outlet. Use care when cleaning the vent-hood filter. Do not remove the third (grounding) prong. However, if it is properly grounded. - Longer cord sets or extension cords are not ...the appliance is necessary to use of the grounding plug can be allowed to reduce the risk of filter. 2. Use care when cleaning the vent-hood filter. WARNING WARNING Improper use an extension cord, read and follow the "Use of electric shock by children or tripped over the ...
User Manual (user Manual) (ver.1.0) (English)
Page 7
... or just after cooking. - Failing to do so may result in electric shock or fire due to do so may ignite and spread if the vent fan is operating.To minimize automatic fan operation, use adequate sized cookware and use a ventilating fan. - Do not use high heat on the surface unit...
User Manual (user Manual) (ver.1.0) (English)
Page 11
Button 19 Using The More/Less Button 19 Using The Hi/Mid/Lo/Off Vent Button 20 Using The Vent Delay Off Button 20 Using The Light Hi/Lo/Off Button 20 Using The Light Timer Button 21 Using The Turntable On/Off Button 21 ...
User Manual (user Manual) (ver.1.0) (English)
Page 16
... 16_ setting up your microwave oven" on the next page for detailed information on to set and start a function. VENT DELAY 27 OFF Press this button to select a cooking power level. OFF will be changed (Hi » Lo ...30 seconds to the cooking time. Press number buttons to enter cooking time, power level, quantity or weight. VENT HI/Mid/ 28 LO/OFF Press this button to start cooking quickly at 100% power level. 1 14 ...17 18 19 20 23 25 26 Timer Hi/Lo/Off Light Delay Off Hi/Mid/Lo/Off Vent 16 15 21 22 24 27 28 15 MORE(9) 16 NUMBER 17 POWER LEVEL 18 ADD 30 SEC....
User Manual (user Manual) (ver.1.0) (English)
Page 19
... a timer. The display counts down sufficiently. The time is an automated process and cannot be cooked for medium fan speed. 3. Add 30 sec. Press the Vent Hi/Mid/Lo/Off button once for the "Sensor Reheat", "Sensor Cooking(except Beverage)", "Add 30 sec.", "Custom Cook", "Kitchen Timer", "Soften/ Melt", "...you want the timer to be turned off . Each time you have already begun cooking with your new Samsung microwave oven. Press the Less (1) button to cook it by 10 seconds. Press the Vent Hi/Mid/Lo/Off button twice for . The fan will only operate in low speed mode while ...