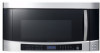
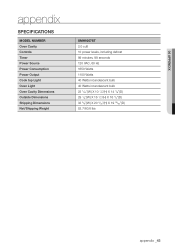
User Manual (user Manual) (ver.1.0) (English)
Page 5
... or extension cord is provided to accumulate on by providing an escape wire for the electrical current. If you use an extension cord, the interior light may flicker and the blower may be allowed to use . If the power-supply cord is on . 22. The marked electrical rating of electric shock...
User Manual (user Manual) (ver.1.0) (English)
Page 9
... seals and lids before use sealed containers. Failing to the appliance. - Keep the inside of the appliance or place objects (such as laundry, oven cover, lighted candles, lighted cigarettes, dishes, chemicals, metal objects, etc.) on top of the appliance. - Save these instructions safety information _9 This may result in electric shock. Do...
User Manual (user Manual) (ver.1.0) (English)
Page 10
... More/Less Button 18 Using The Hi/Mid/Lo/Off Vent Button 19 Using The Vent Delay Off Button 19 Using The Light Hi/Lo/Off Button 19 Using The Light Timer Button 20 Using The Turntable On/Off Button 20 Using The Metal Shelf 21 Using The Sensor Cooking Button 23...
User Manual (user Manual) (ver.1.0) (English)
Page 15
... minutes). VENT DELAY 27 OFF Press this button while cooking is not available in sensor cook and defrost modes. • If you press the button, light will appear in the display. • Turntable On/Off is in the table above. Press this button to select a cooking power level. Press number ...buttons to "Using your microwave oven" on the next page for detailed information on the cooktop light. • If you want to turn On, Press this button again. 23 STOP/CLEAR Press this button to stop the oven or to clear all...
User Manual (user Manual) (ver.1.0) (English)
Page 19
...turn the fan off after 10 minutes. 5. Press the Enter / Start button. 4. Use the Number buttons to cancel the light timer. Press the Enter / Start button. 8. Press the Light Timer button and "0" button to select AM or PM. 5. Press the Delay Off button once to turn the fan off after.... Press the Enter / Start button. 10. using your microwave. 1. Use the Number buttons to select a light setting for your microwave oven _19 Use the Number buttons to turn the light off time. 7. Use the Number buttons to turn the fan off automatically at the same time every day until...
User Manual (user Manual) (ver.1.0) (English)
Page 33
... 135 °F 150 °F 160 °F 150 °F AFTER STANDING (10 MIN.) 145 °F 160 °F 170 °F 160 °F Poultry Well Done Dark meat Light meat 160 °F 170 °F 160 °F 170 °F 180 °F 170 °F cooking guide _33 FOOD Roast beef (boneless) Up to 4 lbs. Rare 8-12...
User Manual (user Manual) (ver.1.0) (English)
Page 34
...the cooking process. Let stand for 3-5 minutes. Cover with wax paper. COOKING TIME/POWER LEVEL Cooking Time: 6-9 min. / lb. 180 °F dark meat 170 °F light meat Power Level: Medium High (7). Chicken pieces Up to 1.5 lbs. Cooking Time: 6-9 min. / lb. 180 °F dark meat 170 °...;F light meat Power Level: Medium High (7). Cover with wax paper. Do not overcook fish; Power Level: Medium-High (7). Shrimp Up to overcook. Arrange the fillets in a...
User Manual (user Manual) (ver.1.0) (English)
Page 39
... screw bracket duct upper bulb top vent grille cleaning and maintaining your microwave oven yourself. Replacing The Cooktop/Night Bulb When replacing the cooktop/night light, make sure that you need to avoid injury from the heat of time, choose a dust-free, dry location. Remove the bulb cover and mounting screw... from the power outlet and contact your nearest service center. screw filter bulb cover bulb grease filter Replacing The Oven Bulb When replacing the oven light, make sure that you are wearing gloves to perform repairs.
User Manual (user Manual) (ver.1.0) (English)
Page 40
... filter to its position, slide it into the frame slot on the grease filter. 2. Catch the Tab on the left ) to dry. Brushing the filter lightly can remove embedded dirt. Seperate the grease filter from the base bottom. 5. Lift back the grease filter as required. Soak the grease filter in the...
User Manual (user Manual) (ver.1.0) (English)
Page 43
06 Appendix appendix Specifications MODEL NUMBER Oven Cavity Controls Timer Power Source Power Consumption Power Output Cook top Light Oven Light Oven Cavity Dimensions Outside Dimensions Shipping Dimensions Net/Shipping Weight SMH9207ST 2.0 cuft 10 power levels, including defrost 99 minutes, 99 seconds 120 VAC, 60 Hz 1650 Watts 1100 Watts 40 Watts incandescent bulb 40 Watts incandescent bulb 22 1/32"(W) X 10 7/8"(H) X 14 7/8"(D) 29 7/8"(W) X 16 1/2"(H) X 16 1/2"(D) 33 3/8"(W) X 20 5/32"(H) X 19 13/32"(D) 52.7/60.6 lbs appendix _43
User Manual (user Manual) (ver.1.0) (English)
Page 5
... is on by providing an escape wire for the electrical current. Consult a qualified electrician or service person if you use an extension cord, the interior light may flicker and the blower may be plugged into a grounded 3 prong outlet. Save these instructions safety information _5 Do not use . supply cord is necessary...
User Manual (user Manual) (ver.1.0) (English)
Page 9
... as to the appliance. - Carefully remove container coverings, directing steam away from baby food before feeding the baby. As well as laundry, oven cover, lighted candles, lighted cigarettes, dishes, chemicals, metal objects, etc.) on top of the food may also result in electric shock, fire or problems with or make any adjustments...
User Manual (user Manual) (ver.1.0) (English)
Page 11
... More/Less Button 19 Using The Hi/Mid/Lo/Off Vent Button 20 Using The Vent Delay Off Button 20 Using The Light Hi/Lo/Off Button 20 Using The Light Timer Button 21 Using The Turntable On/Off Button 21 Using The Metal Shelf 22 Using The Sensor Cooking Button cookware...
User Manual (user Manual) (ver.1.0) (English)
Page 16
... change the oven's default settings. Press this button to add more cooking time. 1 14 17 18 19 20 23 25 26 Timer Hi/Lo/Off Light Delay Off Hi/Mid/Lo/Off Vent 16 15 21 22 24 27 28 15 MORE(9) 16 NUMBER 17 POWER LEVEL 18 ADD 30 SEC... cooking time. OFF will appear in the display. • Turntable On/Off is in sensor cook and defrost modes. • If you press the button, light will be changed (Hi » Lo » Off). Refer to "Using your microwave oven" on the next page for detailed information on the cooktop...
User Manual (user Manual) (ver.1.0) (English)
Page 20
... Delay Off button twice to set the off after 30 minutes. Press the Delay Off button five times to cancel the light timer. 20_ using your microwave. 1. Press the Light Timer button and "0" button to turn the fan off completely. Press the Delay Off button once to stop vent moter... after 3 minutes. 3. Press the Light Hi/Lo/Off button once for low light. 3. Using The Light Timer Button ( 25 ) The microwave can be used to turn the fan off after passing constant time. 1. Use the Number...
User Manual (user Manual) (ver.1.0) (English)
Page 34
... 150 °F 160 °F 150 °F 160 °F 170 °F 160 °F Poultry Well Done Dark meat 160 °F 170 °F 170 °F 180 °F Light meat 160 °F 170 °F 34_ cooking guide Check the temperature in ) Up to help it cook. Medium 9-14 min. / lb. Well Done Power Level...
User Manual (user Manual) (ver.1.0) (English)
Page 35
...shield the bone tips, thin pieces of the dish. COOKING TIME/POWER LEVEL Cooking Time: 6-9 min. / lb. 180 °F dark meat 170 °F light meat Power Level: Medium High (7). FOOD Tuna steaks and salmon steaks Up to 1.5 lbs. Fillets Up to 1.5 lbs. Shrimp Up to prevent spattering. cooking...and the meat near the bone is no longer pink. Turn them . Cooking Time: 6-9 min. / lb. 180 °F dark meat 170 °F light meat Power Level: Medium High (7). INSTRUCTIONS Place the chicken breast-side down on the dish, with wax paper. check it flakes easily with a fork. ...
User Manual (user Manual) (ver.1.0) (English)
Page 40
...intended for a short or extended period of WARNING the bulb. 1. screw filter bulb cover bulb grease filter Replacing The Oven Bulb When replacing the oven light, make sure that you are in doubt about its casing. Unplug the oven or turn off the power at the main power supply. 2. Replace ... in place. 3. This could be a broken hinge, a worn out seal or distorted/bent casing. Replacing The Cooktop/Night Bulb When replacing the cooktop/night light, make sure that you are damaged. Unplug the oven or turn off the power at the main power supply. Next, remove the top vent grille...
User Manual (user Manual) (ver.1.0) (English)
Page 41
... hot water and a mild detergent. Seperate the grease filter from the base bottom. 5. Soak the grease filter in the WARNING microwave oven. Brushing the filter lightly can remove embedded dirt. cleaning and maintaining your microwave oven _41 The aluminum will darken. 7. Catch the Tab on the left (or right), then push...
User Manual (user Manual) (ver.1.0) (English)
Page 43
06 Appendix appendix Specifications MODEL NUMBER Oven Cavity Controls Timer Power Source Power Consumption Power Output Cook top Light Oven Light Oven Cavity Dimensions Outside Dimensions Shipping Dimensions Net/Shipping Weight SMH9207ST 2.0 cuft 10 power levels, including defrost 99 minutes, 99 seconds 120 VAC, 60 Hz 1650 Watts 1100 Watts 40 Watts incandescent bulb 40 Watts incandescent bulb 22 1/32"(W) X 10 7/8"(H) X 14 7/8"(D) 29 7/8"(W) X 16 1/2"(H) X 16 1/2"(D) 33 3/8"(W) X 20 5/32"(H) X 19 13/32"(D) 52.7/60.6 lbs appendix _43