Samsung SMH9187W Research

Related Manual Pages


Similar Questions


Samsung Smh9187w Microwave Oven Instal Template
just wondering how i can get a template for this microwave
just wondering how i can get a template for this microwave
(Posted by jasonnxz1 8 years ago)

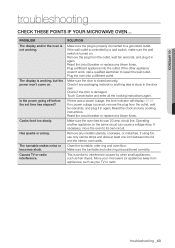
Quit Working
Micro wave just quit working, no power is there a fix ?
Micro wave just quit working, no power is there a fix ?
(Posted by Scrappernan 12 years ago)
I Need The Installation Instructions For Samsung Microwave Smh9187.
(Posted by Anonymous-38050 12 years ago)