
User Manual (user Manual) (ver.1.0) (English)
Page 1
SMH8165 Microwave Oven user manual imagine the possibilities Thank you for purchasing this Samsung product. Please register your product at www.samsung.com/global/register
SMH8165 Microwave Oven user manual imagine the possibilities Thank you for purchasing this Samsung product. Please register your product at www.samsung.com/global/register
User Manual (user Manual) (ver.1.0) (English)
Page 2
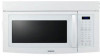
You can set the orientation of the vent. Samsung's new OTR sensor technology offers preset functions resulting in perfectly cooked dishes every time. The design matches perfectly with Cook-top Lighting and oven control the degree of lighting (On/Night/Off) • Sensor Cooking ... and allows you to cook? Moreover, your Over The Range (OTR) oven provides optimal cook settings for various items guaranteeing satisfaction. • Cook-top Lighting Illuminate your kitchen. features of your new microwave oven • Luxurious Look The Stainless Steel (STSS) exterior delivers a luxurious...
You can set the orientation of the vent. Samsung's new OTR sensor technology offers preset functions resulting in perfectly cooked dishes every time. The design matches perfectly with Cook-top Lighting and oven control the degree of lighting (On/Night/Off) • Sensor Cooking ... and allows you to cook? Moreover, your Over The Range (OTR) oven provides optimal cook settings for various items guaranteeing satisfaction. • Cook-top Lighting Illuminate your kitchen. features of your new microwave oven • Luxurious Look The Stainless Steel (STSS) exterior delivers a luxurious...
User Manual (user Manual) (ver.1.0) (English)
Page 4
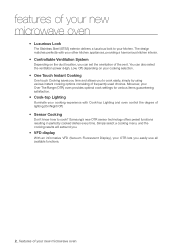
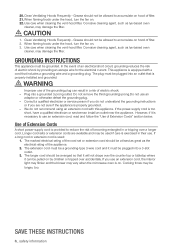
... may result in minor personal injury or property damage. It is grounded to you need to take full advantage of your microwave oven's many benefits and features. Unplug the power plug from the wall socket. Do NOT touch. Do NOT attempt. Do ...time to use and care of fire, explosion, electric shock, or personal injury when using your microwave oven, follow them explicitly. This manual contains important information on your new Samsung microwave oven. safety information Congratulations on the installation, use common sense, caution, and care when installing, ...
... may result in minor personal injury or property damage. It is grounded to you need to take full advantage of your microwave oven's many benefits and features. Unplug the power plug from the wall socket. Do NOT touch. Do NOT attempt. Do ...time to use and care of fire, explosion, electric shock, or personal injury when using your microwave oven, follow them explicitly. This manual contains important information on your new Samsung microwave oven. safety information Congratulations on the installation, use common sense, caution, and care when installing, ...
User Manual (user Manual) (ver.1.0) (English)
Page 5
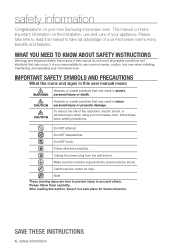
... risk of table or counter. 17. a. Do not overcook food. If materials inside the oven to stand in the microwave oven for its intended uses as described in the oven cavity. Visible bubbling or boiling when the container is removed from paper or plastic bags before placing... 10. b. c. After heating, allow the container to facilitate cooking. Remove wire twist-ties from the microwave oven is necessary when used by qualified service personnel. To reduce the risk of this oven. 7. Stir the liquid both before removing the container. Do not use as described in...
... risk of table or counter. 17. a. Do not overcook food. If materials inside the oven to stand in the microwave oven for its intended uses as described in the oven cavity. Visible bubbling or boiling when the container is removed from paper or plastic bags before placing... 10. b. c. After heating, allow the container to facilitate cooking. Remove wire twist-ties from the microwave oven is necessary when used by qualified service personnel. To reduce the risk of this oven. 7. Stir the liquid both before removing the container. Do not use as described in...
User Manual (user Manual) (ver.1.0) (English)
Page 6
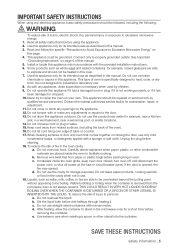
... remove the third (grounding) prong.Do not use an extension cord, the interior light may flicker and the blower may vary when the microwave oven is necessary to reduce the risk of becoming entangled in or tripping over a longer cord. The marked electrical rating of filter. 21. Cooking...and a grounding plug. If the power-supply cord is properly installed and grounded. CAUTION CAUTION 1. Corrosive cleaning agent, such as lye-based oven cleaner, may damage the filter. This appliance is provided to use of electric shock by children or tripped over the counter top or tabletop ...
... remove the third (grounding) prong.Do not use an extension cord, the interior light may flicker and the blower may vary when the microwave oven is necessary to reduce the risk of becoming entangled in or tripping over a longer cord. The marked electrical rating of filter. 21. Cooking...and a grounding plug. If the power-supply cord is properly installed and grounded. CAUTION CAUTION 1. Corrosive cleaning agent, such as lye-based oven cleaner, may damage the filter. This appliance is provided to use of electric shock by children or tripped over the counter top or tabletop ...
User Manual (user Manual) (ver.1.0) (English)
Page 11
... 13 Checking the parts 14 Warranty and service information 14 Setting up your microwave oven 15 Checking the control panel 17 Setting the time using your microwave oven 18 18 Using the Kitchen Timer Button 18 Using the One Minute+ Button 18 Using the More/Less Buttons 18 Using the Vent Hi/Lo/... 24 Using the Custom Cook button 24 Using the Handy Helper button 25 Using the Kids Meals button 26 Using the Snack Bar button 27 Microwave cooking times & Power levels cookware guide 29 29...
... 13 Checking the parts 14 Warranty and service information 14 Setting up your microwave oven 15 Checking the control panel 17 Setting the time using your microwave oven 18 18 Using the Kitchen Timer Button 18 Using the One Minute+ Button 18 Using the More/Less Buttons 18 Using the Vent Hi/Lo/... 24 Using the Custom Cook button 24 Using the Handy Helper button 25 Using the Kids Meals button 26 Using the Snack Bar button 27 Microwave cooking times & Power levels cookware guide 29 29...
User Manual (user Manual) (ver.1.0) (English)
Page 12
cleaning and maintaining your microwave oven 34 34 Cleaning the exterior 34 Cleaning the interior 34 Cleaning the door and door seals 34 Cleaning the turntable and roller rings 35 Cleaning the grease filter 35 Storing and repairing your microwave oven 36 Replacing the Cooktop/Night light 36 Replacing the oven light 37 Replacing the charcoal filter troubleshooting 38 38 Check these points if your microwave oven... appendix 39 39 Specifications warranty 40 12_ contents
cleaning and maintaining your microwave oven 34 34 Cleaning the exterior 34 Cleaning the interior 34 Cleaning the door and door seals 34 Cleaning the turntable and roller rings 35 Cleaning the grease filter 35 Storing and repairing your microwave oven 36 Replacing the Cooktop/Night light 36 Replacing the oven light 37 Replacing the charcoal filter troubleshooting 38 38 Check these points if your microwave oven... appendix 39 39 Specifications warranty 40 12_ contents
User Manual (user Manual) (ver.1.0) (English)
Page 13
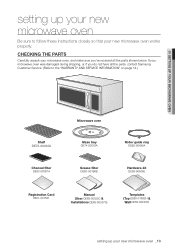
... sure to the "WARRANTY AND SERVICE INFORMATION" on page 14.) 01 Setting up your microwave oven Shelf DE75-00032A Chacoal filter DE63-00367A Microwave oven Glass tray DE74-20016A Grease filter DE63-00196B Roller guide ring DE92-90495A Hardware-kit DE68-90505E ...setting up your new microwave oven works properly. If your microwave oven was damaged during shipping, or if you 've received all the parts, contact Samsung Customer Service. (Refer to follow these instructions closely so that your new microwave oven _13 Checking the parts Carefully unpack your microwave oven, and make sure...
... sure to the "WARRANTY AND SERVICE INFORMATION" on page 14.) 01 Setting up your microwave oven Shelf DE75-00032A Chacoal filter DE63-00367A Microwave oven Glass tray DE74-20016A Grease filter DE63-00196B Roller guide ring DE92-90495A Hardware-kit DE68-90505E ...setting up your new microwave oven works properly. If your microwave oven was damaged during shipping, or if you 've received all the parts, contact Samsung Customer Service. (Refer to follow these instructions closely so that your new microwave oven _13 Checking the parts Carefully unpack your microwave oven, and make sure...
User Manual (user Manual) (ver.1.0) (English)
Page 14
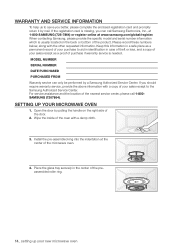
... is usually located on the right side of the door. 2. Install the pre-assembled ring into the indentation at www.samsung.com/global/register. Setting up your microwave oven 1. Wipe the inside of the microwave oven. 4. Please record these numbers below, along with a damp cloth. 3. If you better, please complete the enclosed registration card and...
... is usually located on the right side of the door. 2. Install the pre-assembled ring into the indentation at www.samsung.com/global/register. Setting up your microwave oven 1. Wipe the inside of the microwave oven. 4. Please record these numbers below, along with a damp cloth. 3. If you better, please complete the enclosed registration card and...

User Manual (user Manual) (ver.1.0) (English)
Page 15
setting up your new microwave oven Checking the control panel 01 Setting up your microwave oven 1 2 17 3 4 5 6 7 8 16 9 15 10 14 11 13 12 setting up your new microwave oven _15
setting up your new microwave oven Checking the control panel 01 Setting up your microwave oven 1 2 17 3 4 5 6 7 8 16 9 15 10 14 11 13 12 setting up your new microwave oven _15
User Manual (user Manual) (ver.1.0) (English)
Page 16
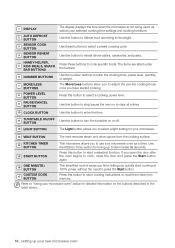
...Start button again. 16 One Minute+ button This simplified control saves you time, letting you to use your microwave oven as your selected cooking time settings and cooking functions. 2 Auto Defrost button Use this button to press ...need to store cooking instructions or recall them later from the cooking surface. 14 Kitchen Timer button This microwave allows you quickly start a selected function. Use the Kitchen Timer button for detailed information on the buttons..., Kids Meals, Snack Bar buttons Press these buttons to "Using your microwave oven" below for timing up your new...
...Start button again. 16 One Minute+ button This simplified control saves you time, letting you to use your microwave oven as your selected cooking time settings and cooking functions. 2 Auto Defrost button Use this button to press ...need to store cooking instructions or recall them later from the cooking surface. 14 Kitchen Timer button This microwave allows you quickly start a selected function. Use the Kitchen Timer button for detailed information on the buttons..., Kids Meals, Snack Bar buttons Press these buttons to "Using your microwave oven" below for timing up your new...
User Manual (user Manual) (ver.1.0) (English)
Page 17
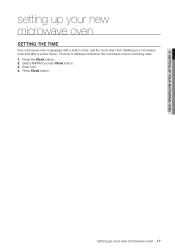
Set the clock when first installing your microwave oven and after a power failure. Select AM/PM by press Clock button. 3. Press the Clock button. 2. setting up your new microwave oven Setting the time Your microwave oven is not being used. 1. The time is displayed whenever the microwave oven is equipped with a built-in clock. Enter time. 4. 01 Setting up your microwave oven setting up your new microwave oven _17 Press Clock button.
Set the clock when first installing your microwave oven and after a power failure. Select AM/PM by press Clock button. 3. Press the Clock button. 2. setting up your new microwave oven Setting the time Your microwave oven is not being used. 1. The time is displayed whenever the microwave oven is equipped with a built-in clock. Enter time. 4. 01 Setting up your microwave oven setting up your new microwave oven _17 Press Clock button.
User Manual (user Manual) (ver.1.0) (English)
Page 18
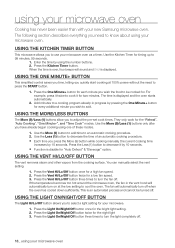
...these modes. 1. Press the Light On/Night/Off button three times to know about using your microwave oven You can manually select the vent setting. 1. If the temperature becomes too hot around the microwave oven, the fan in progress by 10 seconds. This is disable for two minutes. Press the ... (1) button to cook it by using the number buttons. 2. Press the Vent Hi/Lo/Off button once for timing up to use your new Samsung microwave oven. For example, press it twice to decrease it for "Auto Defrost" & "Beverage" option. Using the Light On/night/Off Button The Light ...
...these modes. 1. Press the Light On/Night/Off button three times to know about using your microwave oven You can manually select the vent setting. 1. If the temperature becomes too hot around the microwave oven, the fan in progress by 10 seconds. This is disable for two minutes. Press the ... (1) button to cook it by using the number buttons. 2. Press the Vent Hi/Lo/Off button once for timing up to use your new Samsung microwave oven. For example, press it twice to decrease it for "Auto Defrost" & "Beverage" option. Using the Light On/night/Off Button The Light ...

User Manual (user Manual) (ver.1.0) (English)
Page 19
... Use pot holders when handling the shelf as it can be hot. • Do not use the oven with the shelf on . using your microwave oven _19 02 Using your microwave oven using your microwave oven Using the Turntable On/Off button For best cooking results leave the turntable on the... microwave floor. The turntable may be turned off . The shelf could damage the microwave. Food cooks best on or ...
... Use pot holders when handling the shelf as it can be hot. • Do not use the oven with the shelf on . using your microwave oven _19 02 Using your microwave oven using your microwave oven Using the Turntable On/Off button For best cooking results leave the turntable on the... microwave floor. The turntable may be turned off . The shelf could damage the microwave. Food cooks best on or ...
User Manual (user Manual) (ver.1.0) (English)
Page 20
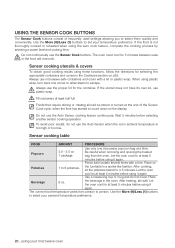
... Cookware section on Potatoes 1 to escape. the beverage in a spoke-like fashion. After heating, stir well. The correct food temperature varies from the oven. When using your microwave oven If the utensil does not have its own lid, use the Auto Sensor cooking feature continuously. Place on p29. CAUTION Foods that require stirring...
... Cookware section on Potatoes 1 to escape. the beverage in a spoke-like fashion. After heating, stir well. The correct food temperature varies from the oven. When using your microwave oven If the utensil does not have its own lid, use the Auto Sensor cooking feature continuously. Place on p29. CAUTION Foods that require stirring...
User Manual (user Manual) (ver.1.0) (English)
Page 21
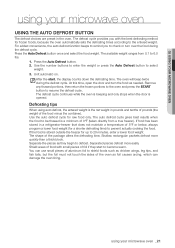
... shield foods such as they start , the display counts down the defrosting time. 02 Using your microwave oven using your microwave oven Using the Auto Defrost button The defrost choices are preset in the oven. For added convenience, the auto defrost function beeps to remind you with small pieces of the... oven as foil causes arcing, which can use small pieces of aluminum foil to prevent actually ...
... shield foods such as they start , the display counts down the defrosting time. 02 Using your microwave oven using your microwave oven Using the Auto Defrost button The defrost choices are preset in the oven. For added convenience, the auto defrost function beeps to remind you with small pieces of the... oven as foil causes arcing, which can use small pieces of aluminum foil to prevent actually ...
User Manual (user Manual) (ver.1.0) (English)
Page 22
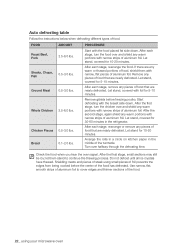
.... After each stage, rearrange the food. Start defrosting with the food placed fat side down . Check the food when you hear the oven signal. Use narrow, flat, smooth strips of foil prevents the edges from being cooked before freezing poultry. Start with the breast side down... the final stage, small sections may still be icy; Remove any warm portions with narrow, flat pieces of steak using your microwave oven Shielding roasts and pieces of aluminum foil. Let stand, covered for 10-20 minutes. Auto defrosting table Follow the instructions below when...
.... After each stage, rearrange the food. Start defrosting with the food placed fat side down . Check the food when you hear the oven signal. Use narrow, flat, smooth strips of foil prevents the edges from being cooked before freezing poultry. Start with the breast side down... the final stage, small sections may still be icy; Remove any warm portions with narrow, flat pieces of steak using your microwave oven Shielding roasts and pieces of aluminum foil. Let stand, covered for 10-20 minutes. Auto defrosting table Follow the instructions below when...
User Manual (user Manual) (ver.1.0) (English)
Page 23
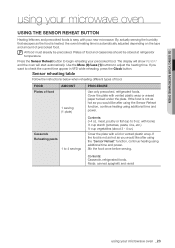
... to adjust the heating time. Contents: Casserole, refrigerated foods. The display will show REHEAT and the oven will start automatically. Pasta: canned spaghetti and ravioli using your new microwave. Use the More (9)/Less (1) buttons to 6 oz. Plates of precooked food. FOOD Plates of food...not as hot as the food is heated, the oven's heating time is automatically adjusted depending on the type and amount of food and casseroles should be precooked. 02 Using your microwave oven using your microwave oven Using the Sensor Reheat button Heating leftovers and precooked ...
... to adjust the heating time. Contents: Casserole, refrigerated foods. The display will show REHEAT and the oven will start automatically. Pasta: canned spaghetti and ravioli using your new microwave. Use the More (9)/Less (1) buttons to 6 oz. Plates of precooked food. FOOD Plates of food...not as hot as the food is heated, the oven's heating time is automatically adjusted depending on the type and amount of food and casseroles should be precooked. 02 Using your microwave oven using your microwave oven Using the Sensor Reheat button Heating leftovers and precooked ...
User Manual (user Manual) (ver.1.0) (English)
Page 24
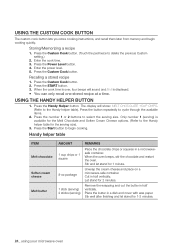
... is over, four beeps will show: MELT CHOCOLATE 1CUP CHIPS. (Refer to the Handy helper table for 1-2 minutes. 24_ using your microwave oven Press the Handy Helper button. The display will sound and End is available for the Melt Chocolate and Soften Cream Cheese options. (Refer to..., stir the chocolate and restart the oven. Place the butter in a microwavesafe container. Storing/Memorizing a recipe 1. Press the button repeatedly to select the serving size. Unwrap the cream cheese and place on a microwave-safe container. Using the Custom Cook button The custom cook button lets ...
... is over, four beeps will show: MELT CHOCOLATE 1CUP CHIPS. (Refer to the Handy helper table for 1-2 minutes. 24_ using your microwave oven Press the Handy Helper button. The display will sound and End is available for the Melt Chocolate and Soften Cream Cheese options. (Refer to..., stir the chocolate and restart the oven. Place the butter in a microwavesafe container. Storing/Memorizing a recipe 1. Press the button repeatedly to select the serving size. Unwrap the cream cheese and place on a microwave-safe container. Using the Custom Cook button The custom cook button lets ...
User Manual (user Manual) (ver.1.0) (English)
Page 25
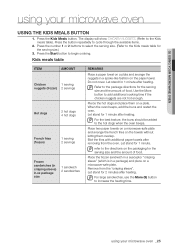
... the french fries on the towels without letting them on the packaging for 1 minute after heating. using your microwave oven _25 02 Using your microwave oven using your microwave oven Using the Kids Meals button 1. Press the button repeatedly to the Kids meals table). Do not cover. Let.... Place the frozen sandwich in a susceptor "crisping sleeve" (which is in a spoke-like fashion on a microwave-safe plate. When the oven beeps, add the buns and restart the oven. Blot the fries with additional paper towels after heating. Press the number 1 or 2 buttons to select the...
... the french fries on the towels without letting them on the packaging for 1 minute after heating. using your microwave oven _25 02 Using your microwave oven using your microwave oven Using the Kids Meals button 1. Press the button repeatedly to the Kids meals table). Do not cover. Let.... Place the frozen sandwich in a susceptor "crisping sleeve" (which is in a spoke-like fashion on a microwave-safe plate. When the oven beeps, add the buns and restart the oven. Blot the fries with additional paper towels after heating. Press the number 1 or 2 buttons to select the...


