
User Manual (user Manual) (ver.1.0) (English)
Page 2
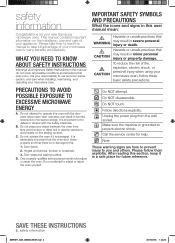
... future reference. D. C. Only properly qualified service personnel should adjust or repair the oven. This manual contains important information on the installation, use common sense, caution, and care when installing, maintaining, and operating your microwave oven's many benefits and features. Do NOT touch. Note These warning signs are here to prevent injury to prevent electric shock. After reading this oven with the safety interlocks. safety...
... future reference. D. C. Only properly qualified service personnel should adjust or repair the oven. This manual contains important information on the installation, use common sense, caution, and care when installing, maintaining, and operating your microwave oven's many benefits and features. Do NOT touch. Note These warning signs are here to prevent injury to prevent electric shock. After reading this oven with the safety interlocks. safety...
User Manual (user Manual) (ver.1.0) (English)
Page 3
... instructions before placing the bags in the oven cavity. Use this page. 3. It is opened, the fire may damage the filter. a. Remove wire twist-ties from the microwave oven is specifically designed to stand in a microwave oven. 6. Visible bubbling or boiling when the container is removed from paper or plastic bags before using any appliance, close supervision is used by qualified service personnel. Use care when cleaning the vent-hood filter. Install or locate...
... instructions before placing the bags in the oven cavity. Use this page. 3. It is opened, the fire may damage the filter. a. Remove wire twist-ties from the microwave oven is specifically designed to stand in a microwave oven. 6. Visible bubbling or boiling when the container is removed from paper or plastic bags before using any appliance, close supervision is used by qualified service personnel. Use care when cleaning the vent-hood filter. Install or locate...

User Manual (user Manual) (ver.1.0) (English)
Page 4
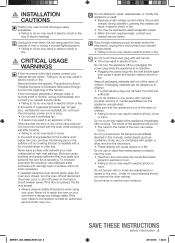
...; This may vary when the microwave oven is properly installed and grounded. Remove all foreign substances such as dust or water from the power cord under any circumstances. It may be longer, too. Do not ground the appliance to install your nearest service center for the electrical current. If you use a long cord or extension cord: 1. GROUNDING INSTRUCTIONS This appliance must be plugged...
...; This may vary when the microwave oven is properly installed and grounded. Remove all foreign substances such as dust or water from the power cord under any circumstances. It may be longer, too. Do not ground the appliance to install your nearest service center for the electrical current. If you use a long cord or extension cord: 1. GROUNDING INSTRUCTIONS This appliance must be plugged...
User Manual (user Manual) (ver.1.0) (English)
Page 5
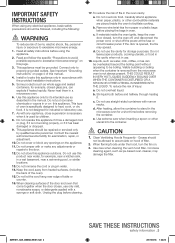
... oven door closed, turn the appliance off power at high heat settings. Packaging materials can suffocate. In the event of the appliance immediately after cooking. • Failing to do so may ignite and spread if the vent fan is flooded, please contact your nearest service center : Failing to electromagnetic waves. • When the oven requires repair, contact your oven unattended at the fuse or circuit breaker panel...
... oven door closed, turn the appliance off power at high heat settings. Packaging materials can suffocate. In the event of the appliance immediately after cooking. • Failing to do so may ignite and spread if the vent fan is flooded, please contact your nearest service center : Failing to electromagnetic waves. • When the oven requires repair, contact your oven unattended at the fuse or circuit breaker panel...
User Manual (user Manual) (ver.1.0) (English)
Page 6
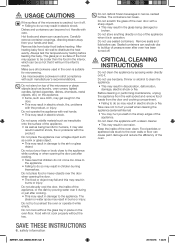
... information Do not defrost frozen beverages in electric shock or fire. Do not clean the appliance with care. Food particles or spattered oils stuck to the sink or glass object. CAUTION USAGE CAUTIONS If the surface of the microwave is cracked, turn it off . Food will burn the infant's mouth. Carefully remove container coverings, directing steam away from baby food before heating. Always test the...
... information Do not defrost frozen beverages in electric shock or fire. Do not clean the appliance with care. Food particles or spattered oils stuck to the sink or glass object. CAUTION USAGE CAUTIONS If the surface of the microwave is cracked, turn it off . Food will burn the infant's mouth. Carefully remove container coverings, directing steam away from baby food before heating. Always test the...
User Manual (user Manual) (ver.1.0) (English)
Page 7
...8 Setting up your microwave oven Replacing the cooktop/night light Replacing the oven light Cleaning the grease filter Replacing the charcoal filter TROUBLESHOOTING 21 APPENDIX 21 WARRANTY 21 COOKING GUIDE 16 16 16 17 17 17 17 18 General microwave tips Cooking meat Cooking poultry Cooking seafood Cooking eggs Cooking vegetables Recipes SMH1611_XAA_03898A_EN-01.indd 7 contents _7 2011-03-16 1:33:29 button Vent buttons (2 Speed & On/Off) Light Hi/Lo/Off button Cooking Presets buttons Auto Reheat button Auto Defrost button Soften/Melt button Microwave Cooking Times & Power Levels Eco...
...8 Setting up your microwave oven Replacing the cooktop/night light Replacing the oven light Cleaning the grease filter Replacing the charcoal filter TROUBLESHOOTING 21 APPENDIX 21 WARRANTY 21 COOKING GUIDE 16 16 16 17 17 17 17 18 General microwave tips Cooking meat Cooking poultry Cooking seafood Cooking eggs Cooking vegetables Recipes SMH1611_XAA_03898A_EN-01.indd 7 contents _7 2011-03-16 1:33:29 button Vent buttons (2 Speed & On/Off) Light Hi/Lo/Off button Cooking Presets buttons Auto Reheat button Auto Defrost button Soften/Melt button Microwave Cooking Times & Power Levels Eco...
User Manual (user Manual) (ver.1.0) (English)
Page 8
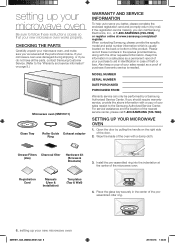
... provided below . Open the door by pulling the handle on the back or bottom of theft or loss. Registration Card Manuals (User & Installation) Templates (Top & Wall) 4. Grease Filters Charcoal filter (2ea) Hardware kit (Screws & Brackets) 3. If you better, please complete the enclosed registration card and promptly return it by a Samsung Authorized Service Center. Install the pre-assembled ring into the indentation at www.samsung.com/global/ register. SETTING UP YOUR MICROWAVE OVEN 1. Also...
... provided below . Open the door by pulling the handle on the back or bottom of theft or loss. Registration Card Manuals (User & Installation) Templates (Top & Wall) 4. Grease Filters Charcoal filter (2ea) Hardware kit (Screws & Brackets) 3. If you better, please complete the enclosed registration card and promptly return it by a Samsung Authorized Service Center. Install the pre-assembled ring into the indentation at www.samsung.com/global/ register. SETTING UP YOUR MICROWAVE OVEN 1. Also...
User Manual (user Manual) (ver.1.0) (English)
Page 10
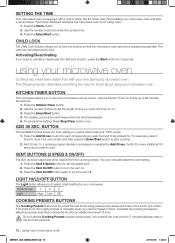
... touch of a button. LIGHT HI/LO/OFF BUTTON The Light button allows you wish the food to select a light setting for 5 minutes between uses or CAUTION the food will overcook. 10_ using your microwave oven. button for each 30 seconds you to be operated accidentally. using preset power levels and times at any time. Use the number buttons to activate or deactivate the child lock function, press the Start button for . Press the Enter/Start button. 4. Press (times) 1 2 3 Light High Low Off COOKING...
... touch of a button. LIGHT HI/LO/OFF BUTTON The Light button allows you wish the food to select a light setting for 5 minutes between uses or CAUTION the food will overcook. 10_ using your microwave oven. button for each 30 seconds you to be operated accidentally. using preset power levels and times at any time. Use the number buttons to activate or deactivate the child lock function, press the Start button for . Press the Enter/Start button. 4. Press (times) 1 2 3 Light High Low Off COOKING...
User Manual (user Manual) (ver.1.0) (English)
Page 11
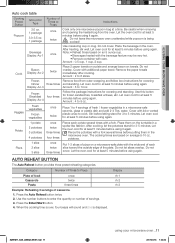
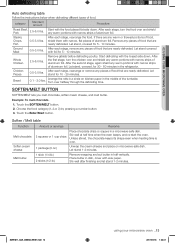
... a microwave-safe ceramic, glass or plastic dish and add 2-4 Tbs. Veggies Frozen Dinner Display: Ac-3 Frozen Breakfast Display: Ac-4 Fresh vegetables Frozen vegetables Remove food from the oven. four times Follow the package instructions for covering three times and standing. Let the oven cool for at least 5 minutes before using again. Use the number buttons to enter the quantity or number of casserole. 1. 02 USING YOUR MICROWAVE OVEN Auto cook table Cooking Preset Button Popcorn Cook Amount...
... a microwave-safe ceramic, glass or plastic dish and add 2-4 Tbs. Veggies Frozen Dinner Display: Ac-3 Frozen Breakfast Display: Ac-4 Fresh vegetables Frozen vegetables Remove food from the oven. four times Follow the package instructions for covering three times and standing. Let the oven cool for at least 5 minutes before using again. Use the number buttons to enter the quantity or number of casserole. 1. 02 USING YOUR MICROWAVE OVEN Auto cook table Cooking Preset Button Popcorn Cook Amount...
User Manual (user Manual) (ver.1.0) (English)
Page 12
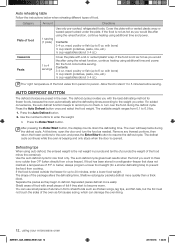
... the oven lining. 12_ using auto defrost, the entered weight is opened. Press the Auto Defrost button. 2. Defrosting tips When using your microwave oven SMH1611_XAA_03898A_EN-01.indd 12 2011-03-16 1:33:30 meat, poultry or fish (up to become warm. The defrost cycle continues while the oven is beeping and only stops when the door is the net weight in the oven. Auto reheating table Follow the instructions below , always program a lower food weight (for...
... the oven lining. 12_ using auto defrost, the entered weight is opened. Press the Auto Defrost button. 2. Defrosting tips When using your microwave oven SMH1611_XAA_03898A_EN-01.indd 12 2011-03-16 1:33:30 meat, poultry or fish (up to become warm. The defrost cycle continues while the oven is beeping and only stops when the door is the net weight in the oven. Auto reheating table Follow the instructions below , always program a lower food weight (for...
User Manual (user Manual) (ver.1.0) (English)
Page 13
... shape even when heating time is over halfway through the defrosting time. Start with the breast side down . Remove giblets before defrosting poultry. Touch the Enter/Start button. Place butter in a microwave-safe dish. Steaks, Chops, Fish 0.5-3.0 lbs. Let stand covered with narrow strips of aluminum foil. Unwrap the cream cheese and place on kitchen paper in the refrigerator. Remove wrapping and cut butter in...
... shape even when heating time is over halfway through the defrosting time. Start with the breast side down . Remove giblets before defrosting poultry. Touch the Enter/Start button. Place butter in a microwave-safe dish. Steaks, Chops, Fish 0.5-3.0 lbs. Let stand covered with narrow strips of aluminum foil. Unwrap the cream cheese and place on kitchen paper in the refrigerator. Remove wrapping and cut butter in...
User Manual (user Manual) (ver.1.0) (English)
Page 14
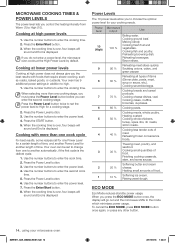
... START button. 5. Power Levels The 10 power levels allow you to High for a cooking stage. 2. Making candy. Bacon slices. 90 % Reheating meat slices quickly. Cooking meats, whole poultry. Cooking less tender cuts of food. Reheating frozen convenience foods. Press the Power Level button twice to set to change from Warm (1) to high. 1. Press the Power Level button. 3. When you press the ECO MODE button once, the display will sound and End is the defrost cycle. 1. Use the number buttons...
... START button. 5. Power Levels The 10 power levels allow you to High for a cooking stage. 2. Making candy. Bacon slices. 90 % Reheating meat slices quickly. Cooking meats, whole poultry. Cooking less tender cuts of food. Reheating frozen convenience foods. Press the Power Level button twice to set to change from Warm (1) to high. 1. Press the Power Level button. 3. When you press the ECO MODE button once, the display will sound and End is the defrost cycle. 1. Use the number buttons...
User Manual (user Manual) (ver.1.0) (English)
Page 15
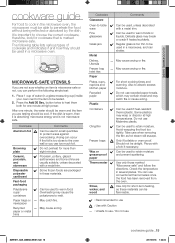
... power. Take care when removing the film as these materials. Should not be used in a microwave oven. MICROWAVE-SAFE UTENSILS If you can occur if the foil is marked microwave-safe. Only if boilable or oven-proof. The following simple test: 1. Cookware Glassware Oven-to-table ware Fine glassware Glass jars Metal Dishes, Utensils Freezer bag twist ties Paper Plates, cups, napkins and kitchen...
... power. Take care when removing the film as these materials. Should not be used in a microwave oven. MICROWAVE-SAFE UTENSILS If you can occur if the foil is marked microwave-safe. Only if boilable or oven-proof. The following simple test: 1. Cookware Glassware Oven-to-table ware Fine glassware Glass jars Metal Dishes, Utensils Freezer bag twist ties Paper Plates, cups, napkins and kitchen...
User Manual (user Manual) (ver.1.0) (English)
Page 16
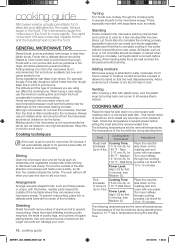
... power after the oven stops. When heating baby food, stir well and test the temperature before serving. Venting After covering a dish with the thicker, meatier parts toward the outside of water to dry food to shield any bone tips or thin pieces of these molecules creates friction and the resulting heat cooks the food. High (10) for first 5 minutes, then Medium (5). GENERAL MICROWAVE TIPS Dense foods...
... power after the oven stops. When heating baby food, stir well and test the temperature before serving. Venting After covering a dish with the thicker, meatier parts toward the outside of water to dry food to shield any bone tips or thin pieces of these molecules creates friction and the resulting heat cooks the food. High (10) for first 5 minutes, then Medium (5). GENERAL MICROWAVE TIPS Dense foods...
User Manual (user Manual) (ver.1.0) (English)
Page 17
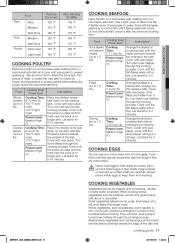
... the outside of the dish and cooking guide _17 SMH1611_XAA_03898A_EN-01.indd 17 2011-03-16 1:33:33 Always pierce whole eggs to 1.5 lbs. Cooking Time: 6-9 min./lb. 180 °F dark meat 170 °F light meat Power Level: Medium High (7). Place the chicken bone-side down on a microwave-safe roasting rack in ., turn them over halfway through the cooking process. Food Cooking time/ Power level Instructions Tuna steaks Cooking...
... the outside of the dish and cooking guide _17 SMH1611_XAA_03898A_EN-01.indd 17 2011-03-16 1:33:33 Always pierce whole eggs to 1.5 lbs. Cooking Time: 6-9 min./lb. 180 °F dark meat 170 °F light meat Power Level: Medium High (7). Place the chicken bone-side down on a microwave-safe roasting rack in ., turn them over halfway through the cooking process. Food Cooking time/ Power level Instructions Tuna steaks Cooking...
User Manual (user Manual) (ver.1.0) (English)
Page 18
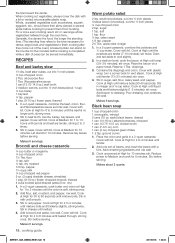
Generally, the denser the food, the longer the standing time. (The standing time refers to the time necessary for dense, large foods and vegetables to finish cooking after they come out of beans, and mash the beans with a lid or vented microwavable plastic wrap. Cover ...in red pepper. dry) 1. Stir in several spots before serving. Cook at High for 4 to 4 minutes until heated through the cook time. Makes 6 servings. 18_ cooking guide Warm potato salad 2 lbs. Cover with lid. Combine the drippings and onion. stir once. Makes 6 servings. stir. Whole...
Generally, the denser the food, the longer the standing time. (The standing time refers to the time necessary for dense, large foods and vegetables to finish cooking after they come out of beans, and mash the beans with a lid or vented microwavable plastic wrap. Cover ...in red pepper. dry) 1. Stir in several spots before serving. Cook at High for 4 to 4 minutes until heated through the cook time. Makes 6 servings. 18_ cooking guide Warm potato salad 2 lbs. Cover with lid. Combine the drippings and onion. stir once. Makes 6 servings. stir. Whole...
User Manual (user Manual) (ver.1.0) (English)
Page 19
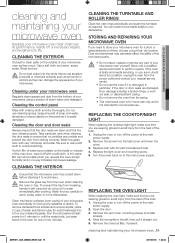
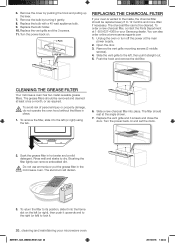
... you need to avoid injury from the heat of your dishwasher. STORING AND REPAIRING YOUR MICROWAVE OVEN If you operate the oven at high humidity and in the dishwasher. REPLACING THE COOKTOP/NIGHT LIGHT When replacing the cooktop/night light, make sure that the door closes properly. Open the door. 3. Remove the vent cover mounting screws (3 middle screws). 4. Remove the charcoal filter, if present. cleaning and maintaining your microwave oven periodically to avoid injury from breaking, handle it with care...
... you need to avoid injury from the heat of your dishwasher. STORING AND REPAIRING YOUR MICROWAVE OVEN If you operate the oven at high humidity and in the dishwasher. REPLACING THE COOKTOP/NIGHT LIGHT When replacing the cooktop/night light, make sure that the door closes properly. Open the door. 3. Remove the vent cover mounting screws (3 middle screws). 4. Remove the charcoal filter, if present. cleaning and maintaining your microwave oven periodically to avoid injury from breaking, handle it with care...
User Manual (user Manual) (ver.1.0) (English)
Page 20
... not operate the oven hood without the filters in hot water and a mild detergent. Replace the vent grille and the 3 screws. 11. The charcoal filter cannot be removed and cleaned at the main power supply. 2. Unplug the oven or turn off the power at least once a month, or as required. Replace the vent grille and 3 screws and close the door. Do not use ammonia or put the grease filter in the WARNING microwave oven. Slide the vent grille to...
... not operate the oven hood without the filters in hot water and a mild detergent. Replace the vent grille and the 3 screws. 11. The charcoal filter cannot be removed and cleaned at the main power supply. 2. Unplug the oven or turn off the power at least once a month, or as required. Replace the vent grille and 3 screws and close the door. Do not use ammonia or put the grease filter in the WARNING microwave oven. Slide the vent grille to...
User Manual (user Manual) (ver.1.0) (English)
Page 21
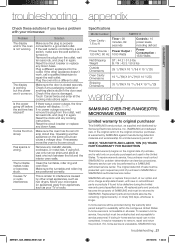
... and the interior oven walls. Reset the clock and any metallic utensils, cookware, or metal ties. Remove any cooking instructions. Specifications Model number SMH1611 Oven Cavity : 1.6 cu ft Timer : 99 minutes, 99 seconds Controls : 10 power levels, including defrost Power Source : Power Output : 120 VAC, 60 Hz 1000 Watts Power Consumption : 1580 Watts Net/Shipping Weight ST : 44.2 / 51.8 lbs B / W : 43.3 / 50.8 lbs Outside Dimensions 29 7/8"(W) X 16 1/2"(H) X 15 1/8"(D) Oven Cavity Dimensions 19 5/16"(W) X 9 5/8"(H) X 14 3/8"(D) Shipping Dimensions 33 3/8"(W) X 19...
... and the interior oven walls. Reset the clock and any metallic utensils, cookware, or metal ties. Remove any cooking instructions. Specifications Model number SMH1611 Oven Cavity : 1.6 cu ft Timer : 99 minutes, 99 seconds Controls : 10 power levels, including defrost Power Source : Power Output : 120 VAC, 60 Hz 1000 Watts Power Consumption : 1580 Watts Net/Shipping Weight ST : 44.2 / 51.8 lbs B / W : 43.3 / 50.8 lbs Outside Dimensions 29 7/8"(W) X 16 1/2"(H) X 15 1/8"(D) Oven Cavity Dimensions 19 5/16"(W) X 9 5/8"(H) X 14 3/8"(D) Shipping Dimensions 33 3/8"(W) X 19...
User Manual (user Manual) (ver.1.0) (English)
Page 22
... DAMAGE. Some states do not allow limitations on how long an implied warranty lasts, or the exclusion or limitation of products, equipment, systems, utilities, services, parts, supplies, accessories, applications, installations, repairs, external wiring or connectors not supplied or authorized by user; altered product or serial numbers; elect, at : 1-800-SAMSUNG (726-7864) or www. incorrect electrical line voltage, fluctuations and surges;
... DAMAGE. Some states do not allow limitations on how long an implied warranty lasts, or the exclusion or limitation of products, equipment, systems, utilities, services, parts, supplies, accessories, applications, installations, repairs, external wiring or connectors not supplied or authorized by user; altered product or serial numbers; elect, at : 1-800-SAMSUNG (726-7864) or www. incorrect electrical line voltage, fluctuations and surges;


