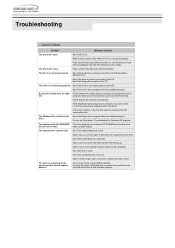
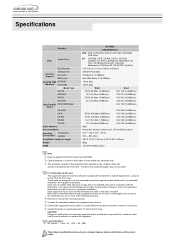
User Manual (user Manual) (ver.1.0) (English)
Page 2
...Installation During Operating Others Features Exterior System Requirements Features Installing DVD±R/RW Drive and Connecting Cables Installing Drive Connecting Cables Installing Device Driver and Confirming The Installation Firmware Update Confirming the Installation of Device Driver Installing the MS-DOS device driver How To Use The DVD±R/RW Drive How to Use the Drive How to Use DVD±R/RW and Other Discs Deleting Utilities Troubleshooting Product Specifications Storing/Cleaning Drive and Disc Cleaning the Drive Storing the Disc Cleaning the Disc When the on/off Light Blinks
User Manual (user Manual) (ver.1.0) (English)
Page 3
...this symbol and handle the device the wrong way, damage to the disc. When a cracked disc is used continuously, the size of the crack is recommended to read and understand at all times Do not disassemble Always make a copy immediately and use . Safety Precautions Safety Precautions ...This symbol indicates explanations about dangerous matters. If users ignore ...
User Manual (user Manual) (ver.1.0) (English)
Page 5
... always use cracked, distorted or damaged discs. VSeaifleigthyePidrseicnasturtuicotniess During Operating Handle with a crack on the inner tracks may cause damage to the product or human body Do not use the open/close all working programs before attempting to malfunction. Do not insert a pin into the emergency opening while in operation. Do not insert hands in the tray while in operation. Make sure...
User Manual (user Manual) (ver.1.0) (English)
Page 7
Features DVD±R/RW Drive 40-pin interface cable audio cable four screws to install the drive drive installation instruction sheets software programs (software: Nero Express 6.3, InCD 4,WinDVD Creator, WinDVD Recorder, Intervideo DVD Copy, Acrobat Reader 5.0, DirectX 9.0)
User Manual (user Manual) (ver.1.0) (English)
Page 9
Rewritable : write data one or more times. Features Versatile Multimedia Features DVD-R : Read / Write DVD+R : Read / Write DVD-ROM : Read DVD-RAM : Read Supports Read (playback) for various types of discs DVD-RW : Read / Write / Rewrite allowed DVD+RW : Read / Write / Rewrite allowed CD-R : Read / Write CD-RW : Read / Write / Rewrite allowed See table below for details CD DVD Disc Type CD-STAMP CD-R CD-RW DVD-STAMP DVD-R For General Ver 2.1 DVD-RW Ver 1.1 DVD+R Basic Ver 1.11 DVD+RW Basic Ver 1.2 DVD-RAM Read Ver 2.1 Writable × O (O) × O (O) O (O) × Rewritable ×...
User Manual (user Manual) (ver.1.0) (English)
Page 10
...), CD-RW (24x), DVD-RAM Ver2.1 (2X) Recording Speed(MAX) DVD-R (8x), DVD-RW (4x), DVD+R (8x), DVD+RW (4x), CD-R (32x), CD-RW (16x) Ultra Speed CD-RW DISC(24X higher) does not support Recording. When you use the other disc, may affect Reading / Recording of the data. A technology to prevent "buffer underrun" errors in which the data transmission speed is not as fast as the data writing speed when data is " buffer underrun...
User Manual (user Manual) (ver.1.0) (English)
Page 11
The support devices are PC accessories. Open the cover as below Purchase a pair if necessary. 4. Turn the PC off. 2. Installing DVD R/RW Drive and Connecting Cables 1. If necessary, attach the support devices on both sides of the drive - Insert the DVD±R/RW Drive after removing the plate as shown in the picture. 3.
User Manual (user Manual) (ver.1.0) (English)
Page 12
Installing DVD R/RW Drive and Connecting Cables Connecting the Power Cable Hold the power cable (with four pins) in the power box within the computer with the cutoff edges( ) facing up and connect it to SL (slave) in the Master/Slave port in the back of the DVD±R/RW Drive. Connecting E-IDE Cable When you use one E-IDE cable Set the jumper to the power port in the back of the DVD±R/RW Drive A - Check the direction of the power cable and...
User Manual (user Manual) (ver.1.0) (English)
Page 13
When you have one DVD±R/RW Drive and the other ODD products: Set it to MA (Master) a : Master Drive (Select the MA jumper) c : Motherboard e : Secondly 1 b : HDD d : Primary 1 When you use two E-IDE cables Set the jumper to MA (Master) / SL (Slave), Installing DVD R/RW Drive and Connecting Cables a : Slave Drive (Select the SL jumper) b : HDD c : MotherBoard When you have one DVD±R/RW Drive: Set it to MA (Master) in the Master/Slave port in the back of the DVD±R/RW Drive.
User Manual (user Manual) (ver.1.0) (English)
Page 14
... device using the host interface signal CSEL. (Connection to MA is recommended.) MA : Master SL : Slave CS : Cable Select(CSEL) Connecting the Audio Cable (When Connected to the Sound Card) To listen to the sound from the drive in Analog mode, connect the audio output on the DVD±R/RW drive to the slot in the back of the sound card using an audio cable (4-pin). Installing DVD R/RW Drive and Connecting Cables a : Master Drive (Select the MA jumper...
User Manual (user Manual) (ver.1.0) (English)
Page 15
Click Firmware on the menu bar (in the upper right-hand corner). 3. Click "Download Live Update Full Version." (Click Firmware Downloads to start downloading.) select a drive model from the list and click to manually download Firmware; Go to http://samsung-ODD.com 2. Installing Device Driver and Confirming the Installation 1.
User Manual (user Manual) (ver.1.0) (English)
Page 16
... window. 3. Windows 2000 Windows XP 1. Click DVD/CD-ROM drive in the Device Manager window. 1 in the picture in the Administrative Tools window. 4. Click [Computer Management] icon in the left appear if the driver is installed properly. 1. Click [Start] - [Settings] - [Control Panel] [System] 2. Click CDROM drive in the Device Manager window. 1 in the picture in the System Properties window. 3. Click [Start] - [Settings] - [Control Panel] [System] 2. Installing Device Driver and Confirming the Installation Confirming Using [Device...
User Manual (user Manual) (ver.1.0) (English)
Page 17
... MS-DOS device driver is provided with the DVD±R/RW Drive 1. Add the DEVICE=C:\SAMSUNG\SSCDROM.SYS \D:SSCD000 /UDMA entry. 4. Insert the CD provided with the DVD±R/RW Drive to detect a DVD-MULTI drive in MS-DOS and supports only the read function as in the case of the CD which is used to the C:\SAMSUNG directory. Installing Device Driver and Confirming the Installation Automatic Setup The device driver is located...
User Manual (user Manual) (ver.1.0) (English)
Page 18
... guiding line. How to Use a Horizontally Installed Drive You can use the 3.15 Inch(8cm) discs) The drive cannot read the disc properly if any part of the disc is orange, do not turn the PC off or remove the DVD±R/RW Drive as it may cause damage in the drive. How to Use a Vertically Installed Drive This drive can use only the 4.72 Inch(12cm) discs. (You cannot use...
User Manual (user Manual) (ver.1.0) (English)
Page 19
... a DVD Video Disc : You need a DVD decoder board or the DVD decoder software program. (Provided with WinDVD Recorder) Use WinDVD Recorder to change the region code of DVD or software titles is illegal and the individuals that make illegal copies will be held responsible for any copyright infringement. The drive also allows writing DVD±R discs using InCD. If your computer recognizes the [CD-ROM] icon designated to the DVD±R/RW Drive as...
User Manual (user Manual) (ver.1.0) (English)
Page 21
Do not use the device properly. Read carefully and use benzene, paint thinner, or any foreign objects from the surface of the manual is to prevent damages or data loss. Storing/Cleaning Drive and Disc This part of the drive using soft cloth. Turn the PC off and pull out the drive. Remove any other solvents.
User Manual (user Manual) (ver.1.0) (English)
Page 22
Read carefully and use the device properly. Do not place it to severe temperature fluctuations. (Exposure to such environment may cause congealing.) Do not scratch or place a label on a flat surface. Storing/Cleaning Drive and Disc This part of the manual is to prevent damage from external shock. Do not expose it under the direct sunlight. Place it so that it sits on its side on the disc. Handle the disc with caution to prevent damages or data loss.
User Manual (user Manual) (ver.1.0) (English)
Page 23
Place your fingers on the edge of the disc. Use only disc cleaning liquids. Clean the disc lightly with fingerprints, foreign substances or dust, the disc may not function properly. Do not touch the surface of the disc to prevent damages or data loss. Do not use the device properly. If the disc surface becomes dirty with soft cotton cloth, starting from the center and move to the edge of the manual is to hold. Storing/Cleaning Drive and Disc This part of the disc. Read carefully and use benzene, paint thinner, or any other solvents.
User Manual (user Manual) (ver.1.0) (English)
Page 25
... audio Check whether the audio cable is not working properly. The system won 't close. Make sure you use . See if the floppy disc remains in E-IDE interface capacity. Troubleshooting Problem Meaning / Solution The tray won't open . Make sure the region code of the driver. The drive is not working properly. Check the condition of the CD and wipe the surface of the CD clean before use the types of DVD-RAM discs and therefore disc...
User Manual (user Manual) (ver.1.0) (English)
Page 26
... occur in a residential installation. Specifications Category DISC Usable Discs Disc Diameter Interface Support Interface Port PIO mode DMA mode ACCESS TIME CD-ROM (Random) DVD-ROM Media Type DVD+R DVD+RW DVD-R DVD-RW Data Transfer DVD-ROM(Single) Speed CD-ROM CD-R US-RW HS-RW CD-RW Buffer Memory Drive Installation Operating Temperature Environment Humidity Size(Width x Height x Length) Weight MTBF SH-W08A DVD R/RW Drive DVD : DVD-R, DVD-RW, DVD+R, DVD+RW, DVD-ROM, DVD-Video CD : CD-ROM, CD-R, CD-RW...