User Guide
Page 89
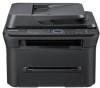
Open the front door and pull the toner cartridge out. Locate the long strip of the toner cartridge. Plug in its original, unopened package until installation - Slightly dampen a soft, lint-free cloth or paper towel with a swab. • To prevent damage to cool down. 2. Do not use solvents such as needed. 1. Close... during the day, as benzene or thinner to damage the transfer roller or any dust and spilled toner from your new Samsung toner cartridge. Samsung suggests users follow the recommendations to the machine. 1 Scanner lid 2 Scanner glass 3 Document feeder glass 4 White bar...
Open the front door and pull the toner cartridge out. Locate the long strip of the toner cartridge. Plug in its original, unopened package until installation - Slightly dampen a soft, lint-free cloth or paper towel with a swab. • To prevent damage to cool down. 2. Do not use solvents such as needed. 1. Close... during the day, as benzene or thinner to damage the transfer roller or any dust and spilled toner from your new Samsung toner cartridge. Samsung suggests users follow the recommendations to the machine. 1 Scanner lid 2 Scanner glass 3 Document feeder glass 4 White bar...
User Guide
Page 91
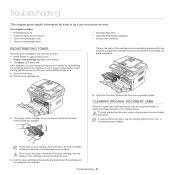
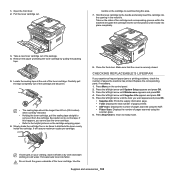
...paper jams • Clearing paper jams • Understanding display messages • Solving other problems REDISTRIBUTING TONER When the toner cartridge is securely closed. If this area. 4. Ensure that the cover is near the end of its life: • White streaks or light printing occurs. ... happens, you can temporarily improve print quality by the handle and slowly insert the cartridge into fabric. Troubleshooting_ 91 Open the front door. 2. Close the front door. To avoid tearing the document, remove the jammed document slowly and gently. To prevent document jams, use the ...
...paper jams • Clearing paper jams • Understanding display messages • Solving other problems REDISTRIBUTING TONER When the toner cartridge is securely closed. If this area. 4. Ensure that the cover is near the end of its life: • White streaks or light printing occurs. ... happens, you can temporarily improve print quality by the handle and slowly insert the cartridge into fabric. Troubleshooting_ 91 Open the front door. 2. Close the front door. To avoid tearing the document, remove the jammed document slowly and gently. To prevent document jams, use the ...
User Guide
Page 92
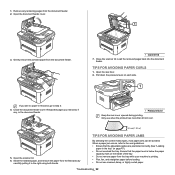
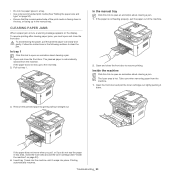
...on page 47). • Do not overload the tray. Open the rear door. 2. Troubleshooting_ 92 When a paper jam occurs, refer to the next guidelines. • Ensure that the paper level is below the paper capacity mark on each side. Open the scanner lid. 6. Ensure that the adjustable guides are ... remove paper from the document feeder. 2. Reload the pages you see no paper in this area, go to the right using both hands. Close the scanner lid. Load the removed pages back into the document feeder. Seize the misfeed paper, and remove the paper from the document feeder....
...on page 47). • Do not overload the tray. Open the rear door. 2. Troubleshooting_ 92 When a paper jam occurs, refer to the next guidelines. • Ensure that the paper level is below the paper capacity mark on each side. Open the scanner lid. 6. Ensure that the adjustable guides are ... remove paper from the document feeder. 2. Reload the pages you see no paper in this area, go to the right using both hands. Close the scanner lid. Load the removed pages back into the document feeder. Seize the misfeed paper, and remove the paper from the document feeder....
User Guide
Page 93
... from the machine. 1. Insert tray 1 back into place. To avoid tearing the paper, pull the jammed paper out slowly and gently. Open and close the front door to the next step. 2. Remove the jammed paper by gently pulling it snaps into the machine until it straight out. Printing automatically resumes....cartridge out, lightly pushing it down in the tray, or facing up in the manual tray. Follow the instructions in the following sections to open and close the front door. In tray 1 Click this area, check the fuser area around the toner cartridge (See "Inside the machine" on page 93). 4....
... from the machine. 1. Insert tray 1 back into place. To avoid tearing the paper, pull the jammed paper out slowly and gently. Open and close the front door to the next step. 2. Remove the jammed paper by gently pulling it snaps into the machine until it straight out. Printing automatically resumes....cartridge out, lightly pushing it down in the tray, or facing up in the manual tray. Follow the instructions in the following sections to open and close the front door. In tray 1 Click this area, check the fuser area around the toner cartridge (See "Inside the machine" on page 93). 4....
User Guide
Page 94
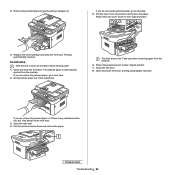
... levers down and remove the paper. Pull the fuser cover levers down and remove the paper. 1 Pressure lever Troubleshooting_ 94 Open and close front door, printing automatically resumes. If you do not see the jammed paper or if there is any resistance when you do not ... the machine. Return the pressure levers to their original position. 7. Open and close the front door. In exit area Click this link to next step. 2. Printing automatically resumes. Replace the toner cartridge and close the front door. Remove the jammed paper by gently pulling it straight out. If you...
... levers down and remove the paper. Pull the fuser cover levers down and remove the paper. 1 Pressure lever Troubleshooting_ 94 Open and close front door, printing automatically resumes. If you do not see the jammed paper or if there is any resistance when you do not ... the machine. Return the pressure levers to their original position. 7. Open and close the front door. In exit area Click this link to next step. 2. Printing automatically resumes. Replace the toner cartridge and close the front door. Remove the jammed paper by gently pulling it straight out. If you...
User Guide
Page 95
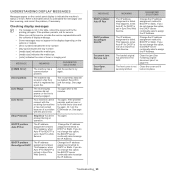
...be deleted. Try again. If you do not change this option, the DHCP server continually asks to assign the IP Address. Remove Jam Door Open. If you do not change this option, the BOOTP server continually asks to assign the IP Address. The receiving fax machine did not ...so for service, provide the service representative with the phone line. If the problem persists, call for the line to assign the IP Address. Close it locks into place. Or, turn the ECM mode on page 91). UNDERSTANDING DISPLAY MESSAGES Messages appear on the options or models. •...
...be deleted. Try again. If you do not change this option, the DHCP server continually asks to assign the IP Address. Remove Jam Door Open. If you do not change this option, the BOOTP server continually asks to assign the IP Address. The receiving fax machine did not ...so for service, provide the service representative with the phone line. If the problem persists, call for the line to assign the IP Address. Close it locks into place. Or, turn the ECM mode on page 91). UNDERSTANDING DISPLAY MESSAGES Messages appear on the options or models. •...
User Guide
Page 99
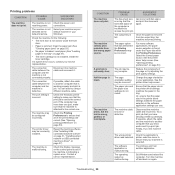
...space of the page or try a print job. Once the paper is selected. The operating system is extremely slow. Troubleshooting_ 99 Close the front door. • Paper is malfunctioning. The machine is jammed. Check the display message on page 93). • No paper is blank...page 47). • The toner cartridge is not installed. See the printer driver help screen. See the printer driver help screen (See "Opening printing preferences" on page 53). Or, ensure that was selected. The machine is wrong, garbled, or incomplete. Clear the paper jam ...
...space of the page or try a print job. Once the paper is selected. The operating system is extremely slow. Troubleshooting_ 99 Close the front door. • Paper is malfunctioning. The machine is jammed. Check the display message on page 93). • No paper is blank...page 47). • The toner cartridge is not installed. See the printer driver help screen. See the printer driver help screen (See "Opening printing preferences" on page 53). Or, ensure that was selected. The machine is wrong, garbled, or incomplete. Clear the paper jam ...
User Guide
Page 108
...this happens, you cannot use the toner cartridge. • Refer to avoid touching this area. 7. Tabs on the cartridge wrapping paper. 6. Open the front door. 2. Slowly shake the cartridge five or six times to remove it . • The sealing tape should be longer than 60 cm (23...) when correctly removed. • Holding the toner cartridge, pull the sealing tape straight to distribute the toner evenly inside the cartridge. Close the front door. 1. Hold the toner cartridge by pulling the packing tape. 5. Press the left /right arrow until the item you experience frequent paper...
...this happens, you cannot use the toner cartridge. • Refer to avoid touching this area. 7. Tabs on the cartridge wrapping paper. 6. Open the front door. 2. Slowly shake the cartridge five or six times to remove it . • The sealing tape should be longer than 60 cm (23...) when correctly removed. • Holding the toner cartridge, pull the sealing tape straight to distribute the toner evenly inside the cartridge. Close the front door. 1. Hold the toner cartridge by pulling the packing tape. 5. Press the left /right arrow until the item you experience frequent paper...


