
User Manual
Page 2
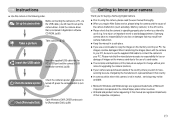
... to change without prior notice for upgrading the camera functions. ƀ If your camera Thank you for any loss or damages that is not in market, servicings may result from camera malfunction. ƀ Keep this manual in a safe place. ƀ If you will need to set up the camera driver Before connecting the camera to a PC, via the USB cable, you use a card reader to copy the images on the memory card...
... to change without prior notice for upgrading the camera functions. ƀ If your camera Thank you for any loss or damages that is not in market, servicings may result from camera malfunction. ƀ Keep this manual in a safe place. ƀ If you will need to set up the camera driver Before connecting the camera to a PC, via the USB cable, you use a card reader to copy the images on the memory card...
User Manual
Page 4
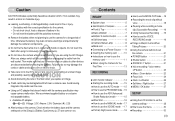
.../ 5-function button ŊŊŊŊ8 ƅSelf-timer lamp 8 ƅCamera Status Lamp ŊŊŊŊŊ8 ƅMode icon 9 ƀConnecting to a Power Source ŊŊ9 ƀInserting the memory card ŊŊŊ10 ƀInstructions on how to use the memory card 11 ƀWhen Using the Camera for the First Time 13 RECORDING ƀLCD monitor indicator ŊŊŊŊŊ14 ƀStarting the recording mode...
.../ 5-function button ŊŊŊŊ8 ƅSelf-timer lamp 8 ƅCamera Status Lamp ŊŊŊŊŊ8 ƅMode icon 9 ƀConnecting to a Power Source ŊŊ9 ƀInserting the memory card ŊŊŊ10 ƀInstructions on how to use the memory card 11 ƀWhen Using the Camera for the First Time 13 RECORDING ƀLCD monitor indicator ŊŊŊŊŊ14 ƀStarting the recording mode...

User Manual
Page 5
... recording date ŊŊ34 ƅLCD brightness 34 ƅAuto Focus lamp 34 ƅStart up the USB Driver for MAC Ŋ90 ƀUsing the USB Driver for MAC Ŋ90 ƀRemoving the USB Driver for Windows 98SE 90 ƀDigimax Master 91 ƀFAQ 93 button 43 ƀSize 44 ƀQuality / Frame rate 45 ƀMetering 45 ƀContinuous shot 46 ƀISO 46 ƀWhite balance 47 ƀExposure...
... recording date ŊŊ34 ƅLCD brightness 34 ƅAuto Focus lamp 34 ƅStart up the USB Driver for MAC Ŋ90 ƀUsing the USB Driver for MAC Ŋ90 ƀRemoving the USB Driver for Windows 98SE 90 ƀDigimax Master 91 ƀFAQ 93 button 43 ƀSize 44 ƀQuality / Frame rate 45 ƀMetering 45 ƀContinuous shot 46 ƀISO 46 ƀWhite balance 47 ƀExposure...

User Manual
Page 15
... Icons 1 Recording mode 2 3 4 5 6 Ś14ś Aperture Value/ Shutter Speed Flash/ Without Sound Self-timer Macro Contrast F2.8, 1/30 Page p.9 p.17 p.25 / 18 p.27 p.23 p.30 No. Description 7 Sharpness 8 Auto focus frame 9 Camera shake warning 10 Date/ Time 11 Exposure compensation 12 White Balance S730 13 ISO S750/S630 S750/S730 14 Continuous shot S630 15 Metering 16 Image quality S750/S730 17 Image size S630 18 Battery Optical/ Digital Zoom bar/ 19 Digital Zoom rate 20 Voice memo Number of available shots remaining 21 Movie...
... Icons 1 Recording mode 2 3 4 5 6 Ś14ś Aperture Value/ Shutter Speed Flash/ Without Sound Self-timer Macro Contrast F2.8, 1/30 Page p.9 p.17 p.25 / 18 p.27 p.23 p.30 No. Description 7 Sharpness 8 Auto focus frame 9 Camera shake warning 10 Date/ Time 11 Exposure compensation 12 White Balance S730 13 ISO S750/S630 S750/S730 14 Continuous shot S630 15 Metering 16 Image quality S750/S730 17 Image size S630 18 Battery Optical/ Digital Zoom bar/ 19 Digital Zoom rate 20 Voice memo Number of available shots remaining 21 Movie...

User Manual
Page 16
... battery chamber cover. [ AUTO mode ] 4. Press the power button to turn on the camera. (If the date/ time that the camera cannot focus on the memory card. 3. button to configure advanced functions such as Image Size (p.44), Quality (p.45), Metering (p.45), Continuous shooting (p.46), ISO (p.46), White Balance (p.47), and Exposure Compensation (p.48). [ PROGRAM mode ] ƅ How to use the AUTO mode ( ) Please select this mode for quick and easy picture taking with optimal settings. Insert the memory card (p.10). INFORMATION ƀ If the auto focus frame turns...
... battery chamber cover. [ AUTO mode ] 4. Press the power button to turn on the camera. (If the date/ time that the camera cannot focus on the memory card. 3. button to configure advanced functions such as Image Size (p.44), Quality (p.45), Metering (p.45), Continuous shooting (p.46), ISO (p.46), White Balance (p.47), and Exposure Compensation (p.48). [ PROGRAM mode ] ƅ How to use the AUTO mode ( ) Please select this mode for quick and easy picture taking with optimal settings. Insert the memory card (p.10). INFORMATION ƀ If the auto focus frame turns...

User Manual
Page 21
... obstructing the lens or the flash when you capture an image. ƅ Compose the image by using the LCD monitor. Ś20ś If the subject is moving at high speed. - To take a picture against the sun, please use a tripod, support the camera on a solid surface or change to flash shot mode. ƅ Shooting against the sun may appear on shooting conditions and camera settings. ƅ When the Flash Off or...
... obstructing the lens or the flash when you capture an image. ƅ Compose the image by using the LCD monitor. Ś20ś If the subject is moving at high speed. - To take a picture against the sun, please use a tripod, support the camera on a solid surface or change to flash shot mode. ƅ Shooting against the sun may appear on shooting conditions and camera settings. ƅ When the Flash Off or...

User Manual
Page 34
... folder number is removed and inserted again, the language setting will be set from 0001 even after deleting all or inserting a new memory card. [Series] : New files are assigned sequentially from 100 to the DCF (Design rule for Camera File systems) format. Even if the battery is assigned sequentially from S7300001 Ɗ S7300002 Ɗ ~ Ɗ S7309999. - SETUP1 File Language Date&Time Imprint LCD AF Lamp Back -6/41;0 6Ç)1; ,-= The files used...
... folder number is removed and inserted again, the language setting will be set from 0001 even after deleting all or inserting a new memory card. [Series] : New files are assigned sequentially from 100 to the DCF (Design rule for Camera File systems) format. Even if the battery is assigned sequentially from S7300001 Ɗ S7300002 Ɗ ~ Ɗ S7309999. - SETUP1 File Language Date&Time Imprint LCD AF Lamp Back -6/41;0 6Ç)1; ,-= The files used...

User Manual
Page 35
... the image file. The start -up image : [Off], [LOGO], [User Image] - Use a saved image for the start -up image will light up in the play mode. - SETUP1 File Language Date&Time Imprint LCD AF Lamp Back Off Date Date&Time OK Set [ LCD brightness ] ƅ You can adjust the LCD brightness. ƀ [LCD] sub menu : Dark, Normal, Bright SETUP1 File Language Date&Time Imprint LCD AF Lamp Back Dark Normal Bright OK Set [ Auto Focus lamp ] ƅ You can select the image that is first displayed on the LCD...
... the image file. The start -up image : [Off], [LOGO], [User Image] - Use a saved image for the start -up image will light up in the play mode. - SETUP1 File Language Date&Time Imprint LCD AF Lamp Back Off Date Date&Time OK Set [ LCD brightness ] ƅ You can adjust the LCD brightness. ƀ [LCD] sub menu : Dark, Normal, Bright SETUP1 File Language Date&Time Imprint LCD AF Lamp Back Dark Normal Bright OK Set [ Auto Focus lamp ] ƅ You can select the image that is first displayed on the LCD...

User Manual
Page 36
... idle(LCD monitor : OFF, Camera status lamp : Blinking) automatically. Quick view is briefly displayed during the selected time. Setup 2 ( ) [ Quick view ] ƅ If you enable Quick View before capturing an image, you just captured on the LCD monitor for the period of time specified. - Note that the LCD save function will not operate if the camera is in PC / Printer mode, slide show , playing back a voice recording, playing back a movie clip. [ LCD save ] ƅ If you set the [LCD save] to...
... idle(LCD monitor : OFF, Camera status lamp : Blinking) automatically. Quick view is briefly displayed during the selected time. Setup 2 ( ) [ Quick view ] ƅ If you enable Quick View before capturing an image, you just captured on the LCD monitor for the period of time specified. - Note that the LCD save function will not operate if the camera is in PC / Printer mode, slide show , playing back a voice recording, playing back a movie clip. [ LCD save ] ƅ If you set the [LCD save] to...

User Manual
Page 37
... [Format] on the memory, all images, including the protected images, will not be visible on the following types of memory card. - Video White - If you will get a [Card Error!] message. Ś36ś Your choice of the camera turns off. sound [ Formatting a memory ] ƅ This is connected. Press the menu button three times and the menu display will disappear. [Yes] : A [Processing!] message appears and the memory will be NTSC or PAL. SETUP2 Quick View Power Off LCD Save Video Out Format Reset Back...
... [Format] on the memory, all images, including the protected images, will not be visible on the following types of memory card. - Video White - If you will get a [Card Error!] message. Ś36ś Your choice of the camera turns off. sound [ Formatting a memory ] ƅ This is connected. Press the menu button three times and the menu display will disappear. [Yes] : A [Processing!] message appears and the memory will be NTSC or PAL. SETUP2 Quick View Power Off LCD Save Video Out Format Reset Back...

User Manual
Page 72
... OK button. [Select] : Selection window for an image to display the confirmation message. OK Button : Press the OK button to delete is displayed. - PLAYBACK Protect Delete DPOF Copy To Card OSD Info Back Select All OK Set T Select OK Delete Delete All? Select the pictures to be changed to make. ƅThe DPOF indicator will display. 3. Remember that this will be printed and how many prints to the play mode screen. Check that has DPOF information plays back...
... OK button. [Select] : Selection window for an image to display the confirmation message. OK Button : Press the OK button to delete is displayed. - PLAYBACK Protect Delete DPOF Copy To Card OSD Info Back Select All OK Set T Select OK Delete Delete All? Select the pictures to be changed to make. ƅThe DPOF indicator will display. 3. Remember that this will be printed and how many prints to the play mode screen. Check that has DPOF information plays back...

User Manual
Page 73
... Right button. 2. Press the Right button again and [Index] sub PLAYBACK Standard Index Size menu will show. Back OK Set [Select] : Selection window for all W ֒֒ Images T OK Set pictures except movie and voice files. - Zoom W / T Button : Select the number of prints. [All Pics] : Configure number of prints [Cancel] : Cancel the print setup. 4. Press the Up / Down button and select the [DPOF] menu tab. Press the OK button to print. - No Yes OK Set Ś...
... Right button. 2. Press the Right button again and [Index] sub PLAYBACK Standard Index Size menu will show. Back OK Set [Select] : Selection window for all W ֒֒ Images T OK Set pictures except movie and voice files. - Zoom W / T Button : Select the number of prints. [All Pics] : Configure number of prints [Cancel] : Cancel the print setup. 4. Press the Up / Down button and select the [DPOF] menu tab. Press the OK button to print. - No Yes OK Set Ś...

User Manual
Page 74
... button. Up / Down / Left / Right : Select an image. - PLAYBACK Protect Delete DPOF Copy To Card No OSD Info Yes - [No] : Cancels "Copy to Card". - [Yes] : All images, movie clips and voice Back OK Set recording files saved in the internal memory are copied to play mode. After copying has been completed, the screen will return to the memory card after the [Processing!] message is displayed. Playback ( ) ƅ Print size : You can specify the print size when printing images stored on the manufacturer and print model...
... button. Up / Down / Left / Right : Select an image. - PLAYBACK Protect Delete DPOF Copy To Card No OSD Info Yes - [No] : Cancels "Copy to Card". - [Yes] : All images, movie clips and voice Back OK Set recording files saved in the internal memory are copied to play mode. After copying has been completed, the screen will return to the memory card after the [Processing!] message is displayed. Playback ( ) ƅ Print size : You can specify the print size when printing images stored on the manufacturer and print model...
User Manual
Page 78
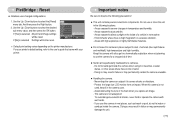
... troublesome to use or store this camera is selected : Settings will be reset. Areas exposed to select the [Reset] menu tab. Areas with your printer's default setting, refer to the user's guide that came with high explosives or highly flammable materials. ƅ Do not leave this camera in the following precautions! ƅ This unit contains precision electronic components. Protect the large size LCD monitor from...
... troublesome to use or store this camera is selected : Settings will be reset. Areas exposed to select the [Reset] menu tab. Areas with your printer's default setting, refer to the user's guide that came with high explosives or highly flammable materials. ƅ Do not leave this camera in the following precautions! ƅ This unit contains precision electronic components. Protect the large size LCD monitor from...

User Manual
Page 81
... camera has adopted the default settings ƊReset the date and time correctly The camera buttons do not operate ϏCamera malfunction Ɗ Remove/re-insert battery and switch the camera on A card error has occurred while the memory card is being used in low temperatures Ɗ Keep the camera in the camera. ϏIncorrect memory card format Ɗ Re-format the memory card The images don't play back ϏIncorrect file name (Violation of DCF format) Ɗ Do not change the image file...
... camera has adopted the default settings ƊReset the date and time correctly The camera buttons do not operate ϏCamera malfunction Ɗ Remove/re-insert battery and switch the camera on A card error has occurred while the memory card is being used in low temperatures Ɗ Keep the camera in the camera. ϏIncorrect memory card format Ɗ Re-format the memory card The images don't play back ϏIncorrect file name (Violation of DCF format) Ɗ Do not change the image file...

User Manual
Page 83
...; Color Effect : Normal, B&W, Sepia, Red, Green, Blue, Negative, User Set ƅ White Balance : Auto, Daylight, Cloudy, Fluorescent_H, Fluorescent_L, Tungsten, Custom ƅ Voice Recording : Voice Recording (max.10 hours) Voice Memo in flash, Slow sync, Flash off - Modes : Auto, Auto & Red-eye reduction, Fill-in Still Image (max. 10 sec.) ƅ Date Imprinting : Date, Date & Time, Off (user selectable) ƅ Shooting - Range : Wide : 0.2m ~ 3.0m, Tele : 0.4m ~ 2.5m (ISO AUTO) - Compensation : Ţ2EV (1/3EV steps) - Media :ňInternal memory...
...; Color Effect : Normal, B&W, Sepia, Red, Green, Blue, Negative, User Set ƅ White Balance : Auto, Daylight, Cloudy, Fluorescent_H, Fluorescent_L, Tungsten, Custom ƅ Voice Recording : Voice Recording (max.10 hours) Voice Memo in flash, Slow sync, Flash off - Modes : Auto, Auto & Red-eye reduction, Fill-in Still Image (max. 10 sec.) ƅ Date Imprinting : Date, Date & Time, Off (user selectable) ƅ Shooting - Range : Wide : 0.2m ~ 3.0m, Tele : 0.4m ~ 2.5m (ISO AUTO) - Compensation : Ţ2EV (1/3EV steps) - Media :ňInternal memory...

User Manual
Page 84
.... 136g (without batteries and card) ƅ Operating Temperature : 0 ~ 40ŪC ƅ Operating Humidity : 5 ~ 85% ƅ Software : Digimax Master, Adobe Reader ż Specifications are subject to change without prior notice. ż All trademarks are measured under Samsung's standard conditions and may vary depending on shooting conditions and camera settings. ƅ "E" Button - Effect : Color, Image Adjust, Fun (Highlight, Composite ,Photo Frame) - Specifications - Capacity (256 MB MMC) ňS750/S730 Super...
.... 136g (without batteries and card) ƅ Operating Temperature : 0 ~ 40ŪC ƅ Operating Humidity : 5 ~ 85% ƅ Software : Digimax Master, Adobe Reader ż Specifications are subject to change without prior notice. ż All trademarks are measured under Samsung's standard conditions and may vary depending on shooting conditions and camera settings. ƅ "E" Button - Effect : Color, Image Adjust, Fun (Highlight, Composite ,Photo Frame) - Specifications - Capacity (256 MB MMC) ňS750/S730 Super...
User Manual
Page 85
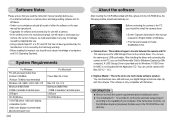
... download, view, edit and save your computer. This camera uses the USB Storage Driver as a USB card reader. If the frame does not show, run . We cannot, however, be held responsible in -one multi media software solution. After installing the driver and connecting this manual is based on English Edition of Windows. żThis manual is based on this camera to the capability of your digital images and movie clips clip with a camera...
... download, view, edit and save your computer. This camera uses the USB Storage Driver as a USB card reader. If the frame does not show, run . We cannot, however, be held responsible in -one multi media software solution. After installing the driver and connecting this manual is based on English Edition of Windows. żThis manual is based on this camera to the capability of your digital images and movie clips clip with a camera...
User Manual
Page 87
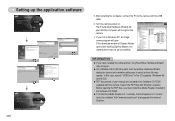
... camera with the USB cable. 4. If the download window of user manual are included in the CD supplied. (Windows 98 and 98 SE). ƀ PDF documents of Digmax Master opens after starting Digimax Master, the camera driver was set up the application software 3. After restarting the computer, connect the PC to be installed. Turn the camera power on. Before opening the PDF files, you to select a driver file may appear. INFORMATION ƀ If you have installed the camera driver...
... camera with the USB cable. 4. If the download window of user manual are included in the CD supplied. (Windows 98 and 98 SE). ƀ PDF documents of Digmax Master opens after starting Digimax Master, the camera driver was set up the application software 3. After restarting the computer, connect the PC to be installed. Turn the camera power on. Before opening the PDF files, you to select a driver file may appear. INFORMATION ƀ If you have installed the camera driver...
User Manual
Page 94
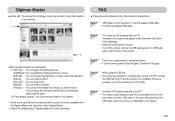
... an unexpected error during file transfer. Ɗ Turn the camera power off the camera, remove the USB cable, plug in Digimax Master for further information. In this window. ż Some movie clips that were compressed with a codec that is not recognised by your PC. Movie clip edit functions are not compatible. Transfer the file again. Wherever possible, connect the camera to the [Help] menu in the USB cable again, and then turn on again...
... an unexpected error during file transfer. Ɗ Turn the camera power off the camera, remove the USB cable, plug in Digimax Master for further information. In this window. ż Some movie clips that were compressed with a codec that is not recognised by your PC. Movie clip edit functions are not compatible. Transfer the file again. Wherever possible, connect the camera to the [Help] menu in the USB cable again, and then turn on again...


