
Quick Guide (easy Manual) (ver.1.0) (English)
Page 1
for questions about features, operation/performance, parts, accesories or service, call: 1-800-726-7864 (1-800-SAMSUNG) www.samsung.com Register your product at www.samsung.com/global/register DA68-01506B REV(0.4) Write the model and serial number here: Model # Serial # ... LIGHT 15 WATER FILTER 16 DOORS ...16 INSTALLATION INSTRUCTIONS 17 INSTALLATION OF THE REFRIGERATOR 17 REMOVING THE REFRIGERATOR DOORS 18 REATTACHING THE REFRIGERATOR DOORS 21 LEVELING REFRIGERATOR 24 ADJUSTING THE CLEARANCE BETWEEN THE DOORS 25 CHECKING THE WATER DISPENSER LINE 26 INSTALLING THE WATER DISPENSER LINE...
for questions about features, operation/performance, parts, accesories or service, call: 1-800-726-7864 (1-800-SAMSUNG) www.samsung.com Register your product at www.samsung.com/global/register DA68-01506B REV(0.4) Write the model and serial number here: Model # Serial # ... LIGHT 15 WATER FILTER 16 DOORS ...16 INSTALLATION INSTRUCTIONS 17 INSTALLATION OF THE REFRIGERATOR 17 REMOVING THE REFRIGERATOR DOORS 18 REATTACHING THE REFRIGERATOR DOORS 21 LEVELING REFRIGERATOR 24 ADJUSTING THE CLEARANCE BETWEEN THE DOORS 25 CHECKING THE WATER DISPENSER LINE 26 INSTALLING THE WATER DISPENSER LINE...

Quick Guide (easy Manual) (ver.1.0) (English)
Page 2
...heavy articles on it replaced immediately by children or infirm persons without adult supervision. • Children should be handled by first removing the doors and seals. • Do so in a damp place or a place where it is a risk of the electrical parts may cause ...; There is a risk of the refrigerator, throw it away by a service center. Represents something you must NOT do not play with water on the appliance. It is fully grounded. 2 After reading these following operating instructions cover various models, the characteristics of personal injury or material...
...heavy articles on it replaced immediately by children or infirm persons without adult supervision. • Children should be handled by first removing the doors and seals. • Do so in a damp place or a place where it is a risk of the electrical parts may cause ...; There is a risk of the refrigerator, throw it away by a service center. Represents something you must NOT do not play with water on the appliance. It is fully grounded. 2 After reading these following operating instructions cover various models, the characteristics of personal injury or material...
Quick Guide (easy Manual) (ver.1.0) (English)
Page 8
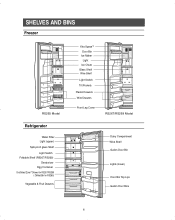
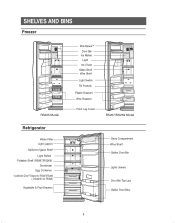
SHELVES AND BINS Freezer RS265 Model Refrigerator Water Filter Light (upper) Spill-proof glass Shelf Light Switch Foldable Shelf (RS267/RS269) Deodorizer Egg Container CoolSelect ZoneTM Drawer for RS267/RS269 ( Chilled Bin for RS265) Vegetable & Fruit Drawers Xtra SpaceTM Door Bin Ice Maker Light Ice Chute Glass Shelf Wire Shelf Light Switch Tilt Pockets Plastic Drawers Wire Drawers Front Leg Cover RS267/RS269 Model Dairy Compartment Wine Shelf Gallon Door Bin Lights (lower) Door Bin Top Lips Gallon Door Bins 8
SHELVES AND BINS Freezer RS265 Model Refrigerator Water Filter Light (upper) Spill-proof glass Shelf Light Switch Foldable Shelf (RS267/RS269) Deodorizer Egg Container CoolSelect ZoneTM Drawer for RS267/RS269 ( Chilled Bin for RS265) Vegetable & Fruit Drawers Xtra SpaceTM Door Bin Ice Maker Light Ice Chute Glass Shelf Wire Shelf Light Switch Tilt Pockets Plastic Drawers Wire Drawers Front Leg Cover RS267/RS269 Model Dairy Compartment Wine Shelf Gallon Door Bin Lights (lower) Door Bin Top Lips Gallon Door Bins 8
Quick Guide (easy Manual) (ver.1.0) (English)
Page 14
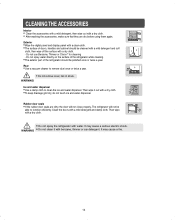
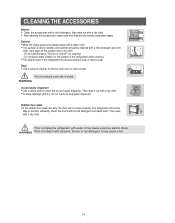
... a serious electric shock. Rear • Use a vacuum cleaner to clean the ice and water dispenser. Clean the doors with a dry cloth. • To keep drainage grid dry, do not touch ice and water dispenser. CLEANING THE ACCESSORIES Interior • Clean the accessories with a mild detergent, then wipe... of shock. WARNING Ice and water dispenser • Use a damp cloth to remove dust once or twice a year. • Do not remove cover, risk of doors, handles and cabinet should be able to function efficiently. Rubber door seals • If the rubber door seals are dry before using them...
... a serious electric shock. Rear • Use a vacuum cleaner to clean the ice and water dispenser. Clean the doors with a dry cloth. • To keep drainage grid dry, do not touch ice and water dispenser. CLEANING THE ACCESSORIES Interior • Clean the accessories with a mild detergent, then wipe... of shock. WARNING Ice and water dispenser • Use a damp cloth to remove dust once or twice a year. • Do not remove cover, risk of doors, handles and cabinet should be able to function efficiently. Rubber door seals • If the rubber door seals are dry before using them...
Quick Guide (easy Manual) (ver.1.0) (English)
Page 16
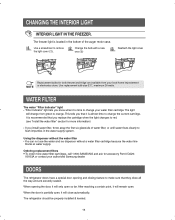
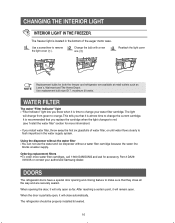
...make sure that it will remain open. When the door is time to red. (see "Install the water filter" section for accessory Part # DA29- 00003A or contact your authorized Samsung dealer. Use a screwdriver to orange. WATER FILTER The water "Filter Indicator" light • "Filter Indicator" light... is almost time to flush impurities in the bottom of water filter, or until water flows clearly to change from your water filter cartridge. Ordering replacement filters • To order more water filter cartridges, call 1-800-SAMSUNG and ask for more information) • If you that...
...make sure that it will remain open. When the door is time to red. (see "Install the water filter" section for accessory Part # DA29- 00003A or contact your authorized Samsung dealer. Use a screwdriver to orange. WATER FILTER The water "Filter Indicator" light • "Filter Indicator" light... is almost time to flush impurities in the bottom of water filter, or until water flows clearly to change from your water filter cartridge. Ordering replacement filters • To order more water filter cartridges, call 1-800-SAMSUNG and ask for more information) • If you that...
Quick Guide (easy Manual) (ver.1.0) (English)
Page 17
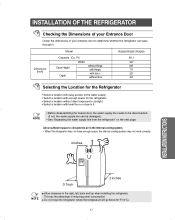
...consumption. Ft) Width Case Height Depth without Hinge with Hinge with door without door RS265/RS267/RS269 26.1 36" 69" 70" 35" 30" Selecting the Location for the Refrigerator • Select a location with easy access to the water supply. • Select a location with enough space for the...back and top when installing the refrigerator. NOTE • Before disassembling the freezer door, the water supply line needs to determine whether the refrigerator can be damaged.) • See "Separating the water supply line from the refrigerator" on the next page. Do not install the ...
...consumption. Ft) Width Case Height Depth without Hinge with Hinge with door without door RS265/RS267/RS269 26.1 36" 69" 70" 35" 30" Selecting the Location for the Refrigerator • Select a location with easy access to the water supply. • Select a location with enough space for the...back and top when installing the refrigerator. NOTE • Before disassembling the freezer door, the water supply line needs to determine whether the refrigerator can be damaged.) • See "Separating the water supply line from the refrigerator" on the next page. Do not install the ...
Quick Guide (easy Manual) (ver.1.0) (English)
Page 18
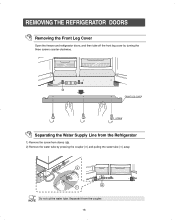
a FRONT LEG COVER SCREW Separating the Water Supply Line from the Refrigerator 1) Remove the screw from the coupler. NOTE 18 Separate it from clamp ( a). 2) Remove the water tube by turning the three screws counter-clockwise. REMOVING THE REFRIGERATOR DOORS Removing the Front Leg Cover Open the freezer and refrigerator doors, and then take off the front leg cover by pressing the coupler (➁) and pulling the water tube (➀) away. Do not cut the water tube.
a FRONT LEG COVER SCREW Separating the Water Supply Line from the Refrigerator 1) Remove the screw from the coupler. NOTE 18 Separate it from clamp ( a). 2) Remove the water tube by turning the three screws counter-clockwise. REMOVING THE REFRIGERATOR DOORS Removing the Front Leg Cover Open the freezer and refrigerator doors, and then take off the front leg cover by pressing the coupler (➁) and pulling the water tube (➀) away. Do not cut the water tube.

Quick Guide (easy Manual) (ver.1.0) (English)
Page 19
... not fall on a protected surface. INSTALLATION INSTRUCTIONS 19 Be careful when removing the door to pinch the water tubing and wire harness on the door. • Place doors on you. 3) Remove the door from the lower hinge (➆) by carefully lifting the door (➇). 4) Remove the lower hinge (➈) from the bracket lower hinge (➉) by...
... not fall on a protected surface. INSTALLATION INSTRUCTIONS 19 Be careful when removing the door to pinch the water tubing and wire harness on the door. • Place doors on you. 3) Remove the door from the lower hinge (➆) by carefully lifting the door (➇). 4) Remove the lower hinge (➈) from the bracket lower hinge (➉) by...
Quick Guide (easy Manual) (ver.1.0) (English)
Page 23
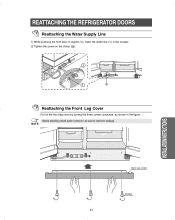
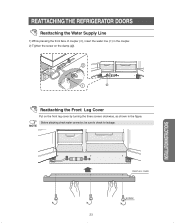
REATTACHING THE REFRIGERATOR DOORS Reattaching the Water Supply Line 1) While pressing the front face of coupler (➁), insert the water line (➀) in the coupler. 2) Tighten the screw on the front leg cover by turning the three screws clockwise, as shown in the figure. Before attaching check water connector, be sure to check for leakage. NOTE FRONT LEG COVER SCREW 23 INSTALLATION INSTRUCTIONS a Reattaching the Front Leg Cover Put on the clamp ( a ).
REATTACHING THE REFRIGERATOR DOORS Reattaching the Water Supply Line 1) While pressing the front face of coupler (➁), insert the water line (➀) in the coupler. 2) Tighten the screw on the front leg cover by turning the three screws clockwise, as shown in the figure. Before attaching check water connector, be sure to check for leakage. NOTE FRONT LEG COVER SCREW 23 INSTALLATION INSTRUCTIONS a Reattaching the Front Leg Cover Put on the clamp ( a ).
Quick Guide (easy Manual) (ver.1.0) (English)
Page 28
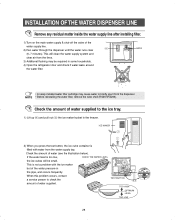
... LOW 28 This will be required in some households. 4) Open the refrigerator door and check if water leaks around the water filter. Check the amount of water (see the illustration below). This is not a problem with water from the water supply tap. NOTE • Before reinstalling the water filter, remove the wine shelf (RS267/RS269). If the...
... LOW 28 This will be required in some households. 4) Open the refrigerator door and check if water leaks around the water filter. Check the amount of water (see the illustration below). This is not a problem with water from the water supply tap. NOTE • Before reinstalling the water filter, remove the wine shelf (RS267/RS269). If the...

Quick Guide (easy Manual) (ver.1.0) (English)
Page 29
... supplied • Is the water line connected and the shut-off valve open? • Is the refrigerator in the refrigerator • The bubbling comes from inside the refrig- • Is the door closed properly? Try setting it to a lower temperature. • Is there any rotten food. Try setting... it is leveled and stable. • Is the back of • Is the water tank frozen because the refrigerator tem- the refrigerator to the...
... supplied • Is the water line connected and the shut-off valve open? • Is the refrigerator in the refrigerator • The bubbling comes from inside the refrig- • Is the door closed properly? Try setting it to a lower temperature. • Is there any rotten food. Try setting... it is leveled and stable. • Is the back of • Is the water tank frozen because the refrigerator tem- the refrigerator to the...
User Manual (user Manual) (ver.1.0) (English)
Page 1
... ADJUSTING THE CLEARANCE BETWEEN THE DOORS 25 CHECKING THE WATER DISPENSER LINE 26 INSTALLING THE WATER DISPENSER LINE 27 TROUBLESHOOTING 29 CONSUMER SUPPORT 30 In the CANADA.for questions about features, operation/performance, parts, accesories or service, call: 1-800-726-7864 (1-800-SAMSUNG) www.samsung.ca Register your product at www.samsung.com/global/register DA68...
... ADJUSTING THE CLEARANCE BETWEEN THE DOORS 25 CHECKING THE WATER DISPENSER LINE 26 INSTALLING THE WATER DISPENSER LINE 27 TROUBLESHOOTING 29 CONSUMER SUPPORT 30 In the CANADA.for questions about features, operation/performance, parts, accesories or service, call: 1-800-726-7864 (1-800-SAMSUNG) www.samsung.ca Register your product at www.samsung.com/global/register DA68...
User Manual (user Manual) (ver.1.0) (English)
Page 2
... leakage from the socket. After reading the warning signs, keep them in a safe place for a child to prevent electric shock. Do not directly spray water inside . aged, have it is not intended for use of the ground plug can result in a risk of electric shock. If you must ground the..., LP gas and other such products may cause explosions. Indicates that you wish to dispose of the refrigerator, throw it away by first removing the doors and seals. • Do so in a way that a ground is dam- SAFETY WARNINGS WARNING • Before operating the appliance, please read and retain this...
... leakage from the socket. After reading the warning signs, keep them in a safe place for a child to prevent electric shock. Do not directly spray water inside . aged, have it is not intended for use of the ground plug can result in a risk of electric shock. If you must ground the..., LP gas and other such products may cause explosions. Indicates that you wish to dispose of the refrigerator, throw it away by first removing the doors and seals. • Do so in a way that a ground is dam- SAFETY WARNINGS WARNING • Before operating the appliance, please read and retain this...
User Manual (user Manual) (ver.1.0) (English)
Page 8
SHELVES AND BINS Freezer RS265 Model Refrigerator Water Filter Light (upper) Spill-proof glass Shelf Light Switch Foldable Shelf (RS267/RS269) Deodorizer Egg Container CoolSelect ZoneTM Drawer for RS267/RS269 ( Chilled Bin for RS265) Vegetable & Fruit Drawers Xtra SpaceTM Door Bin Ice Maker Light Ice Chute Glass Shelf Wire Shelf Light Switch Tilt Pockets Plastic Drawers Wire Drawers Front Leg Cover RS267/RS269 Model Dairy Compartment Wine Shelf Gallon Door Bin Lights (lower) Door Bin Top Lips Gallon Door Bins 8
SHELVES AND BINS Freezer RS265 Model Refrigerator Water Filter Light (upper) Spill-proof glass Shelf Light Switch Foldable Shelf (RS267/RS269) Deodorizer Egg Container CoolSelect ZoneTM Drawer for RS267/RS269 ( Chilled Bin for RS265) Vegetable & Fruit Drawers Xtra SpaceTM Door Bin Ice Maker Light Ice Chute Glass Shelf Wire Shelf Light Switch Tilt Pockets Plastic Drawers Wire Drawers Front Leg Cover RS267/RS269 Model Dairy Compartment Wine Shelf Gallon Door Bin Lights (lower) Door Bin Top Lips Gallon Door Bins 8
User Manual (user Manual) (ver.1.0) (English)
Page 14
...out with a dry cloth. • To keep drainage grid dry, do not touch ice and water dispenser. Do not spray water directly on the surface of the refrigerator while cleaning. • The exterior part of doors, handles and cabinet should be cleaned with a mild detergent and soft cloth, then wipe off ... Clean the accessories with a mild detergent, then wipe out with a dry cloth. • After washing the accessories, make sure that they are dirty, the door will not close properly, The refrigerator will not be able to remove dust once or twice a year. • Do not remove cover, risk of shock...
...out with a dry cloth. • To keep drainage grid dry, do not touch ice and water dispenser. Do not spray water directly on the surface of the refrigerator while cleaning. • The exterior part of doors, handles and cabinet should be cleaned with a mild detergent and soft cloth, then wipe off ... Clean the accessories with a mild detergent, then wipe out with a dry cloth. • After washing the accessories, make sure that they are dirty, the door will not close properly, The refrigerator will not be able to remove dust once or twice a year. • Do not remove cover, risk of shock...
User Manual (user Manual) (ver.1.0) (English)
Page 16
...8226; To order more information) • If you that it is time to red. (see "Install the water filter" section for more water filter cartridges, call 1-800-SAMSUNG and ask for both the freezer and refrigerator are securely sealed. Use replacement bulb size E17, maximum 30 watts.... that they close automatically. After reaching a certain point, it will close all the way and are available at water supply. It is located in the water supply system. DOORS The refrigerator doors have a special door opening the door, it will change your authorized Samsung dealer.
...8226; To order more information) • If you that it is time to red. (see "Install the water filter" section for more water filter cartridges, call 1-800-SAMSUNG and ask for both the freezer and refrigerator are securely sealed. Use replacement bulb size E17, maximum 30 watts.... that they close automatically. After reaching a certain point, it will close all the way and are available at water supply. It is located in the water supply system. DOORS The refrigerator doors have a special door opening the door, it will change your authorized Samsung dealer.

User Manual (user Manual) (ver.1.0) (English)
Page 17
... Width 36" Dimension Case Height without Hinge with Hinge 69" 70" (inch) with door 35" Depth without door 30" Selecting the Location for the Refrigerator • Select a location with easy access to the water supply. • Select a location with enough space for the refrigerator. • Select... or close to determine whether the refrigerator can be disconnected. (If not, the water supply line can pass through it . NOTE This has the advantage of your Entrance Door Check the dimensions of reducing power consumption. 17 Allow sufficient space to circulate the air...
... Width 36" Dimension Case Height without Hinge with Hinge 69" 70" (inch) with door 35" Depth without door 30" Selecting the Location for the Refrigerator • Select a location with easy access to the water supply. • Select a location with enough space for the refrigerator. • Select... or close to determine whether the refrigerator can be disconnected. (If not, the water supply line can pass through it . NOTE This has the advantage of your Entrance Door Check the dimensions of reducing power consumption. 17 Allow sufficient space to circulate the air...

User Manual (user Manual) (ver.1.0) (English)
Page 18
NOTE 18 Do not cut the water tube. a FRONT LEG COVER SCREW Separating the Water Supply Line from the Refrigerator 1) Remove the screw from the coupler. Separate it from clamp ( a). 2) Remove the water tube by turning the three screws counter-clockwise. REMOVING THE REFRIGERATOR DOORS Removing the Front Leg Cover Open the freezer and refrigerator doors, and then take off the front leg cover by pressing the coupler (➁) and pulling the water tube (➀) away.
NOTE 18 Do not cut the water tube. a FRONT LEG COVER SCREW Separating the Water Supply Line from the Refrigerator 1) Remove the screw from the coupler. Separate it from clamp ( a). 2) Remove the water tube by turning the three screws counter-clockwise. REMOVING THE REFRIGERATOR DOORS Removing the Front Leg Cover Open the freezer and refrigerator doors, and then take off the front leg cover by pressing the coupler (➁) and pulling the water tube (➀) away.

User Manual (user Manual) (ver.1.0) (English)
Page 19
... not fall on a protected surface. INSTALLATION INSTRUCTIONS 19 Be careful when removing the door to pinch the water tubing and wire harness on the door. • Place doors on you. 3) Remove the door from the lower hinge (➆) by carefully lifting the door (➇). 4) Remove the lower hinge (➈) from the bracket lower hinge (➉) by...
... not fall on a protected surface. INSTALLATION INSTRUCTIONS 19 Be careful when removing the door to pinch the water tubing and wire harness on the door. • Place doors on you. 3) Remove the door from the lower hinge (➆) by carefully lifting the door (➇). 4) Remove the lower hinge (➈) from the bracket lower hinge (➉) by...
User Manual (user Manual) (ver.1.0) (English)
Page 23
NOTE FRONT LEG COVER SCREW 23 INSTALLATION INSTRUCTIONS REATTACHING THE REFRIGERATOR DOORS Reattaching the Water Supply Line 1) While pressing the front face of coupler (➁), insert the water line (➀) in the coupler. 2) Tighten the screw on the front leg cover by turning the three screws clockwise, as shown in the figure. Before attaching check water connector, be sure to check for leakage. a Reattaching the Front Leg Cover Put on the clamp ( a ).
NOTE FRONT LEG COVER SCREW 23 INSTALLATION INSTRUCTIONS REATTACHING THE REFRIGERATOR DOORS Reattaching the Water Supply Line 1) While pressing the front face of coupler (➁), insert the water line (➀) in the coupler. 2) Tighten the screw on the front leg cover by turning the three screws clockwise, as shown in the figure. Before attaching check water connector, be sure to check for leakage. a Reattaching the Front Leg Cover Put on the clamp ( a ).


