
Quick Guide (easy Manual) (ver.1.0) (English)
Page 1
...16 INSTALLATION INSTRUCTIONS 17 INSTALLATION OF THE REFRIGERATOR 17 REMOVING THE REFRIGERATOR DOORS 18 REATTACHING THE REFRIGERATOR DOORS 21 LEVELING THE REFRIGERATOR 24 ADJUSTING THE CLEARANCE BETWEEN THE DOORS ...25 CHECKING THE WATER DISPENSER LINE 26 INSTALLATION OF THE WATER DISPENSER LINE 27 TROUBLESHOOTING 29 CONSUMER SUPPORT 30 WARRANTY 30 In the U.S. for questions about features, operation/performance, parts, accesories or service, call: 1-800-726-7864 (1-800-SAMSUNG) www.samsung...
...16 INSTALLATION INSTRUCTIONS 17 INSTALLATION OF THE REFRIGERATOR 17 REMOVING THE REFRIGERATOR DOORS 18 REATTACHING THE REFRIGERATOR DOORS 21 LEVELING THE REFRIGERATOR 24 ADJUSTING THE CLEARANCE BETWEEN THE DOORS ...25 CHECKING THE WATER DISPENSER LINE 26 INSTALLATION OF THE WATER DISPENSER LINE 27 TROUBLESHOOTING 29 CONSUMER SUPPORT 30 WARRANTY 30 In the U.S. for questions about features, operation/performance, parts, accesories or service, call: 1-800-726-7864 (1-800-SAMSUNG) www.samsung...
Quick Guide (easy Manual) (ver.1.0) (English)
Page 2
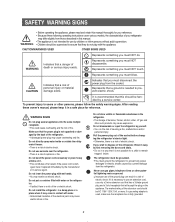
...may come in contact with wet hands. • You may receive an electric shock. Do not disassemble or repair the refrigerator by current leakage from the refrigerator. The refrigerator must be grounded. • You must NOT touch. CAUTION/WARNINGS USED OTHER SIGNS USED WARNING Indicates that a risk ... injury to ensure that they do . The marked rating of fire. Do not directly spray water inside . Do not use aerosols near the refrigerator . • There is fully grounded. 2 Do not insert the power plug with water. • Deteriorated insulation of the electrical parts may...
...may come in contact with wet hands. • You may receive an electric shock. Do not disassemble or repair the refrigerator by current leakage from the refrigerator. The refrigerator must be grounded. • You must NOT touch. CAUTION/WARNINGS USED OTHER SIGNS USED WARNING Indicates that a risk ... injury to ensure that they do . The marked rating of fire. Do not directly spray water inside . Do not use aerosols near the refrigerator . • There is fully grounded. 2 Do not insert the power plug with water. • Deteriorated insulation of the electrical parts may...
Quick Guide (easy Manual) (ver.1.0) (English)
Page 3
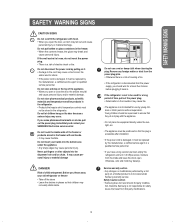
...party modification, therefore Samsung is not intended for safety issues that children may not easily climb inside and leave the doors open the door, an item may develop. Do not insert your old refrigerator or freezer • Take off . If the refrigerator is not to ...or a qualified service personnel. • If you open . Do not store pharmaceutical products, scientific materials and temperature-sensitive products in the refrigerator. • Products that require strict temperature controls must be used for at least five minutes before plugging it off the doors • Leave...
...party modification, therefore Samsung is not intended for safety issues that children may not easily climb inside and leave the doors open the door, an item may develop. Do not insert your old refrigerator or freezer • Take off . If the refrigerator is not to ...or a qualified service personnel. • If you open . Do not store pharmaceutical products, scientific materials and temperature-sensitive products in the refrigerator. • Products that require strict temperature controls must be used for at least five minutes before plugging it off the doors • Leave...
Quick Guide (easy Manual) (ver.1.0) (English)
Page 4
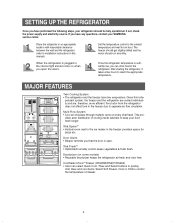
...thaw and cool items. Select Soft Freeze, Cool or Chill to keep your SAMSUNG service center. MAJOR FEATURES Twin Cooling System • The refrigerator and the freezer have performed the following steps, your refrigerator should be fully operational. Multi-Flow System • Cool air circulates through... space for an hour. Place the refigerator in an appropriate location with reasonable clearance between the wall and the refrigerator. (refer to installation instructions in the freezer due to reach the appropriate temperature. Deodorizer (on some models) • Reusable ...
...thaw and cool items. Select Soft Freeze, Cool or Chill to keep your SAMSUNG service center. MAJOR FEATURES Twin Cooling System • The refrigerator and the freezer have performed the following steps, your refrigerator should be fully operational. Multi-Flow System • Cool air circulates through... space for an hour. Place the refigerator in an appropriate location with reasonable clearance between the wall and the refrigerator. (refer to installation instructions in the freezer due to reach the appropriate temperature. Deodorizer (on some models) • Reusable ...
Quick Guide (easy Manual) (ver.1.0) (English)
Page 5
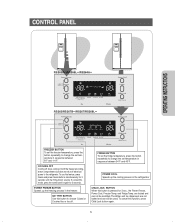
... and power freeze buttons simultaneously for 3 sec., the Power Freeze, Power Cool, Freezer Temp. POWER FREEZE BUTTON Speeds up the cooling process in the refrigerator CHILD LOCK BUTTON When this button is pressed for 3 seconds until the "Ding-Dong" sounds. and Fridge Temp. FRIDGE BUTTON To set the fridge... the set temperature in sequence between 34°F and 46°F. POWER COOL Speeds up the freezing process in both the freezer and refrigerator compartments but does not shut off . To cancel this button to choose Cubed or Crushed Ice or Ice off electrical power to the...
... and power freeze buttons simultaneously for 3 sec., the Power Freeze, Power Cool, Freezer Temp. POWER FREEZE BUTTON Speeds up the cooling process in the refrigerator CHILD LOCK BUTTON When this button is pressed for 3 seconds until the "Ding-Dong" sounds. and Fridge Temp. FRIDGE BUTTON To set the fridge... the set temperature in sequence between 34°F and 46°F. POWER COOL Speeds up the freezing process in both the freezer and refrigerator compartments but does not shut off . To cancel this button to choose Cubed or Crushed Ice or Ice off electrical power to the...
Quick Guide (easy Manual) (ver.1.0) (English)
Page 6
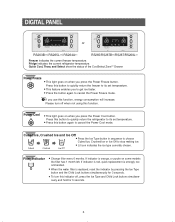
... every 6 months. DIGITAL PANEL or RS263B**/ RS265L**/ RS264A** RS265/RS267B**/RS267/RS269L** Freezer indicates the current freezer temperature. Press this button to quickly return the refrigerator to its set temperature. • Press this button again to stop making ice. • Lit icon indicates the ice type currently chosen. If indicator is...
... every 6 months. DIGITAL PANEL or RS263B**/ RS265L**/ RS264A** RS265/RS267B**/RS267/RS269L** Freezer indicates the current freezer temperature. Press this button to quickly return the refrigerator to its set temperature. • Press this button again to stop making ice. • Lit icon indicates the ice type currently chosen. If indicator is...
Quick Guide (easy Manual) (ver.1.0) (English)
Page 7
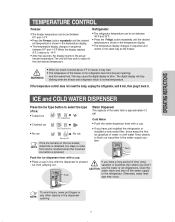
...and -14°F. This may occur. To avoid injury, never put fingers or NOTE any other objects in . OPERATING INSTRUCTIONS TEMPERATURE CONTROL Freezer Refrigerator • The freezer temperature can be set between 8°F and -14°F. • Press the Freezer. WARNING • When ice cream... display. • The temperature display changes in the water supply system. vacation or business trip) where you have just installed the refrigerator or installed a new water filter, throw away the first six glassfuls of the water tank is shown in the temperature display. •...
...and -14°F. This may occur. To avoid injury, never put fingers or NOTE any other objects in . OPERATING INSTRUCTIONS TEMPERATURE CONTROL Freezer Refrigerator • The freezer temperature can be set between 8°F and -14°F. • Press the Freezer. WARNING • When ice cream... display. • The temperature display changes in the water supply system. vacation or business trip) where you have just installed the refrigerator or installed a new water filter, throw away the first six glassfuls of the water tank is shown in the temperature display. •...
Quick Guide (easy Manual) (ver.1.0) (English)
Page 8
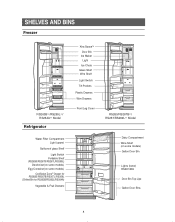
SHELVES AND BINS Freezer RS263B**/RS265L**/ RS264A** Model Refrigerator Water Filter Compartment Light (upper) Spill-proof glass Shelf Light Switch Foldable Shelf (RS265B/RS267B/RS267L/RS269L) Deodorizer(on some models) Egg Container(on some ...
SHELVES AND BINS Freezer RS263B**/RS265L**/ RS264A** Model Refrigerator Water Filter Compartment Light (upper) Spill-proof glass Shelf Light Switch Foldable Shelf (RS265B/RS267B/RS267L/RS269L) Deodorizer(on some models) Egg Container(on some ...
Quick Guide (easy Manual) (ver.1.0) (English)
Page 10
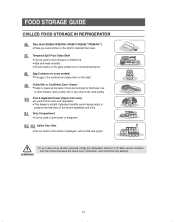
...normal phenomenon. Gallon Door Bins • Can be used quickly. Otherwise, odor and mold may develop. 10 FOOD STORAGE GUIDE CHILLED FOOD STORAGE IN REFRIGERATOR Wine Shelf (RS265 / RS267B**/ RS267/ RS269L**/RS264A**) • Place your wine bottles on the shelf. Tempered Spill Proof Glass Shelf •...is airtight. Optimized humidity control design helps to store butter or margarine. WARNING • If you have a long vacation planned, empty the refrigerator and turn it off. Use to store cheese, meat, poultry, fish or any other foods used to preserve the freshness of food and ...
...normal phenomenon. Gallon Door Bins • Can be used quickly. Otherwise, odor and mold may develop. 10 FOOD STORAGE GUIDE CHILLED FOOD STORAGE IN REFRIGERATOR Wine Shelf (RS265 / RS267B**/ RS267/ RS269L**/RS264A**) • Place your wine bottles on the shelf. Tempered Spill Proof Glass Shelf •...is airtight. Optimized humidity control design helps to store butter or margarine. WARNING • If you have a long vacation planned, empty the refrigerator and turn it off. Use to store cheese, meat, poultry, fish or any other foods used to preserve the freshness of food and ...
Quick Guide (easy Manual) (ver.1.0) (English)
Page 12
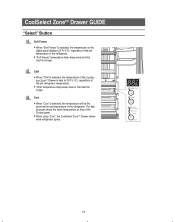
... Chill • When "Chill" is selected, the temperature of the CoolSe- The digital panel shows the same temperature as the set temperature of the refrigerator. Cool • When "Cool" is selected, the temperature will be the same as that of the Control panel. • When using "Cool...", the CoolSelect ZoneTM Drawer allows extra refrigerator space. 12 CoolSelect ZoneTM Drawer GUIDE "Select" Button Soft Freeze • When "Soft Freeze" is selected, the temperature on the digital panel ...
... Chill • When "Chill" is selected, the temperature of the CoolSe- The digital panel shows the same temperature as the set temperature of the refrigerator. Cool • When "Cool" is selected, the temperature will be the same as that of the Control panel. • When using "Cool...", the CoolSelect ZoneTM Drawer allows extra refrigerator space. 12 CoolSelect ZoneTM Drawer GUIDE "Select" Button Soft Freeze • When "Soft Freeze" is selected, the temperature on the digital panel ...
Quick Guide (easy Manual) (ver.1.0) (English)
Page 13
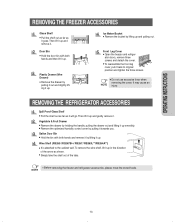
...force when removing the cover. It may cause an NOTE injury. Plastic Drawer (Wire Drawer) • Remove the drawer by pulling it up . REMOVING THE REFRIGERATOR ACCESSORIES Spill Proof Glass Shelf • Pull the shelf out as far as shown. • Simply take the shelf out of the tabs. • ...Before removing the freezer and refrigerator accessories, please move the stored foods. ator doors, remove three screws and detach the cover. • To reassemble the front leg cover, put it will...
...force when removing the cover. It may cause an NOTE injury. Plastic Drawer (Wire Drawer) • Remove the drawer by pulling it up . REMOVING THE REFRIGERATOR ACCESSORIES Spill Proof Glass Shelf • Pull the shelf out as far as shown. • Simply take the shelf out of the tabs. • ...Before removing the freezer and refrigerator accessories, please move the stored foods. ator doors, remove three screws and detach the cover. • To reassemble the front leg cover, put it will...
Quick Guide (easy Manual) (ver.1.0) (English)
Page 14
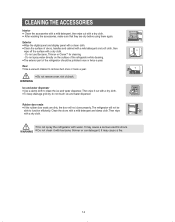
...efficiently. Clean the doors with a dry cloth. • After washing the accessories, make sure that they are dirty, the door will not close properly, The refrigerator will not be polished once or twice a year. It may cause a serious electric shock. Exterior • Wipe the digital panel and display panel with water... dispenser. WARNING • Do not clean it out with benzene, thinner or car detergent. Then wipe with a dry cloth. • Do not spray the refrigerator with a clean cloth. • Clean the surface of shock. Do not spray water directly on the surface of the...
...efficiently. Clean the doors with a dry cloth. • After washing the accessories, make sure that they are dirty, the door will not close properly, The refrigerator will not be polished once or twice a year. It may cause a serious electric shock. Exterior • Wipe the digital panel and display panel with water... dispenser. WARNING • Do not clean it out with benzene, thinner or car detergent. Then wipe with a dry cloth. • Do not spray the refrigerator with a clean cloth. • Clean the surface of shock. Do not spray water directly on the surface of the...

Quick Guide (easy Manual) (ver.1.0) (English)
Page 15
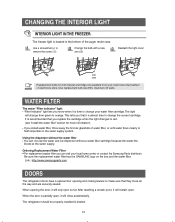
CHANGING THE INTERIOR LIGHT Before changing the interior light, unplug the refrigerator from contaminated water. If you have difficulty changing the light, contact your local home improvement or NOTE electronics store. After changing the bulb, replace...light cover hooks and push in the direction of the arrow. Use replacement bulb size E17, maximum 30 watts. 15 WARNING INTERIOR LIGHT IN THE REFRIGERATOR . E26 40W Replacement bulbs for both freezer and fridge are available from your local home improvement or NOTE electronics store. Upper Place a flat screwdriver...
CHANGING THE INTERIOR LIGHT Before changing the interior light, unplug the refrigerator from contaminated water. If you have difficulty changing the light, contact your local home improvement or NOTE electronics store. After changing the bulb, replace...light cover hooks and push in the direction of the arrow. Use replacement bulb size E17, maximum 30 watts. 15 WARNING INTERIOR LIGHT IN THE REFRIGERATOR . E26 40W Replacement bulbs for both freezer and fridge are available from your local home improvement or NOTE electronics store. Upper Place a flat screwdriver...
Quick Guide (easy Manual) (ver.1.0) (English)
Page 16
... the bottom of water filter, or until water flows clearly to remove the screw (➀). Link : http://www.samsungparts.com DOORS The refrigerator doors have a special door opening the door, it will remain open so far. This tells you install water filter, throw away the ...first six glassfulls of the auger motor case. The freezer light is time to change from your local home center or contact the Samsung Parts distributor. The refrigerator should be properly installed & leveled. 16 WATER FILTER The water "Filter Indicator" light • "Filter Indicator" light lets you...
... the bottom of water filter, or until water flows clearly to remove the screw (➀). Link : http://www.samsungparts.com DOORS The refrigerator doors have a special door opening the door, it will remain open so far. This tells you install water filter, throw away the ...first six glassfulls of the auger motor case. The freezer light is time to change from your local home center or contact the Samsung Parts distributor. The refrigerator should be properly installed & leveled. 16 WATER FILTER The water "Filter Indicator" light • "Filter Indicator" light lets you...
Quick Guide (easy Manual) (ver.1.0) (English)
Page 17
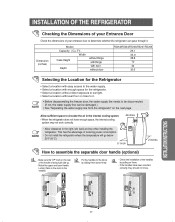
...space, the internal cooling system may not work correctly. 4inches NOTE Allow clearance to the right, left, back and top when installing the refrigerator. Match the upper and lower Handle Locking Tabs on the doors to assemble the separable door handle (optional) - NOTE • Before ... by sliding them . - INSTALLATION INSTRUCTIONS 17 Allow sufficient space to circulate the air in the internal cooling system. • When the refrigerator does not have been inserted correctly, they should not move. Ft) Width Case Height Depth without Hinge with Hinge with door without door ...
...space, the internal cooling system may not work correctly. 4inches NOTE Allow clearance to the right, left, back and top when installing the refrigerator. Match the upper and lower Handle Locking Tabs on the doors to assemble the separable door handle (optional) - NOTE • Before ... by sliding them . - INSTALLATION INSTRUCTIONS 17 Allow sufficient space to circulate the air in the internal cooling system. • When the refrigerator does not have been inserted correctly, they should not move. Ft) Width Case Height Depth without Hinge with Hinge with door without door ...
Quick Guide (easy Manual) (ver.1.0) (English)
Page 18
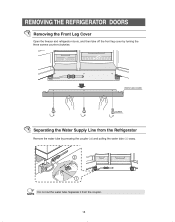
Separate it from the Refrigerator Remove the water tube by turning the three screws counter-clockwise. FRONT LEG COVER SCREW Separating the Water Supply Line from the coupler. NOTE 18 Do not cut the water tube. REMOVING THE REFRIGERATOR DOORS Removing the Front Leg Cover Open the freezer and refrigerator doors, and then take off the front leg cover by pressing the coupler (➁) and pulling the water tube (➀) away.
Separate it from the Refrigerator Remove the water tube by turning the three screws counter-clockwise. FRONT LEG COVER SCREW Separating the Water Supply Line from the coupler. NOTE 18 Do not cut the water tube. REMOVING THE REFRIGERATOR DOORS Removing the Front Leg Cover Open the freezer and refrigerator doors, and then take off the front leg cover by pressing the coupler (➁) and pulling the water tube (➀) away.
Quick Guide (easy Manual) (ver.1.0) (English)
Page 19
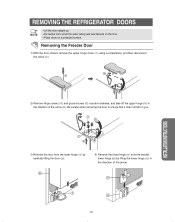
REMOVING THE REFRIGERATOR DOORS NOTE • Lift the door straight up. • Be careful not to ensure that it does not fall on a protected surface. Removing the Freezer ...
REMOVING THE REFRIGERATOR DOORS NOTE • Lift the door straight up. • Be careful not to ensure that it does not fall on a protected surface. Removing the Freezer ...
Quick Guide (easy Manual) (ver.1.0) (English)
Page 20
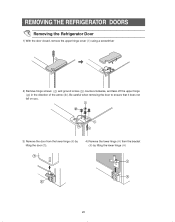
Be careful when removing the door to ensure that it does not fall on you. 3) Remove the door from the lower hinge (➅) by lifting the door (➆). 4) Remove the lower hinge (➇) from the bracket (➈) by lifting the lower hinge (➇) 20 REMOVING THE REFRIGERATOR DOORS Removing the Refrigerator Door 1) With the door closed, remove the upper hinge cover (➀) using a screwdriver 2) Remove hinge screws ( ) and ground screw ( ) counter-clockwise, and take off the upper hinge ( ) in the direction of the arrow ( ).
Be careful when removing the door to ensure that it does not fall on you. 3) Remove the door from the lower hinge (➅) by lifting the door (➆). 4) Remove the lower hinge (➇) from the bracket (➈) by lifting the lower hinge (➇) 20 REMOVING THE REFRIGERATOR DOORS Removing the Refrigerator Door 1) With the door closed, remove the upper hinge cover (➀) using a screwdriver 2) Remove hinge screws ( ) and ground screw ( ) counter-clockwise, and take off the upper hinge ( ) in the direction of the arrow ( ).
Quick Guide (easy Manual) (ver.1.0) (English)
Page 21
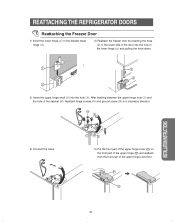
After levelling between the upper hinge hole (➆) and the hole of the upper hinge cover first. REATTACHING THE REFRIGERATOR DOORS Reattaching the Freezer Door 1) Insert the lower hinge (➀) in the bracket lower hinge (➁). 2) Reattach the freezer door by inserting the hose (➂) ...
After levelling between the upper hinge hole (➆) and the hole of the upper hinge cover first. REATTACHING THE REFRIGERATOR DOORS Reattaching the Freezer Door 1) Insert the lower hinge (➀) in the bracket lower hinge (➁). 2) Reattach the freezer door by inserting the hose (➂) ...
Quick Guide (easy Manual) (ver.1.0) (English)
Page 22
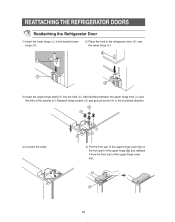
REATTACHING THE REFRIGERATOR DOORS Reattaching the Refrigerator Door 1) Insert the lower hinge (➀) in the bracket lower hinge (➁). 2) Place the hole in the clockwise direction. 4) Connect the wires. 5) Put the front ... the upper hinge (12 ) and reattach it from the front part of the cabinet (➇). Reattach hinge screws (➈) and ground screw (➉) in the refrigerator door (➂) over the lower hinge (➃). 3) Insert the upper hinge shaft (➄) into the hole (➅). After levelling between the upper hinge hole (➆...
REATTACHING THE REFRIGERATOR DOORS Reattaching the Refrigerator Door 1) Insert the lower hinge (➀) in the bracket lower hinge (➁). 2) Place the hole in the clockwise direction. 4) Connect the wires. 5) Put the front ... the upper hinge (12 ) and reattach it from the front part of the cabinet (➇). Reattach hinge screws (➈) and ground screw (➉) in the refrigerator door (➂) over the lower hinge (➃). 3) Insert the upper hinge shaft (➄) into the hole (➅). After levelling between the upper hinge hole (➆...

