
User Manual (user Manual) (ver.8.0) (English)
Page 1
... about features, operation/performance, parts, accesories or service, call: 1-800-726-7864 (1-800-SAMSUNG) www.samsung.com Register your product at www.samsung.com/global/register DA68-00500Y REV(0.8) SIDE BY SIDE REFRIGERATOR RS2534WW RS2534VQ RS2534BB RS2556WW RS2556BB RS2556SH RS2578WW RS2578BB RS2578SH OWNER'S MANUAL AND INSTALLATION CONTENTS SAFETY WARNING SIGNS 2 OPERATING INSTRUCTIONS 4 SETTING UP THE...
... about features, operation/performance, parts, accesories or service, call: 1-800-726-7864 (1-800-SAMSUNG) www.samsung.com Register your product at www.samsung.com/global/register DA68-00500Y REV(0.8) SIDE BY SIDE REFRIGERATOR RS2534WW RS2534VQ RS2534BB RS2556WW RS2556BB RS2556SH RS2578WW RS2578BB RS2578SH OWNER'S MANUAL AND INSTALLATION CONTENTS SAFETY WARNING SIGNS 2 OPERATING INSTRUCTIONS 4 SETTING UP THE...
User Manual (user Manual) (ver.8.0) (English)
Page 2
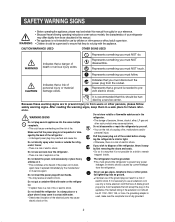
... various models, the characteristics of explosion or fire. Do not directly spray water inside . Do not store volatile or flammable substances in the refrigerator. • The storage of benzene, thinner, alcohol, ether, LP gas and other potential lightening rods as ground. • Improper use ...danger of causing a fire, malfunctions and/or personal injury. If you must follow safety warning signs. Represents something you must ground the refrigerator to prevent any power leakages or electric shocks caused by yourself. • You run the risk of death or serious injury exists....
... various models, the characteristics of explosion or fire. Do not directly spray water inside . Do not store volatile or flammable substances in the refrigerator. • The storage of benzene, thinner, alcohol, ether, LP gas and other potential lightening rods as ground. • Improper use ...danger of causing a fire, malfunctions and/or personal injury. If you must follow safety warning signs. Represents something you must ground the refrigerator to prevent any power leakages or electric shocks caused by yourself. • You run the risk of death or serious injury exists....
User Manual (user Manual) (ver.8.0) (English)
Page 3
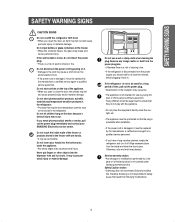
... the power cord by pulling on the door because a serious injury may cause frostbite. Do not insert your SAMSUNG Electronics service center. SAFETYWARNING SIGNS SAFETY WARNING SIGNS CAUTION SIGNS Do not overfill the refrigerator with the appliance. • Do not place the equipment directly under the sunlight, etc. • The appliance must...
... the power cord by pulling on the door because a serious injury may cause frostbite. Do not insert your SAMSUNG Electronics service center. SAFETYWARNING SIGNS SAFETY WARNING SIGNS CAUTION SIGNS Do not overfill the refrigerator with the appliance. • Do not place the equipment directly under the sunlight, etc. • The appliance must...
User Manual (user Manual) (ver.8.0) (English)
Page 4
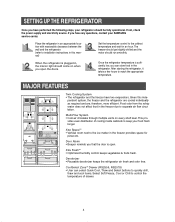
...Chill to control the temperature of cooling inside cabinets to keep your SAMSUNG service center. Once the refrigerator temperature is sufficiently low, you that the door is plugged in the refrigerator. pendent system, the freezer and the refrigerator are cooled individually as required and are, therefore, more efficient. ...mannal) Set the temperature control to the ice maker in the freezer due to reach the appropriate temperature. Food odor from the refrigerator does not affect food in the freezer provides space for an hour. If not, check the power supply and electricity source....
...Chill to control the temperature of cooling inside cabinets to keep your SAMSUNG service center. Once the refrigerator temperature is sufficiently low, you that the door is plugged in the refrigerator. pendent system, the freezer and the refrigerator are cooled individually as required and are, therefore, more efficient. ...mannal) Set the temperature control to the ice maker in the freezer due to reach the appropriate temperature. Food odor from the refrigerator does not affect food in the freezer provides space for an hour. If not, check the power supply and electricity source....
User Manual (user Manual) (ver.8.0) (English)
Page 5
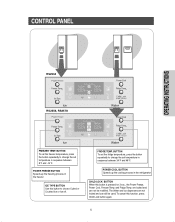
... dispensers are locked and can still be modified. CONTROL PANEL OPERATING INSTRUCTIONS RS2534 RS2556, RS2578 FREEZER TEMP. FRIDGE TEMP. BUTTON To set temperature in the refrigerator CHILD LOCK BUTTON When this button is pressed for 3 sec., the Power Freeze, Power Cool, Freezer Temp.
... dispensers are locked and can still be modified. CONTROL PANEL OPERATING INSTRUCTIONS RS2534 RS2556, RS2578 FREEZER TEMP. FRIDGE TEMP. BUTTON To set temperature in the refrigerator CHILD LOCK BUTTON When this button is pressed for 3 sec., the Power Freeze, Power Cool, Freezer Temp.
User Manual (user Manual) (ver.8.0) (English)
Page 6
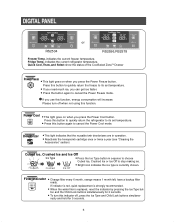
... function. Power Cool • This light goes on when you press the Power Cool button. Press this button to quickly return the refrigerator to its set temperature. • Press this button to quickly return the freeze to cancel the Power Cool mode. If you can ...mode. ously and hold for 3 seconds. • To turn off , press the Ice Type and Child Lock buttons simultane- indicates the current refrigerator temperature. Please turn this indicator off when not using this function, energy consumption will increase. ton and the Child Lock buttons simultaneously for 5 seconds....
... function. Power Cool • This light goes on when you press the Power Cool button. Press this button to quickly return the refrigerator to its set temperature. • Press this button to quickly return the freeze to cancel the Power Cool mode. If you can ...mode. ously and hold for 3 seconds. • To turn off , press the Ice Type and Child Lock buttons simultane- indicates the current refrigerator temperature. Please turn this indicator off when not using this function, energy consumption will increase. ton and the Child Lock buttons simultaneously for 5 seconds....
User Manual (user Manual) (ver.8.0) (English)
Page 7
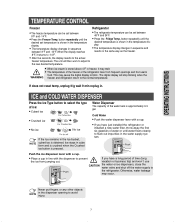
...ice dispenser lever with a cup. • Place a cup in line with a cup. • If you have just installed the refrigerator or installed a new water filter, throw away the first six glassfuls of water or until the desired temperature is shown in . OPERATING ...INSTRUCTIONS TEMPERATURE CONTROL Freezer Refrigerator • The freezer temperature can be set temperature is shown in the temperature display. • The temperature display changes in sequence ...
...ice dispenser lever with a cup. • Place a cup in line with a cup. • If you have just installed the refrigerator or installed a new water filter, throw away the first six glassfuls of water or until the desired temperature is shown in . OPERATING ...INSTRUCTIONS TEMPERATURE CONTROL Freezer Refrigerator • The freezer temperature can be set temperature is shown in the temperature display. • The temperature display changes in sequence ...
User Manual (user Manual) (ver.8.0) (English)
Page 8
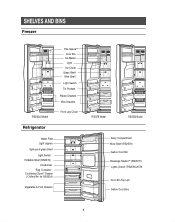
SHELVES AND BINS Freezer RS2534 Model Refrigerator Xtra SpaceTM Door Bin Ice Maker Light Ice Chute Glass Shelf Wire Shelf Light Switch Tilt Pockets Plastic Drawers Wire Drawers Front Leg Cover Water Filter Light (upper) Spill-proof glass Shelf Light Switch Foldable Shelf (RS2578) Deodorizer Egg Container CoolSelect ZoneTM Drawer ( Chilled Bin for RS2534) Vegetable & Fruit Drawers RS2578 Model RS2556 Model Dairy Compartment Wine Shelf (RS2578) Gallon Door Bin Beverage StationTM (RS2578) Lights (lower) (RS2556,2578) Door Bin Top Lips Gallon Door Bins 8
SHELVES AND BINS Freezer RS2534 Model Refrigerator Xtra SpaceTM Door Bin Ice Maker Light Ice Chute Glass Shelf Wire Shelf Light Switch Tilt Pockets Plastic Drawers Wire Drawers Front Leg Cover Water Filter Light (upper) Spill-proof glass Shelf Light Switch Foldable Shelf (RS2578) Deodorizer Egg Container CoolSelect ZoneTM Drawer ( Chilled Bin for RS2534) Vegetable & Fruit Drawers RS2578 Model RS2556 Model Dairy Compartment Wine Shelf (RS2578) Gallon Door Bin Beverage StationTM (RS2578) Lights (lower) (RS2556,2578) Door Bin Top Lips Gallon Door Bins 8
User Manual (user Manual) (ver.8.0) (English)
Page 10
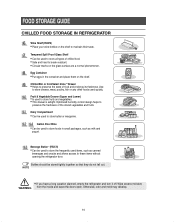
..., odor and mold may develop. 10 Wipe excess moisture WARNING from the inside and leave the doors open. FOOD STORAGE GUIDE CHILLED FOOD STORAGE IN REFRIGERATOR Wine Shelf (RS2578) • Place your wine bottles on the shelf. Dairy Compartment • Can be used to store fruits and vegetables. &#... or CoolSelect ZoneTM Drawer • Helps to preserve the freshness of chilled food. • Safe and hard to these items without opening the refrigerator door. Bottles should be stored tightly together so that they do not fall out. NOTE • If you have a long vacation planned, empty ...
..., odor and mold may develop. 10 Wipe excess moisture WARNING from the inside and leave the doors open. FOOD STORAGE GUIDE CHILLED FOOD STORAGE IN REFRIGERATOR Wine Shelf (RS2578) • Place your wine bottles on the shelf. Dairy Compartment • Can be used to store fruits and vegetables. &#... or CoolSelect ZoneTM Drawer • Helps to preserve the freshness of chilled food. • Safe and hard to these items without opening the refrigerator door. Bottles should be stored tightly together so that they do not fall out. NOTE • If you have a long vacation planned, empty ...
User Manual (user Manual) (ver.8.0) (English)
Page 12
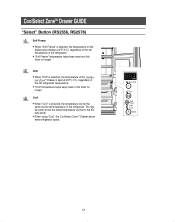
lect ZoneTM Drawer is kept at 30°F(-1oC), regardless of the refrigerator. • "Soft Freeze" temperature helps keep meat or fish fresh for longer. CoolSelect ZoneTM Drawer GUIDE "Select" Button (RS2556, RS2578) Soft Freeze • When... of the display panel. • When using "Cool", the CoolSelect ZoneTM Drawer allows extra refrigerator space. 12 Cool • When "Cool" is selected, the temperature of the refrigerator. The digital panel shows the same temperature as the set refrigerator temperature. • "Chill" temperature helps keep meat and fish fresh for longer.
lect ZoneTM Drawer is kept at 30°F(-1oC), regardless of the refrigerator. • "Soft Freeze" temperature helps keep meat or fish fresh for longer. CoolSelect ZoneTM Drawer GUIDE "Select" Button (RS2556, RS2578) Soft Freeze • When... of the display panel. • When using "Cool", the CoolSelect ZoneTM Drawer allows extra refrigerator space. 12 Cool • When "Cool" is selected, the temperature of the refrigerator. The digital panel shows the same temperature as the set refrigerator temperature. • "Chill" temperature helps keep meat and fish fresh for longer.
User Manual (user Manual) (ver.8.0) (English)
Page 13
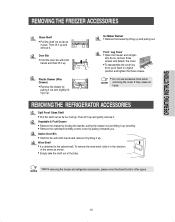
... the bin with both hands and remove it by pulling it out and slightly lifting it towards you. It may cause an injury. REMOVING THE REFRIGERATOR ACCESSORIES Spill Proof Glass Shelf • Pull the shelf out as far as shown. • Simply take the shelf out of the tabs. • Before... removing the freezer and refrigerator accessories, please move the stored foods to other space. NOTE 13 Door Bin • Hold the door bin with both hands and then lift it...
... the bin with both hands and remove it by pulling it out and slightly lifting it towards you. It may cause an injury. REMOVING THE REFRIGERATOR ACCESSORIES Spill Proof Glass Shelf • Pull the shelf out as far as shown. • Simply take the shelf out of the tabs. • Before... removing the freezer and refrigerator accessories, please move the stored foods to other space. NOTE 13 Door Bin • Hold the door bin with both hands and then lift it...
User Manual (user Manual) (ver.8.0) (English)
Page 14
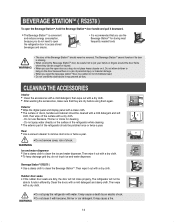
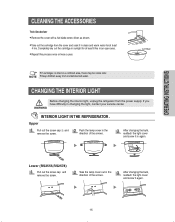
...open the beverage stationTM door, be removed. Clean the doors with water. Then wipe with a dry cloth. • Do not spray the refrigerator with a mild detergent and damp cloth. Do not spray water directly on the door because there is missing. • When closing the Beverage...Do not remove cover, risk of shock. Then wipe it . WARNING 14 The Beverage StationTM cannot function if its door is a risk of the refrigerator should be able to clean the Beverage StationTM. CLEANING THE ACCESSORIES Interior • Clean the accessories with a mild detergent, then wipe out with a...
...open the beverage stationTM door, be removed. Clean the doors with water. Then wipe with a dry cloth. • Do not spray the refrigerator with a mild detergent and damp cloth. Do not spray water directly on the door because there is missing. • When closing the Beverage...Do not remove cover, risk of shock. Then wipe it . WARNING 14 The Beverage StationTM cannot function if its door is a risk of the refrigerator should be able to clean the Beverage StationTM. CLEANING THE ACCESSORIES Interior • Clean the accessories with a mild detergent, then wipe out with a...
User Manual (user Manual) (ver.8.0) (English)
Page 15
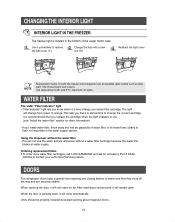
...; Repeat this process once or twice a year. • If cartridges is dried in a confined area, there may be some odor. WARNING INTERIOR LIGHT IN THE REFRIGERATOR . Take the lamp cover out in the direction of the arrows. OPERATING INSTRUCTIONS CLEANING THE ACCESSORIES Twin Deodorizer • Remove the cover with a flat blade... the arrows. Push the lamp cover in changing the light, contact your service center. CHANGING THE INTERIOR LIGHT Before changing the interior light, unplug the refrigerator from containmented water.
...; Repeat this process once or twice a year. • If cartridges is dried in a confined area, there may be some odor. WARNING INTERIOR LIGHT IN THE REFRIGERATOR . Take the lamp cover out in the direction of the arrows. OPERATING INSTRUCTIONS CLEANING THE ACCESSORIES Twin Deodorizer • Remove the cover with a flat blade... the arrows. Push the lamp cover in changing the light, contact your service center. CHANGING THE INTERIOR LIGHT Before changing the interior light, unplug the refrigerator from containmented water.
User Manual (user Manual) (ver.8.0) (English)
Page 16
...when the light changes to red. (see "Install the water filter" section for more water filter cartridges, call 1-800-SAMSUNG and ask for both the freezer and refrigerator are securely sealed. When opening and closing feature to change from green to orange. When the door is almost time to...water filter cartridge. This tells you that it is partially open, it will only open . DOORS The refrigerator doors have a special door opening the door, it is time change your authorized Samsung dealer. Use a screwdriver to flush not impurities in the bottom of water filter, or till water flows...
...when the light changes to red. (see "Install the water filter" section for more water filter cartridges, call 1-800-SAMSUNG and ask for both the freezer and refrigerator are securely sealed. When opening and closing feature to change from green to orange. When the door is almost time to...water filter cartridge. This tells you that it is partially open, it will only open . DOORS The refrigerator doors have a special door opening the door, it is time change your authorized Samsung dealer. Use a screwdriver to flush not impurities in the bottom of water filter, or till water flows...
User Manual (user Manual) (ver.8.0) (English)
Page 17
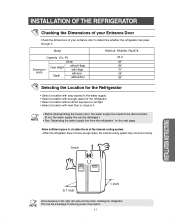
... with level floor or close to the right, left, back and top when installing the refrigerator. Allow sufficient space to circulate the air at the internal cooling system. • When the refrigerator does not have enough space, the internal cooling system may not work correctly. 1 inch ...entrance door to be damaged.) • See "Separating the water supply line from the refrigerator" on the next page. Model RS2534, RS2556, RS2578 Capacity (Cu. INSTALLATION OF THE REFRIGERATOR Checking the Dimensions of your Entrance Door Check the dimensions of reducing power consumption. 17 ...
... with level floor or close to the right, left, back and top when installing the refrigerator. Allow sufficient space to circulate the air at the internal cooling system. • When the refrigerator does not have enough space, the internal cooling system may not work correctly. 1 inch ...entrance door to be damaged.) • See "Separating the water supply line from the refrigerator" on the next page. Model RS2534, RS2556, RS2578 Capacity (Cu. INSTALLATION OF THE REFRIGERATOR Checking the Dimensions of your Entrance Door Check the dimensions of reducing power consumption. 17 ...
User Manual (user Manual) (ver.8.0) (English)
Page 18
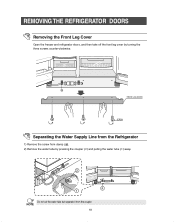
NOTE 18 Do not cut the water tube but separate it from clamp ( a). 2) Remove the water tube by turning the three screws counter-clockwise. a FRONT LEG COVER SCREW Separating the Water Supply Line from the Refrigerator 1) Remove the screw from the coupler. REMOVING THE REFRIGERATOR DOORS Removing the Front Leg Cover Open the freezer and refrigerator doors, and then take off the front leg cover by pressing the coupler (➁) and pulling the water tube (➀) away.
NOTE 18 Do not cut the water tube but separate it from clamp ( a). 2) Remove the water tube by turning the three screws counter-clockwise. a FRONT LEG COVER SCREW Separating the Water Supply Line from the Refrigerator 1) Remove the screw from the coupler. REMOVING THE REFRIGERATOR DOORS Removing the Front Leg Cover Open the freezer and refrigerator doors, and then take off the front leg cover by pressing the coupler (➁) and pulling the water tube (➀) away.
User Manual (user Manual) (ver.8.0) (English)
Page 19
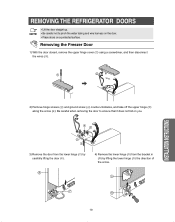
...;). INSTALLATION INSTRUCTIONS 2) Remove hinge screws (➂) and ground screw (➃) counter-clockwise, and take off the upper hinge (➄) along the arrow (➅). REMOVING THE REFRIGERATOR DOORS NOTE • Lift the door straight up. • Be careful not to ensure that it does not fall on a protected surface. Be careful when...
...;). INSTALLATION INSTRUCTIONS 2) Remove hinge screws (➂) and ground screw (➃) counter-clockwise, and take off the upper hinge (➄) along the arrow (➅). REMOVING THE REFRIGERATOR DOORS NOTE • Lift the door straight up. • Be careful not to ensure that it does not fall on a protected surface. Be careful when...
User Manual (user Manual) (ver.8.0) (English)
Page 20
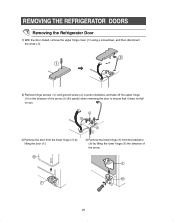
... on you. 3) Remove the door from the lower hinge (➆) by lifting the lower hinge (➈) the direction of the arrow (➅). REMOVING THE REFRIGERATOR DOORS Removing the Refrigerator Door 1) With the door closed, remove the upper hinge cover (➀) using a screwdriver, and then disconnect the wires (➁). 2) Remove hinge screws (➂...
... on you. 3) Remove the door from the lower hinge (➆) by lifting the lower hinge (➈) the direction of the arrow (➅). REMOVING THE REFRIGERATOR DOORS Removing the Refrigerator Door 1) With the door closed, remove the upper hinge cover (➀) using a screwdriver, and then disconnect the wires (➁). 2) Remove hinge screws (➂...

User Manual (user Manual) (ver.8.0) (English)
Page 21
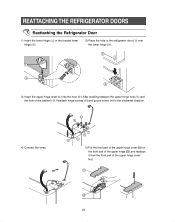
... front part of the upper hinge cover first. After levelling between the upper hinge hole (➆) and the hole of the cabinet (➇). REATTACHING THE REFRIGERATOR DOORS Reattaching the Freezer Door 1) Insert the lower hinge (➀) in the bracket lower hinge (➁). 2) Reattach the freezer door by inserting the hose (➂...
... front part of the upper hinge cover first. After levelling between the upper hinge hole (➆) and the hole of the cabinet (➇). REATTACHING THE REFRIGERATOR DOORS Reattaching the Freezer Door 1) Insert the lower hinge (➀) in the bracket lower hinge (➁). 2) Reattach the freezer door by inserting the hose (➂...
User Manual (user Manual) (ver.8.0) (English)
Page 22
... (➂) over the lower hinge (➃). 3) Insert the upper hinge shaft (➄) into the hole (➅). REATTACHING THE REFRIGERATOR DOORS Reattaching the Refrigerator Door 1) Insert the lower hinge (➀) in the bracket lower hinge (➁). 2) Place the hole in the clockwise direction. 4) Connect the wires. 5) Put the front ...
... (➂) over the lower hinge (➃). 3) Insert the upper hinge shaft (➄) into the hole (➅). REATTACHING THE REFRIGERATOR DOORS Reattaching the Refrigerator Door 1) Insert the lower hinge (➀) in the bracket lower hinge (➁). 2) Place the hole in the clockwise direction. 4) Connect the wires. 5) Put the front ...

