
User Manual (user Manual) (ver.0.0) (English)
Page 1
... 4 SETTING UP THE REFRIGERATOR 4 MAJOR FEATURES 4 CONTROL PANEL 5 DIGITAL PANEL 6 TEMPERATURE CONTROL 7 ICE and COLD WATER DISPENSER 7 SHELVES and BINS 8 FOOD STORAGE GUIDE 9 REMOVING THE FREEZER ACCESSORIES 11 REMOVING THE FRIDGE ACCESSORIES 11 CARE AND CLEANING 12 CHANGING THE INTERIOR LIGHTS 13 WATER FILTER 14 DOORS ...14 INSTALLATION INSTRUCTIONS 15 INSTALLATION OF THE REFRIGERATOR 15 REMOVING THE REFRIGERATOR DOORS 16 REATTACHING THE REFRIGERATOR DOORS 19 LEVELING THE REFRIGERATOR 22 ADJUSTING THE HEIGHT BETWEEN THE DOORS 23 CHECKING THE WATER DISPENSER LINE 24...
... 4 SETTING UP THE REFRIGERATOR 4 MAJOR FEATURES 4 CONTROL PANEL 5 DIGITAL PANEL 6 TEMPERATURE CONTROL 7 ICE and COLD WATER DISPENSER 7 SHELVES and BINS 8 FOOD STORAGE GUIDE 9 REMOVING THE FREEZER ACCESSORIES 11 REMOVING THE FRIDGE ACCESSORIES 11 CARE AND CLEANING 12 CHANGING THE INTERIOR LIGHTS 13 WATER FILTER 14 DOORS ...14 INSTALLATION INSTRUCTIONS 15 INSTALLATION OF THE REFRIGERATOR 15 REMOVING THE REFRIGERATOR DOORS 16 REATTACHING THE REFRIGERATOR DOORS 19 LEVELING THE REFRIGERATOR 22 ADJUSTING THE HEIGHT BETWEEN THE DOORS 23 CHECKING THE WATER DISPENSER LINE 24...

User Manual (user Manual) (ver.0.0) (English)
Page 2
...; You may receive an electric shock. Pull the power plug out of the socket before changing the interior light of the refrigerator. • Otherwise, there is a risk of explosion or fire. trapped inside or outside the refrigerator/freezer. • There is a risk of death or serious injury exists. If the power cord is fully grounded. The marked rating of the extension cord...
...; You may receive an electric shock. Pull the power plug out of the socket before changing the interior light of the refrigerator. • Otherwise, there is a risk of explosion or fire. trapped inside or outside the refrigerator/freezer. • There is a risk of death or serious injury exists. If the power cord is fully grounded. The marked rating of the extension cord...

User Manual (user Manual) (ver.0.0) (English)
Page 3
...; Any sharp edges may have a cooling system that have thawed completely. Do not let children hang on the automatic icemaking mechanism while the refrigerator is removed for use a wet or damp cloth when cleaning the plug. Do not insert your SAMSUNG Electronics service center. Never put bottles or glass containers in the freezer with moving parts. Do not place fingers or hands...
...; Any sharp edges may have a cooling system that have thawed completely. Do not let children hang on the automatic icemaking mechanism while the refrigerator is removed for use a wet or damp cloth when cleaning the plug. Do not insert your SAMSUNG Electronics service center. Never put bottles or glass containers in the freezer with moving parts. Do not place fingers or hands...

User Manual (user Manual) (ver.0.0) (English)
Page 4
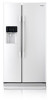
... distribution of cooling inside cabinets to reach the appropriate temperature. If you have performed the following steps, your refrigerator should run smoothly. SETTING UP THE REFRIGERATOR Once you have any questions, contact your SAMSUNG service center. Set the temperature control to installation instructions in this manual) Once the refrigerator temperature is open the doors. Cable tie MAJOR FEATURES Twin X AirFlow • Cool air circulates through side vents on when you open . Door Alarm •...
... distribution of cooling inside cabinets to reach the appropriate temperature. If you have performed the following steps, your refrigerator should run smoothly. SETTING UP THE REFRIGERATOR Once you have any questions, contact your SAMSUNG service center. Set the temperature control to installation instructions in this manual) Once the refrigerator temperature is open the doors. Cable tie MAJOR FEATURES Twin X AirFlow • Cool air circulates through side vents on when you open . Door Alarm •...

User Manual (user Manual) (ver.0.0) (English)
Page 5
... fridge temperature, press the button repeatedly to choose Cubed or Crushed ice or Ice off. CHILD LOCK BUTTON When this button to change the set temperature in sequence between cold and coldest. FRIDGE TEMP. FILTER RESET BUTTON When the water filter is pressed for 3 seconds. 5 CONTROL PANEL OPERATING INSTRUCTIONS POWER FREEZE BUTTON Speeds up the freezing process in sequence between cool and coolest. ICE TYPE BUTTON Use this button is replaced, reset the indicator by pressing the button for 3seconds, all functions are locked. FREEZER TEMP. The water and ice dispenser...
... fridge temperature, press the button repeatedly to choose Cubed or Crushed ice or Ice off. CHILD LOCK BUTTON When this button to change the set temperature in sequence between cold and coldest. FRIDGE TEMP. FILTER RESET BUTTON When the water filter is pressed for 3 seconds. 5 CONTROL PANEL OPERATING INSTRUCTIONS POWER FREEZE BUTTON Speeds up the freezing process in sequence between cool and coolest. ICE TYPE BUTTON Use this button is replaced, reset the indicator by pressing the button for 3seconds, all functions are locked. FREEZER TEMP. The water and ice dispenser...

User Manual (user Manual) (ver.0.0) (English)
Page 6
... replaced, reset the indicator by pressing the filter reset buttons for 2 hr.30 min. • Press the Power Freeze button again to cancel the Power Freeze function. • This feature enables you press the Power Freezer button. The water and ice dispenser are locked and can not be modified. DIGITAL PANEL Power Freeze • This light goes on when you to get ice faster. Power Freeze speeds up the freezing process. • If you select Power Freeze, the interior temperature...
... replaced, reset the indicator by pressing the filter reset buttons for 2 hr.30 min. • Press the Power Freeze button again to cancel the Power Freeze function. • This feature enables you press the Power Freezer button. The water and ice dispenser are locked and can not be modified. DIGITAL PANEL Power Freeze • This light goes on when you to get ice faster. Power Freeze speeds up the freezing process. • If you select Power Freeze, the interior temperature...

User Manual (user Manual) (ver.0.0) (English)
Page 7
... refrigerator is plugged in, the Cubed ice mode is set. • For lower temperature, press the button(Freezer Temp or Fridge Temp) until more LEDs light (coldest). • For higher temperature, press the button(Freezer Temp or Fridge Temp) until less LEDs light (cold). Press the Ice Type button to select the type of ice: • Cubed ice Water Dispenser The capacity of time (long vacation or business trip), close the water valve and shut off the water supply to the refrigerator. For Cubed ice...
... refrigerator is plugged in, the Cubed ice mode is set. • For lower temperature, press the button(Freezer Temp or Fridge Temp) until more LEDs light (coldest). • For higher temperature, press the button(Freezer Temp or Fridge Temp) until less LEDs light (cold). Press the Ice Type button to select the type of ice: • Cubed ice Water Dispenser The capacity of time (long vacation or business trip), close the water valve and shut off the water supply to the refrigerator. For Cubed ice...

User Manual (user Manual) (ver.0.0) (English)
Page 11
OPERATING INSTRUCTIONS REMOVING THE FREEZER ACCESSORIES Wire Shelf • Pull the shelf out as far as it will go. Door Bin • Hold the door bin with both hands and then lift it up and gently remove it up . • Before removing the freezer and fridge accessories, please remove the stored foods. It may cause an injury. Ice Maker Bucket • Remove the bucket by pulling it out and lifting...
OPERATING INSTRUCTIONS REMOVING THE FREEZER ACCESSORIES Wire Shelf • Pull the shelf out as far as it will go. Door Bin • Hold the door bin with both hands and then lift it up and gently remove it up . • Before removing the freezer and fridge accessories, please remove the stored foods. It may cause an injury. Ice Maker Bucket • Remove the bucket by pulling it out and lifting...

User Manual (user Manual) (ver.0.0) (English)
Page 14
This tells you that you replace the cartridge when the light changes to change the current cartridge. Ordering replacement filters • To order more information.) Using the dispenser without the water filter • You can not use the water and ice dispenser without a water filter cartridge because the water line blocks at the water supply. DOORS The refrigerator doors have a special door opening the door, it is recommended that it will close all the way and are securely sealed. When...
This tells you that you replace the cartridge when the light changes to change the current cartridge. Ordering replacement filters • To order more information.) Using the dispenser without the water filter • You can not use the water and ice dispenser without a water filter cartridge because the water line blocks at the water supply. DOORS The refrigerator doors have a special door opening the door, it is recommended that it will close all the way and are securely sealed. When...

User Manual (user Manual) (ver.0.0) (English)
Page 15
Model Capacity (Cu. NOTE • Before removing the freezer door, the water supply line needs to determine whether the refrigerator can pass through it. INSTALLATION OF THE REFRIGERATOR Checking the Dimensions of your Entrance Door Check the dimensions of reducing power consumption. • Do not install the refrigerator where the temperature will go below 50°F(10°C). 15 Allow sufficient space to circulate the air at the internal cooling system...
Model Capacity (Cu. NOTE • Before removing the freezer door, the water supply line needs to determine whether the refrigerator can pass through it. INSTALLATION OF THE REFRIGERATOR Checking the Dimensions of your Entrance Door Check the dimensions of reducing power consumption. • Do not install the refrigerator where the temperature will go below 50°F(10°C). 15 Allow sufficient space to circulate the air at the internal cooling system...

User Manual (user Manual) (ver.0.0) (English)
Page 16
REMOVING THE REFRIGERATOR DOORS Removing the Front Leg Cover Open the freezer and fridge doors, and then take off the front leg cover by pressing the coupler (➁) and pulling the water tube (➀) away. FRONT LEG COVER SCREW Separating the Water Supply Line from the coupler. NOTE 16 Be careful not to cut the water tube when separating it from the Refrigerator Remove the water tube by turning the three screws counter-clockwise.
REMOVING THE REFRIGERATOR DOORS Removing the Front Leg Cover Open the freezer and fridge doors, and then take off the front leg cover by pressing the coupler (➁) and pulling the water tube (➀) away. FRONT LEG COVER SCREW Separating the Water Supply Line from the coupler. NOTE 16 Be careful not to cut the water tube when separating it from the Refrigerator Remove the water tube by turning the three screws counter-clockwise.

User Manual (user Manual) (ver.0.0) (English)
Page 18
REMOVING THE REFRIGERATOR DOORS Removing the Fridge Door Unplug the refrigerator before removing the doors. Be careful when removing the door to ensure that it does not fall on you. 3) Remove the door from the lower hinge (➅) by lifting the door (➆). 4) Remove the lower hinge (➇) from the bracket (➈) by lifting the lower hinge (➇). 18 CAUTION 1) With the door closed, remove the upper hinge cover (➀) using a screwdriver 2) Remove hinge screws (➁) and...
REMOVING THE REFRIGERATOR DOORS Removing the Fridge Door Unplug the refrigerator before removing the doors. Be careful when removing the door to ensure that it does not fall on you. 3) Remove the door from the lower hinge (➅) by lifting the door (➆). 4) Remove the lower hinge (➇) from the bracket (➈) by lifting the lower hinge (➇). 18 CAUTION 1) With the door closed, remove the upper hinge cover (➀) using a screwdriver 2) Remove hinge screws (➁) and...

User Manual (user Manual) (ver.0.0) (English)
Page 22
... control lever (➁), turn it clockwise and level the refrigerator. HEIGHT DIFFERENCE ➀ SCREW DRIVER(-) Case 2) Freezer door is lower than the fridge door ➁ CONTROL LEVER Insert a flat-blade screwdriver (-) (➀) into a slot of the control lever (➁), turn it clockwise and level the refrigerator. The doors will be uneven if the refrigerator is not level. HEIGHT DIFFERENCE ➀ SCREW DRIVER(-) NOTE ➁ CONTROL LEVER Do not make small adjustments with the control...
... control lever (➁), turn it clockwise and level the refrigerator. HEIGHT DIFFERENCE ➀ SCREW DRIVER(-) Case 2) Freezer door is lower than the fridge door ➁ CONTROL LEVER Insert a flat-blade screwdriver (-) (➀) into a slot of the control lever (➁), turn it clockwise and level the refrigerator. The doors will be uneven if the refrigerator is not level. HEIGHT DIFFERENCE ➀ SCREW DRIVER(-) NOTE ➁ CONTROL LEVER Do not make small adjustments with the control...

User Manual (user Manual) (ver.0.0) (English)
Page 24
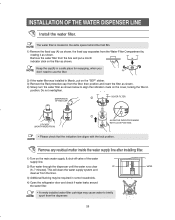
Shut off position. - Locate the nearest cold water line. - Cold Water line. 2. After connecting the water supply with low water pressure (below 20psi), you should install a boost- Follow the instructions in 10 secs. 2) The water filter removes particles. A Water line installation kit is filled. NOTE Samsung recommends using a water supply kit containing copper tubing. er pump to compensate for the low pressure. 4) Ensure the water storage tank inside the refrigerator is available at extra cost from the outlet. Water Line Installation Kit. 4. Shut Off Valve. 24 It...
Shut off position. - Locate the nearest cold water line. - Cold Water line. 2. After connecting the water supply with low water pressure (below 20psi), you should install a boost- Follow the instructions in 10 secs. 2) The water filter removes particles. A Water line installation kit is filled. NOTE Samsung recommends using a water supply kit containing copper tubing. er pump to compensate for the low pressure. 4) Ensure the water storage tank inside the refrigerator is available at extra cost from the outlet. Water Line Installation Kit. 4. Shut Off Valve. 24 It...

User Manual (user Manual) (ver.0.0) (English)
Page 25
... correct the problem before installing the water supply line to the refrigerator. • To prevent burns and product damage, do not hook up the water line to the hot water line. • If you use your refrigerator before connecting the water line, make sure the"Ice Type" is set to water leakage or flooding. Refrigerator Ferrule (Purchased) Compression Nut (1/4") (Provided) Compression Fitting (Provided) Compression Nut (1/4") (Purchased) Copper Tubing (Purchased) Plastic Tubing (Purchased) Household Water Line Water line must...
... correct the problem before installing the water supply line to the refrigerator. • To prevent burns and product damage, do not hook up the water line to the hot water line. • If you use your refrigerator before connecting the water line, make sure the"Ice Type" is set to water leakage or flooding. Refrigerator Ferrule (Purchased) Compression Nut (1/4") (Provided) Compression Fitting (Provided) Compression Nut (1/4") (Purchased) Copper Tubing (Purchased) Plastic Tubing (Purchased) Household Water Line Water line must...
User Manual (user Manual) (ver.0.0) (English)
Page 26
... recapping, when you NOTE don't need to use the filter. (A) 2) If the water filter was installed in March, put a month indicator stick on the main water supply & shut-off valve of the water supply line. 2) Run water through the dispenser until the water runs clear ICE (6~7 minutes). NOTE Remove any residual matter inside the water supply line after installing filter. 1) Turn on the filter as shown. SEPARATION OF RED CAP COVER FILTER STICKER (MONTH INDICATION) ALIGN THE INDICATION MARK WITH LOCK POSITION. •...
... recapping, when you NOTE don't need to use the filter. (A) 2) If the water filter was installed in March, put a month indicator stick on the main water supply & shut-off valve of the water supply line. 2) Run water through the dispenser until the water runs clear ICE (6~7 minutes). NOTE Remove any residual matter inside the water supply line after installing filter. 1) Turn on the filter as shown. SEPARATION OF RED CAP COVER FILTER STICKER (MONTH INDICATION) ALIGN THE INDICATION MARK WITH LOCK POSITION. •...

User Manual (user Manual) (ver.0.0) (English)
Page 27
... glass with a wooden spoon. Beverages and foods should not be connected to a cold water line. 5) Start the Icemaker : Set the "Ice Type" to press it reachs its operating temperature of the feeler arm, the icemaker will stop producing ice. After crushed ice is dispensed, some water may be sure to the "Cubed Ice" or "Crushed Ice" position. ICE MAKER 2) Throw away the first few cubes accidentally get directed to freeze shut. If ice is no water supply, turn...
... glass with a wooden spoon. Beverages and foods should not be connected to a cold water line. 5) Start the Icemaker : Set the "Ice Type" to press it reachs its operating temperature of the feeler arm, the icemaker will stop producing ice. After crushed ice is dispensed, some water may be sure to the "Cubed Ice" or "Crushed Ice" position. ICE MAKER 2) Throw away the first few cubes accidentally get directed to freeze shut. If ice is no water supply, turn...

User Manual (user Manual) (ver.0.0) (English)
Page 28
... freezer • Is the air vent blocked? • Is the door closed properly? • Allow sufficient space between stored food for a long time. Ice is not dispensed • Did you store the food with a high water content in the refrigerator • Wrap strong smelling food so that the power plug is properly connected. • Is the temperature control on the display • Try setting...
... freezer • Is the air vent blocked? • Is the door closed properly? • Allow sufficient space between stored food for a long time. Ice is not dispensed • Did you store the food with a high water content in the refrigerator • Wrap strong smelling food so that the power plug is properly connected. • Is the temperature control on the display • Try setting...

User Manual (user Manual) (ver.0.0) (English)
Page 29
.... Problem Possible Causes What To Do Small or hollow cubes Slow ice cube freezing Water filter clogged. Dispenser is clogged. Icemaker turned off or water supply turned off the icemaker, remove cubes, and turn the icemaker back on . Temperature control not set cold enough. • Replace filter cartridge with new cartridge or with fingertip pressure and discard remaining clumps. • Freezer may be too warm. Cubes jammed in the bottom of freezer Drain in chute. • See Care and Cleaning on icemaker blinking...
.... Problem Possible Causes What To Do Small or hollow cubes Slow ice cube freezing Water filter clogged. Dispenser is clogged. Icemaker turned off or water supply turned off the icemaker, remove cubes, and turn the icemaker back on . Temperature control not set cold enough. • Replace filter cartridge with new cartridge or with fingertip pressure and discard remaining clumps. • Freezer may be too warm. Cubes jammed in the bottom of freezer Drain in chute. • See Care and Cleaning on icemaker blinking...

User Manual (user Manual) (ver.0.0) (English)
Page 30
... SAMSUNG customer care center. SAMSUNG ELECTRONICS CANADA, INC. 55 STANDISH COURT MISSISSAUGA, ONTARIO L5R 4B2 CANADA TEL : 905-542-3535 FAX : 905-542-3835 1-800-SAMSUNG (7267864) www.samsung.com/ca To obtain service, please call our toll-free CAMCO CUSTOMER SERVICE number at 1-800-361-3400 If further help is needed concerning warranty, contact: Manager, Consumer Relations Camco, Inc. 1 Factory Lane Moncton, New...
... SAMSUNG customer care center. SAMSUNG ELECTRONICS CANADA, INC. 55 STANDISH COURT MISSISSAUGA, ONTARIO L5R 4B2 CANADA TEL : 905-542-3535 FAX : 905-542-3835 1-800-SAMSUNG (7267864) www.samsung.com/ca To obtain service, please call our toll-free CAMCO CUSTOMER SERVICE number at 1-800-361-3400 If further help is needed concerning warranty, contact: Manager, Consumer Relations Camco, Inc. 1 Factory Lane Moncton, New...


