
User Manual (ENGLISH)
Page 1
...INSTRUCTIONS 4 SETTING UP THE REFRIGERATOR 4 MAJOR FEATURES 4 CONTROL PANEL 5 DIGITAL PANEL 6 TEMPERATURE CONTROL 7 ICE and COLD WATER DISPENSER 7 SHELVES and BINS 8 FOOD STORAGE GUIDE 9 REMOVING THE FREEZER ACCESSORIES 11 REMOVING THE FRIDGE ACCESSORIES 11 CARE AND CLEANING 12 CHANGING THE INTERIOR LIGHT 13 WATER FILTER 14 DOORS ...14 INSTALLATION INSTRUCTIONS 15 INSTALLATION OF THE REFRIGERATOR 15 REMOVING THE REFRIGERATOR DOORS 16 REATTACHING THE REFRIGERATOR DOORS 19 LEVELING THE REFRIGERATOR 22 ADJUSTING THE HEIGHT BETWEEN THE DOORS 23 CHECKING THE WATER DISPENSER LINE...
...INSTRUCTIONS 4 SETTING UP THE REFRIGERATOR 4 MAJOR FEATURES 4 CONTROL PANEL 5 DIGITAL PANEL 6 TEMPERATURE CONTROL 7 ICE and COLD WATER DISPENSER 7 SHELVES and BINS 8 FOOD STORAGE GUIDE 9 REMOVING THE FREEZER ACCESSORIES 11 REMOVING THE FRIDGE ACCESSORIES 11 CARE AND CLEANING 12 CHANGING THE INTERIOR LIGHT 13 WATER FILTER 14 DOORS ...14 INSTALLATION INSTRUCTIONS 15 INSTALLATION OF THE REFRIGERATOR 15 REMOVING THE REFRIGERATOR DOORS 16 REATTACHING THE REFRIGERATOR DOORS 19 LEVELING THE REFRIGERATOR 22 ADJUSTING THE HEIGHT BETWEEN THE DOORS 23 CHECKING THE WATER DISPENSER LINE...
User Manual (ENGLISH)
Page 2
...the power plug out of the socket before changing the interior light of the refrigerator. • Otherwise, there is not possible for future reference. SAFETY WARNING SIGNS • Before operating the appliance, please read this action be handled by a service person...water inside . Do not bend the power cord excessively or place heavy articles on it replaced immediately by yourself. • You run the risk of electric shock. Do not disassemble or repair the refrigerator by the manufacturer or its service agent. if a grounding adapter is used, make sure the receptacle box is needed...
...the power plug out of the socket before changing the interior light of the refrigerator. • Otherwise, there is not possible for future reference. SAFETY WARNING SIGNS • Before operating the appliance, please read this action be handled by a service person...water inside . Do not bend the power cord excessively or place heavy articles on it replaced immediately by yourself. • You run the risk of electric shock. Do not disassemble or repair the refrigerator by the manufacturer or its service agent. if a grounding adapter is used, make sure the receptacle box is needed...
User Manual (ENGLISH)
Page 3
... responsible for use a wet or damp cloth when cleaning the plug. CFC Disposal • Your old refrigerator may have thawed completely. DANGER Risk of electric shock or fire. Before You Throw Away Your Old Refrigerator or Freezer: • Take off the doors • Leave the shelves in places so that the plug is accessible after installation. • If the power cord is...
... responsible for use a wet or damp cloth when cleaning the plug. CFC Disposal • Your old refrigerator may have thawed completely. DANGER Risk of electric shock or fire. Before You Throw Away Your Old Refrigerator or Freezer: • Take off the doors • Leave the shelves in places so that the plug is accessible after installation. • If the power cord is...

User Manual (ENGLISH)
Page 4
... fully operational. Door Alarm • Beep sound reminds you can arrange the Power cable with reasonable clearance between the wall and the refrigerator. (refer to installation instructions in this Cable tie, after you plug in , the interior light should run smoothly. If not, check the power supply and electricity source. When the refrigerator is open the doors. Place the refrigerator in an appropriate location with this manual) Once the refrigerator temperature is...
... fully operational. Door Alarm • Beep sound reminds you can arrange the Power cable with reasonable clearance between the wall and the refrigerator. (refer to installation instructions in this Cable tie, after you plug in , the interior light should run smoothly. If not, check the power supply and electricity source. When the refrigerator is open the doors. Place the refrigerator in an appropriate location with this manual) Once the refrigerator temperature is...
User Manual (ENGLISH)
Page 5
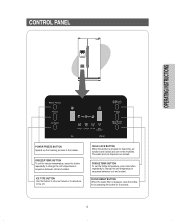
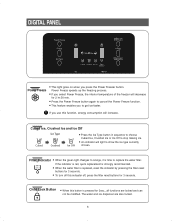
.... CONTROL PANEL OPERATING INSTRUCTIONS POWER FREEZE BUTTON Speeds up the freezing process in sequence between cool and coolest. BUTTON To set the fridge temperature, press the button repeatedly to change the set temperature in sequence between cold and coldest. BUTTON To set the freezer temperature, press the button repeatedly to choose Cubed or Crushed ice or Ice off. CHILD LOCK BUTTON When this button to change the set temperature in the freezer. FREEZER TEMP. The water and ice dispenser are locked and can not be modified. FILTER RESET BUTTON...
.... CONTROL PANEL OPERATING INSTRUCTIONS POWER FREEZE BUTTON Speeds up the freezing process in sequence between cool and coolest. BUTTON To set the fridge temperature, press the button repeatedly to change the set temperature in sequence between cold and coldest. BUTTON To set the freezer temperature, press the button repeatedly to choose Cubed or Crushed ice or Ice off. CHILD LOCK BUTTON When this button to change the set temperature in the freezer. FREEZER TEMP. The water and ice dispenser are locked and can not be modified. FILTER RESET BUTTON...
User Manual (ENGLISH)
Page 6
... the Power Freeze function. • This feature enables you select Power Freeze, the interior temperature of the freezer will light to get ice faster. The water and ice dispenser are locked and can not be modified. If you press the Power Freezer button. Filter Indicator • When the green light changes to orange, it is pressed for 3 seconds. DIGITAL PANEL Power Freeze • This light goes on when you use this button is time to replace the water filter.
... the Power Freeze function. • This feature enables you select Power Freeze, the interior temperature of the freezer will light to get ice faster. The water and ice dispenser are locked and can not be modified. If you press the Power Freezer button. Filter Indicator • When the green light changes to orange, it is pressed for 3 seconds. DIGITAL PANEL Power Freeze • This light goes on when you use this button is time to replace the water filter.
User Manual (ENGLISH)
Page 7
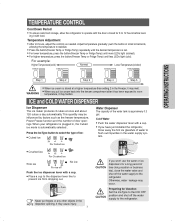
... to stabilize. • Press the button(Freezer Temp or Fridge Temp) repeatedly until less LEDs light (cold). ICE and COLD WATER DISPENSER Ice Dispenser The ice maker produces 8 cubes at a higher temperature than setting 2 in the NOTE dispenser opening. Otherwise, water leakage may cause injury. 7 CAUTION If you have just installed the refrigerator, throw away the first six glassfuls of door openings. For example: Higher Temperature(cold) Normal Lower Temperature(coldest) freeze freeze freeze freeze freeze OPERATING INSTRUCTIONS Step 1 Step 2 Step 3 Step 4 Step...
... to stabilize. • Press the button(Freezer Temp or Fridge Temp) repeatedly until less LEDs light (cold). ICE and COLD WATER DISPENSER Ice Dispenser The ice maker produces 8 cubes at a higher temperature than setting 2 in the NOTE dispenser opening. Otherwise, water leakage may cause injury. 7 CAUTION If you have just installed the refrigerator, throw away the first six glassfuls of door openings. For example: Higher Temperature(cold) Normal Lower Temperature(coldest) freeze freeze freeze freeze freeze OPERATING INSTRUCTIONS Step 1 Step 2 Step 3 Step 4 Step...
User Manual (ENGLISH)
Page 11
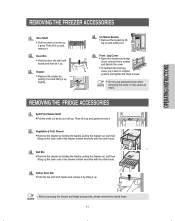
... Cover • Open the freezer and fridge doors, remove three screws and detach the cover. • To reattach the front leg cover, put it up . • Before removing the freezer and fridge accessories, please remove the stored foods. REMOVING THE FRIDGE ACCESSORIES Spill Proof Glass Shelf • Pull the shelf out as far as it up slightly. Ice Maker Bucket • Remove the bucket by lifting it . Vegetable & Fruit Drawer • Remove...
... Cover • Open the freezer and fridge doors, remove three screws and detach the cover. • To reattach the front leg cover, put it up . • Before removing the freezer and fridge accessories, please remove the stored foods. REMOVING THE FRIDGE ACCESSORIES Spill Proof Glass Shelf • Pull the shelf out as far as it up slightly. Ice Maker Bucket • Remove the bucket by lifting it . Vegetable & Fruit Drawer • Remove...
User Manual (ENGLISH)
Page 14
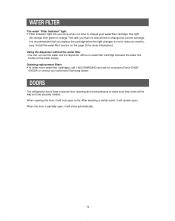
... cartridge when the light changes to orange. When opening and closing feature to make sure they close automatically. 14 DOORS The refrigerator doors have a special door opening the door, it is almost time to change your authorized Samsung dealer. Ordering replacement filters • To order more water filter cartridges, call 1-800-SAMSUNG and ask for more information.) Using the dispenser without the water filter • You can not use the water and ice dispenser without a water filter cartridge because the water line...
... cartridge when the light changes to orange. When opening and closing feature to make sure they close automatically. 14 DOORS The refrigerator doors have a special door opening the door, it is almost time to change your authorized Samsung dealer. Ordering replacement filters • To order more water filter cartridges, call 1-800-SAMSUNG and ask for more information.) Using the dispenser without the water filter • You can not use the water and ice dispenser without a water filter cartridge because the water line...
User Manual (ENGLISH)
Page 15
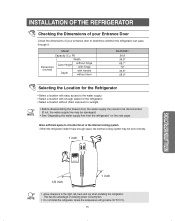
... to circulate the air at the internal cooling system. • When the refrigerator doesn't have enough space, the internal cooling system may be damaged.) • See "Separating the water supply line from the refrigerator" on the next page. Model Capacity (Cu. NOTE • Before disassembling the freezer door, the water supply line needs to be disconnected. (If not, the water supply line may not work correctly. 1 inch INSTALLATION INSTRUCTIONS 1/8 inch 1 inch...
... to circulate the air at the internal cooling system. • When the refrigerator doesn't have enough space, the internal cooling system may be damaged.) • See "Separating the water supply line from the refrigerator" on the next page. Model Capacity (Cu. NOTE • Before disassembling the freezer door, the water supply line needs to be disconnected. (If not, the water supply line may not work correctly. 1 inch INSTALLATION INSTRUCTIONS 1/8 inch 1 inch...
User Manual (ENGLISH)
Page 16
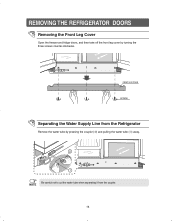
REMOVING THE REFRIGERATOR DOORS Removing the Front Leg Cover Open the freezer and fridge doors, and then take off the front leg cover by pressing the coupler (➁) and pulling the water tube (➀) away. Be careful not to cut the water tube when separating it from the Refrigerator Remove the water tube by turning the three screws counter-clockwise. NOTE 16 FRONT LEG COVER SCREW Separating the Water Supply Line from the coupler.
REMOVING THE REFRIGERATOR DOORS Removing the Front Leg Cover Open the freezer and fridge doors, and then take off the front leg cover by pressing the coupler (➁) and pulling the water tube (➀) away. Be careful not to cut the water tube when separating it from the Refrigerator Remove the water tube by turning the three screws counter-clockwise. NOTE 16 FRONT LEG COVER SCREW Separating the Water Supply Line from the coupler.
User Manual (ENGLISH)
Page 18
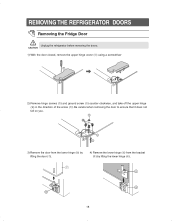
CAUTION 1) With the door closed, remove the upper hinge cover (➀) using a screwdriver 2) Remove hinge screws (➁) and ground screw (➂) counter-clockwise, and take off the upper hinge (④) in the direction of the arrow (➄). REMOVING THE REFRIGERATOR DOORS Removing the Fridge Door Unplug the refrigerator before removing the doors. Be careful when removing the door to ensure that it does not fall on you. 3) Remove the door from the lower...
CAUTION 1) With the door closed, remove the upper hinge cover (➀) using a screwdriver 2) Remove hinge screws (➁) and ground screw (➂) counter-clockwise, and take off the upper hinge (④) in the direction of the arrow (➄). REMOVING THE REFRIGERATOR DOORS Removing the Fridge Door Unplug the refrigerator before removing the doors. Be careful when removing the door to ensure that it does not fall on you. 3) Remove the door from the lower...
User Manual (ENGLISH)
Page 24
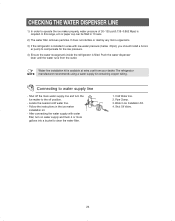
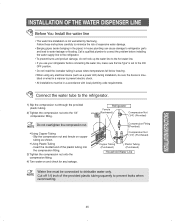
Pipe Clamp. 3. Shut Off Valve. 24 The refrigerator NOTE manufacturer recommends using a water supply kit containing copper tubing. After connecting the water supply with low water pressure (below 20psi), you should install a boost- Cold Water line. 2. Push the water dispenser lever until the water runs from your dealer. CHECKING THE WATER DISPENSER LINE 1) In order to compensate for the low pressure. 4) Ensure the water storage tank inside the refrigerator is filled. er pump to operate the ice maker properly, water pressure...
Pipe Clamp. 3. Shut Off Valve. 24 The refrigerator NOTE manufacturer recommends using a water supply kit containing copper tubing. After connecting the water supply with low water pressure (below 20psi), you should install a boost- Cold Water line. 2. Push the water dispenser lever until the water runs from your dealer. CHECKING THE WATER DISPENSER LINE 1) In order to compensate for the low pressure. 4) Ensure the water storage tank inside the refrigerator is filled. er pump to operate the ice maker properly, water pressure...
User Manual (ENGLISH)
Page 25
... damage to refrigerator parts and lead to water leakage or flooding. INSTALLATION OF THE WATER DISPENSER LINE Before You Install the water line • This water line installation is set to the ICE OFF position. • Do not install the icemaker tubing in areas where temperatures fall below freezing. • When using any leakage. NOTE Do not overtighten the compression nut. ● Using Copper Tubing - lated or wired in a manner to prevent electric shock. •...
... damage to refrigerator parts and lead to water leakage or flooding. INSTALLATION OF THE WATER DISPENSER LINE Before You Install the water line • This water line installation is set to the ICE OFF position. • Do not install the icemaker tubing in areas where temperatures fall below freezing. • When using any leakage. NOTE Do not overtighten the compression nut. ● Using Copper Tubing - lated or wired in a manner to prevent electric shock. •...

User Manual (ENGLISH)
Page 26
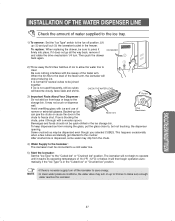
... THE WATER DISPENSER LINE Install the water filter. NOTE Remove any residual matter inside the water supply line after installing filter. 1) Turn on the filter as shown. Keep the cap(A) in a safe place for recapping, when you NOTE don't need to use the filter. (A) 2) If the water filter was installed in March, put a month indicator stick on the main water supply & shut-off valve of the water supply line. 2) Run water through the dispenser until the water runs clear ICE (6~7 minutes). SEPARATION OF RED CAP COVER FILTER...
... THE WATER DISPENSER LINE Install the water filter. NOTE Remove any residual matter inside the water supply line after installing filter. 1) Turn on the filter as shown. Keep the cap(A) in a safe place for recapping, when you NOTE don't need to use the filter. (A) 2) If the water filter was installed in March, put a month indicator stick on the main water supply & shut-off valve of the water supply line. 2) Run water through the dispenser until the water runs clear ICE (6~7 minutes). SEPARATION OF RED CAP COVER FILTER...
User Manual (ENGLISH)
Page 27
... water valve may drip from the chute. 4) Water Supply to the Icemaker : The icemaker must be connected to a cold water line. 5) Start the Icemaker : Set the "Ice Type" to the "Cubed Ice" or "Crushed Ice" position. Then push the drawer back again. If ice is normal for several cubes to be sure to the level of the feeler arm, the icemaker will not begin operation automatically if the "Ice Type" is in the freezer. INSTALLATION INSTRUCTIONS 27...
... water valve may drip from the chute. 4) Water Supply to the Icemaker : The icemaker must be connected to a cold water line. 5) Start the Icemaker : Set the "Ice Type" to the "Cubed Ice" or "Crushed Ice" position. Then push the drawer back again. If ice is normal for several cubes to be sure to the level of the feeler arm, the icemaker will not begin operation automatically if the "Ice Type" is in the freezer. INSTALLATION INSTRUCTIONS 27...

User Manual (ENGLISH)
Page 28
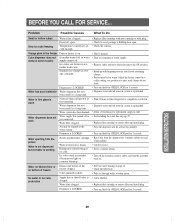
... water pipe connected and the shut-off valve open? • Is the freezer temperature too warm? • Did you stop the ice making ice? • Check the control panel. • Check the ice container. • Check the valve. • Set the temperature lower. located near to • Move the refrigerator to the correct temperature? • Is the temperature in the front corners of the freezer • Is the air vent blocked? • Is the door...
... water pipe connected and the shut-off valve open? • Is the freezer temperature too warm? • Did you stop the ice making ice? • Check the control panel. • Check the ice container. • Check the valve. • Set the temperature lower. located near to • Move the refrigerator to the correct temperature? • Is the temperature in the front corners of the freezer • Is the air vent blocked? • Is the door...
User Manual (ENGLISH)
Page 29
... SERVICE... Temperature control not set cold enough. • Replace filter cartridge with new cartridge or with plug. • Check to the ON position. • Break up with a wooden spoon. Orange glow in storage container. Icemaker turned off or water supply turned off the icemaker, remove cubes, and turn the icemaker back on . Irregular ice clumps in the freezer Cube dispenser does not work Water supply line turned off or not connected. Adjust the freezer control to a warmer setting. • Turn off . Water dispenser has not been used...
... SERVICE... Temperature control not set cold enough. • Replace filter cartridge with new cartridge or with plug. • Check to the ON position. • Break up with a wooden spoon. Orange glow in storage container. Icemaker turned off or water supply turned off the icemaker, remove cubes, and turn the icemaker back on . Irregular ice clumps in the freezer Cube dispenser does not work Water supply line turned off or not connected. Adjust the freezer control to a warmer setting. • Turn off . Water dispenser has not been used...
User Manual (ENGLISH)
Page 30
..., equipment, systems, utilities, services, parts, supplies, accessories, applications, installations, repairs, external plumbing and leaks, external wiring, circuit breakers, fuses or connectors not supplied and authorized by SAMSUNG under the SAMSUNG brand name are set forth in the applicable end user license agreement. This limited warranty covers manufacturing defects in materials and workmanship encountered in service problems; consumable items including filters and light bulbs. applications and uses for transportation of nature...
..., equipment, systems, utilities, services, parts, supplies, accessories, applications, installations, repairs, external plumbing and leaks, external wiring, circuit breakers, fuses or connectors not supplied and authorized by SAMSUNG under the SAMSUNG brand name are set forth in the applicable end user license agreement. This limited warranty covers manufacturing defects in materials and workmanship encountered in service problems; consumable items including filters and light bulbs. applications and uses for transportation of nature...
User Manual (ENGLISH)
Page 32
Samsung Electronics America, Inc. 105 Challenger Road Ridgefield Park, NJ 07660-0511 1-800-SAMSUNG(1-800-726-7864) www.samsung.com All right reserved. This manual maynot be reproduced in whole or in part in any questions or comments relating to Samsung products, please contact the SAMSUNG customer care center. If you have any form without written permission from the SAMSUNG ELECTRONICS Company
Samsung Electronics America, Inc. 105 Challenger Road Ridgefield Park, NJ 07660-0511 1-800-SAMSUNG(1-800-726-7864) www.samsung.com All right reserved. This manual maynot be reproduced in whole or in part in any questions or comments relating to Samsung products, please contact the SAMSUNG customer care center. If you have any form without written permission from the SAMSUNG ELECTRONICS Company


