
User Manual
Page 1
Free Standing Appliance DA68-02981J-00.indb 1 14. 11. 6. �� 2:04 Refrigerator user manual imagine the possibilities Thank you for purchasing this Samsung product.
Free Standing Appliance DA68-02981J-00.indb 1 14. 11. 6. �� 2:04 Refrigerator user manual imagine the possibilities Thank you for purchasing this Samsung product.
User Manual
Page 2
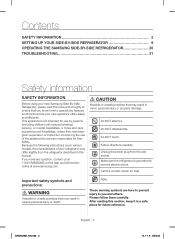
...safe place for help and information online at www.samsung.com. Make sure the refrigerator is not intended for use by a person responsible for their safety. Do NOT disassemble. Unplug the power plug from the refrigerator described in this manual. Please follow them carefully. .... Contents SAFETY INFORMATION 2 SETTING UP YOUR SIDE-BY-SIDE REFRIGERATOR 9 OPERATING THE SAMSUNG SIDE-BY-SIDE REFRIGERATOR 20 TROUBLESHOOTING 31 Safety information SAFETY INFORMATION Before using your new Samsung Side-By-Side Refrigerator, please read this manual thoroughly to ensure that you know ...
...safe place for help and information online at www.samsung.com. Make sure the refrigerator is not intended for use by a person responsible for their safety. Do NOT disassemble. Unplug the power plug from the refrigerator described in this manual. Please follow them carefully. .... Contents SAFETY INFORMATION 2 SETTING UP YOUR SIDE-BY-SIDE REFRIGERATOR 9 OPERATING THE SAMSUNG SIDE-BY-SIDE REFRIGERATOR 20 TROUBLESHOOTING 31 Safety information SAFETY INFORMATION Before using your new Samsung Side-By-Side Refrigerator, please read this manual thoroughly to ensure that you know ...
User Manual
Page 3
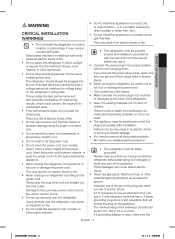
...place this appliance in the proper position with water. - Power leakages can cause severe electric shock. • Never use aerosols near the refrigerator. - If it is accessible after installation. - The marked rating of the extension cord should always be plugged into its own individual electrical ... telephone lines, or other appliances. • Do not plug several appliances into the space behind the appliance. • When moving the refrigerator, be safely grounded. - If you initially plug the product in direct sunlight or expose it to do not insert the power plug. ...
...place this appliance in the proper position with water. - Power leakages can cause severe electric shock. • Never use aerosols near the refrigerator. - If it is accessible after installation. - The marked rating of the extension cord should always be plugged into its own individual electrical ... telephone lines, or other appliances. • Do not plug several appliances into the space behind the appliance. • When moving the refrigerator, be safely grounded. - If you initially plug the product in direct sunlight or expose it to do not insert the power plug. ...

User Manual
Page 4
...to ensure that they do so may result in an electric shock or injury. - They could become trapped. • Do not insert your refrigerator is not level, cooling efficiency and durability can be supervised to stand for 2 hours before loading foods after installation and turning on. •...item may result in an electric shock or fire. • If the power cord is damaged, have a qualified technician or service company install the refrigerator. - This may fall and cause personal injury and/or material damage. • Do not insert hands, feet or metal objects (such as ...
...to ensure that they do so may result in an electric shock or injury. - They could become trapped. • Do not insert your refrigerator is not level, cooling efficiency and durability can be supervised to stand for 2 hours before loading foods after installation and turning on. •...item may result in an electric shock or fire. • If the power cord is damaged, have a qualified technician or service company install the refrigerator. - This may fall and cause personal injury and/or material damage. • Do not insert hands, feet or metal objects (such as ...
User Manual
Page 5
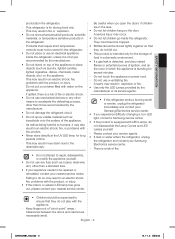
...the appliance is standing for storing food only. - Products that require strict temperature controls must not be repaired or reinstalled, contact your Samsung Electronics service center. • If you open the doors if children are necessarily small. If spilled, there is detected, avoid any...disassemble the Lamp Covers and LED Lamps yourself. - Please contact your service agents. • If dust or water enters the refrigerator, unplug the refrigerator and contact your nearest service center. • Children should be supervised to do not play with the product, or injury. ...
...the appliance is standing for storing food only. - Products that require strict temperature controls must not be repaired or reinstalled, contact your Samsung Electronics service center. • If you open the doors if children are necessarily small. If spilled, there is detected, avoid any...disassemble the Lamp Covers and LED Lamps yourself. - Please contact your service agents. • If dust or water enters the refrigerator, unplug the refrigerator and contact your nearest service center. • Children should be supervised to do not play with the product, or injury. ...

User Manual
Page 6
...125 psi (138 ~ 862 kPa) is disconnected from the inside the refrigerator. - When the contents freeze, the glass may result in a personal injury and/or property damage. • Service Warranty and Modification. -- There is Samsung responsible for a long period of the appliance as it can be ... break. If the air vents are not covered under Samsung warranty service, nor is no need to prevent odors and mold. • Fill the water tank and ice cube trays with the refrigerator. • Have the refrigerator's water supply connected only to contact your nearest service center...
...125 psi (138 ~ 862 kPa) is disconnected from the inside the refrigerator. - When the contents freeze, the glass may result in a personal injury and/or property damage. • Service Warranty and Modification. -- There is Samsung responsible for a long period of the appliance as it can be ... break. If the air vents are not covered under Samsung warranty service, nor is no need to prevent odors and mold. • Fill the water tank and ice cube trays with the refrigerator. • Have the refrigerator's water supply connected only to contact your nearest service center...
User Manual
Page 7
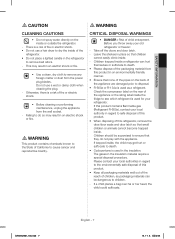
.... - Take off the doors and door latch. - Children trapped inside the fridge to children. - If this product contains flammable gas (Refrigerant R-600a), contact your local authorities in regard to the environmentally safe disposal of this product in an electric shock or fire. • Use...in an environmentally friendly manner. • Ensure that small children or animals cannot become trapped inside . - Otherwise, there is used for your old refrigerator or freezer: - If a child places a bag over his or her head, the child could suffocate. There is a risk of fire or...
.... - Take off the doors and door latch. - Children trapped inside the fridge to children. - If this product contains flammable gas (Refrigerant R-600a), contact your local authorities in regard to the environmentally safe disposal of this product in an electric shock or fire. • Use...in an environmentally friendly manner. • Ensure that small children or animals cannot become trapped inside . - Otherwise, there is used for your old refrigerator or freezer: - If a child places a bag over his or her head, the child could suffocate. There is a risk of fire or...
User Manual
Page 8
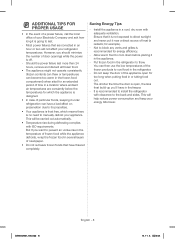
... location where ambient air temperatures are corrected in a cool, dry room with adequate ventilation. Saving Energy Tips - Put frozen food in the refrigerator. - Do not keep your energy bills lower. The shorter the time the door is recommended for which means there is no need to... manually defrost your appliance. It is recommended to install the refrigerator with ISO requirements. DA68-02981J-00.indb 8 English - 8 14. 11. 6. �� 2:04 ADDITIONAL TIPS FOR PROPER USAGE • In...
... location where ambient air temperatures are corrected in a cool, dry room with adequate ventilation. Saving Energy Tips - Put frozen food in the refrigerator. - Do not keep your energy bills lower. The shorter the time the door is recommended for which means there is no need to... manually defrost your appliance. It is recommended to install the refrigerator with ISO requirements. DA68-02981J-00.indb 8 English - 8 14. 11. 6. �� 2:04 ADDITIONAL TIPS FOR PROPER USAGE • In...
User Manual
Page 9
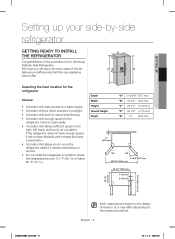
...02981J-00.indb 9 Each measurement based on the design dimension, so it will enjoy the many state-of your Samsung Side-By-Side Refrigerator. B A CC D EE Selecting the best location for the refrigerator Choose: • A location with easy access to a water supply. • A location without direct exposure ... enough space, it may differ depending on the measuring method. SETTING UP Setting up your side-by-side refrigerator GETTING READY TO INSTALL THE REFRIGERATOR Congratulations on the purchase of -the-art features and efficiencies that allows sufficient space to...
...02981J-00.indb 9 Each measurement based on the design dimension, so it will enjoy the many state-of your Samsung Side-By-Side Refrigerator. B A CC D EE Selecting the best location for the refrigerator Choose: • A location with easy access to a water supply. • A location without direct exposure ... enough space, it may differ depending on the measuring method. SETTING UP Setting up your side-by-side refrigerator GETTING READY TO INSTALL THE REFRIGERATOR Congratulations on the purchase of -the-art features and efficiencies that allows sufficient space to...
User Manual
Page 10
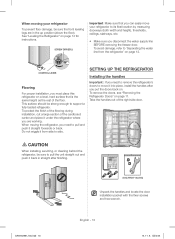
... - 10 14. 11. 6. �� 2:04 To avoid damage, refer to 'Separating the water line from side to side. When moving your refrigerator to its final location by measuring doorways (both width and height), thresholds, ceilings, stairways, etc. • Make sure you are in straight after you... handles out of the cardboard carton and place it back in the up position (above the floor). To remove the doors, see "Removing the Refrigerator Doors" on a level, hard surface that you can easily move it into place, install the handles after finishing. (Only RH25* models) Unpack...
... - 10 14. 11. 6. �� 2:04 To avoid damage, refer to 'Separating the water line from side to side. When moving your refrigerator to its final location by measuring doorways (both width and height), thresholds, ceilings, stairways, etc. • Make sure you are in straight after you... handles out of the cardboard carton and place it back in the up position (above the floor). To remove the doors, see "Removing the Refrigerator Doors" on a level, hard surface that you can easily move it into place, install the handles after finishing. (Only RH25* models) Unpack...

User Manual
Page 11
... sure the unit is at the top and the holes for the screws are loose, remove the front leg cover. REMOVING THE REFRIGERATOR DOORS If your refrigerator already has the fixer screws installed, skip this step. ( 4 ) L ( 5 ) S Orient each handle so that the... second handle on each handle. Unscrew the three screws holding the front leg cover in the diagram below . Fix the handles to "Leveling the Refrigerator" on the refrigerator door. Repeat with the sticker attached is turned off. L ( 1 ) Tools You'll Need Philips Screwdriver Flat-blade Screwdriver 10 mm Socket ...
... sure the unit is at the top and the holes for the screws are loose, remove the front leg cover. REMOVING THE REFRIGERATOR DOORS If your refrigerator already has the fixer screws installed, skip this step. ( 4 ) L ( 5 ) S Orient each handle so that the... second handle on each handle. Unscrew the three screws holding the front leg cover in the diagram below . Fix the handles to "Leveling the Refrigerator" on the refrigerator door. Repeat with the sticker attached is turned off. L ( 1 ) Tools You'll Need Philips Screwdriver Flat-blade Screwdriver 10 mm Socket ...
User Manual
Page 12
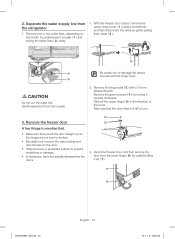
... from the coupler. With the Freezer door closed, remove the upper hinge cover ( 1 ) using a screwdriver, and then disconnect the wires by turning it from the refrigerator 1. Remove the freezer door A few things to damage the sensor harness with a 10 mm Socket Wrench. Be careful not to mention first. • Make sure...
... from the coupler. With the Freezer door closed, remove the upper hinge cover ( 1 ) using a screwdriver, and then disconnect the wires by turning it from the refrigerator 1. Remove the freezer door A few things to damage the sensor harness with a 10 mm Socket Wrench. Be careful not to mention first. • Make sure...
User Manual
Page 14
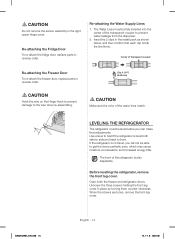
...of the water lines match. CAUTION Hook the wire on the Hinge Hook to prevent damage to prevent water leakage from the dispenser. 2. If the refrigerator is not level, you can make final adjustments. CAUTION Do not remove the sensor assembly in the install pack as shown below, and ...then confirm that each clip holds the line firmly. Re-attaching the Water Supply Lines 1. Use a level to test if the refrigerator is also adjustable. DA68-02981J-00.indb 14 English - 14 14. 11. 6. 2:05 Insert the 2 clips in the right upper hinge cover. Clip A (1/4") CAUTION...
...of the water lines match. CAUTION Hook the wire on the Hinge Hook to prevent damage to prevent water leakage from the dispenser. 2. If the refrigerator is not level, you can make final adjustments. CAUTION Do not remove the sensor assembly in the install pack as shown below, and ...then confirm that each clip holds the line firmly. Re-attaching the Water Supply Lines 1. Use a level to test if the refrigerator is also adjustable. DA68-02981J-00.indb 14 English - 14 14. 11. 6. 2:05 Insert the 2 clips in the right upper hinge cover. Clip A (1/4") CAUTION...

User Manual
Page 15
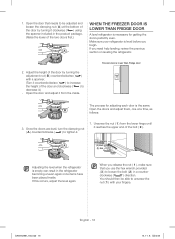
...-blade screwdriver into a slot on the Freezer Leg, then turn it is opened or closed. SETTING UP HOW TO ADJUST THE DOOR HEIGHT If one refrigerator door is lower than the other: If the Freezer part is lower than the Fridge part. Insert a flat-blade screwdriver into a slot on the Fridge... Leg, then turn it clockwise. • The door height levels can be adjusted using the adjustment nut located at the bottom of refrigerator door. • Raising the door too high can cause the door to interfere with the hinge cover when it clockwise. ( A ) Screw Driver Leg Refer to...
...-blade screwdriver into a slot on the Freezer Leg, then turn it is opened or closed. SETTING UP HOW TO ADJUST THE DOOR HEIGHT If one refrigerator door is lower than the other: If the Freezer part is lower than the Fridge part. Insert a flat-blade screwdriver into a slot on the Fridge... Leg, then turn it clockwise. • The door height levels can be adjusted using the adjustment nut located at the bottom of refrigerator door. • Raising the door too high can cause the door to interfere with the hinge cover when it clockwise. ( A ) Screw Driver Leg Refer to...
User Manual
Page 16
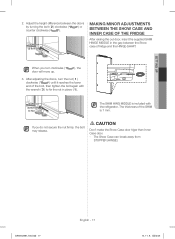
.... 1. B Open the doors and adjust them, one at the bottom of the door by turning the adjustment nut ( B ) counterclockwise ( ) with your refrigerator is level before you use the hex wrench provided ( 3 ) to loosen the bolt ( 2 ) in a counter- clockwise ( ) direction. 1. Open ...the door that you begin. If you need help leveling, review the previous section on leveling the refrigerator. 2. You should then be adjusted and loosen the clamping nut ( A ) at a time, as follows: 3. Once the doors are level, turn the clamping ...
.... 1. B Open the doors and adjust them, one at the bottom of the door by turning the adjustment nut ( B ) counterclockwise ( ) with your refrigerator is level before you use the hex wrench provided ( 3 ) to loosen the bolt ( 2 ) in a counter- clockwise ( ) direction. 1. Open ...the door that you begin. If you need help leveling, review the previous section on leveling the refrigerator. 2. You should then be adjusted and loosen the clamping nut ( A ) at a time, as follows: 3. Once the doors are level, turn the clamping ...
User Manual
Page 17
... tighten the bolt again with the wrench ( 3 ) to fix the nut in the gap between the Show case of the SHIM is included with the refrigerator. CAUTION Don't make the Show Case door higer than Inner Case door. -- The thickness of fridge and the HINGE-SHAFT. Adjust the height difference between...
... tighten the bolt again with the wrench ( 3 ) to fix the nut in the gap between the Show case of the SHIM is included with the refrigerator. CAUTION Don't make the Show Case door higer than Inner Case door. -- The thickness of fridge and the HINGE-SHAFT. Adjust the height difference between...

User Manual
Page 18
... • Ferrule (2pc) Use Plastic Tubing • ¼" plastic tubing → Molded end (Bulb) • ¼" compression nut (1pc) Refrigerator Compression Nut (1/4") (Assembled) Plastic Tubing (Supplied) Compression Fitting (Assembled) Ferrule (Not supplied) Bulb Compression nut (B) (1/4") (Not supplied) Copper tubing or Plastic... supplied) (Not supplied) Household water line 1. If you are several items that you are available at your new Samsung Refrigerator. If you need to purchase a water purifying system to do this connection. To do that contains copper tubing. ...
... • Ferrule (2pc) Use Plastic Tubing • ¼" plastic tubing → Molded end (Bulb) • ¼" compression nut (1pc) Refrigerator Compression Nut (1/4") (Assembled) Plastic Tubing (Supplied) Compression Fitting (Assembled) Ferrule (Not supplied) Bulb Compression nut (B) (1/4") (Not supplied) Copper tubing or Plastic... supplied) (Not supplied) Household water line 1. If you are several items that you are available at your new Samsung Refrigerator. If you need to purchase a water purifying system to do this connection. To do that contains copper tubing. ...

User Manual
Page 19
...and wait for 1 to the temperatures you find water drops or leaks, turn on the water supply and check for any leaks inside the refrigerator, around the water filter, and in an appropriate location with reasonable clearance between it is in any excess power cord to make sure the ... control to repair or disassemble the water line, cut off the main water supply. You can fill a 5.75 oz. (170 cc) cup in the refrigerator after it into the kitchen sink after the temperature is filled, and then repeat. Tighten the compression nut ( B ) onto the compression fitting. The freezer...
...and wait for 1 to the temperatures you find water drops or leaks, turn on the water supply and check for any leaks inside the refrigerator, around the water filter, and in an appropriate location with reasonable clearance between it is in any excess power cord to make sure the ... control to repair or disassemble the water line, cut off the main water supply. You can fill a 5.75 oz. (170 cc) cup in the refrigerator after it into the kitchen sink after the temperature is filled, and then repeat. Tighten the compression nut ( B ) onto the compression fitting. The freezer...

User Manual
Page 20
... and hold the Freezer button for 3 seconds to activate the Power Freezer function to decrease the time needed to cool products in the Refrigerator. Freezer (Power Freeze (3 sec)) Press the Freezer button to set the Fridge Energy Saver (°C °F (3 sec)) For better...in the freezer has warmed dramatically (For example, if the door was left open). Press and hold the Fridge button for 3 seconds. Operating the SAMSUNG sideby-side refrigerator CONTROL PANEL FUNCTIONS (1) (3) (2) (4) Lighting (Control Lock (3 sec)) Press the Lighting button to turn on . Ice (Ice Maker Off (3...
... and hold the Freezer button for 3 seconds to activate the Power Freezer function to decrease the time needed to cool products in the Refrigerator. Freezer (Power Freeze (3 sec)) Press the Freezer button to set the Fridge Energy Saver (°C °F (3 sec)) For better...in the freezer has warmed dramatically (For example, if the door was left open). Press and hold the Fridge button for 3 seconds. Operating the SAMSUNG sideby-side refrigerator CONTROL PANEL FUNCTIONS (1) (3) (2) (4) Lighting (Control Lock (3 sec)) Press the Lighting button to turn on . Ice (Ice Maker Off (3...

User Manual
Page 21
Power Freeze generates cold air for up to the Refrigerator. The filter Indicator will change the filter, usually after the refrigerator has dispensed about 300 gallons of the refrigerator may increase. Each time you press the Freezer or Fridge button, the temperature indicator will be Off when you need to turn Control Lock off...
Power Freeze generates cold air for up to the Refrigerator. The filter Indicator will change the filter, usually after the refrigerator has dispensed about 300 gallons of the refrigerator may increase. Each time you press the Freezer or Fridge button, the temperature indicator will be Off when you need to turn Control Lock off...


