User Manual
Page 2
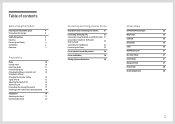
... Safety 5 Installation 6 Operation 7 Preparations Parts 1 0 Control Panel 1 0 Direct Key guide 1 1 Function Key Guide 1 2 Changing Brightness, Contrast and 14 Sharpness settings Changing the Volume setting 14 Types of Ports 1 5 Adjusting the Product Tilt 1 6 Anti-theft Lock 1 6 Precautions for moving the monitor 17 Installing a Wall-mount Kit or Desktop Stand 18 Installation 1 9 Attaching the Stand 1 9 Removing the Stand 2 0 Connecting and Using a Source Device Read below before installing the monitor. 21 Connecting and Using a PC 21 Connection Using the...
... Safety 5 Installation 6 Operation 7 Preparations Parts 1 0 Control Panel 1 0 Direct Key guide 1 1 Function Key Guide 1 2 Changing Brightness, Contrast and 14 Sharpness settings Changing the Volume setting 14 Types of Ports 1 5 Adjusting the Product Tilt 1 6 Anti-theft Lock 1 6 Precautions for moving the monitor 17 Installing a Wall-mount Kit or Desktop Stand 18 Installation 1 9 Attaching the Stand 1 9 Removing the Stand 2 0 Connecting and Using a Source Device Read below before installing the monitor. 21 Connecting and Using a PC 21 Connection Using the...
User Manual
Page 3
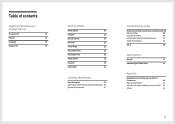
... 29 Language 29 Display Time 29 Setup and Reset Self Diagnosis 30 FreeSync 32 Eco Saving Plus 34 Off Timer 34 PC/AV Mode 35 Source Detection 35 Key Repeat Time 35 Power LED On 35 Reset All 35 Information 36 Installing the Software Easy Setting Box 37 Restrictions and Problems with the Installation 37 System Requirements 37 Troubleshooting Guide Requirements Before Contacting Samsung Customer Service Center 38 Testing...
... 29 Language 29 Display Time 29 Setup and Reset Self Diagnosis 30 FreeSync 32 Eco Saving Plus 34 Off Timer 34 PC/AV Mode 35 Source Detection 35 Key Repeat Time 35 Power LED On 35 Reset All 35 Information 36 Installing the Software Easy Setting Box 37 Restrictions and Problems with the Installation 37 System Requirements 37 Troubleshooting Guide Requirements Before Contacting Samsung Customer Service Center 38 Testing...

User Manual
Page 4
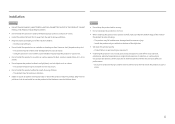
... space as shown below or greater when installing the product. ࣖ The exterior may cause ѣre and damage the product. Consult instructions for use: This symbol instructs the user to allow the amount of damaging the screen. Be sure to consult the user manual for ventilation. This symbol indicates that a safety connection to clean the inside . DC voltage...
... space as shown below or greater when installing the product. ࣖ The exterior may cause ѣre and damage the product. Consult instructions for use: This symbol instructs the user to allow the amount of damaging the screen. Be sure to consult the user manual for ventilation. This symbol indicates that a safety connection to clean the inside . DC voltage...

User Manual
Page 5
... Power off power to the product when an issue occurs. ࡙ Hold the plug when disconnecting the power cord from the product. ࣖ Hold the power cable by Samsung. Be careful not to leave the power cord under a heavy object. ࡙ Do not place the power cord or...use a damaged power cord or plug, or a loose power socket. ࡙ Do not use the power cord with your product by the plug and do not touch the cable with a dry cloth. ࡙ The socket-outlet shall be installed near heat sources. ࡙ Clean any dust around the pins of the power plug or the power socket with wet hands...
... Power off power to the product when an issue occurs. ࡙ Hold the plug when disconnecting the power cord from the product. ࣖ Hold the power cable by Samsung. Be careful not to leave the power cord under a heavy object. ࡙ Do not place the power cord or...use a damaged power cord or plug, or a loose power socket. ࡙ Do not use the power cord with your product by the plug and do not touch the cable with a dry cloth. ࡙ The socket-outlet shall be installed near heat sources. ࡙ Clean any dust around the pins of the power plug or the power socket with wet hands...
User Manual
Page 6
...Keep the plastic packaging out of the reach of children. ࣕ Children may suffocate. ࡙ Do not install the product on cabinets or shelves of the right size. ࡙ Set down the product on its front. ࡙ When installing the product on a cabinet or shelf, make...install the product in an unusual place (a place exposed to install the product at least 10 cm away from oil pollution. And do not install or use.... ࡙ Do not install the product within the reach of time) may seriously affect its performance. ࣕ Be sure to consult Samsung Customer Service Center if you want to...
...Keep the plastic packaging out of the reach of children. ࣕ Children may suffocate. ࡙ Do not install the product on cabinets or shelves of the right size. ࡙ Set down the product on its front. ࡙ When installing the product on a cabinet or shelf, make...install the product in an unusual place (a place exposed to install the product at least 10 cm away from oil pollution. And do not install or use.... ࡙ Do not install the product within the reach of time) may seriously affect its performance. ࣕ Be sure to consult Samsung Customer Service Center if you want to...

User Manual
Page 10
... (Power button): Off ࡙ Power saving mode: Blinking ࡙ Power Off (Power button): On ࣖ The power Indicator operation can be swapped by changing in the menu. (System २ Power LED On) Actual models because of functional variation maybe haven't this function. Chapter 02 Preparations Parts Control Panel ࣖ The color and shape of parts may vary depending on . Power LED JOG Button UP Function Key Guide Icons JOG Button Power LED Function Key Guide Description Multi directional button that helps...
... (Power button): Off ࡙ Power saving mode: Blinking ࡙ Power Off (Power button): On ࣖ The power Indicator operation can be swapped by changing in the menu. (System २ Power LED On) Actual models because of functional variation maybe haven't this function. Chapter 02 Preparations Parts Control Panel ࣖ The color and shape of parts may vary depending on . Power LED JOG Button UP Function Key Guide Icons JOG Button Power LED Function Key Guide Description Multi directional button that helps...

User Manual
Page 12
... applied. UP/DOWN/LEFT/RIGHT: Move to settings. PRESS(ENTER): The selected item will be adjusted. Selects by moving the JOG button in the function key guide screen. OSD control lock: Maintain the current settings, or lock the OSD control to prevent unintended changes to the item you want. System FreeSync, Power LED On is available. The items below are not...
... applied. UP/DOWN/LEFT/RIGHT: Move to settings. PRESS(ENTER): The selected item will be adjusted. Selects by moving the JOG button in the function key guide screen. OSD control lock: Maintain the current settings, or lock the OSD control to prevent unintended changes to the item you want. System FreeSync, Power LED On is available. The items below are not...
User Manual
Page 14
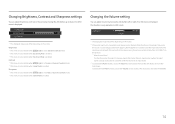
... displayed image may mute the sound or cause choppy audio when applying the headphones or speakers. Changing the Volume setting You can adjust Brightness, Contrast or Sharpness by moving the JOG button up or down . Set the input volume for the input device to move the focus down , if no OSD menu is displayed. To deactivate the Mute function, access the Volume control screen, then increase...
... displayed image may mute the sound or cause choppy audio when applying the headphones or speakers. Changing the Volume setting You can adjust Brightness, Contrast or Sharpness by moving the JOG button up or down . Set the input volume for the input device to move the focus down , if no OSD menu is displayed. To deactivate the Mute function, access the Volume control screen, then increase...
User Manual
Page 21
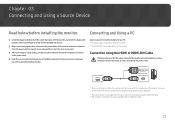
... Samsung, the image quality may not be degraded. If you use the cable that came with the monitor, and check the shapes and positions of the matching ports on the product. The audio function is not supported if the source device is connected using the installed monitor. Connecting parts may vary depending on the monitor and external devices. 2 Before connecting signal cables, disconnect the power cables...
... Samsung, the image quality may not be degraded. If you use the cable that came with the monitor, and check the shapes and positions of the matching ports on the product. The audio function is not supported if the source device is connected using the installed monitor. Connecting parts may vary depending on the monitor and external devices. 2 Before connecting signal cables, disconnect the power cables...

User Manual
Page 22
Connection Using the D-SUB Cable (Analog Type) Check to make sure that the power cables for the monitor and external devices, such as computers and set-top boxes, are not connected to Headphones Use headphones when activating sound with an HDMI-HDMI. D-SUB IN Connecting to the power outlet. The earphone jack supports only the 3 conductor tip-ring-sleeve (TRS) type. 22
Connection Using the D-SUB Cable (Analog Type) Check to make sure that the power cables for the monitor and external devices, such as computers and set-top boxes, are not connected to Headphones Use headphones when activating sound with an HDMI-HDMI. D-SUB IN Connecting to the power outlet. The earphone jack supports only the 3 conductor tip-ring-sleeve (TRS) type. 22
User Manual
Page 24
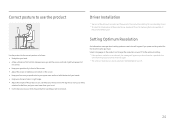
... times for a specified time even when the product is turned off and on your PC. 24 Select a language on the product and change the resolution on again. ࣖ The optimum resolution can keep your knees bent at http://www.samsung.com. An information message about a right angle. ࡙ Adjust the height of the product driver, download it from the Samsung...
... times for a specified time even when the product is turned off and on your PC. 24 Select a language on the product and change the resolution on again. ࣖ The optimum resolution can keep your knees bent at http://www.samsung.com. An information message about a right angle. ࡙ Adjust the height of the product driver, download it from the Samsung...
User Manual
Page 25
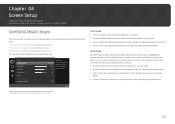
... the factory. This will be used. This menu is not available when Eco Saving Plus is enabled. Dynamic Contrast: Obtain balanced brightness through HDMI and PC/AV Mode is connected through automatic contrast adjustment. In AV mode When the external input is set to an optimum picture quality suitable for editing documents or using Internet. You can select Custom which...
... the factory. This will be used. This menu is not available when Eco Saving Plus is enabled. Dynamic Contrast: Obtain balanced brightness through HDMI and PC/AV Mode is connected through automatic contrast adjustment. In AV mode When the external input is set to an optimum picture quality suitable for editing documents or using Internet. You can select Custom which...

User Manual
Page 27
...of TÜV Rheinland "Low Blue Light Content" standards. Response Time Accelerate the panel response rate to make video appear more vivid and natural. ࣖ It is best to set Response Time to keep Game Mode enabled all the time, select Always On. Use this mode when there is only activated at a certain AV... console such as PlayStation™ or Xbox™ is connected. ࣖ This menu is not available when Eye Saver Mode is enabled. ࣖ When the monitor turns off, enters power-saving mode or changes input sources, Game Mode turns Off even if it was tested by TÜV Rheinland ...
...of TÜV Rheinland "Low Blue Light Content" standards. Response Time Accelerate the panel response rate to make video appear more vivid and natural. ࣖ It is best to set Response Time to keep Game Mode enabled all the time, select Always On. Use this mode when there is only activated at a certain AV... console such as PlayStation™ or Xbox™ is connected. ࣖ This menu is not available when Eye Saver Mode is enabled. ࣖ When the monitor turns off, enters power-saving mode or changes input sources, Game Mode turns Off even if it was tested by TÜV Rheinland ...

User Manual
Page 31
... No. Self Diagnosis Complete Contact the Samsung Call Center for assistance. Turn on the monitor and selecting System > Reset All. ‐ Replace the cable with the one enclosed with your monitor may not have the following information ready: ‐ Model Code S/N OK • You will see... the other connected device. ‐ Update the operating system and graphics card driver to the latest version and restart your PC. ‐ Connect the other connected device, such as a PC, to see the same problem on the test result, select Yes / No / Show Again. Please have a problem. 3 Base...
... No. Self Diagnosis Complete Contact the Samsung Call Center for assistance. Turn on the monitor and selecting System > Reset All. ‐ Replace the cable with the one enclosed with your monitor may not have the following information ready: ‐ Model Code S/N OK • You will see... the other connected device. ‐ Update the operating system and graphics card driver to the latest version and restart your PC. ‐ Connect the other connected device, such as a PC, to see the same problem on the test result, select Yes / No / Show Again. Please have a problem. 3 Base...

User Manual
Page 32
... AMD website to Off and change the frequency? If you are using the function, contact the Samsung Service Center. Set FreeSync to check your gaming experience. FreeSync FreeSync technology is unavailable in the devices (e.g. Apply the optimum resolution when using FreeSync. The sound quality of graphics card, the game option settings, or the video being played. The displayed FreeSync menu...
... AMD website to Off and change the frequency? If you are using the function, contact the Samsung Service Center. Set FreeSync to check your gaming experience. FreeSync FreeSync technology is unavailable in the devices (e.g. Apply the optimum resolution when using FreeSync. The sound quality of graphics card, the game option settings, or the video being played. The displayed FreeSync menu...
User Manual
Page 35
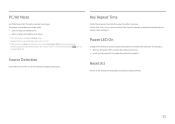
... pressed. Set to PC when connected to recognize input signal. Key Repeat Time Control the response rate of the product. Working: The power LED is on when the product is turned on when the product is on . Supplied for the product to the default factory settings. 35 You can be enlarged. If No Repeat is selected, a command responds only once when a button is...
... pressed. Set to PC when connected to recognize input signal. Key Repeat Time Control the response rate of the product. Working: The power LED is on when the product is turned on when the product is on . Supplied for the product to the default factory settings. 35 You can be enlarged. If No Repeat is selected, a command responds only once when a button is...
User Manual
Page 38
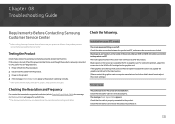
... problem persists, contact Samsung Customer Service Center. Testing the Product Check if your product as follows. Installation issue (PC mode) The screen keeps switching on . 38 If the screen remains blank, check the PC system, video controller and cable. To resolve the problem, adjust the screen size in the HDMI or DVI settings for a short time. The message Check Signal Cable appears. Check that exceeds the supported...
... problem persists, contact Samsung Customer Service Center. Testing the Product Check if your product as follows. Installation issue (PC mode) The screen keeps switching on . 38 If the screen remains blank, check the PC system, video controller and cable. To resolve the problem, adjust the screen size in the HDMI or DVI settings for a short time. The message Check Signal Cable appears. Check that exceeds the supported...

User Manual
Page 39
... low. The volume is blurry. Connect the device using a Windows OS (e.g. The screen is choppy. There are shadows or ghost images left on the screen have your PC sound card or software program. Next, if required, change Turn on the screen and the power LED blinks every 0.5 to Standard Signal Mode Table (P.42 ) in power-saving mode. Windows 7, Windows 8, Windows 8.1 or Windows 10): Go to Control Panel Fonts Adjust ClearType text and change...
... low. The volume is blurry. Connect the device using a Windows OS (e.g. The screen is choppy. There are shadows or ghost images left on the screen have your PC sound card or software program. Next, if required, change Turn on the screen and the power LED blinks every 0.5 to Standard Signal Mode Table (P.42 ) in power-saving mode. Windows 7, Windows 8, Windows 8.1 or Windows 10): Go to Control Panel Fonts Adjust ClearType text and change...

User Manual
Page 40
... I change the frequency? Windows 10: Set power-saving mode in Settings Personalization Lock screen Screen timeout settings Power & sleep or BIOS SETUP on your PC or graphics card for further instructions on adjustment. Set the frequency on the PC. 40 Windows 7: Go to Settings Control Panel Appearance and Personalization Display Adjust Resolution, and adjust the resolution. Windows 7: Go to Settings System Display Advanced display settings Display adapter properties Monitor, and adjust Screen...
... I change the frequency? Windows 10: Set power-saving mode in Settings Personalization Lock screen Screen timeout settings Power & sleep or BIOS SETUP on your PC or graphics card for further instructions on adjustment. Set the frequency on the PC. 40 Windows 7: Go to Settings Control Panel Appearance and Personalization Display Adjust Resolution, and adjust the resolution. Windows 7: Go to Settings System Display Advanced display settings Display adapter properties Monitor, and adjust Screen...

User Manual
Page 46
..., service fee may charge you for a visit from a person besides an engineer of outsourcing service company or partner of another company's Program. Others If product fails by customer's mishandling or wrong repair If a product damage is reinstalled or devices are all used up. (Battery, Toner, Fluorescent lights, Head, Vibrator, Lamp, Filter, Ribbon, etc.) If customer requests a service in User Manual. If customer requests software installation and setup for...
..., service fee may charge you for a visit from a person besides an engineer of outsourcing service company or partner of another company's Program. Others If product fails by customer's mishandling or wrong repair If a product damage is reinstalled or devices are all used up. (Battery, Toner, Fluorescent lights, Head, Vibrator, Lamp, Filter, Ribbon, etc.) If customer requests a service in User Manual. If customer requests software installation and setup for...


