User Manual (user Manual) (ver.1.0) (English)
Page 34
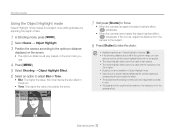
... distinguishable by adjusting the depth of field. 1 In Shooting mode, press [ ]. 2 Select Scene → Object Highlight. 3 Position the camera according to the optimum distance displayed on the screen. • The optimum distance will vary, based on the zoom ratio you can apply the object highlight effect, ( ) will appear. • When the camera...
... distinguishable by adjusting the depth of field. 1 In Shooting mode, press [ ]. 2 Select Scene → Object Highlight. 3 Position the camera according to the optimum distance displayed on the screen. • The optimum distance will vary, based on the zoom ratio you can apply the object highlight effect, ( ) will appear. • When the camera...
User Manual (user Manual) (ver.1.0) (English)
Page 42
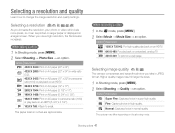
...1/2"). 1920 X 1080: Print on A5 paper in panorama ratio (16:9) or play back on a standard, analog TV. 320 X 240: To post on a larger screen. Fine: Capture photos in larger file sizes. 1 In Shooting mode, press [ ]. 2 Select Shooting → Quality → an option. The options may differ ...the photos you increase the resolution, your photo or video will include more pixels, so it can be printed on larger paper or displayed on a web page. Normal: Capture photos in inches are approximate. Option Description Super Fine: Capture photos in JPEG format. Selecting...
...1/2"). 1920 X 1080: Print on A5 paper in panorama ratio (16:9) or play back on a standard, analog TV. 320 X 240: To post on a larger screen. Fine: Capture photos in larger file sizes. 1 In Shooting mode, press [ ]. 2 Select Shooting → Quality → an option. The options may differ ...the photos you increase the resolution, your photo or video will include more pixels, so it can be printed on larger paper or displayed on a web page. Normal: Capture photos in inches are approximate. Option Description Super Fine: Capture photos in JPEG format. Selecting...
User Manual (user Manual) (ver.1.0) (English)
Page 51
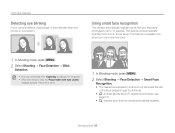
... nearest face appears in a white focus frame and the rest of the faces appear in succession. This feature will automatically prioritize the focus on the screen. • When blink detection fails, the "Picture taken with eyes closed eyes, it automatically takes two photos in gray focus frames. • ... → Blink Detection. • Hold your camera detects closed ." Using face detection Detecting eye blinking If your camera still while "Capturing" is displayed on those faces. message appears. This feature is available only when you frequently photograph (up to 10 people).
... nearest face appears in a white focus frame and the rest of the faces appear in succession. This feature will automatically prioritize the focus on the screen. • When blink detection fails, the "Picture taken with eyes closed eyes, it automatically takes two photos in gray focus frames. • ... → Blink Detection. • Hold your camera detects closed ." Using face detection Detecting eye blinking If your camera still while "Capturing" is displayed on those faces. message appears. This feature is available only when you frequently photograph (up to 10 people).

User Manual (user Manual) (ver.1.0) (English)
Page 63
... mode View photos or play videos and voice memos stored in your memory card. • The camera will turn on the screen, press [ ]. File name To display file information on and display the most recent file. 2 Press [ ] or [ ] to scroll through files. • Press and hold to scroll through ...files quickly. • If you use a memory card Folder name - Display in the internal memory, remove your camera. 1 Press [ ]. • The most recent file will be displayed. • If the camera is off, it will not properly play back photos, videos, or voice ...
... mode View photos or play videos and voice memos stored in your memory card. • The camera will turn on the screen, press [ ]. File name To display file information on and display the most recent file. 2 Press [ ] or [ ] to scroll through files. • Press and hold to scroll through ...files quickly. • If you use a memory card Folder name - Display in the internal memory, remove your camera. 1 Press [ ]. • The most recent file will be displayed. • If the camera is off, it will not properly play back photos, videos, or voice ...

User Manual (user Manual) (ver.1.0) (English)
Page 85
... AF Sound Off Low Medium High Back 4 Press [ Set ] to return to configure your settings. Settings 84 Shooting Sound Display Settings Volume Start Sound Shutter Sound Beep Sound AF Sound Exit Change Menu Description Sound: Set various camera sounds and the volume. (p. 85...) Display: Customize the display settings, such as start image and brightness. (p. 85) Settings: Change the settings for the camera system, such as memory format, default...
... AF Sound Off Low Medium High Back 4 Press [ Set ] to return to configure your settings. Settings 84 Shooting Sound Display Settings Volume Start Sound Shutter Sound Beep Sound AF Sound Exit Change Menu Description Sound: Set various camera sounds and the volume. (p. 85...) Display: Customize the display settings, such as start image and brightness. (p. 85) Settings: Change the settings for the camera system, such as memory format, default...

User Manual (user Manual) (ver.1.0) (English)
Page 86
... Set the duration for reviewing a captured image before returning to display when the camera turns on. • Off*: Display no start image. • Logo: Display a default image stored in the internal memory. • User Image: Display the image you want. (p. 70) • Only one user..., 1*, 2, 3) Select the sound the camera emits when you half-press the shutter button. (Off, On*) Display Item Function Description Start Image * Default Description Display a brief description of the screen. (Auto*, Dark, Normal, Bright) Normal is fixed in the memory. • If you have selected Auto....
... Set the duration for reviewing a captured image before returning to display when the camera turns on. • Off*: Display no start image. • Logo: Display a default image stored in the internal memory. • User Image: Display the image you want. (p. 70) • Only one user..., 1*, 2, 3) Select the sound the camera emits when you half-press the shutter button. (Off, On*) Display Item Function Description Start Image * Default Description Display a brief description of the screen. (Auto*, Dark, Normal, Bright) Normal is fixed in the memory. • If you have selected Auto....
User Manual (user Manual) (ver.1.0) (English)
Page 101
.... (p. 91) • Make sure that your camera at low temperatures, it can create The colors in the display settings menu. (p. 86) Remove the battery and insert it again. For better performance of your camera screen, use your photos • Make sure that the camera is correctly connected to the TV with the...
.... (p. 91) • Make sure that your camera at low temperatures, it can create The colors in the display settings menu. (p. 86) Remove the battery and insert it again. For better performance of your camera screen, use your photos • Make sure that the camera is correctly connected to the TV with the...


