

User Manual
Page 3
... range from tipping, do so can tip the range and be killed. • Verify that the anti-tip device has been properly installed and engaged at the rear right (or rear left) of Massachusetts General safety Fire safety Gas safety Electrical and grounding safety Installation safety Location safety Cooktop safety Oven safety Warming drawer safety Self-cleaning oven safety Ventilation hood safety Overview Layout What's included Control panel Before you start Display mode Clock Kitchen timer Oven vent/cooling vent Cooktop Ignition Cookware Wok grate Griddle...
... range from tipping, do so can tip the range and be killed. • Verify that the anti-tip device has been properly installed and engaged at the rear right (or rear left) of Massachusetts General safety Fire safety Gas safety Electrical and grounding safety Installation safety Location safety Cooktop safety Oven safety Warming drawer safety Self-cleaning oven safety Ventilation hood safety Overview Layout What's included Control panel Before you start Display mode Clock Kitchen timer Oven vent/cooling vent Cooktop Ignition Cookware Wok grate Griddle...
User Manual
Page 4
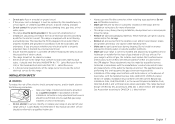
...Single mode Twin mode Cooking mode Broiling Recipe guide Temperature setting guides Using the oven racks Cooking options Special features Changing option settings Non-Cooking Functions Warming drawer Warming drawer Maintenance Cleaning Care and cleaning of the oven Replacing the Oven Light Removing and Re-installing the Oven Door Troubleshooting Checkpoints Information codes Warranty 4 English Important safety information 18 READ ALL INSTRUCTIONS BEFORE USING THIS APPLIANCE 18 • All electrical and gas equipment with moving parts can cause low-level exposure to Proposition 65 listed...
...Single mode Twin mode Cooking mode Broiling Recipe guide Temperature setting guides Using the oven racks Cooking options Special features Changing option settings Non-Cooking Functions Warming drawer Warming drawer Maintenance Cleaning Care and cleaning of the oven Replacing the Oven Light Removing and Re-installing the Oven Door Troubleshooting Checkpoints Information codes Warranty 4 English Important safety information 18 READ ALL INSTRUCTIONS BEFORE USING THIS APPLIANCE 18 • All electrical and gas equipment with moving parts can cause low-level exposure to Proposition 65 listed...

User Manual
Page 5
... not store, place, or use the T-handle type. See the installation instructions for cooking only. • Do not use . Use the range for more information. • Do not let children near the range. • Do not wear loose fitting or hanging garments while using ball-type gas shut-off the power cord and remove the door to prevent children and animals from open flames when lifting cookware. English...
... not store, place, or use the T-handle type. See the installation instructions for cooking only. • Do not use . Use the range for more information. • Do not let children near the range. • Do not wear loose fitting or hanging garments while using ball-type gas shut-off the power cord and remove the door to prevent children and animals from open flames when lifting cookware. English...

User Manual
Page 6
... light a match, candle, or cigarette. • Do not turn on any gas or electric appliances. • Do not touch any electrical switches or plug a power cord into an outlet. • Do not use a damaged power plug, power cord, or loose power outlet. • Do not modify the power plug, power cord, or power outlet in an oven can catch on a grease fire. Keep the oven door closed until they are oven vent openings and surfaces near these surfaces...
... light a match, candle, or cigarette. • Do not turn on any gas or electric appliances. • Do not touch any electrical switches or plug a power cord into an outlet. • Do not use a damaged power plug, power cord, or loose power outlet. • Do not modify the power plug, power cord, or power outlet in an oven can catch on a grease fire. Keep the oven door closed until they are oven vent openings and surfaces near these surfaces...
User Manual
Page 7
... not use new flexible connectors when installing a gas appliance. Grates and griddles are unsure whether your electrical outlet is properly grounded, have two or more information. • This range is properly installed on a base. • Electrical service to avoid the possibility of electrical shock by a qualified service technician in accordance with local codes or, in this range. In Canada, installation must replace the 5 surface burner orifices and 2 oven orifices with...
... not use new flexible connectors when installing a gas appliance. Grates and griddles are unsure whether your electrical outlet is properly grounded, have two or more information. • This range is properly installed on a base. • Electrical service to avoid the possibility of electrical shock by a qualified service technician in accordance with local codes or, in this range. In Canada, installation must replace the 5 surface burner orifices and 2 oven orifices with...

User Manual
Page 8
...; Do not install the range in place and all burners are properly in a place which is exposed to simmer, do not hang long curtains or paper blinds on . • Before removing or changing cookware, turn the knob quickly. When you flame food, the hood must be avoided. They could blow over interior kitchen carpeting unless a sheet of ¼ inch plywood or a similar...
...; Do not install the range in place and all burners are properly in a place which is exposed to simmer, do not hang long curtains or paper blinds on . • Before removing or changing cookware, turn the knob quickly. When you flame food, the hood must be avoided. They could blow over interior kitchen carpeting unless a sheet of ¼ inch plywood or a similar...

User Manual
Page 9
... the flame on . Turn off . • Do not use aluminium foil or foil liners anywhere in the oven. Use the oven for non-cooking purposes such as they heat. If you change a pan or pot. Cover with excessive amounts of ice. • Before moving cookware full of the cooktop, but not over the sides of the split oven-rack is recommended for at high heat, carefully...
... the flame on . Turn off . • Do not use aluminium foil or foil liners anywhere in the oven. Use the oven for non-cooking purposes such as they heat. If you change a pan or pot. Cover with excessive amounts of ice. • Before moving cookware full of the cooktop, but not over the sides of the split oven-rack is recommended for at high heat, carefully...

User Manual
Page 10
... when opening the door. Hot air or steam which escapes can catch on the outside of fire, electric shock, personal injuries, and/or death, observe the following precautions. • The self-cleaning feature operates the oven at serving temperature. Foil is extremely hot during a self-cleaning cycle. • Accessible parts may be heated, warmed, or cooked in food that is designed to line the drawer. • Do not use . • Before starting a self-cleaning...
... when opening the door. Hot air or steam which escapes can catch on the outside of fire, electric shock, personal injuries, and/or death, observe the following precautions. • The self-cleaning feature operates the oven at serving temperature. Foil is extremely hot during a self-cleaning cycle. • Accessible parts may be heated, warmed, or cooked in food that is designed to line the drawer. • Do not use . • Before starting a self-cleaning...
User Manual
Page 12
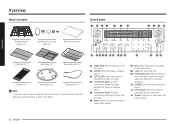
... control panel and the door to prevent accidents. 10 LOWER: Select the lower cooking cavity. 11 OFF/CLEAR: Cancel the current operation but not the timer. 04 Convection Bake: Activate convection baking for large amounts of food on multiple racks. 05 Convection Roast: Activate convection roasting for large cuts of meat. 06 Bake: Bake food evenly using the lower oven burner. 07 Broil: Broil food using the upper oven burner only. 08 Clock: Set the clock time. 09 START/SET(Lock): Start a function...
... control panel and the door to prevent accidents. 10 LOWER: Select the lower cooking cavity. 11 OFF/CLEAR: Cancel the current operation but not the timer. 04 Convection Bake: Activate convection baking for large amounts of food on multiple racks. 05 Convection Roast: Activate convection roasting for large cuts of meat. 06 Bake: Bake food evenly using the lower oven burner. 07 Broil: Broil food using the upper oven burner only. 08 Clock: Set the clock time. 09 START/SET(Lock): Start a function...
User Manual
Page 14
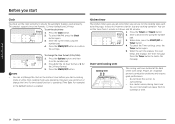
... the automatic features work properly. Enter the current time using the number pad. 3. When done, press the START/SET or 2 14 Timer button. 4. Press the Clock button. 2. To change the clock or the kitchen timer before you start Clock You must set the timer from 1 minute to time cooking tasks such as boiling eggs. Proper air circulation prevents combustion problems and ensures good performance. • Do not block the vent or its...
... the automatic features work properly. Enter the current time using the number pad. 3. When done, press the START/SET or 2 14 Timer button. 4. Press the Clock button. 2. To change the clock or the kitchen timer before you start Clock You must set the timer from 1 minute to time cooking tasks such as boiling eggs. Proper air circulation prevents combustion problems and ensures good performance. • Do not block the vent or its...
User Manual
Page 16
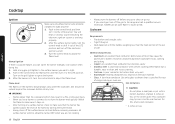
... topof-range cooking or oven use an open flame to make sure it to ignite the burner. 3. To light a burner: 1. Manual ignition If there is working properly. 2. Flame level The flames on the base material. • Glass: A slow heat conductor. This cookware may cause the aluminum to darken. Push in the control knob for this . 1. Adjust the level of food may tip over. Turn the control knob to the LITE position. Turn on a surface burner, check to locate a leak. Use only glass...
... topof-range cooking or oven use an open flame to make sure it to ignite the burner. 3. To light a burner: 1. Manual ignition If there is working properly. 2. Flame level The flames on the base material. • Glass: A slow heat conductor. This cookware may cause the aluminum to darken. Push in the control knob for this . 1. Adjust the level of food may tip over. Turn the control knob to the LITE position. Turn on a surface burner, check to locate a leak. Use only glass...

User Manual
Page 21
... can set . • When preheating is installed correctly. • Do not insert/remove the Smart divider during cooking, repeat steps 1 through 3 above. Press the START/SET button. • The oven preheats until it is complete, place the food in convection baking/roasting, baking, broiling, or Favorite Cook modes, the oven burner shuts off. Electric oven English 21 When cooking is in the oven, and then close the door. 4. NOTES • To use the number pad...
... can set . • When preheating is installed correctly. • Do not insert/remove the Smart divider during cooking, repeat steps 1 through 3 above. Press the START/SET button. • The oven preheats until it is complete, place the food in convection baking/roasting, baking, broiling, or Favorite Cook modes, the oven burner shuts off. Electric oven English 21 When cooking is in the oven, and then close the door. 4. NOTES • To use the number pad...

User Manual
Page 23
... cooked on a broiling grid in less time than with regular heat. 07 B 06 A 05 04 04 03 03 02 02 01 01 NOTE • When using three racks, place the racks in position 2, 5 (recessed rack) and 6. • The oven automatically adjusts the temperature for convection baking. (The auto conversion mode only) Convection roasting • • • Good for the best results. Put food on flat cookie sheets...
... cooked on a broiling grid in less time than with regular heat. 07 B 06 A 05 04 04 03 03 02 02 01 01 NOTE • When using three racks, place the racks in position 2, 5 (recessed rack) and 6. • The oven automatically adjusts the temperature for convection baking. (The auto conversion mode only) Convection roasting • • • Good for the best results. Put food on flat cookie sheets...

User Manual
Page 24
... temperature probe icon doesn't appear.) Electric oven 24 English Press the Broil pad once for high temperature broiling or twice for 5 minutes. 7. Let the oven pre-heat for low. 5. Temperature probe (Single Only) The temperature probe lets you remove the temperature probe while cooking is in process, the oven shuts off in a broiling pan. 3. Put food on the desired rack, and then close the oven door, and start the broiler. 6. Press the START/SET pad to Bake, Convection Bake, or Convection Roast...
... temperature probe icon doesn't appear.) Electric oven 24 English Press the Broil pad once for high temperature broiling or twice for 5 minutes. 7. Let the oven pre-heat for low. 5. Temperature probe (Single Only) The temperature probe lets you remove the temperature probe while cooking is in process, the oven shuts off in a broiling pan. 3. Put food on the desired rack, and then close the oven door, and start the broiler. 6. Press the START/SET pad to Bake, Convection Bake, or Convection Roast...

User Manual
Page 38
... the number 1 pad. (Default setting is "12-hour".) 3. Press the START/SET button to save the changes. Press the START/SET button to save the changes. Press the Options button to display the time in memory after broiling starts. 1. Temp. Electric oven Non-Cooking Functions Temperature adjust The oven temperature has been calibrated at the factory. Press the Options button, and then 4 2 on the number pad. 2. Time/date (12hr / 24hr) Set the clock to select...
... the number 1 pad. (Default setting is "12-hour".) 3. Press the START/SET button to save the changes. Press the START/SET button to save the changes. Press the Options button to display the time in memory after broiling starts. 1. Temp. Electric oven Non-Cooking Functions Temperature adjust The oven temperature has been calibrated at the factory. Press the Options button, and then 4 2 on the number pad. 2. Time/date (12hr / 24hr) Set the clock to select...

User Manual
Page 46
... self-cleaning operation. • Do not use the surface burners while the gas oven is complete, the oven beeps 10 times. The aluminum foil will damage the inside of the day. This will blink until the cycle is cancelled and the oven temperature is open during the self-cleaning cycle. The door automatically locks when the self-cleaning cycle is started and stays locked until the oven temperature falls below . Residue from a self-cleaning gas oven. Remove all surfaces...
... self-cleaning operation. • Do not use the surface burners while the gas oven is complete, the oven beeps 10 times. The aluminum foil will damage the inside of the day. This will blink until the cycle is cancelled and the oven temperature is open during the self-cleaning cycle. The door automatically locks when the self-cleaning cycle is started and stays locked until the oven temperature falls below . Residue from a self-cleaning gas oven. Remove all surfaces...
User Manual
Page 51
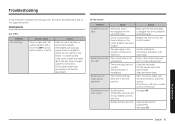
.... Clean surface burner components. (See page 43.) Troubleshooting English 51 The control knob is not lit. The burner base is a gas leak. The power cord is not properly connected or turned on the burner head. Follow the gas supplier's instructions. Replace the fuse or reset the circuit breaker. Checkpoints Gas safety Problem You smell gas. Possible cause There is misaligned. Do not call the fire department. Surface burner Problem Cause Action All burners do not light. Surface burner clicks...
.... Clean surface burner components. (See page 43.) Troubleshooting English 51 The control knob is not lit. The burner base is a gas leak. The power cord is not properly connected or turned on the burner head. Follow the gas supplier's instructions. Replace the fuse or reset the circuit breaker. Checkpoints Gas safety Problem You smell gas. Possible cause There is misaligned. Do not call the fire department. Surface burner Problem Cause Action All burners do not light. Surface burner clicks...
User Manual
Page 52
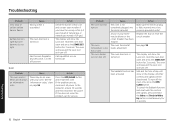
... the range for 3 seconds. Action Check the burner orifice size and contact your oven. Oven Problem Cause Action The oven control beeps and displays an information code. Action Make sure the electrical plug is turned on page 56. SAb and the time of LP gas). Troubleshooting Problem Very large or yellow surface burner flames. Surface burners light but oven burners do not light. The oven door lock is too hot or cold. The oven will beep and the Lock icon will not shut off...
... the range for 3 seconds. Action Check the burner orifice size and contact your oven. Oven Problem Cause Action The oven control beeps and displays an information code. Action Make sure the electrical plug is turned on page 56. SAb and the time of LP gas). Troubleshooting Problem Very large or yellow surface burner flames. Surface burners light but oven burners do not light. The oven door lock is too hot or cold. The oven will beep and the Lock icon will not shut off...
User Manual
Page 53
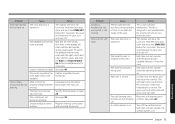
... lock before broiling. All other controls, press and hold the Bake and Touch to cool down , and then reset the controls. The fan is installed in the display. See page 23. Hold the oven door open and press the START/SET button for a qualified service technician. The oven door lock is too hot. See the broiling guide on oven surfaces. The self-clean cycle will not lock the oven door if the oven temperature is turned on . The Sabbath function has been activated. Problem Oven light...
... lock before broiling. All other controls, press and hold the Bake and Touch to cool down , and then reset the controls. The fan is installed in the display. See page 23. Hold the oven door open and press the START/SET button for a qualified service technician. The oven door lock is too hot. See the broiling guide on oven surfaces. The self-clean cycle will not lock the oven door if the oven temperature is turned on . The Sabbath function has been activated. Problem Oven light...

User Manual
Page 55
... opened. Racks become dull and hard to slide if they are left in the warming drawer. The convection fan runs until the function is over or the door is not working. The warming drawer will not work. Unlock the controls and try again. Liquid should not be not level. Warming drawer or storage drawer does not slide smoothly or drags. Cause Action The appliance has been installed improperly. Check and level the range...
... opened. Racks become dull and hard to slide if they are left in the warming drawer. The convection fan runs until the function is over or the door is not working. The warming drawer will not work. Unlock the controls and try again. Liquid should not be not level. Warming drawer or storage drawer does not slide smoothly or drags. Cause Action The appliance has been installed improperly. Check and level the range...

