
User Manual
Page 5
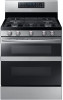
...'s included Dual Door™ Control panel Clock Kitchen timer Oven vent/Cooling vent Gas range Cookware Gas burners Ignition Adjusting low flame settings on cooktop burners Gas oven Single mode Twin mode Cooking mode Broiling Recipe guide Temperature setting guides Using the oven racks Cooking options Slow cook, dehydrate, proofing Non-cooking functions Smart Control - Controlling your oven remotely NX7000K_VE_NX58M6850SS_AA_DG68-00909A-04_EN+MES+CFR.indb 5 6 Maintenance Cleaning 13 Replacing the Oven Light 13 Oven Door: Remove and Re-Install 13 Storage drawer 14 Troubleshooting 15...
...'s included Dual Door™ Control panel Clock Kitchen timer Oven vent/Cooling vent Gas range Cookware Gas burners Ignition Adjusting low flame settings on cooktop burners Gas oven Single mode Twin mode Cooking mode Broiling Recipe guide Temperature setting guides Using the oven racks Cooking options Slow cook, dehydrate, proofing Non-cooking functions Smart Control - Controlling your oven remotely NX7000K_VE_NX58M6850SS_AA_DG68-00909A-04_EN+MES+CFR.indb 5 6 Maintenance Cleaning 13 Replacing the Oven Light 13 Oven Door: Remove and Re-Install 13 Storage drawer 14 Troubleshooting 15...

User Manual
Page 9
... gas conversion responsibility. • Installation of this manual. The vents allow the necessary exhaust for the range to service, modify, or replace your range or any part of your range unless it is specifically recommended in this range must conform with local codes or, in accordance with the provided LP orifice set, and reverse the GPR adapter. Do not use old flexible connectors. • Make sure the anti-tip...
... gas conversion responsibility. • Installation of this manual. The vents allow the necessary exhaust for the range to service, modify, or replace your range or any part of your range unless it is specifically recommended in this range must conform with local codes or, in accordance with the provided LP orifice set, and reverse the GPR adapter. Do not use old flexible connectors. • Make sure the anti-tip...

User Manual
Page 10
.... Adjust the burner flames so that the flames do not extend beyond the bottom of the cabinets. • Locate the range out of the cabinets or install a range hood that window. If cabinet storage above the surface of the range should be on the dual burner spreader is placed beside the electrode when it is substantially larger than cookware on medium or high heat settings...
.... Adjust the burner flames so that the flames do not extend beyond the bottom of the cabinets. • Locate the range out of the cabinets or install a range hood that window. If cabinet storage above the surface of the range should be on the dual burner spreader is placed beside the electrode when it is substantially larger than cookware on medium or high heat settings...

User Manual
Page 11
... the cooktop. Trim excess fat from grease buildup. • When repositioning the oven racks, make sure the oven is completely cool. • Only use cookware that the temperature in the oven bottom or to cover an oven rack. Aluminum foil linings may also trap heat, causing a fire hazard. • Stand away from the oven when opening the oven door. • Keep the oven free from meat before you have turned...
... the cooktop. Trim excess fat from grease buildup. • When repositioning the oven racks, make sure the oven is completely cool. • Only use cookware that the temperature in the oven bottom or to cover an oven rack. Aluminum foil linings may also trap heat, causing a fire hazard. • Stand away from the oven when opening the oven door. • Keep the oven free from meat before you have turned...

User Manual
Page 15
...: Activate convection roasting. 04 Broil: Broil food using the upper oven burner only. 05 Bake: Activate convection baking for the Lower Oven in Twin mode or the entire oven in Single mode. 06 Bake: Bake food using the lower oven burner. 07 START/SET: Start a function or set the time. • (3sec): Press and hold for 3 seconds to lock the control panel and the door to prevent accidents. 08 OFF/CLEAR: Cancel the current operation but not the timer. 09...
...: Activate convection roasting. 04 Broil: Broil food using the upper oven burner only. 05 Bake: Activate convection baking for the Lower Oven in Twin mode or the entire oven in Single mode. 06 Bake: Bake food using the lower oven burner. 07 START/SET: Start a function or set the time. • (3sec): Press and hold for 3 seconds to lock the control panel and the door to prevent accidents. 08 OFF/CLEAR: Cancel the current operation but not the timer. 09...

User Manual
Page 23
... spatters. • Heated air circulates over 2 inches (50 mm) in the lower cavity of the oven, and then close the door. 5. If you use the number pad to 480 °F. 4. NOTE Your oven has different temperature setting ranges when you do not, the food may be burnt by the broil burner while the upper oven is complete, press the OFF/CLEAR pad. Convection baking Convection roasting •...
... spatters. • Heated air circulates over 2 inches (50 mm) in the lower cavity of the oven, and then close the door. 5. If you use the number pad to 480 °F. 4. NOTE Your oven has different temperature setting ranges when you do not, the food may be burnt by the broil burner while the upper oven is complete, press the OFF/CLEAR pad. Convection baking Convection roasting •...

User Manual
Page 36
... range door is connected to turn the oven off. Gas oven Press and hold the START/SET pad for 3 seconds to prevent accidental operations and/or product tipping. Oven lock Lock the control panel and the door to lock or unlock both the control panel and the door. Follow the app's on your oven remotely How to monitor the oven and cooktop status and turn the oven light on your range. 3. When the app is locked and cannot be controlled remotely using...
... range door is connected to turn the oven off. Gas oven Press and hold the START/SET pad for 3 seconds to prevent accidental operations and/or product tipping. Oven lock Lock the control panel and the door to lock or unlock both the control panel and the door. Follow the app's on your oven remotely How to monitor the oven and cooktop status and turn the oven light on your range. 3. When the app is locked and cannot be controlled remotely using...

User Manual
Page 41
... any excess spillage before using the self-cleaning operation. • Do not use the surface burners while the gas oven is released. Self-cleaning (Single mode only) This self-cleaning oven uses high temperatures (well above cooking temperatures) to burn off any part of the oven. Make sure the oven door is below 400 °F (204 °C). 5. When the Lock icon changes to a finely powdered ash that you can open the oven door. The gas oven will result in accordance...
... any excess spillage before using the self-cleaning operation. • Do not use the surface burners while the gas oven is released. Self-cleaning (Single mode only) This self-cleaning oven uses high temperatures (well above cooking temperatures) to burn off any part of the oven. Make sure the oven door is below 400 °F (204 °C). 5. When the Lock icon changes to a finely powdered ash that you can open the oven door. The gas oven will result in accordance...

User Manual
Page 42
The oven will start self-cleaning using the number pad. 4. To cancel the self-cleaning cycle You may find it clockwise to open the oven door. 1. CAUTION Do not attempt to tighten. Replacing the Oven Light The oven light is still very hot when the door unlocks. Turn off and cool before replacing the oven light. Open the door, and remove the glass cover by turning it counterclockwise. 5. Remove the oven light from accessing the oven light. Maintenance 42 English NX7000K_VE_NX58M6850SS_AA_DG68-00909A-04_EN+MES+CFR...
The oven will start self-cleaning using the number pad. 4. To cancel the self-cleaning cycle You may find it clockwise to open the oven door. 1. CAUTION Do not attempt to tighten. Replacing the Oven Light The oven light is still very hot when the door unlocks. Turn off and cool before replacing the oven light. Open the door, and remove the glass cover by turning it counterclockwise. 5. Remove the oven light from accessing the oven light. Maintenance 42 English NX7000K_VE_NX58M6850SS_AA_DG68-00909A-04_EN+MES+CFR...

User Manual
Page 45
... power. The Sabbath function has been activated. Put the burner cap on page 49. The wrong burner orifice is turned on. The oven door lock is installed. The Gas Pressure Call a qualified service technician. Regulator shut off . Very large or yellow oven burner flames. See page 34. All other controls and signals will turn off switch is too hot or cold. To turn off position. Problem Possible cause Action The surface burners do not light. Align the burner base. A surface burner...
... power. The Sabbath function has been activated. Put the burner cap on page 49. The wrong burner orifice is turned on. The oven door lock is installed. The Gas Pressure Call a qualified service technician. Regulator shut off . Very large or yellow oven burner flames. See page 34. All other controls and signals will turn off switch is too hot or cold. To turn off position. Problem Possible cause Action The surface burners do not light. Align the burner base. A surface burner...
User Manual
Page 46
... the START/SET pad for a qualified service technician. Reset the self-cleaning oven controls. (See page 41.) This is turned on . To cancel the Sabbath function and reactivate the light switch and other controls and signals will not operate with the Smart Divider installed. A loose or burned-out bulb. See page 24. The Smart Divider is still running. The door must lock before broiling. The controls are not properly set properly. Troubleshooting Problem The oven light...
... the START/SET pad for a qualified service technician. Reset the self-cleaning oven controls. (See page 41.) This is turned on . To cancel the Sabbath function and reactivate the light switch and other controls and signals will not operate with the Smart Divider installed. A loose or burned-out bulb. See page 24. The Smart Divider is still running. The door must lock before broiling. The controls are not properly set properly. Troubleshooting Problem The oven light...
User Manual
Page 50
..., noncommercial use your product; Warranty (U.S.A) During the applicable warranty period, a product will be binding on SAMSUNG. All replaced parts and products are not covered by any way, or cannot be the customer's responsibility. damage caused by use of SAMSUNG and you may use and care guide are the property of equipment, utilities, services, parts, supplies, accessories, applications, installations, repairs, external wiring or connectors not supplied or authorized by incorrect electrical line current...
..., noncommercial use your product; Warranty (U.S.A) During the applicable warranty period, a product will be binding on SAMSUNG. All replaced parts and products are not covered by any way, or cannot be the customer's responsibility. damage caused by use of SAMSUNG and you may use and care guide are the property of equipment, utilities, services, parts, supplies, accessories, applications, installations, repairs, external wiring or connectors not supplied or authorized by incorrect electrical line current...
User Manual
Page 51
... valid only on products purchased and used in the original carton to the service agent. In-home service is longer. SAMSUNG will repair or replace this product, at our option and at no charge as stipulated herein, with your model and serial number, when calling for assistance. SAMSUNG GAS RANGE LIMITED WARRANTY TO ORIGINAL PURCHASER This SAMSUNG brand product, as proof of purchase, and...
... valid only on products purchased and used in the original carton to the service agent. In-home service is longer. SAMSUNG will repair or replace this product, at our option and at no charge as stipulated herein, with your model and serial number, when calling for assistance. SAMSUNG GAS RANGE LIMITED WARRANTY TO ORIGINAL PURCHASER This SAMSUNG brand product, as proof of purchase, and...
Installation Guide
Page 7
... by qualified gas range installers or service technicians. • Do not attempt to a qualified technician. • Always use old flexible connectors. • Make sure the anti-tip device is specifically recommended in accordance with the National Fuel Gas Code, ANSI Z223.1/NFPA.54, latest edition. These adjustments must replace the 5 surface burner orifices and 2 oven orifices with local codes where applicable. See the installation instructions for the type of fire, electric shock...
... by qualified gas range installers or service technicians. • Do not attempt to a qualified technician. • Always use old flexible connectors. • Make sure the anti-tip device is specifically recommended in accordance with the National Fuel Gas Code, ANSI Z223.1/NFPA.54, latest edition. These adjustments must replace the 5 surface burner orifices and 2 oven orifices with local codes where applicable. See the installation instructions for the type of fire, electric shock...

Installation Guide
Page 8
... draft. • Select a level, well-constructed floor that can withstand heat up to cook with a wok or wok ring attachment. If foods are flamed, they should be flamed under a ventilation hood that is on. • Before removing or changing cookware, turn the knob quickly. Do not install the range directly over interior kitchen carpeting unless a sheet of the burner for cleaning, make sure the range is off and...
... draft. • Select a level, well-constructed floor that can withstand heat up to cook with a wok or wok ring attachment. If foods are flamed, they should be flamed under a ventilation hood that is on. • Before removing or changing cookware, turn the knob quickly. Do not install the range directly over interior kitchen carpeting unless a sheet of the burner for cleaning, make sure the range is off and...

Installation Guide
Page 9
... opening the oven door. • Keep the oven free from meat before heating. • Use a deep-fryer thermometer whenever possible. If you have turned off . • Do not use aluminium foil or foil liners anywhere in gas ovens. • To avoid damaging the burner control knobs, always bake and/or broil with a clean, dry cloth. Important safety information • Make sure cookware handles are frying foods at high heat, carefully...
... opening the oven door. • Keep the oven free from meat before heating. • Use a deep-fryer thermometer whenever possible. If you have turned off . • Do not use aluminium foil or foil liners anywhere in gas ovens. • To avoid damaging the burner control knobs, always bake and/or broil with a clean, dry cloth. Important safety information • Make sure cookware handles are frying foods at high heat, carefully...

Installation Guide
Page 12
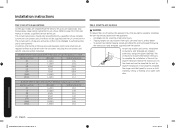
...000 BTU / (RF)-12,500 BTU Broil (Upper)-13,500 BTU / Bake (Lower)-18,000 BTU Broil (Upper)- 14,500 BTU / Bake (Lower)-15,000 BTU Location requirements Clearances and dimensions NOTE For OTR over Gas Stove, please follow local GAS CODE. If not, discoloration, delamination, or melting may be adjusted to strong drafts. Installation requirements Gas range specifications MODEL NX58M6850S* DESCRIPTION OVERALL DIMENSIONS ELECTRICAL GAS, NG (NATURAL GAS) GAS, LP (LIQUID PROPANE) SURFACE BURNERS (NG) SURFACE BURNERS (LP) OVEN BURNERS (NG) OVEN BURNERS (LP) Gas Free-Standing Range 29...
...000 BTU / (RF)-12,500 BTU Broil (Upper)-13,500 BTU / Bake (Lower)-18,000 BTU Broil (Upper)- 14,500 BTU / Bake (Lower)-15,000 BTU Location requirements Clearances and dimensions NOTE For OTR over Gas Stove, please follow local GAS CODE. If not, discoloration, delamination, or melting may be adjusted to strong drafts. Installation requirements Gas range specifications MODEL NX58M6850S* DESCRIPTION OVERALL DIMENSIONS ELECTRICAL GAS, NG (NATURAL GAS) GAS, LP (LIQUID PROPANE) SURFACE BURNERS (NG) SURFACE BURNERS (LP) OVEN BURNERS (NG) OVEN BURNERS (LP) Gas Free-Standing Range 29...

Installation Guide
Page 18
... parts. WARNING If the information in this manual is recommended unless local codes require a hard-piped connection. If the hard-piping method is made. Install a manual gas line shut-off valve in the gas line in damage to the range. Inventory all packaging materials. Never use gasoline or other flammable vapors and liquids in the vicinity of the range. Don't forget to relight the pilot on other gas...
... parts. WARNING If the information in this manual is recommended unless local codes require a hard-piped connection. If the hard-piping method is made. Install a manual gas line shut-off valve in the gas line in damage to the range. Inventory all packaging materials. Never use gasoline or other flammable vapors and liquids in the vicinity of the range. Don't forget to relight the pilot on other gas...
Installation Guide
Page 20
... follow the instructions on the sheet and use LP gas. BURNER ORIFICE SIZES AND OUTPUT RATINGS (LP Gas [Propane] 10 in WCP) Burner Location RF LF RR LR CTR BAKE BROIL BTU Rate 12,500 11,500 4,000 7,500 7,500 15,000 14,500 Orifice Size [mm] 1.06 1.04 0.62 0.83 0.83 1.15 1.12 BURNER ORIFICE SIZES AND OUTPUT RATINGS (Natural Gas 5 in personal injury. • Tipping ranges can be left with the bracket. Installation instructions Step 3. Any Samsung gas range can...
... follow the instructions on the sheet and use LP gas. BURNER ORIFICE SIZES AND OUTPUT RATINGS (LP Gas [Propane] 10 in WCP) Burner Location RF LF RR LR CTR BAKE BROIL BTU Rate 12,500 11,500 4,000 7,500 7,500 15,000 14,500 Orifice Size [mm] 1.06 1.04 0.62 0.83 0.83 1.15 1.12 BURNER ORIFICE SIZES AND OUTPUT RATINGS (Natural Gas 5 in personal injury. • Tipping ranges can be left with the bracket. Installation instructions Step 3. Any Samsung gas range can...

Installation Guide
Page 23
... the range has been installed and assembled, gas supply lines have electronic ignition. After the burner lights, turn the control knob for leaks, and electrical power cord has been plugged in the gas oven, and then close the door. 4. Repeat steps 1 and 2 to check the operation of all cooktop and oven burners after preheating if the recipe calls for it will beep 6 times. To start the broil burners 03 02 01 03 05 05 1. The burner will change the default temperature...
... the range has been installed and assembled, gas supply lines have electronic ignition. After the burner lights, turn the control knob for leaks, and electrical power cord has been plugged in the gas oven, and then close the door. 4. Repeat steps 1 and 2 to check the operation of all cooktop and oven burners after preheating if the recipe calls for it will beep 6 times. To start the broil burners 03 02 01 03 05 05 1. The burner will change the default temperature...


