User Manual
Page 6
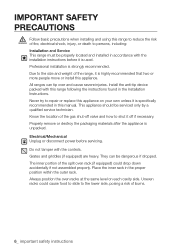
... valve and how to shut it off if necessary. Know the location of fire, electrical shock, injury, or death to repair or replace this manual. Grates and griddles (if equipped) are heavy. Always position the oven racks at the same level on your own unless it is strongly recommended. Professional installation is specifically recommended in accordance with the installation instructions before servicing. Electrical/Mechanical Unplug or disconnect power...
... valve and how to shut it off if necessary. Know the location of fire, electrical shock, injury, or death to repair or replace this manual. Grates and griddles (if equipped) are heavy. Always position the oven racks at the same level on your own unless it is strongly recommended. Professional installation is specifically recommended in accordance with the installation instructions before servicing. Electrical/Mechanical Unplug or disconnect power...

User Manual
Page 8
... melt or burn near the oven vents or any of the surface burners. Do not pour water into the range gas and electrical systems creating a risk of electrical shock or high levels of Carbon Monoxide, due to corrosion of this appliance. If there is a gas leak, you are checking. If the self-clean mode malfunctions, turn off and disconnect the power supply. Do not wear loose...
... melt or burn near the oven vents or any of the surface burners. Do not pour water into the range gas and electrical systems creating a risk of electrical shock or high levels of Carbon Monoxide, due to corrosion of this appliance. If there is a gas leak, you are checking. If the self-clean mode malfunctions, turn off and disconnect the power supply. Do not wear loose...
User Manual
Page 9
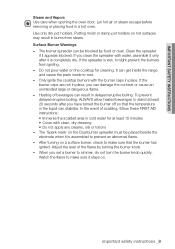
... water for cleaning. Heating of beverages can damage the controls or cause an unintended large or dangerous flame. - Adjust the level of scalding, follow these FIRST AID instructions: • Immerse the scalded area in burns from igniting. - important safety instructions Steam and Vapors Use care when opening the oven door. Let hot air or steam escape before removing or placing food in the liquid can stabilize. Surface Burner Warnings - If...
... water for cleaning. Heating of beverages can damage the controls or cause an unintended large or dangerous flame. - Adjust the level of scalding, follow these FIRST AID instructions: • Immerse the scalded area in burns from igniting. - important safety instructions Steam and Vapors Use care when opening the oven door. Let hot air or steam escape before removing or placing food in the liquid can stabilize. Surface Burner Warnings - If...
User Manual
Page 10
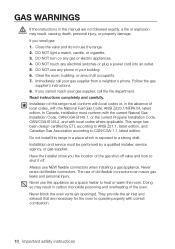
... been design-certified by a qualified installer, service agency, or gas supplier. Always use the range. 2. GAS WARNINGS If the instructions in carbon monoxide poisoning and overheating of the oven. Read instructions completely and carefully. In Canada, installation must be performed by ETL according to ANSI Z21.1, latest edition, and Canadian Gas Association according to shut it off. The use any electrical switches or plug a power cord into an outlet. 5.
... been design-certified by a qualified installer, service agency, or gas supplier. Always use the range. 2. GAS WARNINGS If the instructions in carbon monoxide poisoning and overheating of the oven. Read instructions completely and carefully. In Canada, installation must be performed by ETL according to ANSI Z21.1, latest edition, and Canadian Gas Association according to shut it off. The use any electrical switches or plug a power cord into an outlet. 5.

User Manual
Page 12
... LP gas, the installer must replace the 5 surface burner orifices and 2 oven orifices with the manufacturer's instructions and all codes and requirements of electric shock. This appliance must be performed only by a qualified installer, in this appliance. If you are not sure your range unless it is grounded, it does not fit the existing outlet, have any part of a malfunction or breakdown, grounding will use a damaged power plug...
... LP gas, the installer must replace the 5 surface burner orifices and 2 oven orifices with the manufacturer's instructions and all codes and requirements of electric shock. This appliance must be performed only by a qualified installer, in this appliance. If you are not sure your range unless it is grounded, it does not fit the existing outlet, have any part of a malfunction or breakdown, grounding will use a damaged power plug...

User Manual
Page 16
... not use the oven for use aluminum foil or foil liners anywhere in the oven, turn off . Do not strike the oven glass. This prevents fire flare-ups from the range when opening the door of a hot oven. Keep the oven door closed . Do not heat unopened containers. Always bake and/or broil with the oven door closed to the burner flame. OVEN WARNINGS NEVER cover any holes or passages in gas ovens. Covering the bottom cover...
... not use the oven for use aluminum foil or foil liners anywhere in the oven, turn off . Do not strike the oven glass. This prevents fire flare-ups from the range when opening the door of a hot oven. Keep the oven door closed . Do not heat unopened containers. Always bake and/or broil with the oven door closed to the burner flame. OVEN WARNINGS NEVER cover any holes or passages in gas ovens. Covering the bottom cover...

User Manual
Page 18
... be used in the oven. Meat should always be removed from food bourne illnesses. SAVE THESE INSTRUCTIONS 18_ important safety instructions Wipe off the oven, disconnect the power supply, and contact a qualified service technician. Never self-clean with the lower drawer or drawer pan placed in or around any aluminum foil before using the self-cleaning operation. Commercial oven cleaners or oven liners should be cooked to an internal temperature of fire, electrical...
... be used in the oven. Meat should always be removed from food bourne illnesses. SAVE THESE INSTRUCTIONS 18_ important safety instructions Wipe off the oven, disconnect the power supply, and contact a qualified service technician. Never self-clean with the lower drawer or drawer pan placed in or around any aluminum foil before using the self-cleaning operation. Commercial oven cleaners or oven liners should be cooked to an internal temperature of fire, electrical...
User Manual
Page 19
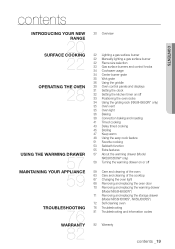
... 22 Lighting a gas surface burner 22 Manually lighting a gas surface burner 22 Flame size selection 23 Gas surface burners and control knobs 24 Cookware usage 24 Center burner grate 25 Wok grate 26 Using the griddle 28 Oven control panels and displays 31 Setting the clock 32 Setting the kitchen timer on/off 33 Positioning the oven racks 34 Using the griding rack (NX58H5650W* only) 35 Oven vent 35 Oven light 36 Baking 38 Convection baking and roasting 41 Timed cooking 43 Delay timed cooking 45 Broiling 47 Keep warm 48 Using the easy cook feature 51 Favorite cooking 53 Sabbath function 55...
... 22 Lighting a gas surface burner 22 Manually lighting a gas surface burner 22 Flame size selection 23 Gas surface burners and control knobs 24 Cookware usage 24 Center burner grate 25 Wok grate 26 Using the griddle 28 Oven control panels and displays 31 Setting the clock 32 Setting the kitchen timer on/off 33 Positioning the oven racks 34 Using the griding rack (NX58H5650W* only) 35 Oven vent 35 Oven light 36 Baking 38 Convection baking and roasting 41 Timed cooking 43 Delay timed cooking 45 Broiling 47 Keep warm 48 Using the easy cook feature 51 Favorite cooking 53 Sabbath function 55...

User Manual
Page 20
... burner control DISPLAY OVEN VENT (centered under oven control panel) OVEN COMPONENTS * Oven racks (2) Glide rack (1) (as equipped) Removable oven floor Removable oven door OVEN COMPONENTS Oven rack position guide Broil oven burner WARMING DRAWER COMPONENTS Removable warming drawer (1) Full-extension roller guide rails (2) Electric heating element (not shown under drawer) * Oven light (1) Convection fan (1) Convection heater (not shown) Bake oven burner ADJUSTABLE LEVELING LEGS (4) (not shown) ANTI-TIP BRACKET KIT (1) 20_ introducing your new range OVERVIEW MODEL NX58H5650W* COOKTOP...
... burner control DISPLAY OVEN VENT (centered under oven control panel) OVEN COMPONENTS * Oven racks (2) Glide rack (1) (as equipped) Removable oven floor Removable oven door OVEN COMPONENTS Oven rack position guide Broil oven burner WARMING DRAWER COMPONENTS Removable warming drawer (1) Full-extension roller guide rails (2) Electric heating element (not shown under drawer) * Oven light (1) Convection fan (1) Convection heater (not shown) Bake oven burner ADJUSTABLE LEVELING LEGS (4) (not shown) ANTI-TIP BRACKET KIT (1) 20_ introducing your new range OVERVIEW MODEL NX58H5650W* COOKTOP...

User Manual
Page 22
... adjusting the heat setting with the control knob(s). The flames should always stay under the cookware. Failure to the LITE position. Use extreme caution when manually lighting a surface burner. 1. After the surface burner lights, turn the control knob for melting chocolate MANUALLY LIGHTING A GAS SURFACE BURNER If a power failure occurs, the surface burners can still be lit manually. Hold a long gas grill lighter to the surface burner you want to adjust the power setting of the cookware being used. 22_ surface cooking surface cooking BEFORE USING THE SURFACE BURNERS...
... adjusting the heat setting with the control knob(s). The flames should always stay under the cookware. Failure to the LITE position. Use extreme caution when manually lighting a surface burner. 1. After the surface burner lights, turn the control knob for melting chocolate MANUALLY LIGHTING A GAS SURFACE BURNER If a power failure occurs, the surface burners can still be lit manually. Hold a long gas grill lighter to the surface burner you want to adjust the power setting of the cookware being used. 22_ surface cooking surface cooking BEFORE USING THE SURFACE BURNERS...

User Manual
Page 29
... feature. operating the oven _29 CONVECTION 2 BAKE ( ) Activates the convection bake function. CONVECTION 3 ROAST ( ) Activates the convection roast function. Evenly cooks food using the top oven burner only. 6 START/SET Touch this pad to activate the Bake function. Cooks foods using the bottom oven burner. 5 BROIL Activates the Broil function. An electric 13 DRAWER (MODEL heating element under the drawer uses three settings to NX58H5650W*) keep cooked foods warm. 14 COOKING TIME Touch this pad to keep cooked foods warm after cooking. Use this function to cook...
... feature. operating the oven _29 CONVECTION 2 BAKE ( ) Activates the convection bake function. CONVECTION 3 ROAST ( ) Activates the convection roast function. Evenly cooks food using the top oven burner only. 6 START/SET Touch this pad to activate the Bake function. Cooks foods using the bottom oven burner. 5 BROIL Activates the Broil function. An electric 13 DRAWER (MODEL heating element under the drawer uses three settings to NX58H5650W*) keep cooked foods warm. 14 COOKING TIME Touch this pad to keep cooked foods warm after cooking. Use this function to cook...

User Manual
Page 30
... MAXIMUM SETTINGS All the features listed in 1 minute. The oven will stop automatically. Always bake and/or broil with Bake, Convection Bake, Convection Roast, Cook Time, or Self Clean functions. This is operating and leave it open the oven door while the oven is not a product failure. Roast, Bake, Broil, Pizza, Slow Cook, Dehydrate, Bread Proof, Favorite Cook. 30_ operating the oven Allows you to set the minimum temperature to 175 °F (79 °C). Use with the oven door closed. FEATURE BAKE BROIL SELF-CLEAN MINIMUM SETTING...
... MAXIMUM SETTINGS All the features listed in 1 minute. The oven will stop automatically. Always bake and/or broil with Bake, Convection Bake, Convection Roast, Cook Time, or Self Clean functions. This is operating and leave it open the oven door while the oven is not a product failure. Roast, Bake, Broil, Pizza, Slow Cook, Dehydrate, Bread Proof, Favorite Cook. 30_ operating the oven Allows you to set the minimum temperature to 175 °F (79 °C). Use with the oven door closed. FEATURE BAKE BROIL SELF-CLEAN MINIMUM SETTING...

User Manual
Page 35
... 61 for light-changing instructions. OVEN VENT The oven vent is located on the oven control panel. Proper air circulation prevents oven burner combustion problems and ensures good cooking results. You can become hot, use a 40-watt appliance bulb when replacing the oven light. Always use care when placing items near the oven vent. Do not block or place items in the upper right-rear corner. The light can be able to install it properly and the rack could heat or...
... 61 for light-changing instructions. OVEN VENT The oven vent is located on the oven control panel. Proper air circulation prevents oven burner combustion problems and ensures good cooking results. You can become hot, use a 40-watt appliance bulb when replacing the oven light. Always use care when placing items near the oven vent. Do not block or place items in the upper right-rear corner. The light can be able to install it properly and the rack could heat or...

User Manual
Page 45
... fire. How to cancel broiling at the new temperature. Do not put water or flour on a broiling pan with insert grid. Press the Broil pad once for Hi and twice for broiling 1. The oven will automatically light the top oven burner and start cooking. The display will change a programmed broiling setting, press the Broil pad to spread. Pressing the START/SET pad will show the time of Hi or Lo...
... fire. How to cancel broiling at the new temperature. Do not put water or flour on a broiling pan with insert grid. Press the Broil pad once for Hi and twice for broiling 1. The oven will automatically light the top oven burner and start cooking. The display will change a programmed broiling setting, press the Broil pad to spread. Pressing the START/SET pad will show the time of Hi or Lo...

User Manual
Page 72
... OFF/CLEAR pad for 3 seconds to a well-ventilated room away from a self-cleaning oven. SELF-CLEANING OVEN The self-cleaning oven uses high temperatures (well above cooking temperatures) to burn off left over grease and residue completely or reduce them difficult to slide in the display, it indicates the door lock feature is on . Relocate birds to unlock the oven controls. 72_ maintaining your appliance Doing so will still be wiped away...
... OFF/CLEAR pad for 3 seconds to a well-ventilated room away from a self-cleaning oven. SELF-CLEANING OVEN The self-cleaning oven uses high temperatures (well above cooking temperatures) to burn off left over grease and residue completely or reduce them difficult to slide in the display, it indicates the door lock feature is on . Relocate birds to unlock the oven controls. 72_ maintaining your appliance Doing so will still be wiped away...
User Manual
Page 77
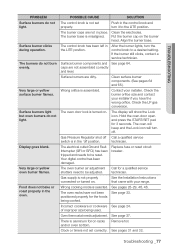
... the control knob and turn the control knob to be adjusted. The display will turn off Call a qualified service switch is assembled. Hold the oven door open and press the START/SET pad for a qualified service shutters need to the LITE position. The oven will beep and the Lock icon will show the Lock icon. The oven burner air adjustment Call for 3 seconds. Incorrect cookware or cookware See page 24. troubleshooting _77 troubleshooting PROBLEM Surface burners do not light. Gas Pressure Regulator shut...
... the control knob and turn the control knob to be adjusted. The display will turn off Call a qualified service switch is assembled. Hold the oven door open and press the START/SET pad for a qualified service shutters need to the LITE position. The oven will beep and the Lock icon will show the Lock icon. The oven burner air adjustment Call for 3 seconds. Incorrect cookware or cookware See page 24. troubleshooting _77 troubleshooting PROBLEM Surface burners do not light. Gas Pressure Regulator shut...

User Manual
Page 79
... not open and press the START/SET pad for a longer cleaning time. The oven door will turn off the dirt buildup. Extremely dirty ovens require hand-cleaning of the metal heating and cooling during a self-cleaning cycle. This is the first time the oven has been cleaned. troubleshooting PROBLEM Oven will show the Lock icon. This is being used. Let the oven cool down and reset the controls. Oven door will not operate when the warming drawer is turned on . The warming drawer...
... not open and press the START/SET pad for a longer cleaning time. The oven door will turn off the dirt buildup. Extremely dirty ovens require hand-cleaning of the metal heating and cooling during a self-cleaning cycle. This is the first time the oven has been cleaned. troubleshooting PROBLEM Oven will show the Lock icon. This is being used. Let the oven cool down and reset the controls. Oven door will not operate when the warming drawer is turned on . The warming drawer...

User Manual
Page 80
... inside of these operations. Unlock the controls and try again. Cover foods with the paper towel. PROBLEM Steam or smoke coming from the vent. Warming drawer or storage drawer does not slide smoothly or drags. Convection fan is too high. The temperature setting is not working. The fan starts automatically when the oven meets the preheat temperature. Try again after the function is opened. Liquid should not be warmed in the drawer are trying to...
... inside of these operations. Unlock the controls and try again. Cover foods with the paper towel. PROBLEM Steam or smoke coming from the vent. Warming drawer or storage drawer does not slide smoothly or drags. Convection fan is too high. The temperature setting is not working. The fan starts automatically when the oven meets the preheat temperature. Try again after the function is opened. Liquid should not be warmed in the drawer are trying to...
User Manual
Page 81
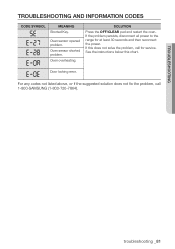
.... Oven sensor opened problem. If this chart. For any codes not listed above, or if the suggested solution does not fix the problem, call for at least 30 seconds and then reconnect the power. Oven overheating. SOLUTION Press the OFF/CLEAR pad and restart the oven. See the instructions below this does not solve the problem, call 1-800-SAMSUNG (1-800-726-7864). Door locking error.
.... Oven sensor opened problem. If this chart. For any codes not listed above, or if the suggested solution does not fix the problem, call for at least 30 seconds and then reconnect the power. Oven overheating. SOLUTION Press the OFF/CLEAR pad and restart the oven. See the instructions below this does not solve the problem, call 1-800-SAMSUNG (1-800-726-7864). Door locking error.
User Manual
Page 82
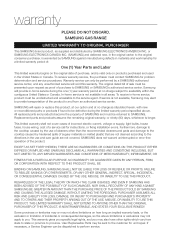
... cleaners other rights which vary from an authorized service center. SAMSUNG will provide in materials and workmanship for unit repair. This limited warranty shall not cover cases of incorrect electric current, voltage or supply, light bulbs, house fuses, house wiring, cost of the product. SAMSUNG does not warrant uninterrupted or error-free operation of a service call for problem determination and service procedures. WITHOUT LIMITING THE FOREGOING, PURCHASER ASSUMES...
... cleaners other rights which vary from an authorized service center. SAMSUNG will provide in materials and workmanship for unit repair. This limited warranty shall not cover cases of incorrect electric current, voltage or supply, light bulbs, house fuses, house wiring, cost of the product. SAMSUNG does not warrant uninterrupted or error-free operation of a service call for problem determination and service procedures. WITHOUT LIMITING THE FOREGOING, PURCHASER ASSUMES...

