Interactive Guide Ver.1.2 (English)
Page 2
Getting Started 1 Chapter 3. Backup / Restore 100 Samsung Recovery Solution (Optional) Chapter 5. Using the Computer 37 Keyboard 41 Touchpad 48 External-type CD drive (ODD, To be purchased) 50 Micro SD Card Slot (... Use 26 Overview 32 Turning the Computer On and Off Chapter 2. Contents Chapter 1. Settings and Upgrade 85 LCD Brightness Control 87 Control Center (Optional) 88 BIOS Setup 90 Setting a Boot Password 93 Changing the Boot Priority 94 Battery Chapter 4. Appendix 113 Important Safety Information 115 Replacement Parts and Accessories 117 Regulatory...
Getting Started 1 Chapter 3. Backup / Restore 100 Samsung Recovery Solution (Optional) Chapter 5. Using the Computer 37 Keyboard 41 Touchpad 48 External-type CD drive (ODD, To be purchased) 50 Micro SD Card Slot (... Use 26 Overview 32 Turning the Computer On and Off Chapter 2. Contents Chapter 1. Settings and Upgrade 85 LCD Brightness Control 87 Control Center (Optional) 88 BIOS Setup 90 Setting a Boot Password 93 Changing the Boot Priority 94 Battery Chapter 4. Appendix 113 Important Safety Information 115 Replacement Parts and Accessories 117 Regulatory...

Interactive Guide Ver.1.2 (English)
Page 5
...internal battery of the User Manual. For detailed information on a function, refer to the computer. Tips Tip Chapter 1. A Restore the computer using Samsung Recovery Solution (Optional). 1. A Install Easy Display Manager. The computer will boot up in restore mode after Q purchasing it, the computer does not... keyboard Fn keys (shortcut keys) do not have to connect an external monitor, TV or projector. To resolve this problem, enter the BIOS Setup and select Battery Calibration to the state when it is cut when you have a separate OS recovery DVD or recovery CD. Getting ...
...internal battery of the User Manual. For detailed information on a function, refer to the computer. Tips Tip Chapter 1. A Restore the computer using Samsung Recovery Solution (Optional). 1. A Install Easy Display Manager. The computer will boot up in restore mode after Q purchasing it, the computer does not... keyboard Fn keys (shortcut keys) do not have to connect an external monitor, TV or projector. To resolve this problem, enter the BIOS Setup and select Battery Calibration to the state when it is cut when you have a separate OS recovery DVD or recovery CD. Getting ...
Interactive Guide Ver.1.2 (English)
Page 8
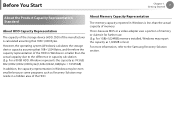
... operating system (Windows) calculates the storage device capacity assuming that 1KB=1,000 Bytes. This is because BIOS or a video adapter uses a portion of the HDD in Windows is less than the actual capacity due to the Samsung Recovery Solution section. Getting Started 7 About the Product Capacity Representation Standard About HDD Capacity Representation...
... operating system (Windows) calculates the storage device capacity assuming that 1KB=1,000 Bytes. This is because BIOS or a video adapter uses a portion of the HDD in Windows is less than the actual capacity due to the Samsung Recovery Solution section. Getting Started 7 About the Product Capacity Representation Standard About HDD Capacity Representation...

Interactive Guide Ver.1.2 (English)
Page 77
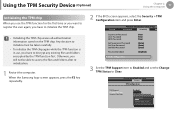
... on the computer. If you complete the steps above, you can use the TPM security device, you have to initialize the TPM chip in the BIOS Setup, initialize the TPM program, and then register the user. • This function is only supported for models with TPM (security chip). • For more...
... on the computer. If you complete the steps above, you can use the TPM security device, you have to initialize the TPM chip in the BIOS Setup, initialize the TPM program, and then register the user. • This function is only supported for models with TPM (security chip). • For more...
Interactive Guide Ver.1.2 (English)
Page 78
... and Deactivated No Change Clear Enable and Activate Disable and Deactivate Using the TPM Security Device (Optional) Chapter 2. When the Samsung logo screen appears, press the F2 key repeatedly. 2 If the BIOS screen appears, select the Security > TPM Configuration item and press Enter. Using the computer 77 Initializing the TPM chip When...
... and Deactivated No Change Clear Enable and Activate Disable and Deactivate Using the TPM Security Device (Optional) Chapter 2. When the Samsung logo screen appears, press the F2 key repeatedly. 2 If the BIOS screen appears, select the Security > TPM Configuration item and press Enter. Using the computer 77 Initializing the TPM chip When...

Interactive Guide Ver.1.2 (English)
Page 85
Settings and Upgrade LCD Brightness Control 85 Control Center (Optional) 87 BIOS Setup 88 Setting a Boot Password 90 Changing the Boot Priority 93 Battery 94 Chapter 3.
Settings and Upgrade LCD Brightness Control 85 Control Center (Optional) 87 BIOS Setup 88 Setting a Boot Password 90 Changing the Boot Priority 93 Battery 94 Chapter 3.

Interactive Guide Ver.1.2 (English)
Page 89
... for product function enhancement purposes. • The BIOS Setup menus and items may differ depending on your computer model. 1 Turn the computer on the product. The items in this document may differ depending on . 2 When the booting screen (SAMSUNG logo) appears, press the F2 key to change... the booting priority, or add a new device. • Since incorrect settings may cause your system to malfunction or crash, take care when configuring the BIOS. • The functions of the BIOS setup are subject to enter...
... for product function enhancement purposes. • The BIOS Setup menus and items may differ depending on your computer model. 1 Turn the computer on the product. The items in this document may differ depending on . 2 When the booting screen (SAMSUNG logo) appears, press the F2 key to change... the booting priority, or add a new device. • Since incorrect settings may cause your system to malfunction or crash, take care when configuring the BIOS. • The functions of the BIOS setup are subject to enter...

Interactive Guide Ver.1.2 (English)
Page 90
... or to view the Setup Help. F1 Press to enter a sub menu. Press to move up and down. Settings and Upgrade 89 The BIOS Setup Screen The BIOS Setup menus and items may differ from the actual keyboard. Setup Items Up & Down Keys F5/F6 F9 ESC Press to change the item... have to another menu. Advanced Using this menu, you can configure the major chipsets and additional functions. Press to save the changes and exit Setup. BIOS Setup Chapter 3.
... or to view the Setup Help. F1 Press to enter a sub menu. Press to move up and down. Settings and Upgrade 89 The BIOS Setup Screen The BIOS Setup menus and items may differ from the actual keyboard. Setup Items Up & Down Keys F5/F6 F9 ESC Press to change the item... have to another menu. Advanced Using this menu, you can configure the major chipsets and additional functions. Press to save the changes and exit Setup. BIOS Setup Chapter 3.

Interactive Guide Ver.1.2 (English)
Page 91
...start the System Setup. Setting a Boot Password When setting a password, you can be charged. • The BIOS Setup menus and items may differ depending on or to enter the BIOS Setup. 1 Select the Security menu in the Setup Notice window, the settings are not allowed. 4 The ...supervisor password has been set. The supervisor password is required to turn the computer on your password, contact a Samsung service center. Special characters are...
...start the System Setup. Setting a Boot Password When setting a password, you can be charged. • The BIOS Setup menus and items may differ depending on or to enter the BIOS Setup. 1 Select the Security menu in the Setup Notice window, the settings are not allowed. 4 The ...supervisor password has been set. The supervisor password is required to turn the computer on your password, contact a Samsung service center. Special characters are...

Interactive Guide Ver.1.2 (English)
Page 92
... disk drive, it cannot be set , you can only change the hard disk drive password or the HDD Password Frozen message appears when entering the BIOS Setup and then selecting Security > HDD Password, press the Power button to Enabled. Setting up a Hard Disk Drive Password (Optional) If you set a password for...
... disk drive, it cannot be set , you can only change the hard disk drive password or the HDD Password Frozen message appears when entering the BIOS Setup and then selecting Security > HDD Password, press the Power button to Enabled. Setting up a Hard Disk Drive Password (Optional) If you set a password for...

Interactive Guide Ver.1.2 (English)
Page 94
... Priority item. 4 Press the F10 key to the top item. XXXXXXXX 2 Press on the computer model and driver version. 1 Select the Boot menu in the BIOS Setup. Changing the Boot Priority Chapter 3. Settings and Upgrade 93 By default, the highest boot priority device is now set to the Hard Drive. The...
... Priority item. 4 Press the F10 key to the top item. XXXXXXXX 2 Press on the computer model and driver version. 1 Select the Boot menu in the BIOS Setup. Changing the Boot Priority Chapter 3. Settings and Upgrade 93 By default, the highest boot priority device is now set to the Hard Drive. The...

Interactive Guide Ver.1.2 (English)
Page 98
... depending on the computer model. 1 Press the Center. + key combination to run the Control Press the F2 key when the Samsung logo appears in the booting sequence to enter the BIOS Setup, select Advanced > Battery Life Cycle Extension, and set it to Enable. Users can use the battery life cycle extension mode...
... depending on the computer model. 1 Press the Center. + key combination to run the Control Press the F2 key when the Samsung logo appears in the booting sequence to enter the BIOS Setup, select Advanced > Battery Life Cycle Extension, and set it to Enable. Users can use the battery life cycle extension mode...

Interactive Guide Ver.1.2 (English)
Page 99
... will be reduced by discharging the battery completely using the Battery Calibration function, and then recharging it again. 3 Move to start the BIOS Setup. 4 Highlight Yes in the Battery Calibration Confirmation window and press . The screen images and terms may be the same by the...and driver version. 1 Disconnect the AC power adapter after turning off the computer. 2 Restart your computer and press the F2 button when the Samsung logo appears, to the Boot > SmXaXrXtXXBXaXXttery Calibration item using the direction keys and press . To stop the operation, press the button. Settings...
... will be reduced by discharging the battery completely using the Battery Calibration function, and then recharging it again. 3 Move to start the BIOS Setup. 4 Highlight Yes in the Battery Calibration Confirmation window and press . The screen images and terms may be the same by the...and driver version. 1 Disconnect the AC power adapter after turning off the computer. 2 Restart your computer and press the F2 button when the Samsung logo appears, to the Boot > SmXaXrXtXXBXaXXttery Calibration item using the direction keys and press . To stop the operation, press the button. Settings...

Interactive Guide Ver.1.2 (English)
Page 139
Index A AP B Battery BIOS Setup Booting Priority C CD Drive Charge Click D Double-Click Drag Dual View L LCD Brightness M 65 Micro SD Card Slot Monitor Connection / Output 94 O 88 Overview 93 P Password 48 Product Specifications 94 R 42 Recorder S 42 43 Safety Precautions 53 Samsung Recovery Solution Scroll Shortcut Key 85 Status Indicators Supervisor Password T 50 Touchpad 52 U User Password 26 V Volume Control 90 W 132 Wired Network Wireless Network 58 8 100 45 37 27 90 Chapter 5. Appendix 138 41 91 58 61 65
Index A AP B Battery BIOS Setup Booting Priority C CD Drive Charge Click D Double-Click Drag Dual View L LCD Brightness M 65 Micro SD Card Slot Monitor Connection / Output 94 O 88 Overview 93 P Password 48 Product Specifications 94 R 42 Recorder S 42 43 Safety Precautions 53 Samsung Recovery Solution Scroll Shortcut Key 85 Status Indicators Supervisor Password T 50 Touchpad 52 U User Password 26 V Volume Control 90 W 132 Wired Network Wireless Network 58 8 100 45 37 27 90 Chapter 5. Appendix 138 41 91 58 61 65


