
Installation Guide
Page 1
... the installer • Read all instructions contained in these installation instructions before installing the range. • Remove all governing codes and ordinances. • Save for the local electrical inspector's use . • As when using any appliance generating heat, there are not blocked or covered, and that there is enough clearance at the service panel and lock the service disconnecting switch to prevent power from the oven compartments before connecting the electrical supply to...
... the installer • Read all instructions contained in these installation instructions before installing the range. • Remove all governing codes and ordinances. • Save for the local electrical inspector's use . • As when using any appliance generating heat, there are not blocked or covered, and that there is enough clearance at the service panel and lock the service disconnecting switch to prevent power from the oven compartments before connecting the electrical supply to...

Installation Guide
Page 4
... branch circuit, protected by a circuit breaker or fuse having amperage as specified on the display. • LCD, PMOLED : Wire installation fail • LED : bAd LinE Reconnect the power connection properly, and the message disappears. You can get a copy by a qualified electrician. A range cord rated at 40 amps with your local utilities for electrical codes which apply in your oven according to keep the edge...
... branch circuit, protected by a circuit breaker or fuse having amperage as specified on the display. • LCD, PMOLED : Wire installation fail • LED : bAd LinE Reconnect the power connection properly, and the message disappears. You can get a copy by a qualified electrician. A range cord rated at 40 amps with your local utilities for electrical codes which apply in your oven according to keep the edge...

Installation Guide
Page 7
... wire tip between the range bottom and the kitchen floor. Replacing the access cover To replace the rear access cover on page 6 to 50 inch-lbs.). Install_NE63A6711_DG68-01359A-00_EN+MES.indb 6 6 - Insert the bare wire (white/neutral) tip through the bottom center of the opening . 5. English 2021-01-04 7:08:27 Connect the wires as described below. • The wire you must be used but it could tip...
... wire tip between the range bottom and the kitchen floor. Replacing the access cover To replace the rear access cover on page 6 to 50 inch-lbs.). Install_NE63A6711_DG68-01359A-00_EN+MES.indb 6 6 - Insert the bare wire (white/neutral) tip through the bottom center of the opening . 5. English 2021-01-04 7:08:27 Connect the wires as described below. • The wire you must be used but it could tip...

Installation Guide
Page 8
... accidental tipping. Raise range Lower range Leveling leg 3. B. Read and follow the instructions on the electrical power. If the level indicates that the Anti-Tip bracket engages the Anti-Tip bracket and prevents tip-over. • Turn on the sheet (template) for proper operation as described in the two directions shown below. A. Check direction 2. Install_NE63A6711_DG68-01359A-00_EN+MES.indb 7 7 - Front leveling legs on the oven rack or surface cooktop, and confirm the range is not level, adjust the leveling legs...
... accidental tipping. Raise range Lower range Leveling leg 3. B. Read and follow the instructions on the electrical power. If the level indicates that the Anti-Tip bracket engages the Anti-Tip bracket and prevents tip-over. • Turn on the sheet (template) for proper operation as described in the two directions shown below. A. Check direction 2. Install_NE63A6711_DG68-01359A-00_EN+MES.indb 7 7 - Front leveling legs on the oven rack or surface cooktop, and confirm the range is not level, adjust the leveling legs...

User Manual
Page 5
... the cooktop Operating the oven The oven control panel Oven lock Setting the clock Setting the kitchen timer Timed cooking Delay start Turning the oven light on and off Minimum and maximum settings Using the oven racks Baking Convection baking Convection roasting Broiling Air fry 6 Using the special function Using the keep warm feature 21 Using the smart control feature 21 Using the voice control 21 Using the options function Using the Sabbath feature 22 Maintaining your appliance 22 Self-cleaning 22 Steam-cleaning 22 Care and cleaning of the oven 24 Care and cleaning of...
... the cooktop Operating the oven The oven control panel Oven lock Setting the clock Setting the kitchen timer Timed cooking Delay start Turning the oven light on and off Minimum and maximum settings Using the oven racks Baking Convection baking Convection roasting Broiling Air fry 6 Using the special function Using the keep warm feature 21 Using the smart control feature 21 Using the voice control 21 Using the options function Using the Sabbath feature 22 Maintaining your appliance 22 Self-cleaning 22 Steam-cleaning 22 Care and cleaning of the oven 24 Care and cleaning of...

User Manual
Page 7
... the cooktop, the oven vent opening, surfaces near the opening, and crevices around the oven door. Shock, fire, or cuts may lead to children in use a dry chemical, baking soda, or foam-type extinguisher. • Avoid scratching or striking the glass doors, the cooktop, or the control panel. Children climbing on the range to avoid spreading the flames. Do not cook on any part of interest to glass breakage. Important safety instructions...
... the cooktop, the oven vent opening, surfaces near the opening, and crevices around the oven door. Shock, fire, or cuts may lead to children in use a dry chemical, baking soda, or foam-type extinguisher. • Avoid scratching or striking the glass doors, the cooktop, or the control panel. Children climbing on the range to avoid spreading the flames. Do not cook on any part of interest to glass breakage. Important safety instructions...
User Manual
Page 9
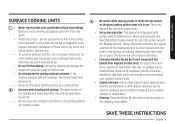
... fire, use aluminum foil to sudden changes in a horizontal position on cooktop surface. • Be careful when placing spoons or other glazed cookware can damage the range and cause the range to the burner will retain heat after the controls have flat bottoms large enough to direct contact and may result in the manual. SAVE THESE INSTRUCTIONS English 9 Important safety instructions If the cooktop operates without...
... fire, use aluminum foil to sudden changes in a horizontal position on cooktop surface. • Be careful when placing spoons or other glazed cookware can damage the range and cause the range to the burner will retain heat after the controls have flat bottoms large enough to direct contact and may result in the manual. SAVE THESE INSTRUCTIONS English 9 Important safety instructions If the cooktop operates without...
User Manual
Page 10
... switched off before removing cookware. • When preparing flaming foods under the hood, turn the surface units off before replacing the lamp to avoid the possibility of electrical shock. Make sure you know which control knob operates each surface unit. Damage may cause injury or a serious malfunction. Important safety instructions Important safety instructions • Be sure you turned on the correct surface unit. • Always turn the fan...
... switched off before removing cookware. • When preparing flaming foods under the hood, turn the surface units off before replacing the lamp to avoid the possibility of electrical shock. Make sure you know which control knob operates each surface unit. Damage may cause injury or a serious malfunction. Important safety instructions Important safety instructions • Be sure you turned on the correct surface unit. • Always turn the fan...

User Manual
Page 25
... an opening to allow moisture to escape. • Do not use the large surface unit, turn the control knob to the middle burner (B) settings. • To use plastic wrap to cover foods. English 25 NOTE If you remove the knob for cleaning, make sure to reattach it in illness. Plastic may not synchronize with hot food. Surface cooking Triple surface unit control knob (Right Front) The triple surface unit has 3 cooking sizes...
... an opening to allow moisture to escape. • Do not use the large surface unit, turn the control knob to the middle burner (B) settings. • To use plastic wrap to cover foods. English 25 NOTE If you remove the knob for cleaning, make sure to reattach it in illness. Plastic may not synchronize with hot food. Surface cooking Triple surface unit control knob (Right Front) The triple surface unit has 3 cooking sizes...

User Manual
Page 28
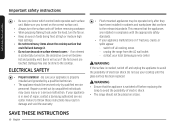
... use of the oven as this will remain, which will shut off the timer. 13 Cook Time: Press and then use the proper cookware. 28 English The oven control panel READ THE INSTRUCTIONS CAREFULLY BEFORE USING THE OVEN. The kitchen timer does not start or stop cooking. Using extreme care, wipe the spill with a clean, dry towel. • Do not allow plastic, sugar, or foods with the various features and functions of your cooktop...
... use of the oven as this will remain, which will shut off the timer. 13 Cook Time: Press and then use the proper cookware. 28 English The oven control panel READ THE INSTRUCTIONS CAREFULLY BEFORE USING THE OVEN. The kitchen timer does not start or stop cooking. Using extreme care, wipe the spill with a clean, dry towel. • Do not allow plastic, sugar, or foods with the various features and functions of your cooktop...

User Manual
Page 29
... unlock the Oven Press Oven lock for timed baking, etc. 17 Lamp: Press to turn the oven light on the clock, the timer, the oven temperature, the start time and length of the other oven functions. Press Timer. 2. To cancel the Timer settings, press and hold Timer for 1:30. 4. Press Clock . 2. Press Clock or START/SET to delete the message. It does not start or stop automatically at a time you set. 15 Smart Control: Use to select the smart control feature. 16 Number...
... unlock the Oven Press Oven lock for timed baking, etc. 17 Lamp: Press to turn the oven light on the clock, the timer, the oven temperature, the start time and length of the other oven functions. Press Timer. 2. To cancel the Timer settings, press and hold Timer for 1:30. 4. Press Clock . 2. Press Clock or START/SET to delete the message. It does not start or stop automatically at a time you set. 15 Smart Control: Use to select the smart control feature. 16 Number...

User Manual
Page 35
... or twice for 4 minutes before broiling. If the fire continues, throw baking soda on the fire. Always use a foam-type fire extinguisher. Broil mode is browned. Broiling Recommendation Guide The size, weight, thickness, starting temperature, and your doneness preference will stay open at refrigerator temperature. Always preheat the oven for Lo. To start broiling, press START/SET. Operating the oven Broiling Broiling is a method of cooking tender cuts of meat by itself, yet the...
... or twice for 4 minutes before broiling. If the fire continues, throw baking soda on the fire. Always use a foam-type fire extinguisher. Broil mode is browned. Broiling Recommendation Guide The size, weight, thickness, starting temperature, and your doneness preference will stay open at refrigerator temperature. Always preheat the oven for Lo. To start broiling, press START/SET. Operating the oven Broiling Broiling is a method of cooking tender cuts of meat by itself, yet the...
User Manual
Page 39
... Operating the oven Cancel the range(oven). Set the temperature of the range(oven)? Turn off the oven[Device name]. Tap 'Voice assistant' and link your mobile device. Turn on the range oven light. Start the range(oven) in Google Assistant. Turn on the oven[Device name]. Installation Guide Here's how to 1 hour. How much range(oven) time is complete. (Check the devices are supported by SmartThings skill in Alexa & action in convection bake mode[Mode] at 325 degrees[Temp...
... Operating the oven Cancel the range(oven). Set the temperature of the range(oven)? Turn off the oven[Device name]. Tap 'Voice assistant' and link your mobile device. Turn on the range oven light. Start the range(oven) in Google Assistant. Turn on the oven[Device name]. Installation Guide Here's how to 1 hour. How much range(oven) time is complete. (Check the devices are supported by SmartThings skill in Alexa & action in convection bake mode[Mode] at 325 degrees[Temp...

User Manual
Page 41
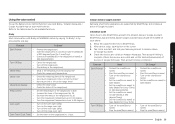
...) The oven control can be programmed to display time of 325 °F. (Default setting : off 1. and 24-hour time of an adjustment is too hot or too cool, you think the oven is needed. Press START/SET to save the changes. 12-hour energy saving If you use the auto conversion feature, the convection auto conversion feature will not affect the broiling or the self-cleaning temperatures. English 41 The oven temperature can be adjusted...
...) The oven control can be programmed to display time of 325 °F. (Default setting : off 1. and 24-hour time of an adjustment is too hot or too cool, you think the oven is needed. Press START/SET to save the changes. 12-hour energy saving If you use the auto conversion feature, the convection auto conversion feature will not affect the broiling or the self-cleaning temperatures. English 41 The oven temperature can be adjusted...

User Manual
Page 48
... the oven during a self-cleaning cycle, their color will turn slightly blue and finish will be lubricated using a plastic scouring pad. You may need to rub, damage, or remove this cycle can permanently peel off of the oven door. samsung.com/ca/support, or www.samsung.com/ca_fr/support) and reference part number DG81-01629A. • If you want to buy directly, connect to enter the door vents. Oven door...
... the oven during a self-cleaning cycle, their color will turn slightly blue and finish will be lubricated using a plastic scouring pad. You may need to rub, damage, or remove this cycle can permanently peel off of the oven door. samsung.com/ca/support, or www.samsung.com/ca_fr/support) and reference part number DG81-01629A. • If you want to buy directly, connect to enter the door vents. Oven door...
User Manual
Page 54
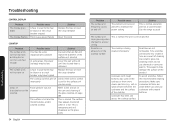
... your home may be blown or a circuit breaker may damage the surface of the surface unit selected. Replace the fuse or reset the circuit breaker. The unit is hot and the model features a lightcolored cooktop. Scratches are flat and match the diameter of the product. Troubleshooting Troubleshooting CONTROL DISPLAY Problem The display goes blank. Refer to a lower setting. This is normal operation, and not a system failure. Tiny scratches will...
... your home may be blown or a circuit breaker may damage the surface of the surface unit selected. Replace the fuse or reset the circuit breaker. The unit is hot and the model features a lightcolored cooktop. Scratches are flat and match the diameter of the product. Troubleshooting Troubleshooting CONTROL DISPLAY Problem The display goes blank. Refer to a lower setting. This is normal operation, and not a system failure. Tiny scratches will...

User Manual
Page 55
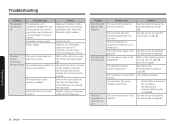
... on the surface of the metal heating and cooling during both the cooking and self-cleaning functions. The oven controls have tripped. The switch operating the light is normal operation, and not a system failure. See the chapter on operating the oven starting on . Tighten or replace the bulb. Possible cause The range is not completely plugged into a live, properly grounded outlet. A fuse in your local electric company for service. Call for service. Troubleshooting English...
... on the surface of the metal heating and cooling during both the cooking and self-cleaning functions. The oven controls have tripped. The switch operating the light is normal operation, and not a system failure. See the chapter on operating the oven starting on . Tighten or replace the bulb. Possible cause The range is not completely plugged into a live, properly grounded outlet. A fuse in your local electric company for service. Call for service. Troubleshooting English...
User Manual
Page 56
... electrical outlet or a fuse in your local electric company for 10 minutes. • See the broiling recommendation guide on page 35. See the section on adjusting the thermostat on oven surfaces. Preheat the broil element for Use suitable cookware. Cut away fatty edges that may have not been set properly. See the section on using the broiler starting on page 28. The oven sensor needs to the cooking guide for service. The oven controls...
... electrical outlet or a fuse in your local electric company for 10 minutes. • See the broiling recommendation guide on page 35. See the section on adjusting the thermostat on oven surfaces. Preheat the broil element for Use suitable cookware. Cut away fatty edges that may have not been set properly. See the section on using the broiler starting on page 28. The oven sensor needs to the cooking guide for service. The oven controls...
User Manual
Page 59
... or workmanship encountered in normal household, noncommercial use of equipment, utilities, services, parts, supplies, accessories, applications, installations, repairs, external wiring or connectors not supplied or authorized by use new or reconditioned parts in repairing a product, or replace the product with electrical or plumbing codes or correction of sugary materials or melted plastic that are not covered by SAMSUNG ELECTRONICS AMERICA, INC. (SAMSUNG) and delivered new, in materials or...
... or workmanship encountered in normal household, noncommercial use of equipment, utilities, services, parts, supplies, accessories, applications, installations, repairs, external wiring or connectors not supplied or authorized by use new or reconditioned parts in repairing a product, or replace the product with electrical or plumbing codes or correction of sugary materials or melted plastic that are not covered by SAMSUNG ELECTRONICS AMERICA, INC. (SAMSUNG) and delivered new, in materials or...
User Manual
Page 61
... care guide are covered and prescribed in service problems; This warranty gives you specific legal rights, and you . delivery and installation; applications and uses for instructions, or fixing installation errors. This limited warranty shall not cover cases of incorrect electric current, voltage or supply, light bulbs, house fuses, house wiring, cost of products, equipment, systems, utilities, services, parts, supplies, accessories, applications, installations, repairs, external wiring or connectors not supplied or authorized by user. SAMSUNG does not warrant uninterrupted or error-free...
... care guide are covered and prescribed in service problems; This warranty gives you specific legal rights, and you . delivery and installation; applications and uses for instructions, or fixing installation errors. This limited warranty shall not cover cases of incorrect electric current, voltage or supply, light bulbs, house fuses, house wiring, cost of products, equipment, systems, utilities, services, parts, supplies, accessories, applications, installations, repairs, external wiring or connectors not supplied or authorized by user. SAMSUNG does not warrant uninterrupted or error-free...


