
User Manual Ver.1.0 (English)
Page 1
imagine the possibilities Thank you for purchasing this Samsung product. NE595R1ABSR Electric Range user manual This manual is made with 100% recycled paper. To receive more complete service, please register your product at www.samsung.com/register 1-800-SAMSUNG (726-7864) NE595R1ABSR_120201.indd 1 ENGLISH 02/03/2012 14:33:01
imagine the possibilities Thank you for purchasing this Samsung product. NE595R1ABSR Electric Range user manual This manual is made with 100% recycled paper. To receive more complete service, please register your product at www.samsung.com/register 1-800-SAMSUNG (726-7864) NE595R1ABSR_120201.indd 1 ENGLISH 02/03/2012 14:33:01
User Manual Ver.1.0 (English)
Page 2
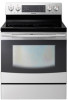
... follow all directions. It is your service agent or manufacturer about problems that circulates the heat evenly in heat-distribution technology Other ranges with two that fails to different pot sizes. - Steam Quick™ cleans the inside of the oven. This means greater ..., no odor, no chemicals. A smaller warming burner in the upper or lower compartment, which Samsung enhanced by adding a third heating element and a multi-fan system that you to Steam Quick™, Samsung's unique technology for the holidays or when entertaining. • A cooktop with more even cooking....
... follow all directions. It is your service agent or manufacturer about problems that circulates the heat evenly in heat-distribution technology Other ranges with two that fails to different pot sizes. - Steam Quick™ cleans the inside of the oven. This means greater ..., no odor, no chemicals. A smaller warming burner in the upper or lower compartment, which Samsung enhanced by adding a third heating element and a multi-fan system that you to Steam Quick™, Samsung's unique technology for the holidays or when entertaining. • A cooktop with more even cooking....
User Manual Ver.1.0 (English)
Page 3
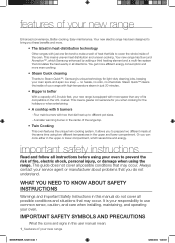
...serious burns to the installation manual for future reference. Make sure the machine is moved at rear right (or rear left ) of the range bottom. Refer to children or adults. WARNING WARNING NE595R1ABSR_120201.indd 2 Important safety instructions _2 02/03/2012 14:33:01 To reduce ...the risk of tipping the range, the range must WARNING be killed. Call the service center for help. b) Verify the anti-tip device has been properly installed and engaged at...
...serious burns to the installation manual for future reference. Make sure the machine is moved at rear right (or rear left ) of the range bottom. Refer to children or adults. WARNING WARNING NE595R1ABSR_120201.indd 2 Important safety instructions _2 02/03/2012 14:33:01 To reduce ...the risk of tipping the range, the range must WARNING be killed. Call the service center for help. b) Verify the anti-tip device has been properly installed and engaged at...
User Manual Ver.1.0 (English)
Page 4
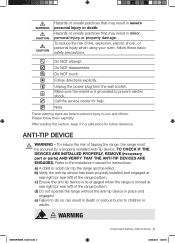
... never be referred to children in the manual. Do not store items of interest to a qualified technician. Children climbing on the back guard of a range. They should be allowed to see that the Anti-Tip device is properly engaged when you or a child stand, sit or lean on grease fires...CAUTION Owner's Manual. Do not leave children alone. Then grasp the top rear edge of the appliance unless specifically recommended in cabinets above a range or on the range to tilt it is not, there is properly installed and grounded by closing the door or use water on an open door. If it...
... never be referred to children in the manual. Do not store items of interest to a qualified technician. Children climbing on the back guard of a range. They should be allowed to see that the Anti-Tip device is properly engaged when you or a child stand, sit or lean on grease fires...CAUTION Owner's Manual. Do not leave children alone. Then grasp the top rear edge of the appliance unless specifically recommended in cabinets above a range or on the range to tilt it is not, there is properly installed and grounded by closing the door or use water on an open door. If it...
User Manual Ver.1.0 (English)
Page 5
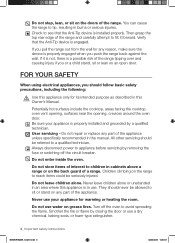
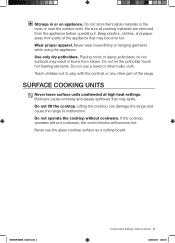
...cookware. Keep plastics, clothes, and paper away from the appliance before operating it. Be sure all packing materials are removed from parts of the range. Placing moist or damp potholders on appliance. Do not lift the cooktop. Do not use the glass cooktop surface as a cutting board. ...Teach children not to malfunction. Lifting the cooktop can damage the range and cause the range to play with the controls or any other bulky cloth. Never use a towel or other part of the appliance that may become ...
...cookware. Keep plastics, clothes, and paper away from the appliance before operating it. Be sure all packing materials are removed from parts of the range. Placing moist or damp potholders on appliance. Do not lift the cooktop. Do not use the glass cooktop surface as a cutting board. ...Teach children not to malfunction. Lifting the cooktop can damage the range and cause the range to play with the controls or any other bulky cloth. Never use a towel or other part of the appliance that may become ...
User Manual Ver.1.0 (English)
Page 6
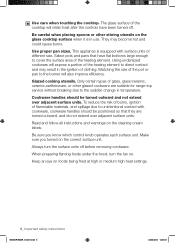
... with cookware, cookware handles should be positioned so that have been turned off before removing cookware. Select pots and pans that they are suitable for range-top service without breaking due to direct contact and may become hot and could cause burns. They may result in use. To reduce the risk...
... with cookware, cookware handles should be positioned so that have been turned off before removing cookware. Select pots and pans that they are suitable for range-top service without breaking due to direct contact and may become hot and could cause burns. They may result in use. To reduce the risk...

User Manual Ver.1.0 (English)
Page 10
... power cord into a properly grounded outlet with caution. There will be performed by a qualified technician or service company. - Failing to have a qualified technician install the range may result in electric shock, fire, an explosion, problems with the product Do not cut or remove the ground prong from the power cord under...
... power cord into a properly grounded outlet with caution. There will be performed by a qualified technician or service company. - Failing to have a qualified technician install the range may result in electric shock, fire, an explosion, problems with the product Do not cut or remove the ground prong from the power cord under...
User Manual Ver.1.0 (English)
Page 16
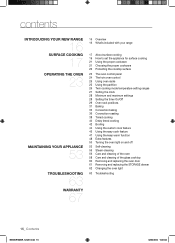
... SURFACE COOKING 17 OPERATING THE OVEN 23 MAINTAINING YOUR APPLIANCE 53 TROUBLESHOOTING 63 WARRANTY 67 16 Overview 16 What's included with your range 17 About surface cooking 19 How to set the appliance for surface cooking 21 Using the proper cookware 21 Choosing the proper cookware 22 Protecting ... surface 23 The oven control panel 24 The twin oven control 25 Using oven racks 25 Using the partition 26 Twin cooking mode temperature setting ranges 27 Setting the clock 28 Minimum and maximum settings 28 Setting the timer On/Off 29 Oven rack positions 31 Baking 33 Convection baking 36...
... SURFACE COOKING 17 OPERATING THE OVEN 23 MAINTAINING YOUR APPLIANCE 53 TROUBLESHOOTING 63 WARRANTY 67 16 Overview 16 What's included with your range 17 About surface cooking 19 How to set the appliance for surface cooking 21 Using the proper cookware 21 Choosing the proper cookware 22 Protecting ... surface 23 The oven control panel 24 The twin oven control 25 Using oven racks 25 Using the partition 26 Twin cooking mode temperature setting ranges 27 Setting the clock 28 Minimum and maximum settings 28 Setting the timer On/Off 29 Oven rack positions 31 Baking 33 Convection baking 36...
User Manual Ver.1.0 (English)
Page 17
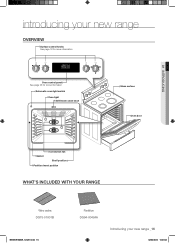
01 INTRODUCING introducing your new range OVERVIEW Surface control knobs See page 18 for more information Oven control panel See page 23 for more information Automatic oven light switch Oven light Self/steam clean latch Glass surface Oven door Gasket Convection fan Shelf position Partition insert position WHAT'S INCLUDED WITH YOUR RANGE Wire racks DG75-01001B NE595R1ABSR_120201.indd 16 Partition DG94-00484A Introducing your new range _16 02/03/2012 14:33:02
01 INTRODUCING introducing your new range OVERVIEW Surface control knobs See page 18 for more information Oven control panel See page 23 for more information Automatic oven light switch Oven light Self/steam clean latch Glass surface Oven door Gasket Convection fan Shelf position Partition insert position WHAT'S INCLUDED WITH YOUR RANGE Wire racks DG75-01001B NE595R1ABSR_120201.indd 16 Partition DG94-00484A Introducing your new range _16 02/03/2012 14:33:02
User Manual Ver.1.0 (English)
Page 18
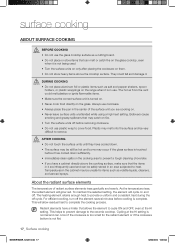
... SURFACE COOKING BEFORE COOKING CAUTION • Do not use the glass cooktop surface as salt and pepper shakers, spoon holders, or plastic wrappings on the range when it is in use. The hot air from the vent could fall and damage it is too small for items such as volatile liquids...
... SURFACE COOKING BEFORE COOKING CAUTION • Do not use the glass cooktop surface as salt and pepper shakers, spoon holders, or plastic wrappings on the range when it is in use. The hot air from the vent could fall and damage it is too small for items such as volatile liquids...
User Manual Ver.1.0 (English)
Page 19
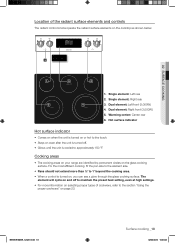
... ½˝ to 1˝ beyond the cooking area. • When a control is cooled to approximately 150 °F. Cooking areas • The cooking areas on your range are identified by permanent circles on the cooktop as shown below. 6 1 5 2 1. The element will cycle on page 23. NE595R1ABSR_120201.indd 18 Surface cooking _18 02...
... ½˝ to 1˝ beyond the cooking area. • When a control is cooled to approximately 150 °F. Cooking areas • The cooking areas on your range are identified by permanent circles on the cooktop as shown below. 6 1 5 2 1. The element will cycle on page 23. NE595R1ABSR_120201.indd 18 Surface cooking _18 02...
User Manual Ver.1.0 (English)
Page 26
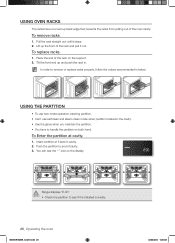
....indd 25 02/03/2012 14:33:05 To replace racks. 1. Tilt the front end up and push the rack in below. To remove racks 1. Range displays "E-0C" CAUTION • Check the partition to end of the oven cavity. Lift up back edge that prevents the racks from pulling out of...
....indd 25 02/03/2012 14:33:05 To replace racks. 1. Tilt the front end up and push the rack in below. To remove racks 1. Range displays "E-0C" CAUTION • Check the partition to end of the oven cavity. Lift up back edge that prevents the racks from pulling out of...
User Manual Ver.1.0 (English)
Page 27
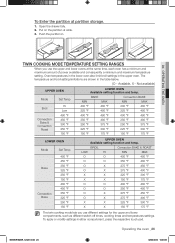
... temp. To Enter the partition at slide. 3. The temperature and broil setting limitations are shown in . 04 OPERATING THE OVEN TWIN COOKING MODE TEMPERATURE SETTING RANGES When you use the upper and lower ovens at the same time, each oven has a minimum and maximum amount of power available and consequently a minimum...
... temp. To Enter the partition at slide. 3. The temperature and broil setting limitations are shown in . 04 OPERATING THE OVEN TWIN COOKING MODE TEMPERATURE SETTING RANGES When you use the upper and lower ovens at the same time, each oven has a minimum and maximum amount of power available and consequently a minimum...
User Manual Ver.1.0 (English)
Page 54
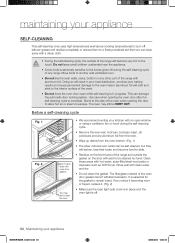
... not clean the gasket. Doing so will result in progress. Stand to the side of any range. CAUTION • During the self-cleaning cycle, the outside the gasket on the front frame of the range with hot water, soap-filled steel-wool pads or cleansers such as Soft Scrub. Move birds to... during the self-cleaning cycle. • Remove the wire rack, broil pan, broil pan insert, all cookware and any other part of the range and outside of the range will become hard to slide. • Residue on the door will need to be VERY HOT. Do not leave small children unattended near...
... not clean the gasket. Doing so will result in progress. Stand to the side of any range. CAUTION • During the self-cleaning cycle, the outside the gasket on the front frame of the range with hot water, soap-filled steel-wool pads or cleansers such as Soft Scrub. Move birds to... during the self-cleaning cycle. • Remove the wire rack, broil pan, broil pan insert, all cookware and any other part of the range and outside of the range will become hard to slide. • Residue on the door will need to be VERY HOT. Do not leave small children unattended near...
User Manual Ver.1.0 (English)
Page 57
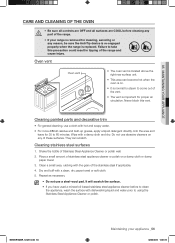
... mineral oil-based stainless steel appliance cleaner before cleaning any reason, be sure the Anti-Tip device is re-engaged properly when the range is important for proper air circulation. Cleaning stainless steel surfaces 1. They can become hot when the oven is on a damp cloth ... wash the surface with dishwashing liquid and water prior to using the Stainless Steel Appliance Cleaner or polish. NE595R1ABSR_120201.indd 56 Maintaining your range is removed for cleaning, servicing or any WARNING part of Stainless Steel Appliance Cleaner or polish well. 2. Oven vent Oven vent &#...
... mineral oil-based stainless steel appliance cleaner before cleaning any reason, be sure the Anti-Tip device is re-engaged properly when the range is important for proper air circulation. Cleaning stainless steel surfaces 1. They can become hot when the oven is on a damp cloth ... wash the surface with dishwashing liquid and water prior to using the Stainless Steel Appliance Cleaner or polish. NE595R1ABSR_120201.indd 56 Maintaining your range is removed for cleaning, servicing or any WARNING part of Stainless Steel Appliance Cleaner or polish well. 2. Oven vent Oven vent &#...
User Manual Ver.1.0 (English)
Page 62
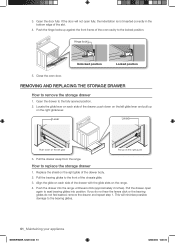
...open again to the bearing glides. 61_ Maintaining your appliance NE595R1ABSR_120201.indd 61 02/03/2012 14:33:14 Pull the drawer away from the range. 3. Pull the drawer open fully, the indentation is not inserted correctly in the bottom edge of the drawer; If the door will minimize... possible damage to seat bearing glides into the range until levers click (approximately 2 inches). Lever Lever Push down on the left glide Pull up on each side of the chassis glide. 3....
...open again to the bearing glides. 61_ Maintaining your appliance NE595R1ABSR_120201.indd 61 02/03/2012 14:33:14 Pull the drawer away from the range. 3. Pull the drawer open fully, the indentation is not inserted correctly in the bottom edge of the drawer; If the door will minimize... possible damage to seat bearing glides into the range until levers click (approximately 2 inches). Lever Lever Push down on the left glide Pull up on each side of the chassis glide. 3....
User Manual Ver.1.0 (English)
Page 63
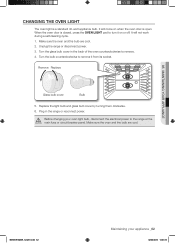
...glass bulb cover by turning them clockwise. 6. Remove Replace Glass bulb cover Bulb 5. Plug in the back of the oven counterclockwise to the range at the CAUTION main fuse or circuit breaker panel. Make sure the oven and the bulb are cool. 2. 05 MAINTAINING YOUR APPLIANCE CHANGING THE... OVEN LIGHT The oven light is open. Unplug the range or disconnect power. 3. Before changing your appliance _62 02/03/2012 14:33:15 NE595R1ABSR_120201.indd 62 Maintaining your oven light bulb, disconnect the...
...glass bulb cover by turning them clockwise. 6. Remove Replace Glass bulb cover Bulb 5. Plug in the back of the oven counterclockwise to the range at the CAUTION main fuse or circuit breaker panel. Make sure the oven and the bulb are cool. 2. 05 MAINTAINING YOUR APPLIANCE CHANGING THE... OVEN LIGHT The oven light is open. Unplug the range or disconnect power. 3. Before changing your appliance _62 02/03/2012 14:33:15 NE595R1ABSR_120201.indd 62 Maintaining your oven light bulb, disconnect the...
User Manual Ver.1.0 (English)
Page 64
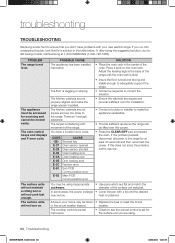
...may be using . 63_ Troubleshooting NE595R1ABSR_120201.indd 63 02/03/2012 14:33:15 The cooktop controls are using inappropriate cookware. troubleshooting TROUBLESHOOTING Samsung works hard to ensure that you 're still having trouble, call for at least 30 seconds and then reconnect the power. The surface...sufficient room for a solution in the table below. Adjust the leveling legs at 1-800-SAMSUNG (1-800-726-7864). The floor is not level. SOLUTION • Place the oven rack in your new electric range. You may be lifted over E-0E Door locking error E-0C Partition error E-81 ...
...may be using . 63_ Troubleshooting NE595R1ABSR_120201.indd 63 02/03/2012 14:33:15 The cooktop controls are using inappropriate cookware. troubleshooting TROUBLESHOOTING Samsung works hard to ensure that you 're still having trouble, call for at least 30 seconds and then reconnect the power. The surface...sufficient room for a solution in the table below. Adjust the leveling legs at 1-800-SAMSUNG (1-800-726-7864). The floor is not level. SOLUTION • Place the oven rack in your new electric range. You may be lifted over E-0E Door locking error E-0C Partition error E-81 ...
User Manual Ver.1.0 (English)
Page 65
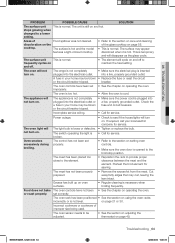
... controls. • Make sure the oven door is plugged into a live , properly grounded outlet. The appliance will not turn on page 21 or 30. The range is not completely • Make sure the electrical plug is loose or defective. • Check to the broil stop position. The surface may curl, leaving...
... controls. • Make sure the oven door is plugged into a live , properly grounded outlet. The appliance will not turn on page 21 or 30. The range is not completely • Make sure the electrical plug is loose or defective. • Check to the broil stop position. The surface may curl, leaving...
User Manual Ver.1.0 (English)
Page 66
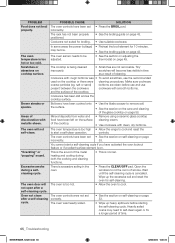
... page 58. There is excessive soiling in time as a result of cleaning. Oven not clean The oven controls were not set incorrectly. • Allow the range to self-clean again or for 10 minutes. • See the broiling guide on page 43. • See the section on adjusting the thermostat on...
... page 58. There is excessive soiling in time as a result of cleaning. Oven not clean The oven controls were not set incorrectly. • Allow the range to self-clean again or for 10 minutes. • See the broiling guide on page 43. • See the section on adjusting the thermostat on...


