Installation Instructions
Page 2
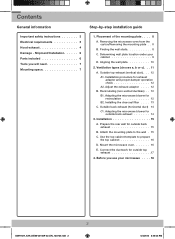
... charcoal filter 13 C. Contents General information Important safety instructions 3 Electrical requirements 3 Hood exhaust 4 Damage - Use the top cabinet template to the wall . . 15 C. Shipment/Installation 6 Parts included 6 Tools you use your cabinet 9 D. Removing the microwave oven from the carton/Removing the mounting plate . . 8 B. Aligning the wall plate 10 2. Connect the ductwork...
... charcoal filter 13 C. Contents General information Important safety instructions 3 Electrical requirements 3 Hood exhaust 4 Damage - Use the top cabinet template to the wall . . 15 C. Shipment/Installation 6 Parts included 6 Tools you use your cabinet 9 D. Removing the microwave oven from the carton/Removing the mounting plate . . 8 B. Aligning the wall plate 10 2. Connect the ductwork...
Installation Instructions
Page 6
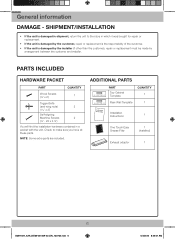
Parts included HARDWARE PACKET PART QUANTITY Wood Screws (¼˝ x 2˝) 1 Toggle Bolts (and wing nuts) 2 (3/16˝ x 3˝) Self-aligning Machine Screws 2 (¼˝ - 28 x 3 &#...the unit is damaged in shipment, return the unit to make sure you have all these parts. NOTE: Some extra parts are included. Check to the store in a packet with the unit. TTTeeemmmppplllaaattteee ADTeDmpIlaTte IONAL PARTS PART TOP CABINET TEMPLATE INITNROSSEPTATACRRLAUWLBACIANTLTELIIOTOTNTENEMSMPPLLAATTEE REAR WALL TEMPLATE Top Cabinet Template Rear Wall Template QUANTITY 1 1...
Parts included HARDWARE PACKET PART QUANTITY Wood Screws (¼˝ x 2˝) 1 Toggle Bolts (and wing nuts) 2 (3/16˝ x 3˝) Self-aligning Machine Screws 2 (¼˝ - 28 x 3 &#...the unit is damaged in shipment, return the unit to make sure you have all these parts. NOTE: Some extra parts are included. Check to the store in a packet with the unit. TTTeeemmmppplllaaattteee ADTeDmpIlaTte IONAL PARTS PART TOP CABINET TEMPLATE INITNROSSEPTATACRRLAUWLBACIANTLTELIIOTOTNTENEMSMPPLLAATTEE REAR WALL TEMPLATE Top Cabinet Template Rear Wall Template QUANTITY 1 1...
Installation Instructions
Page 11
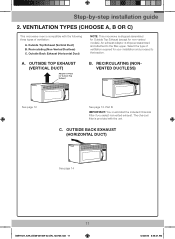
... microwave oven is compatible with the following three types of ventilation required for non-vented models). Recirculating (nonvented ductless) See page 12 See page 12, Part B IMPORTANT: You must install the included Charcoal Filter if you select nonvented exhaust. Outside top exhaust (vertical duct) AAddaappttoorrininPPlalcaece fEfooxrrhOOauuusttstsidideeTop Top Exhaust B. A. Step-by-step...
... microwave oven is compatible with the following three types of ventilation required for non-vented models). Recirculating (nonvented ductless) See page 12 See page 12, Part B IMPORTANT: You must install the included Charcoal Filter if you select nonvented exhaust. Outside top exhaust (vertical duct) AAddaappttoorrininPPlalcaece fEfooxrrhOOauuusttstsidideeTop Top Exhaust B. A. Step-by-step...
Installation Instructions
Page 14
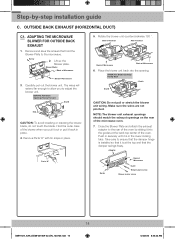
Lift up the Blower plate. Parts "A" 5. AFTER: Fan Blade Openings Facing Back End A End B CAUTION: Do not pull or stretch the blower unit wiring. Take care to the microwave. Adaptor Guide ... blower unit exhaust openings should match the exhaust openings on the rear of Microwave 6. Rotate the blower unit counterclockwise 180 °. Push in place. 4. Remove Parts "A" with tin snips or pliers. Outside back exhaust (horizontal duct) C1. Hold the outer case of the oven.
Lift up the Blower plate. Parts "A" 5. AFTER: Fan Blade Openings Facing Back End A End B CAUTION: Do not pull or stretch the blower unit wiring. Take care to the microwave. Adaptor Guide ... blower unit exhaust openings should match the exhaust openings on the rear of Microwave 6. Rotate the blower unit counterclockwise 180 °. Push in place. 4. Remove Parts "A" with tin snips or pliers. Outside back exhaust (horizontal duct) C1. Hold the outer case of the oven.


