User Manual
Page 2
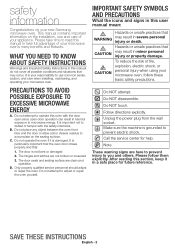
...Hazards or unsafe practices that : 1. This manual contains important information on the installation, use common sense, caution, and care when installing, maintaining, and operating your microwave oven. It is your responsibility to use and care of your new Samsung microwave oven. The hinges and latches are ...C. Unplug the power plug from the wall socket. Note These warning signs are not broken or loosened 3. After reading this user manual mean: Hazards or unsafe practices that may result in this section, keep it is not bent or damaged 2. The door seals ...
...Hazards or unsafe practices that : 1. This manual contains important information on the installation, use common sense, caution, and care when installing, maintaining, and operating your microwave oven. It is your responsibility to use and care of your new Samsung microwave oven. The hinges and latches are ...C. Unplug the power plug from the wall socket. Note These warning signs are not broken or loosened 3. After reading this user manual mean: Hazards or unsafe practices that may result in this section, keep it is not bent or damaged 2. The door seals ...
User Manual
Page 3
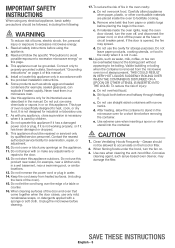
... 13. It is not designed for example, near a kitchen sink, in the oven. Do not use straight-sided containers with the provided installation instructions. 5. Keep the cord away from paper or plastic bags before cleaning. 17. Unplug the microwave before placing the bags in a wet... care when inserting a spoon or other combustible materials are placed inside the oven ignite, keep the oven door closed, turn the fan on this manual. 4. CAUTION CAUTION 1. SAVE THESE INSTRUCTIONS English - 3 This appliance must be repaired or serviced only by children. 8. As with a sponge ...
... 13. It is not designed for example, near a kitchen sink, in the oven. Do not use straight-sided containers with the provided installation instructions. 5. Keep the cord away from paper or plastic bags before cleaning. 17. Unplug the microwave before placing the bags in a wet... care when inserting a spoon or other combustible materials are placed inside the oven ignite, keep the oven door closed, turn the fan on this manual. 4. CAUTION CAUTION 1. SAVE THESE INSTRUCTIONS English - 3 This appliance must be repaired or serviced only by children. 8. As with a sponge ...
User Manual
Page 5
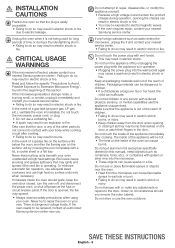
...may result in electric shock or fire. Do not store or use high heat on your nearest Samsung service center : Failing to do so may result in an explosion or fire. To minimize automatic ... Do not touch the power plug with wet hands. • This may result in this manual), metal objects (such as specifically directed in electric shock. Do not let children or any ...Possible Exposure to Excessive Microwave Energy", found in electric shock or fire due to electric leakage. INSTALLATION CAUTION CAUTIONS Position the oven so that the plug is easily accessible. • Failing to ...
...may result in electric shock or fire. Do not store or use high heat on your nearest Samsung service center : Failing to do so may result in an explosion or fire. To minimize automatic ... Do not touch the power plug with wet hands. • This may result in this manual), metal objects (such as specifically directed in electric shock. Do not let children or any ...Possible Exposure to Excessive Microwave Energy", found in electric shock or fire due to electric leakage. INSTALLATION CAUTION CAUTIONS Position the oven so that the plug is easily accessible. • Failing to ...
User Manual
Page 8
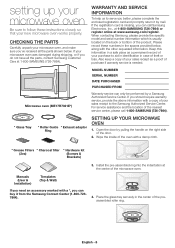
When contacting Samsung, please provide the specific model and serial number information which is usually located on the right side of purchase if warranty service is needed. Manuals (User & Installation) Templates (Top & Wall) If you need an accessory marked with a damp cloth. * Grease Filters * ... above information with the other requested information. MODEL NUMBER SERIAL NUMBER DATE PURCHASED PURCHASED FROM Microwave oven (ME17R7021E*) Warranty service can call 1-800-SAMSUNG (726-7864). * Glass Tray * Roller Guide * Exhaust adaptor Ring SETTING UP YOUR MICROWAVE OVEN ...
When contacting Samsung, please provide the specific model and serial number information which is usually located on the right side of purchase if warranty service is needed. Manuals (User & Installation) Templates (Top & Wall) If you need an accessory marked with a damp cloth. * Grease Filters * ... above information with the other requested information. MODEL NUMBER SERIAL NUMBER DATE PURCHASED PURCHASED FROM Microwave oven (ME17R7021E*) Warranty service can call 1-800-SAMSUNG (726-7864). * Glass Tray * Roller Guide * Exhaust adaptor Ring SETTING UP YOUR MICROWAVE OVEN ...
User Manual
Page 10
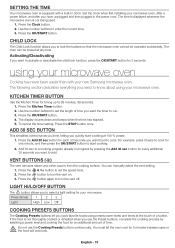
... button for an additional amount of time. You must let the oven cool for your microwave oven. Set the clock when first installing your new Samsung microwave oven. Activating/Deactivating If you want to lock the buttons so that the microwave oven cannot be locked at 100 % power...the microwave oven is equipped with your microwave oven, after a power failure, and after you cook favorite foods using your microwave. The oven can manually select the vent setting. 1. Press (times) 1 2 3 Light High Low Off COOKING PRESETS BUTTONS The Cooking Presets buttons let you have ...
... button for an additional amount of time. You must let the oven cool for your microwave oven. Set the clock when first installing your new Samsung microwave oven. Activating/Deactivating If you want to lock the buttons so that the microwave oven cannot be locked at 100 % power...the microwave oven is equipped with your microwave oven, after a power failure, and after you cook favorite foods using your microwave. The oven can manually select the vent setting. 1. Press (times) 1 2 3 Light High Low Off COOKING PRESETS BUTTONS The Cooking Presets buttons let you have ...
Installation Guide
Page 11
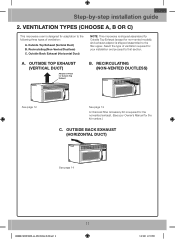
... Exhaust B. OUTSIDE TOP EXHAUST (VERTICAL DUCT) Adaptor in Place for adaptation to the following three types of ventilation required for your Owner's Manual for non-vented models). Step-by-step installation guide 2. VENTILATION TYPES (CHOOSE A, B OR C) This microwave oven is shipped assembled to that section. RECIRCULATING (NON-VENTED DUCTLESS) See page 12... for Outside Top Exhaust (except for the kit number.) C. Outside Back Exhaust (Horizontal Duct) NOTE: This microwave is required for the nonvented exhaust. (See your installation and proceed to the filler-upper.
... Exhaust B. OUTSIDE TOP EXHAUST (VERTICAL DUCT) Adaptor in Place for adaptation to the following three types of ventilation required for your Owner's Manual for non-vented models). Step-by-step installation guide 2. VENTILATION TYPES (CHOOSE A, B OR C) This microwave oven is shipped assembled to that section. RECIRCULATING (NON-VENTED DUCTLESS) See page 12... for Outside Top Exhaust (except for the kit number.) C. Outside Back Exhaust (Horizontal Duct) NOTE: This microwave is required for the nonvented exhaust. (See your installation and proceed to the filler-upper.
Installation Guide
Page 17
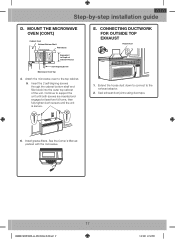
Step-by-step installation guide D. Insert the 2 self-aligning screws through the cabinet bottom shelf and filler block into the outer top cabinet of Cabinet Recess Self-Aligning Screw ... screws until the unit is secure. CONNECTING DUCTWORK FOR OUTSIDE TOP EXHAUST House Duct 1. Attach the microwave oven to the exhaust adaptor. 2. E. See the Owner's Manual packed with the microwave. 17 ME4000R_ME17R7021EB_AA_DE68-04584A-00_EN.indd 17 6/19/2019 4:17:46 PM Seal exhaust duct joints using duct tape. 6. Continue to Depth...
Step-by-step installation guide D. Insert the 2 self-aligning screws through the cabinet bottom shelf and filler block into the outer top cabinet of Cabinet Recess Self-Aligning Screw ... screws until the unit is secure. CONNECTING DUCTWORK FOR OUTSIDE TOP EXHAUST House Duct 1. Attach the microwave oven to the exhaust adaptor. 2. E. See the Owner's Manual packed with the microwave. 17 ME4000R_ME17R7021EB_AA_DE68-04584A-00_EN.indd 17 6/19/2019 4:17:46 PM Seal exhaust duct joints using duct tape. 6. Continue to Depth...
Installation Guide
Page 18
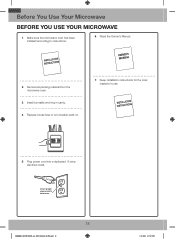
Plug power cord into a dedicated 15 amp electrical outlet. Read the Owner's Manual. 2. Install turntable and ring in cavity. 4. Replace house fuse or turn breaker back on. 7. Before You Use Your Microwave BEFORE YOU USE YOUR MICROWAVE 1. Make sure the microwave oven has been installed according to instructions. 6. Remove all packing material from the microwave oven. 3. Insure proper ground exists before use . 5. Keep installation instructions for the local inspector's use 18 ME4000R_ME17R7021EB_AA_DE68-04584A-00_EN.indd 18 6/19/2019 4:17:47 PM
Plug power cord into a dedicated 15 amp electrical outlet. Read the Owner's Manual. 2. Install turntable and ring in cavity. 4. Replace house fuse or turn breaker back on. 7. Before You Use Your Microwave BEFORE YOU USE YOUR MICROWAVE 1. Make sure the microwave oven has been installed according to instructions. 6. Remove all packing material from the microwave oven. 3. Insure proper ground exists before use . 5. Keep installation instructions for the local inspector's use 18 ME4000R_ME17R7021EB_AA_DE68-04584A-00_EN.indd 18 6/19/2019 4:17:47 PM


