User Manual
Page 11
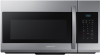
... display End. Let the oven cool for at least 5 minutes before using again. Let the oven cool for at least 5 minutes before using again. Use a measuring cup or mug. Let oven cool for at a time. once twice three times four times once twice three times Pierce each slice toward the outside...
... display End. Let the oven cool for at least 5 minutes before using again. Let the oven cool for at least 5 minutes before using again. Use a measuring cup or mug. Let oven cool for at a time. once twice three times four times once twice three times Pierce each slice toward the outside...
User Manual
Page 15
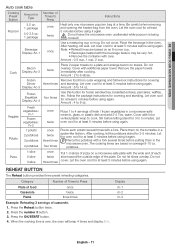
... to retain moisture and prevent spattering. Do not use too much foil. You can perform the following table lists various types of water (in a glass-measuring cup) inside your oven next to the item to be used if heat-resistant thermoplastic. Cookware Glassware Oven-to-table ware Fine glassware Glass jars...
... to retain moisture and prevent spattering. Do not use too much foil. You can perform the following table lists various types of water (in a glass-measuring cup) inside your oven next to the item to be used if heat-resistant thermoplastic. Cookware Glassware Oven-to-table ware Fine glassware Glass jars...
User Manual
Page 19
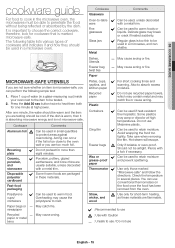
Do not get water into a four-cup measuring glass. Cleaning the door and door seals Always ensure that you are wearing gloves to clean spills on the panel as they can wash the ..., in particular, if the door or door seals are in doubt about its condition, unplug the oven from the power outlet and contact your nearest Samsung service center. • Do not use a soft cloth to avoid injury. Remove the screw from the heat of water accumulates on at the main power...
Do not get water into a four-cup measuring glass. Cleaning the door and door seals Always ensure that you are wearing gloves to clean spills on the panel as they can wash the ..., in particular, if the door or door seals are in doubt about its condition, unplug the oven from the power outlet and contact your nearest Samsung service center. • Do not use a soft cloth to avoid injury. Remove the screw from the heat of water accumulates on at the main power...
Installation Guide
Page 7
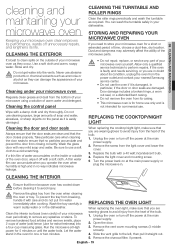
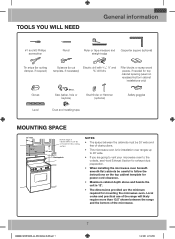
... bottom of the range will likely require more from the cooking surface. TOOLS YOU WILL NEED General information #1 and #2 Phillips screwdriver Pencil Ruler or tape measure and straight edge Carpenter square (optional) Tin snips (for cutting damper, if required) Scissors (to cut Electric drill with 3/16˝, ½˝ and template...
... bottom of the range will likely require more from the cooking surface. TOOLS YOU WILL NEED General information #1 and #2 Phillips screwdriver Pencil Ruler or tape measure and straight edge Carpenter square (optional) Tin snips (for cutting damper, if required) Scissors (to cut Electric drill with 3/16˝, ½˝ and template...
Installation Guide
Page 9
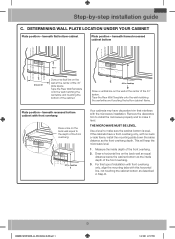
... horizontal line, not touching the cabinet bottom as the inside depth of installation with front overhang only, align the mounting tabs with the microwave installation. Measure the inside depth of the cabinet.
... horizontal line, not touching the cabinet bottom as the inside depth of installation with front overhang only, align the mounting tabs with the microwave installation. Measure the inside depth of the cabinet.
