User Manual (ENGLISH)
Page 1
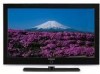
..., Ontario L5R 4B2 Canada Samsung Electronique Canada Inc., Service á la Clientéle 55 Standish Court Mississauga, Ontario L5R 4B2 Canada Samsung Electronics America, Inc. 105 Challenger Road Ridgefield Park, NJ 07660-0511 LN-S4095D LN-S4695D TFT-LCD TELEVISION BN68-01047J-01 Owner...'s Instructions Register your product at www.samsung.com/global/register Contacte con SAMSUNG WORLD-WIDE Si tiene alguna pregunta o comentario referente a nuestros productos, por favor ...
..., Ontario L5R 4B2 Canada Samsung Electronique Canada Inc., Service á la Clientéle 55 Standish Court Mississauga, Ontario L5R 4B2 Canada Samsung Electronics America, Inc. 105 Challenger Road Ridgefield Park, NJ 07660-0511 LN-S4095D LN-S4695D TFT-LCD TELEVISION BN68-01047J-01 Owner...'s Instructions Register your product at www.samsung.com/global/register Contacte con SAMSUNG WORLD-WIDE Si tiene alguna pregunta o comentario referente a nuestros productos, por favor ...
User Manual (ENGLISH)
Page 5
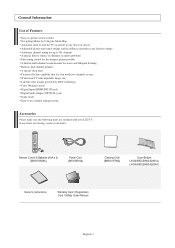
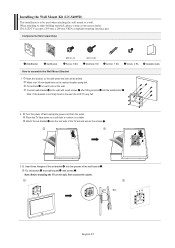
... Please make sure the following items are missing, contact your LCD TV. If any time you choose Adjustable picture and sound settings ...-in, dual channel speakers A special sleep timer Picture-in-Picture capability that lets you watch two channels at once Widescreen TV with your dealer. Remote Control & Batteries (AAA x 2) (BN59-00568A) Power Cord (3903-000144) Cleaning Cloth (BN63... Easy-to-operate remote control Navigating Menus by Using the Menu Map Automatic timer to turn the TV on and off at any items are included with adjustable image size Life-like clear images provided by...
... Please make sure the following items are missing, contact your LCD TV. If any time you choose Adjustable picture and sound settings ...-in, dual channel speakers A special sleep timer Picture-in-Picture capability that lets you watch two channels at once Widescreen TV with your dealer. Remote Control & Batteries (AAA x 2) (BN59-00568A) Power Cord (3903-000144) Cleaning Cloth (BN63... Easy-to-operate remote control Navigating Menus by Using the Menu Map Automatic timer to turn the TV on and off at any items are included with adjustable image size Life-like clear images provided by...
User Manual (ENGLISH)
Page 85
... light or too dark. Move the computer's mouse or press any key on . The TFT LCD panel uses a panel consisting of the remote control (transmission window). No sound or sound is working. The TV won't turn on the keyboard. Digital broadcasting screen problem. Try another channel. First, check the...performance of time, adjust the settings so that the signal cable is not correct, use your nearest Samsung service center. Adjust the Coarse tuning and then adjust the Fine tuning. The TV is plugged in the Display Modes. The screen position must be few bright or dark pixels on the...
... light or too dark. Move the computer's mouse or press any key on . The TFT LCD panel uses a panel consisting of the remote control (transmission window). No sound or sound is working. The TV won't turn on the keyboard. Digital broadcasting screen problem. Try another channel. First, check the...performance of time, adjust the settings so that the signal cable is not correct, use your nearest Samsung service center. Adjust the Coarse tuning and then adjust the Fine tuning. The TV is plugged in the Display Modes. The screen position must be few bright or dark pixels on the...
User Manual (ENGLISH)
Page 87
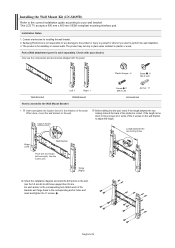
... down on a soft cloth or cushion on the wall, first connect the cables. Note: Before installing the TV on a table. Fix anchors on each hole on the marked location using drill. This LCD TV accepts a 200 mm x 200 mm VESA-compliant mounting interface pad. Make over 35 mm-depth-hole on the wall... dealer. Installation Guide 2 Turn the power off and unplug the power cord from the outlet. Attach the set-bracket onto the rear side of the TV set -bracket into the wall-bracket . Connect wall-bracket to the wall with screws . Note: If the bracket is to be drilled. Fix set-bracket...
... down on a soft cloth or cushion on the wall, first connect the cables. Note: Before installing the TV on a table. Fix anchors on each hole on the marked location using drill. This LCD TV accepts a 200 mm x 200 mm VESA-compliant mounting interface pad. Make over 35 mm-depth-hole on the wall... dealer. Installation Guide 2 Turn the power off and unplug the power cord from the outlet. Attach the set-bracket onto the rear side of the TV set -bracket into the wall-bracket . Connect wall-bracket to the wall with screws . Note: If the bracket is to be drilled. Fix set-bracket...
User Manual (ENGLISH)
Page 88
... of the 4 screws on the wall bracket to adjust the length. When done, mount the wall bracket on the wall. Installation Notes 1. Samsung Electronics is not responsible for installing on plaster or wood. Check with the panel. Match each anchor in the corresponding hole. Plastic Hanger : ... hinge holes to the corresponding anchor holes and insert and tighten the 11 screws . Fix each of the product is sold separately. This LCD TV accepts a 600 mm x 400 mm VESA-compliant mounting interface pad. Captive Screw Before drilling into the wall, check if the length between...
... of the 4 screws on the wall bracket to adjust the length. When done, mount the wall bracket on the wall. Installation Notes 1. Samsung Electronics is not responsible for installing on plaster or wood. Check with the panel. Match each anchor in the corresponding hole. Plastic Hanger : ... hinge holes to the corresponding anchor holes and insert and tighten the 11 screws . Fix each of the product is sold separately. This LCD TV accepts a 600 mm x 400 mm VESA-compliant mounting interface pad. Captive Screw Before drilling into the wall, check if the length between...
User Manual (ENGLISH)
Page 89
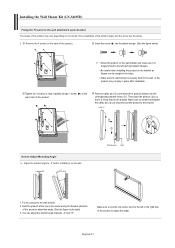
Tighten the 4 screws in the center and pull it on the bracket as fingers can adjust the bracket angle between -2° and 15°. LCD TV How to Adjust Mounting Angle Adjust the bracket angle to -2° before installing it forward (direction of the arrow) to adjust the angle. (See the ... the product to the bracket. Wall Bracket Wall 1. Insert the screw into the corresponding bracket holes ( ). Installing the Wall Mount Kit (LN-S4695D) Fixing the TV panel to the wall attachment panel bracket The shape of the product may not stay in place after installation. English-87
Tighten the 4 screws in the center and pull it on the bracket as fingers can adjust the bracket angle between -2° and 15°. LCD TV How to Adjust Mounting Angle Adjust the bracket angle to -2° before installing it forward (direction of the arrow) to adjust the angle. (See the ... the product to the bracket. Wall Bracket Wall 1. Insert the screw into the corresponding bracket holes ( ). Installing the Wall Mount Kit (LN-S4695D) Fixing the TV panel to the wall attachment panel bracket The shape of the product may not stay in place after installation. English-87
User Manual (ENGLISH)
Page 90
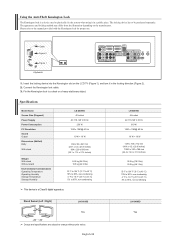
The locking device has to change without prior notice. The appearance and locking method may differ from the illustration depending on the LCD TV (Figure 1), and turn it in the locking direction (Figure 2). 2. Cable Figure 2 Figure 1 1. Insert the locking device into the ... Resolution Sound Output Dimensions (WxDxH) Body With stand Weight With stand Without stand Environmental Considerations Operating Temperature Operating Humidity Storage Temperature Storage Humidity LN-S4095D 40 inches AC 110-120 V 60 Hz 250 W 1920 x 1080@ 60 Hz 10 W + 10 W 994 x 92 x 647 mm (39.1 x 3.6 x 25.5 inches...
The locking device has to change without prior notice. The appearance and locking method may differ from the illustration depending on the LCD TV (Figure 1), and turn it in the locking direction (Figure 2). 2. Cable Figure 2 Figure 1 1. Insert the locking device into the ... Resolution Sound Output Dimensions (WxDxH) Body With stand Weight With stand Without stand Environmental Considerations Operating Temperature Operating Humidity Storage Temperature Storage Humidity LN-S4095D 40 inches AC 110-120 V 60 Hz 250 W 1920 x 1080@ 60 Hz 10 W + 10 W 994 x 92 x 647 mm (39.1 x 3.6 x 25.5 inches...


